One of the most important skills an MPC beat maker can possess is the ability to chop samples – in this MPC Renaissance and MPC Studio tutorial adapted from my book, the ‘MPC Renaissance & MPC Studio Bible‘ I take a look at the basics behind developing a quick chopping workflow using the ‘Regions’ chopping method.
Before You Start
Before starting this tutorial, download the project files so you can recreate all the examples in your MPC as you read. Unzip and copy the files to a preferred location on your computer such as your desktop or ‘MPC’ Documents folder.
Basic Chopping Using the Extract Function
Start with a new blank project by hitting CMD & N (or CTRL & N in a PC). Go to the BROWSER and navigate inside the folder you just downloaded (detailed instructions for using the BROWSER are covered in chapter 2 of the book).
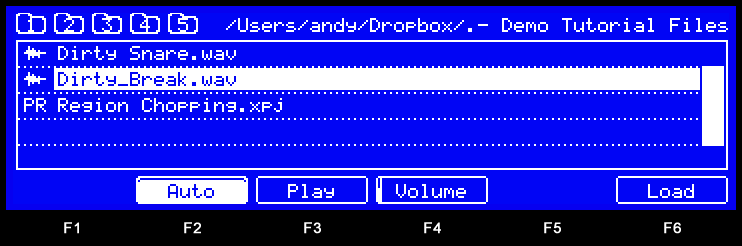
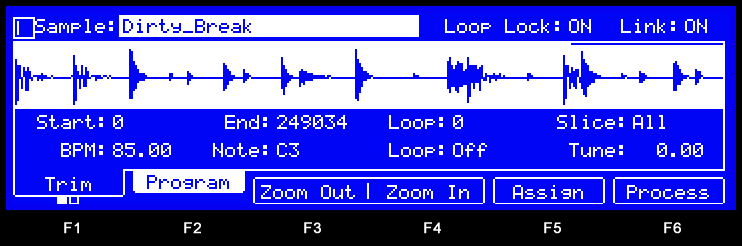
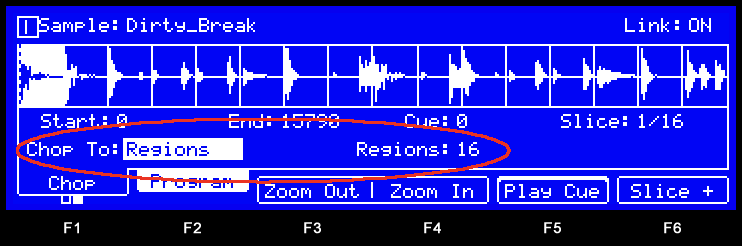
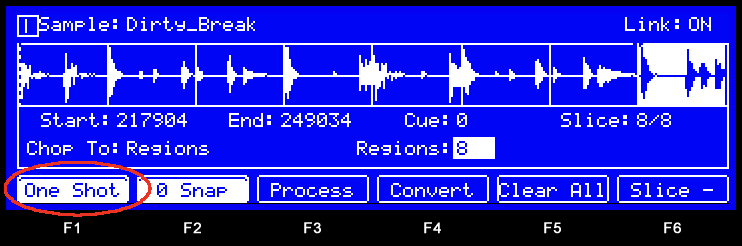
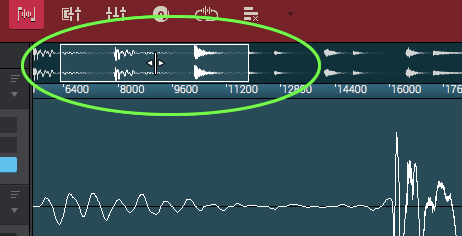
Select the ‘Dirty Break’ file using your cursors and hit Load (F6) to load this sample into your project. Go to SAMPLE EDIT > TRIM (F1) and have a listen to the sample by hitting the ‘Play Sample’ pad 10. It’s a looped drum break, with a tempo of 85.0 BPM. Here’s the view from the hardware UI:
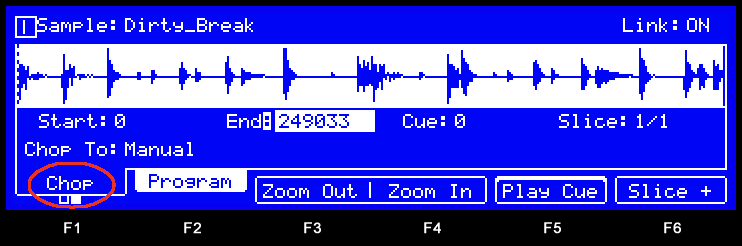
Lets chop this break into a number of smaller regions which we can then assign to a DRUM program and use to create a completely new drum break. In the SAMPLE EDIT screen press the Trim (F1) so it changes name to Chop. You’ll now be in CHOP MODE – here’s the view in the hardware UI:
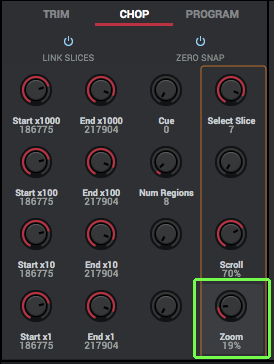
If you want to view the waveform in more detail, head over to the GUI – in the PANEL STRIP make sure the Q-LINKS panel is activated:

The CHOP mode button is centre top of the QLINKS panel, as circled above. The waveform displayed in the GUI is not only more detailed, it shows both channels of the (stereo) break:
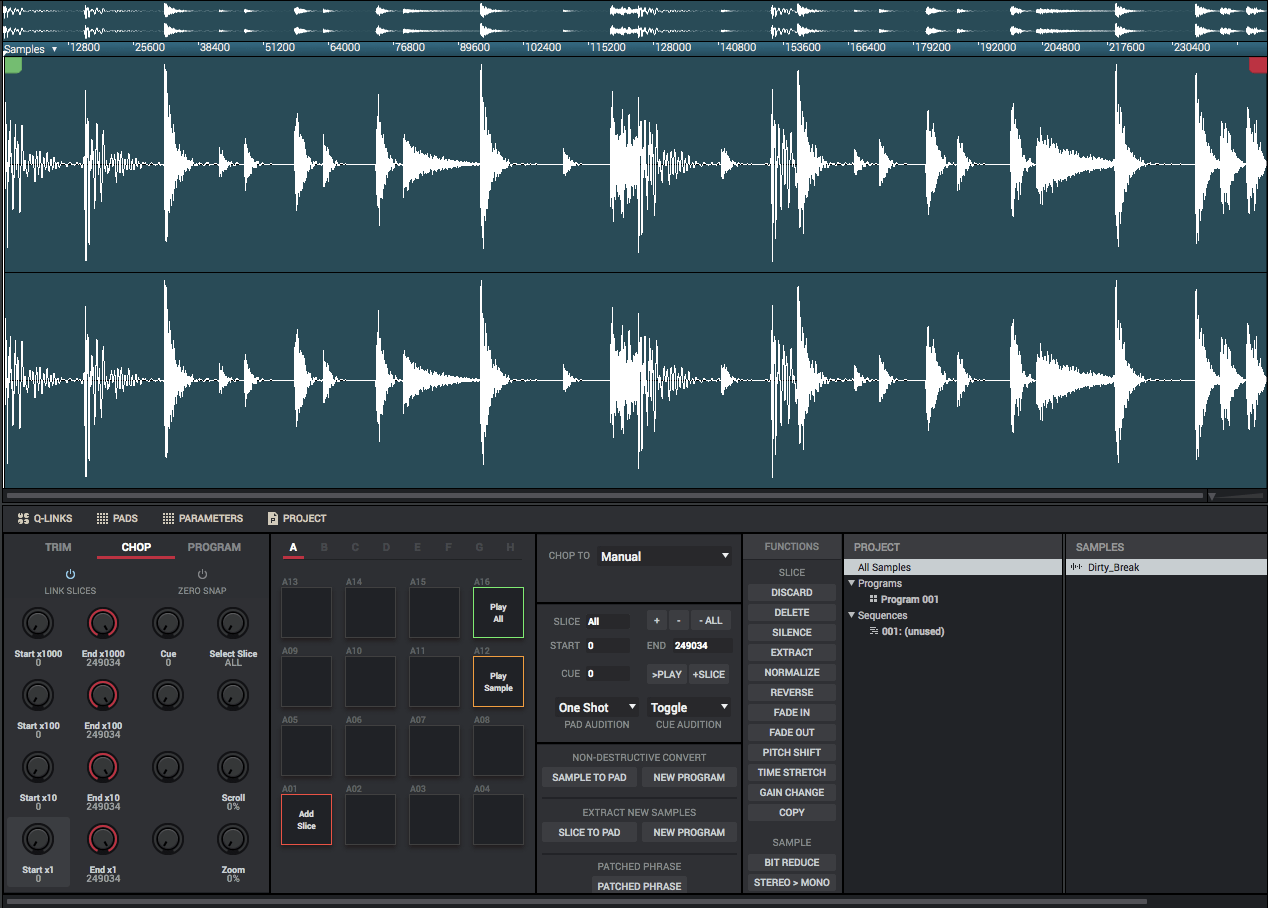
Notice the new dedicated ‘chop’ PARAMETERS panel under the waveform which replaces the standard ‘TRIM’ panel.
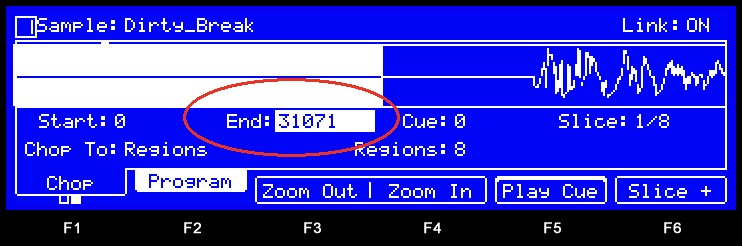
Locate the ‘Chop To’ parameter and select REGIONS:
Or in the GUI:
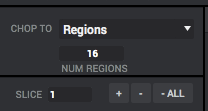
When chopping to ‘regions’, the MPC initially splits your break into 16 equal parts – this is much clearer in the GUI, so at this point I’ll use the GUI for the examples:
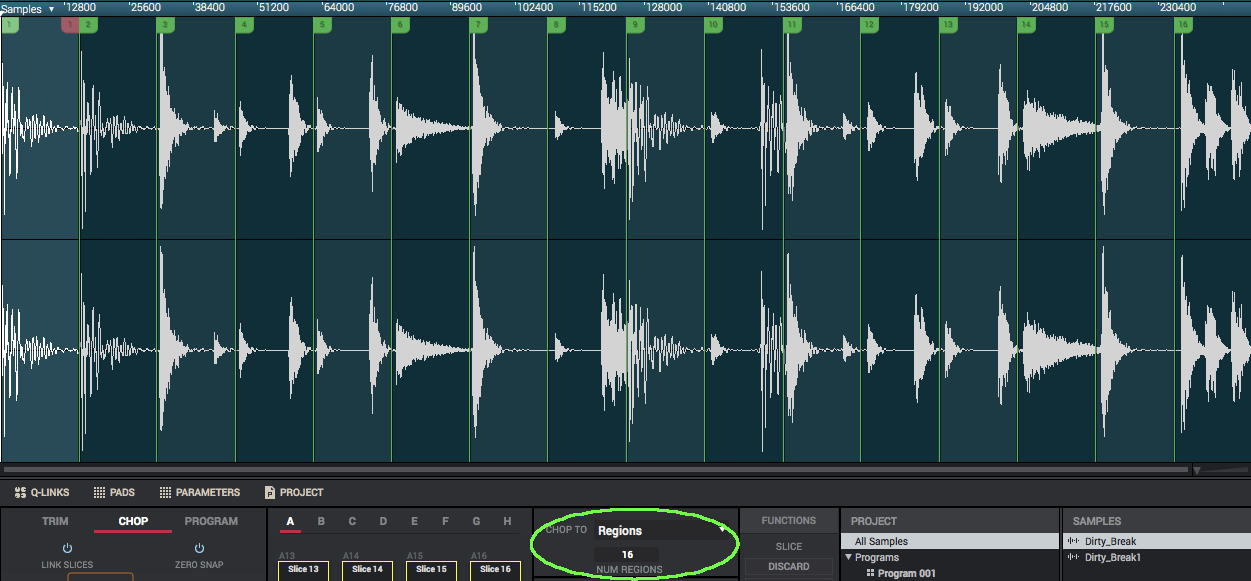
Change NUM REGIONS (‘Regions’ in the hardware UI) from 16 to 8 – the MPC will now split your break into 8 equal parts:
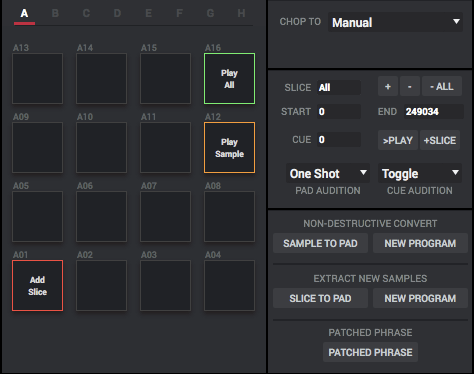
Take a look at your MPC controller or the ‘PADS’ panel in the GUI- notice the eight illuminated pads?
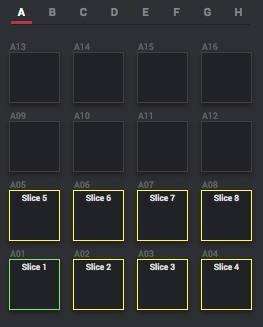
Each region (or ‘slice’) is now automatically assigned its own ‘preview’ pad, with the currently selected region in green, the rest are yellow. Hit pads A01 through to A08 to hear each individual region.
Pad Preview: ONE SHOT or NOTE ON?
In the PARAMETERS panel you’ll see the PAD AUDITION options:
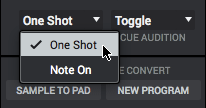
Alternatively hold down SHIFT and you’ll see the ONE SHOT option (F1) at the bottom left of the hardware screen:
When set to ONE SHOT (the button is white) each pad hit will preview the region as a ONE SHOT sample. Press F1 again to change the preview to a NOTE ON style preview – now the region stops playing when you let go of the pad (handy when you are editing the start point of a long region).
Identifying ‘Problem’ Regions
It is worth noting that a REGIONS chop is not performing any kind of waveform transient detection – it just divides your entire waveform into equally sized regions irrespective of the actual audio content itself. As such, it is often the case that you’ll find that some regions are not perfectly lined up with the transients in your break, especially when dealing with live breaks performed by an actual drummer (they don’t tend to have quantise options!).
The first thing I would say is that you don’t always have to ‘fix’ regions, because often the regions still ‘sound’ fine. However when region chopping there are often three problems you may come across that may need some attention.
Firstly some regions may have a nasty click at the end (we’ll look at fixing this in detail in the next chapter). Secondly some regions will be too short with too much audio prematurely discarded at the end of the region. And thirdly some regions just have a bit too much space at the beginning of the region which means the resulting slice sounds a bit delayed and not very ‘tight’. Let’s illustrate this with an example.
First, set a Zoom level of 19% and there’s a few ways to do this in the MPC. Firstly you can turn Q-LINK 4 clockwise (this is the bottom Q-LINK, column 4 in the MPC Studio) – if you look in the GUI you’ll see the current zoom level is indicated in the QLINKS panel:
In the hardware UI you can press the Zoom In (F4) button – a zoom level of 19% is achieved from pressing Zoom In three times.
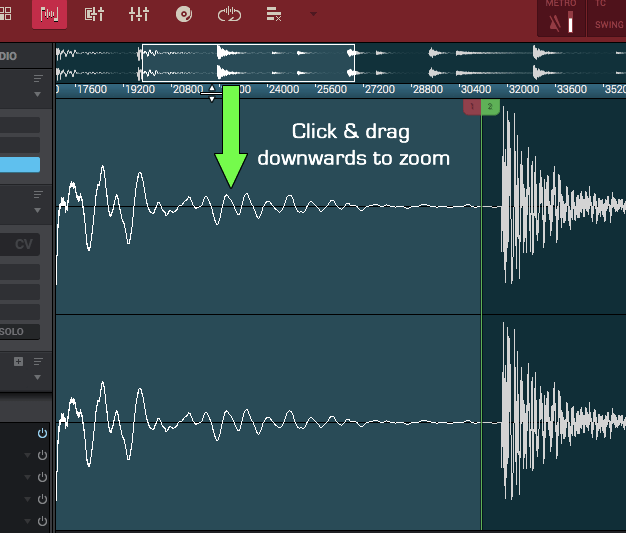
If you prefer working exclusively in the GUI you can use the two dedicated tools in the waveform editor; first there’s the zoom slider at the bottom right of the waveform:
Secondly you can click in the timeline above the waveform and drag downwards:
Repositioning the Waveform
After magnifying the waveform you’ll often have to reposition the waveform as some portions may now be ‘off screen’. You can do this by turning Q-LINK 8 (2nd QLINK from the bottom, column 4), or by click and dragging the scroll bars above and below the waveform (I prefer to use the top ‘preview’ scrollbar):
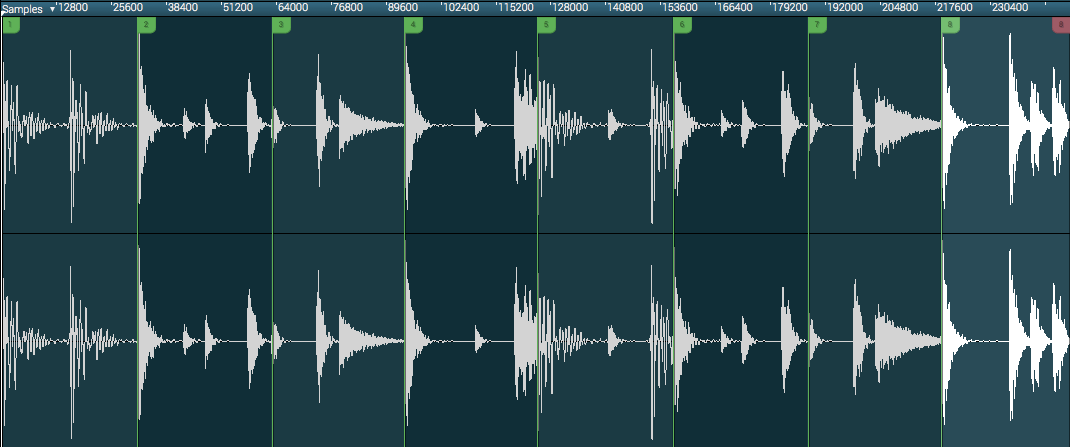
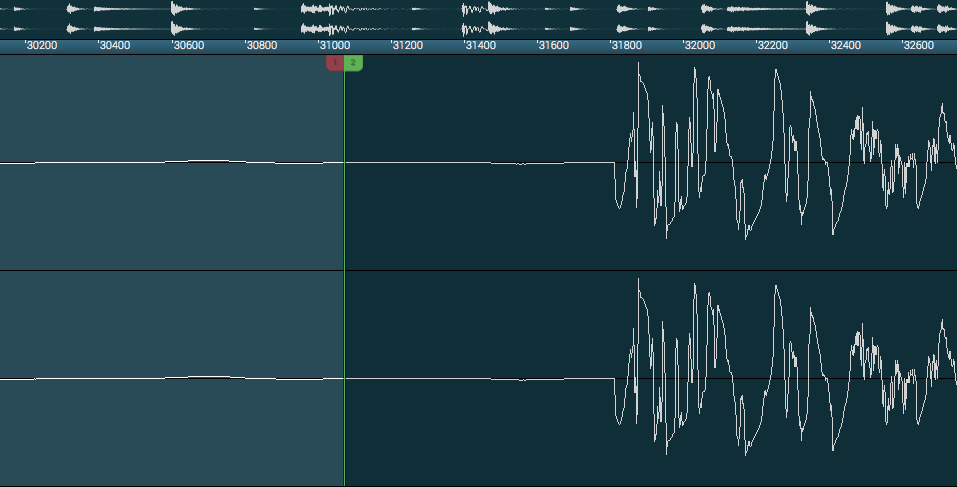
After setting a zoom level of 19%, hit pad A07.
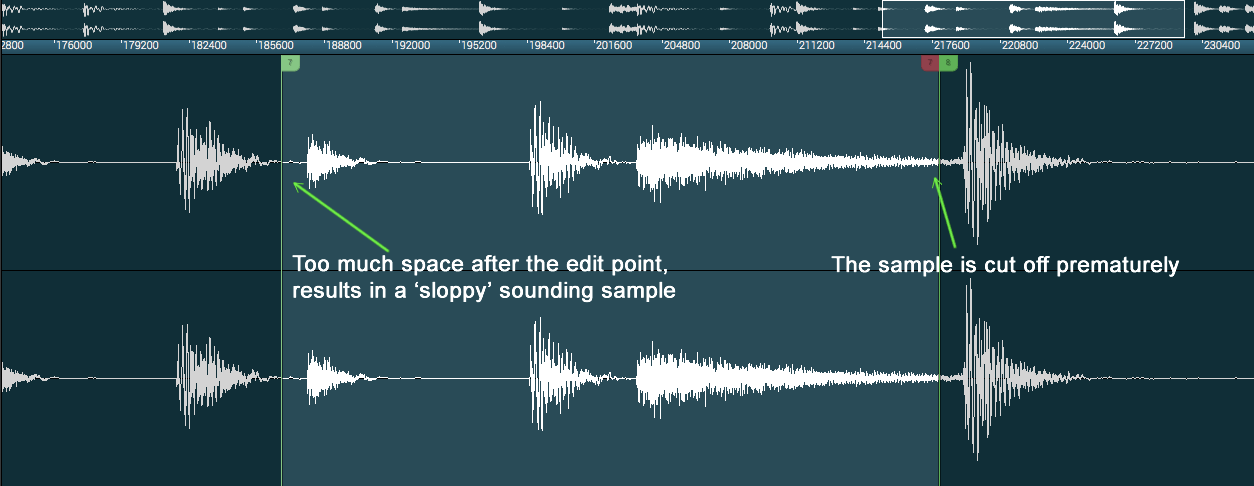
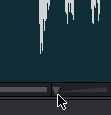
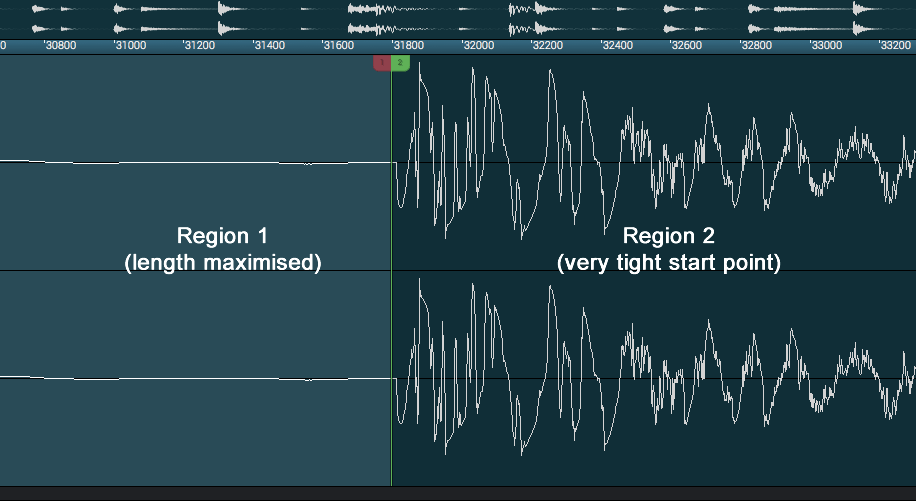
As you can see, the beginning of the region is not very ‘tight’ at all. If you hit A07 to preview the slice there’s definitely an audible delay before that hi hat comes in, Its just sounds sloppy.
Additionally, at the end of the region you can see that the open hat is cut off prematurely – ideally we want to salvage as much of this open hat as possible.
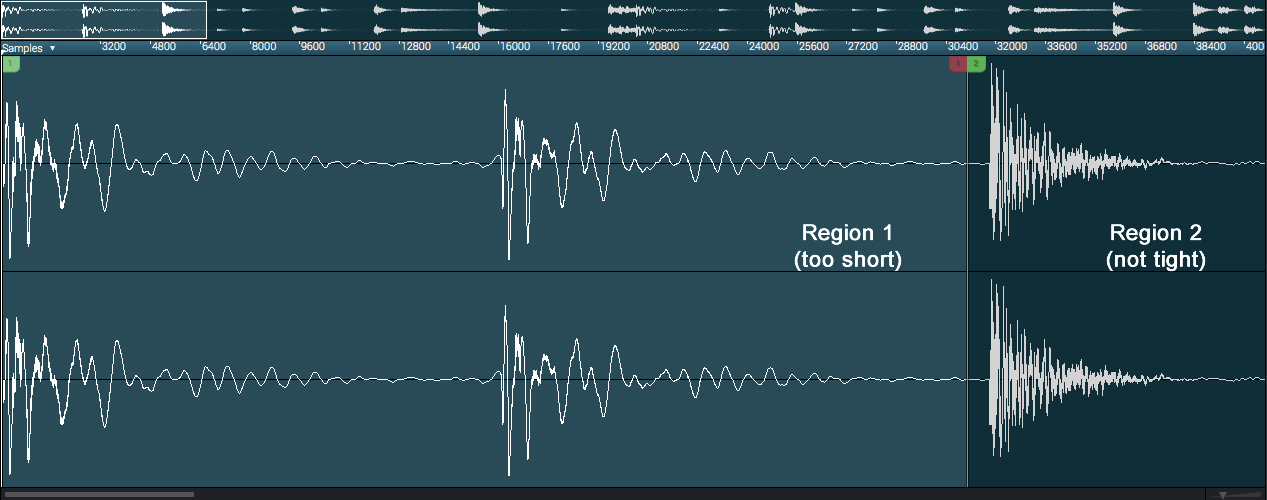
Take a look at all the regions and you’ll see that this problem is present in all of them. For example, here’s region 1, which is cut off prematurely – you can also see that region 2 is not ‘tight’.
Let’s look at a nice speedy ‘chopping’ workflow to get these issued rectified very efficiently.
Fixing the Regions – Speed Chopping Workflow
The core editing techniques in CHOP mode are similar to those found in SAMPLE EDIT ‘TRIM’, however here in CHOP mode the Q-LINKS are configured a little differently to normal TRIM mode – check out the Q-LINKS panel in the Panel Strip:
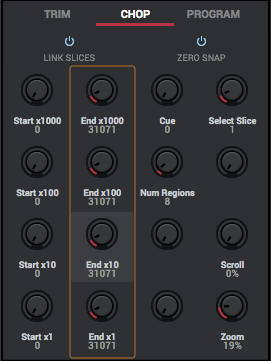
The START and END point Q-LINKS are the the same, but this time there’s no ‘LOOP’ Q-LINKS (there’s no looping in CHOP mode).
This speed chopping workflow is designed to use an efficient combination of hardware and software. Give it a go and see how it works for you, just remember that there are so often several ways to perform the same task in the MPC so you can always substitute some techniques with your own favourites.
The first three steps are used to configure the workflow:
Step 1: Set SNAP TO ZERO
As covered in chapter 8, setting SNAP TO ZERO ensures all our edits land on a nice ‘click-free’ zero crossing point. In the GUI you can this is done by clicking on the ZERO SNAP button in the QLINKS panel, while in the hardware UI this is achieved by holding down SHIFT and pressing 0 Snap (F2).
Step 2: Select the END point in the hardware UI
In this workflow we’re only going to edit ‘END’ points (I’ll explain why very soon), so in order to ensure the MPC always zooms into the end point of our region we’ll need to ‘select’ the END point parameter in the hardware. So in your hardware, use the cursor keys to highlight the ‘End’ parameter:
Step 3: Magnify the waveform
You’ll need to magnify the waveform so you can see the edit point clearly. Try to pick a magnification level that still shows some of the surrounding waveform, a Zoom level of approximately 59% works well, which correlates to hitting the Zoom In (f4) button six times.
With the workflow configured it’s time to begin editing.
Step 4: Select the region to edit
Tap the pad relating to the region you wish to edit. In this case, pad A01 for region 1.
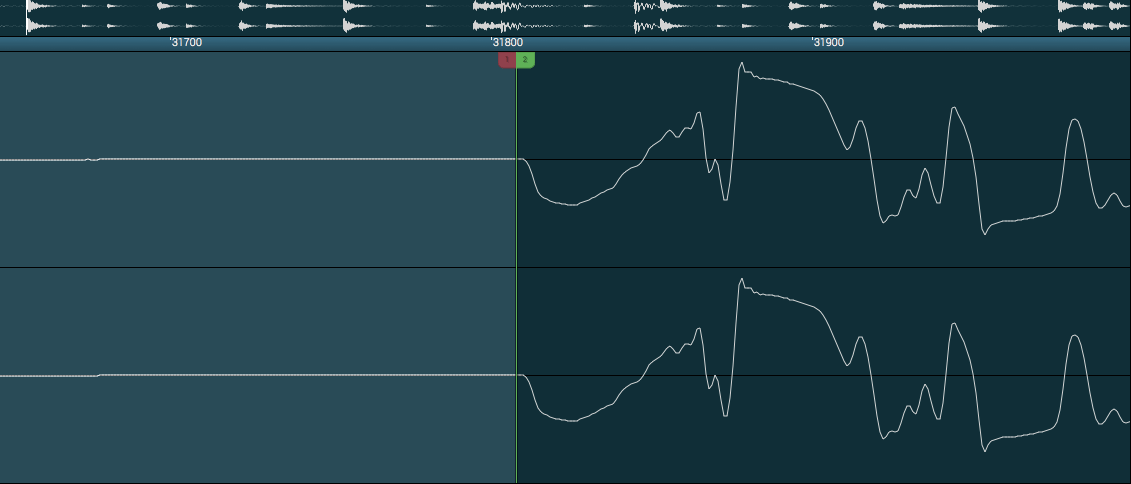
Step 5: Check the waveform
Quickly examine the waveform for any obvious problems. Also use your ears to listen out for any nasty clicks. As you can see from the above screenshot, the end of region 1 is clearly too short so we are going to need to extend the ‘END’ point a little.
Step 6: Adjust the END point
We know from chapter 8 that there are many ways to adjust the end point in the MPC – for example you can click and drag the red ‘end point’ flag in the GUI waveform, however in this workflow iI’ll be changing the END point using the hardware.
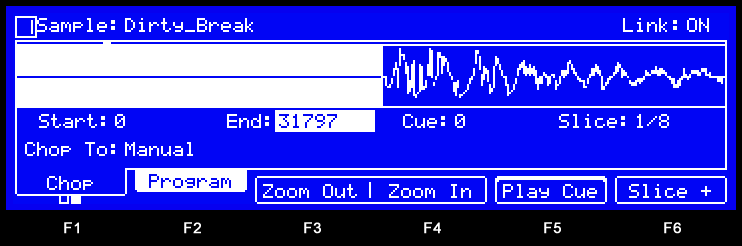
While you can use Q-LINK 2 (bottom Q-LINK, column 2) to make fine END point adjustments, I prefer to use the data wheel. Remember we have SNAP TO ZERO set and also have a decent magnification so each turn of the data wheel should land us on a good edit point.
So turn the data wheel clockwise while looking at the waveform until the END point is taken right up to the beginning of the transient from the next region, in this case an END of 31797:
So in this workflow I use my right hand to turn the data wheel, my left hand to tap the region selection pads and view the waveform on my computer screen.
Alternatively, you might prefer to look at the hardware screen, it’s normally accurate enough for this kind of editing where we are ultimately relying heavily on ‘snap to zero’ to handle all the zero crossings:
Once you are happy with the edit from a visual perspective, quickly tap pad A01 again to have a quick listen and if all sounds good repeat the workflow from step 4 onwards for all the other regions.
Shared Edit Points
Notice how by adjusting the END point of region 1 we’ve also simultaneously adjusted the START point of the next region (region 2) to make it nice and tight.
This is because by default, adjacent chop regions have a ‘shared’ edit point; so the end point of region 1 has the same value as the start point of region 2. Get that one ‘shared’ edit point correct and we’ve taken care of two issues; the premature ending of region 1 and the sloppy start to region 2.
This is why we only need to edit the ‘END’ point in this workflow, as editing the END point of one region also fixes any issues with the start of the next region. This makes the editing process quick and painless.
Here’s the final edit after adjusting all regions:
Exporting Your Regions
With our break chopped into eight regions, it’s time to ‘convert’ these regions into usable samples. To do this in the hardware UI, hold down SHIFT and hit CONVERT (F4):
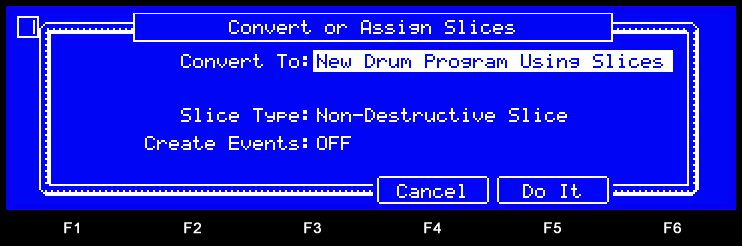
‘Convert To’ gives us several different conversion types, but at this stage I want to pick the simplest type of conversion, so turn your data wheel to select ‘New program with new samples’. Upon selecting this, the options available change:
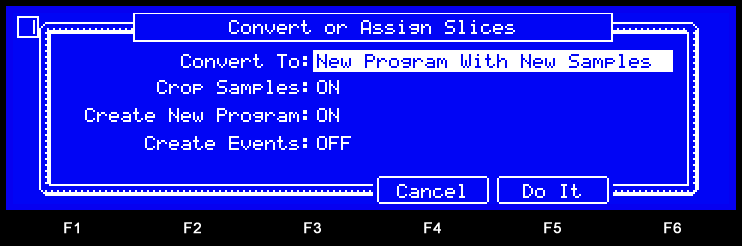
‘Crop Samples’ means the MPC will create a unique sample out of each region, so leave this ON.
‘Create new program’ will create a new DRUM program and automatically assign our new chopped samples to their own unique pad – leave this ON.
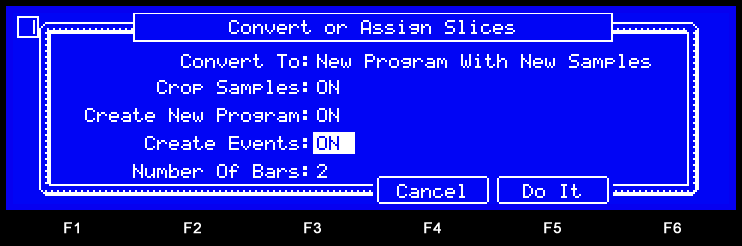
Finally, make sure you ‘Create Events’ is ON – this is going to create a new sequence that when combined with our new program, will ‘recreate’ our original break in the MPC sequencer. Upon checking ‘Create Events’ you’ll be asked how many ‘BARS’ make up your break. Leave this to the default ‘2’ (remember in 4/4 music, 1 bar is 4 beats, our break has 8 beats).
If you prefer doing this from the GUI, this ‘convert’ option has its own dedicated button under ‘EXTRACT NEW SAMPLES’:
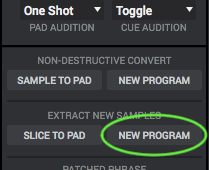
Hit DO IT to perform the conversion. Now take a look at the PROJECT panel:

You can see that the MPC has created a new program, Dirty_Breakch, and also eight new samples, each representing one of the chop regions we set previously.
Go to MAIN mode. The MPC has assigned the new Dirty_Breakch program to track 1 of the current sequence (in fact it assigns it to the next available empty track in the current sequence). Hit pads A01 to A08 to hear our individual break chops.
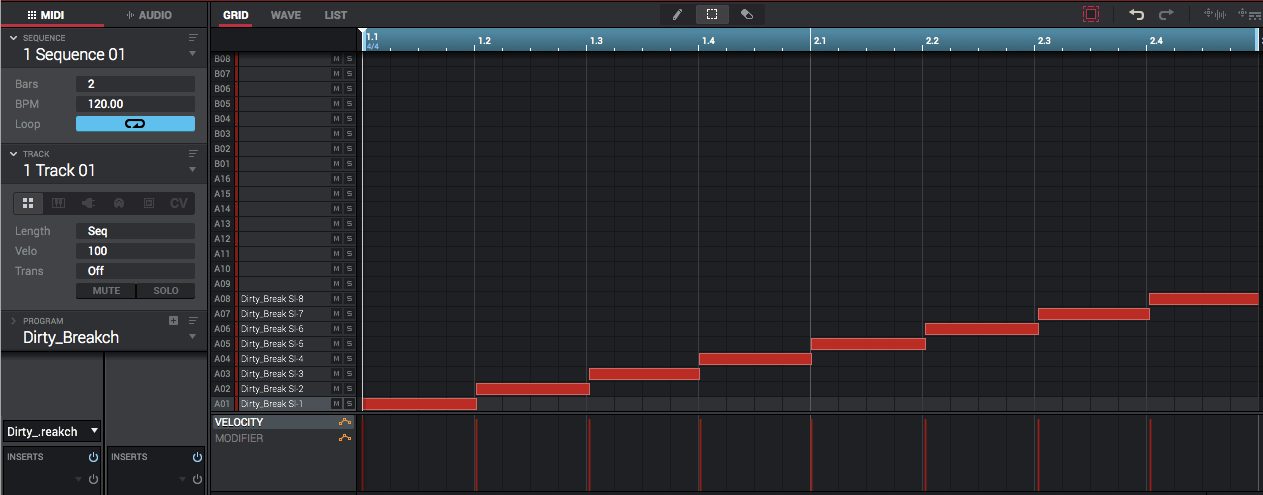
We have eight events, one for each chop region, so press PLAY START to listen to our break…. Yeah, sounds terrible. That’s because the original break was 85 BPM while your default sequence is likely to be 120.0 BPM. Change the sequence tempo to 85.0. Now press PLAY START again – that’s better!
So why would we do all this in the first place? Well chopping your breaks into smaller chunks lets us easily rearrange the original break by playing the chop regions in a different order.
From the project files folder you downloaded at the start of this tutorial, load up the Region Chopping.xpj project file.
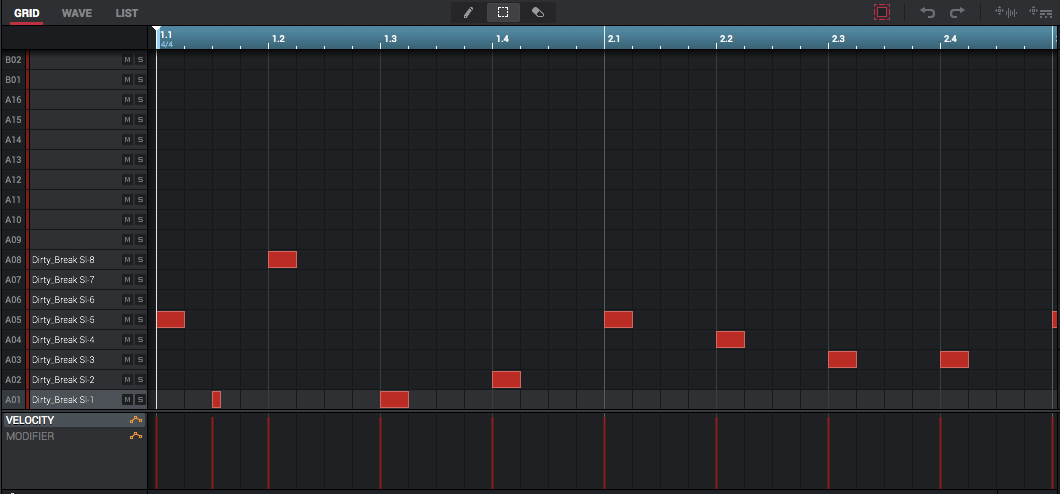
Sequence 1 is my version of the ‘standard’ sequence we just created. Select sequence 2 and press PLAY START – this is my ‘rearranged’ version which I simply recorded in real time, finger drumming style, but you could record it using any of the standard MPC sequencing methods (I cover core sequencing techniques in chapters 3-5 of the MPC Renaissance & MPC Studio Bible).
As you can see from the grid, my new version has a very different event structure to the original.
Mono Program Playback
One thing you will quickly realise when playing your chop program is that it’s not possible to overlap your chops – this is because a chopped program is automatically set to a POLYPHONY (‘Poly’) of ‘Mono’, as seen in PROG EDIT > MASTER (F1):
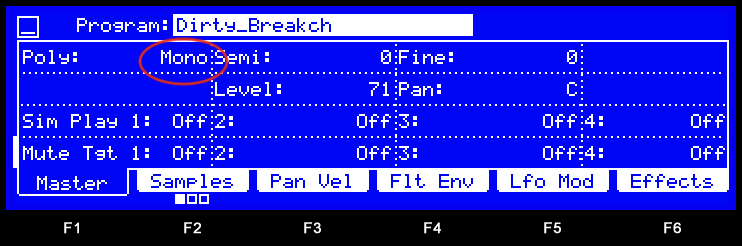
Or in the MASTER section of the PROGRAM EDITOR panel in the GUI:
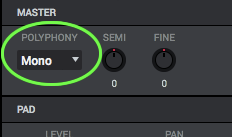
If you want to experiment with overlapping your chops (or overlapping any additional samples you might add to this program in the future) you should set the POLYPHONY to Poly (which is the default setting for a normal DRUM program).
Chopping Down to Individual Hits
Region chopping like this is a great way to quickly ‘remix’ a break while retaining a lot of the original feel as each region still contains some ‘timed’ elements, leading to a natural sounding performance (e.g. region 1 contains two kicks, region 2 contains a snare followed by two hats and another snare, etc).
However as we heard when the sequence tempo was incorrectly set to 120.00 BPM, the fact that each region contains these small timed portions means we must always keep our sequence at the same tempo as the original break (unless you implement ‘warping’, but we’ll look at that in a later chapter).
A more flexible method of chopping involves slicing our breaks all the way down to individual transients (‘hits’). This way, each region only contains the one hit, there’s no timed elements at all – once we do this things get really exciting, as we can start building custom kits and drum libraries from our breaks, write complex drum sequences, create patched phrase loops and all other manner of cool tricks. I cover all this and more in the ‘MPC Renaissance & MPC Studio Bible‘
4 Responses
Leave a Reply


Nov 20, 2019 2:34 pm
I am an MPC renaissance owner and a beginner, so I need a lot of help. I am an older fellow so I need detailed instructions. I am a singer songwriter, but not yet a professional yet. How can you help me? Is there really an MPC bible with detailed instructions that I can get? … please advise! Thank you!
Nov 20, 2019 2:45 pm
Yes, there is a bible for the MPC Renaissance, you can find out more here: https://www.mpc-samples.com/product.php/276/mpc-renaissance-mpc-studio-bible/
Aug 30, 2021 11:50 pm
I would like to purchase this tutorial as I have with previously but I can not get the MPC 2.10 to recognize my MPC studio silver. With this MPC Bible does it show me how to get my MPC studio connected to the software?
Aug 31, 2021 12:33 am
Hi
This book was written for a much older version of the MPC Software and hasn’t been updated for some time now as the MPC Studio/Ren are now long discontinued. The current ‘MPC Bible’ is written specifically for the current line of standalone MPCs (MPC Live 1, MPC Live 2/One/X) and only covers the standalone firmware/touchscreen UI. Regarding any connection problems you might be having with the MPC Studio and 2.10, you should talk to Akai support to find out if your computer is still compatible with the drivers.