Just received your MPC Renaissance or MPC Studio (or MPC Element) and wondering ‘what next’? This tutorial covers the basics of getting your MPC hardware and MPC Software up and running – quick and to the point! Adapted from my critically acclaimed MPC Software tutorial books, ‘The MPC Renaissance & MPC Studio Bible‘ and ‘MPC: Sampling Laid Bare‘.
Computer Hook Up
Your MPC hardware (the MPC Renaissance, MPC Studio or MPC Element controller) needs to be in continual communication with your computer, and this is achieved using USB. Connecting your MPC to your computer is simple – take a standard USB cable and plug one end into the orange computer port at the back of the MPC hardware and plug the other end into a spare USB port in your computer.
There are reports of a few people experiencing issues plugging their MPC into USB 3.0 ports – if you find your MPC is not communicating reliably with your computer, connect it to a USB 2.0 port instead. If you have no USB 2.0 ports, plug a USB 2.0 hub into a USB 3.0 port and then plug your MPC into the hub.
As for the USB cable itself, one came with my MPC but it was quite short, but I’ve not had any problems using my own USB cables, including a 3m one I bought off Ebay.
Power
The MPC Studio and MPC Element are simply powered by the USB cable plugged into your computer. The MPC Renaissance requires separate electrical power, and a suitable PSU (power supply unit) is provided with the Ren. If you find this is too short, MPC Stuff sell an extended length PSU:
http://www.mpcstuff.com/exps-ren.html
You’ll need access to a suitable AC power source – I would advise you invest in a ‘surge protected’ power strip, one that has several mains plug points; the surge protection will ensure that none of your audio equipment is damaged should there ever be any sudden power surges in your electricity supply.
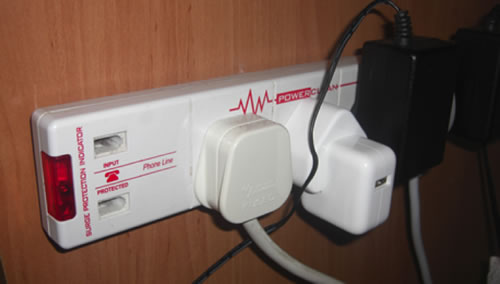
To connect the Ren to power, plug your PSU into your AC power strip and plug the other end of the PSU into the back of the Ren. You can twist the PSU around the cable tidy to prevent the PSU connection being accidentally yanked out.
Software Set Up
Next, install the MPC Software. You can either download the latest version from the Akai web site, or use the DVD that came with your MPC hardware. It’s then simply a case of double clicking the installer and following the onscreen instructions.
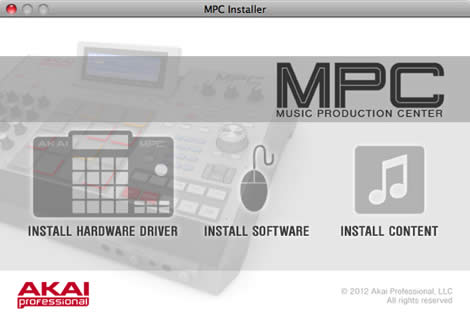
You’ll first install the hardware driver; this handles all audio and controller messages with your computer – after installing, reboot your computer. Then install the MPC Software itself (‘Install Software’), and then the MPC ‘Content’ (the library of sounds).
Finally you can install all the MPC Expansions that came on the DVDs with your MPC. This process can take a while so make yourself a coffee and relax.
Once the software set up is completed, turn on your MPC hardware and wait a few seconds – this gives the MPC time to begin communicating with your computer. Now launch the MPC Software, and once it’s loaded fully, it should detect your MPC hardware.
You’ll now be asked to unlock the MPC Software, so click the ‘Unlock Now’ button – here you can enter all your personal details. When you are finished, click ‘Unlock Now’ and hopefully your personal details and hardware will be registered with Akai and your MPC unlocked. You should be good to go!
Configuring Your Interface In the MPC Software
The audio output generated by the MPC Software is handed by an audio interface.
What is an Audio Interface?
Most computers come with a built in sound card that handles audio input and output – however these are very basic and definitely not to pro audio standard. Hence most people purchase a separate audio interface to handle all audio duties in their computer – these can be in the form of an internal PCI card, but typically these days are externally connected via USB (or firewire).
Once connected to your computer (and appropriate drivers installed), an audio interface can be configured to override the built in sound interface. Many audio interfaces also have MIDI ports, so can also act as a MIDI interface (hence you’ll often see them referred to as ‘audio/MIDI interfaces’).
The MPC Renaissance has its own built in audio interface, while the MPC Studio must use an audio interface connected to the host computer.
To configure the audio for the MPC Software, go to MPC > Preferences (Mac) or Help > Preferences (PC):
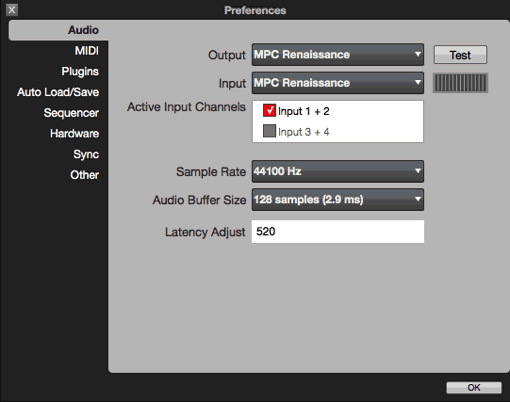
The Output and Input select boxes will display all available audio interfaces that your computer currently recognises. MPC Renaissance owners should see the ‘MPC Renaissance’ entry. If you are using a separate audio interface and cannot see it here, there will be a problem with the way it is set up within your host computer, so make sure you’ve installed the relevant drivers and that your interface is properly connected to your computer as per the manufacturer’s instructions.
Now simply select the audio interface you wish to handle the Input and Output duties. Typically, you’d select the same interface for both options, however you can select one interface for input (recording samples) and a different one for output.
Configuring Audio Hardware
A typical MPC Studio audio set up is shown below:
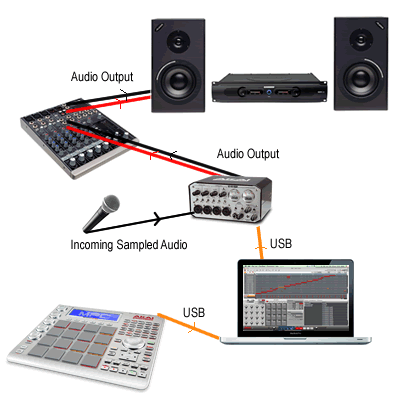
Here the MPC Studio is connected to your computer via USB, but all audio generated by the MPC Software is simply output from your computer’s audio interface. If you wanted to record an external audio source such as a microphone or a CD, you’d actually use the recording inputs of your computer audio interface.
Once the audio leaves the computer interface, it is then routed optionally to a mixer (where you could combine other external sound sources or add hardware based effects and dynamic processing via effect inserts), and ultimately to the studio’s amplifier and speakers.
The set up for the MPC Renaissance is as follows:
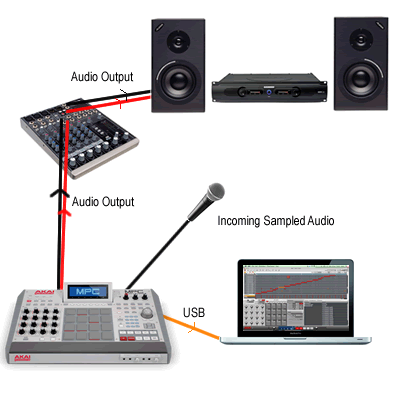
This time, your audio ‘output’ cables are plugged directly into the Ren’s ‘L and R’ stereo outputs and these in turn are routed to your studio’s audio system (via a hardware mixer).
To record audio into the Ren, you’ll simply plug the audio output of your audio source into the appropriate recording inputs of the MPC Renaissance.
Alternatively, you can use the Ren’s SPDIF digital inputs and outputs to handle the incoming and outgoing audio.
Connections For Recording Different Audio Sources
There are a few different types of audio sources you will typically record:
- Line level – this is the audio from CD players, iPods, smartphones, DVD, DJ mixers, other samplers etc
- Mic level – the signal received from condenser microphones.
- Phono Level – the signal directly out of the back of a turntable
- Digital – a pure digital signal passed through a dedicated digital connection
To record a live level signal, you simply connect the left and right outputs of the source into the left and right inputs of your interface (the L and R inputs of the MPC Renaissance) using 1/4 inch jack leads.
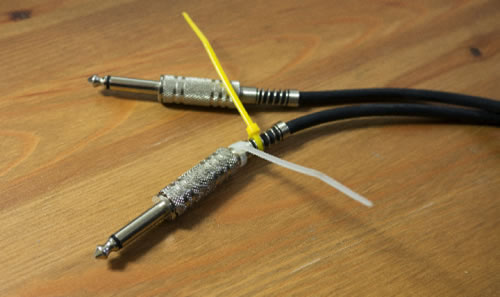
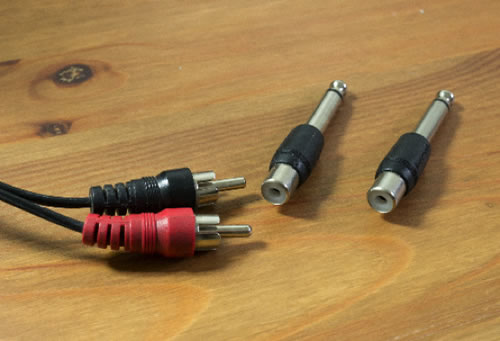
If your audio source is a ‘consumer’ level device, it may use ‘coaxial’ outputs, or even just offer a single stereo headphone jack. In this case, you’ll need convertors or a special cable that has 1/4 inch jack at one end and RCA (or a single stereo jack) at the other end.
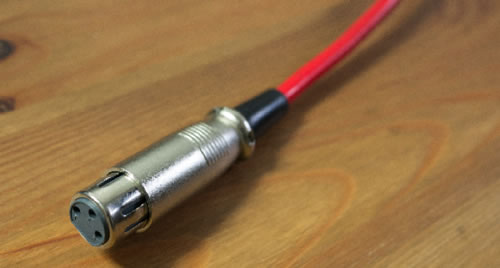
To record a mic level signal, plug the mic into the left hand recording input of your MPC or audio interface using a dedicated microphone cable. Most interfaces can accept XLR (shown below) or standard 1/4 inch jack mic cable input.
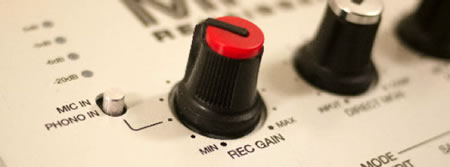
For condenser mics, you will also have to providee ‘phantom power’ to boost the mic level. This is usually built into most interfaces (including the MPC Renaissance), otherwise you will need to invest in additional hardware that can provide phantom power to the mic signal, such as a vocal compressor. On the MPC Renaissance, remember to switch to ‘MIC IN’ on the top, and the MIC switch at the back of the unit:
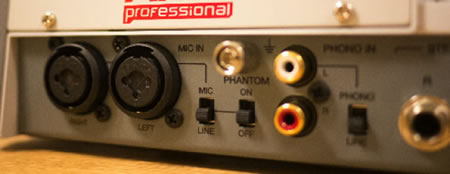
If you are sampling directly from a turntable, the MPC Renaissance has dedicated RCA inputs at the back as well as a ground wire attachment to avoid hum. You’ll also find that the ‘phono’ level signal they output is too low for recording and needs to be brought up to line level. To do this you can simply set the switch at the back of the MPC Renaissance from LINE to PHONO.
If you are using an interface with no phono inputs, you should route your turntable via a standard DJ mixer first as this will deal with the line level amplification and grounding. You can then treat the turntable signal as a standard line level signal and use the 1/4 inch jack inputs set to LINE.
Finally if you any of your devices utilise digital inputs or outputs, you can connect these to any digital ins/outs you may have on your interface. The MPC Renaissance has SPDIF connectors, which officially require a special SPDIF cable, but in most cases you can use a standard RCA cable (but there is a possibility of data corruption).
Tweaks
Once everything is set up, it’s time to perform some last minute tweaks and tests. First go back to Preferences > Audio and hit the Test button – you should hear a tone and also see the level meter under the ‘Test’ button turn green. If you see the green lights but don’t hear the tone, check your audio connections are set up correctly, and check obvious things like volume dials on mixers, amps and interfaces are active and no mute or solo switches are engaged on your mixer.
At this point, you can leave all other settings in the Audio tab to the defaults, unless you have a specific reason to change them. The Samplerate setting controls the samplerate used to record audio, which is commonly 441000 or 48000 Hz, however your audio interface may give you additional options. There are many endless arguments about which samplerate to use, but these are beyond the scope of this book, so I’d suggest sticking to 48000 or 44100.
The Audio Buffer size helps you control the latency you may experience when using your MPC controller. When you hit a pad in your MPC, ideally it will register as a hit in your MPC Software instantaneously – this however is unlikely, there will always be a very short delay (latency), but usually this is not noticeable.
If you experience any obvious delays, reduce the Audio Buffer size – however if it is set too low, you’ll experience all sorts of horrible distortion from your MPC, so use it wisely.
Go to the Other tab:
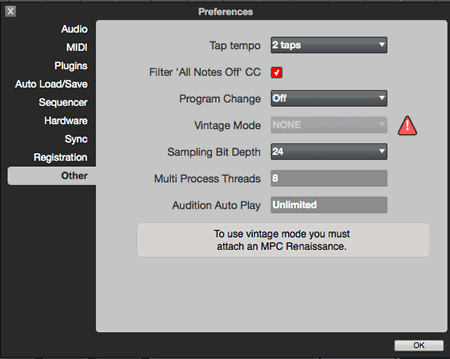
For the moment, the only change you may wish to make here is the Sampling Bit Depth. I would suggest you set this at 24 bit, as it will record any incoming audio at a higher quality compared to 16 bit. You will of course still be able to export your completed songs in 16 bit format if you prefer.
The Next Step
And that’s the very basic quick start guide for all MPC Renaissance and MPC Studio users! Next, head over to MPC-Samples.com and check out my MPC Renaissance/MPC Studio ‘hands-on’ courses, as well as our range of MPC Expansions!
13 Responses
Leave a Reply


Dec 9, 2014 11:11 am
Man I wish I would have found this article 5 years ago. I’ve been wanting to learn how to make beats for years but was so overwhelmed with all the jargon and so forth that I just never took action. I’m about to order my MPC right now matter of fact. But I had a question… When I buy it, if I don’t have any speakers or a mixer yet can I just use it with my headphones?
Jul 16, 2017 8:15 am
Yes, you can. But remember, it’s not a standalone and you need too use a computer. This mean than either way, you can hear the sound from your headphones or from the computer.
Jan 23, 2015 12:52 am
Hello. Really appreciate the article. I have now discovered that if I plug in both my MPC Renaissance and my Focusrite Scarlett 18i6 audio interface to my computer, I can choose to output from my MPC to my speakers and input audio from my Scarlett. Instead, I was either using one or the other.
Feb 18, 2015 2:18 am
So to hook up the MPC Studio to a turntable all i would need is RCA cables and adaptors with a preamp? I’m confused
Feb 19, 2015 9:24 am
Yes for the Studio you’ll need either a pre-amp or a DJ mixer to raise the phono signal to line level. On the MPC Ren, you won’t need the pre-amp as it has one built in.
Mar 28, 2015 2:43 am
I Did everything that mentioned above, but i still can’t see the mpc studio/ren listed as an option. Everything seems to be installed correctly. I can’t hear any sound. Should i re-install anything? Thank you
Dec 8, 2015 12:28 am
Can i connect the mpc studio to my rane 62 mixer?
Jan 27, 2016 9:43 am
I just got my MPC Touch, looking forward to diving in. Is it possible to load the MPC software on the computer itself, then load the sound libraries on an external hard drive? I do this with the software instruments I use in Logic, i.e., Logic resides on the Mac, software instrument libraries are on an external drive. I’ll be running the MPC on a Surface Pro, if that makes a difference. Thanks in advance…great website!
Feb 29, 2016 7:56 pm
I have the studio had it for some years and I still can’t use the bank or the other that came with it.. Why is that? My guess was its just for the ren but why would the studio ship with the disk if you can’t use it
Jul 16, 2017 8:23 am
You need to check the compatibility of your computer or you also can download the bank from Akai.com
May 2, 2016 7:07 pm
I’ve got the mpc element when I put a long sample on the pad it plays the full sample. Can I change it so it only plays the sample for the length of time the pad is held down?
Jul 13, 2016 2:47 pm
I 2 comp 2 MPC REN 1ST GEN and i would would like to sync 2 MPC Ren’s so that one of them is the master is that possible?
Dec 10, 2019 9:06 am
We have the Mpc renaissance and we can’t get our monitor speakers to work….they are hooked up correctly! can anyone help or lead us in the right direction thanks!!!!