
This MPC5000 tutorial looks at some ways in which we can take some average kicks and snares and produce something different within your MPC5000. I’ll take you step by step through the process of filtering, tuning and griming up your drum sounds using only an MPC5000. Adapted from my 400 page MPC5000 tutorial book, ‘Beat Making on the MPC5000‘.
Tuning Drums With the MPC5000
By tuning down a sample it instantly becomes a lot darker. Go to DISK (MODE and pad 3), LOAD (F1), and from the tutorial files, locate the ‘TUNING & BIT RATE’ sub folder. Load up the project file, ‘TUNE001.prj’. Now go to MAIN, sequence 1 and press PLAY START, you’ll hear a 2-bar break.
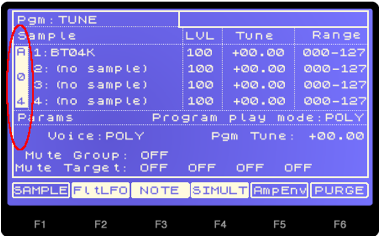
Go to PROGRAM (MODE and pad 6) and select the TUNE program – this contains the drum kit used to make the break in sequence 1. Select PAD A4 – this has a single kick assigned to it on layer 1. Highlight the ‘Tune’ parameter with your cursor keys and take the tuning down to -04.00 using your jog wheel and preview by pressing pad A4. The kick instantly sounds lower, darker and basically more mean! So what happens if we do this to all the sounds in the break?
The quickest way to tune down all the pads in a program is to cursor over to the left hand side where the pad number is currently displayed:
Now turn your data wheel several clicks to the left until it reads ‘MULTI’:
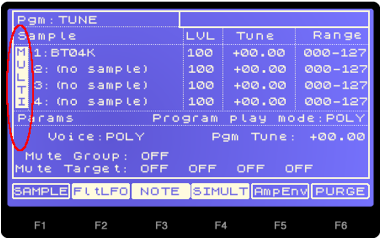
Now highlight the ‘Tune’ parameter for layer 1, and drop the tuning down to -04.00 using your jog wheel. This will drop the tuning down on all pads together,
Now press PLAY START on the sequencer and you’ll find that the loop sounds a lot darker and grungy. While the sequence is playing, you can continue to drop the tuning in real time to hear the effect this has on the beat. Basically the lower you go, the darker and more brooding the beat becomes, although watch out for tuning ‘artefacts’ – this is where massive amounts of tuning produce metallic rings and also highlight existing noise on the original samples.
Settle on a tuning you like and press MAIN to return to the main sequencer page. Highlight the tempo field and change this from 80.0 to 70.0. The slower BPM makes the beat even more grungy, with a real tripped-out feel.
You can hear my tuned down version by playing sequence 2 – TUNEDOWN. Here I’ve just created a new program called ‘TUNEDOWN’ that already contains all the tuned down pads.
What about tuning up? Play sequence 3 of our project – ‘TUNEUP’ – this uses a third program called ‘TUNEUP’ with all pads tuned to +04.00. As you can hear, tuning up drums like this makes your sounds tighter and brighter.
So from this one break beat you have created three different sounding loops, just by tuning the individual drum sounds. You can of course tune entire drum loops the same way, however you’re then faced with the additional issue of time stretching or pitch shifting to ensure the correct BPM is obtained and as we’ll see in later tutorials, each of these processes has their own inherent problems. That’s why I prefer to take breaks, chop them down to their individual hits and make drum kits out of them – it gives you much more control over the make up of each hit, plus the tempo is simply changed by varying the BPM in the corresponding sequence file. We’ll explore the whole process of chopping breaks and creating your own kits in Section C of Beat Making on the MPC5000.
Tuning Down Without Dropping Pitch
If you sample from vinyl, try this. Take a 33rpm record and pitch it to 45rpm. Now sample a break into your MPC at this higher (45rpm) pitch. Once sampled, go to TRIM, WINDOW and adjust the tuning to bring the sample back to its original pitch, a tuning of -05.00 is required.This way you’ve tuned down your sample (and hence, it’s achieved a more grimy tone), but you’ve not changed its overall pitch of the sample, which is still the same as it originally was on the record. This method also saves memory, as your sample is a lot shorter!
Bit Rate Reduction
We’ve all heard about the classic 12 bit sound of the Akai MPC60 or the Emu SP12, and most people would love to be able to recreate that sound using their MPC5000. Unfortunately it isn’t really possible to recreate things exactly as there are many factors that decide the sound of a sampler, particularly the A/D (analogue to digital) converters.
The MPC5000 offers us the ability to re-sample any internal sample to change it from a clean 16 bit sound to a lower quality 12 bit or even 8 bit sound. We’ll use one of the snares from the ‘tuning’ tutorial above – I’ve actually created a brand new program called GRIME and have assigned this snare sample to pad A1, giving it a new name GSNR. So go to PROGRAM and select this GRIME program. If the pads are still set to MULTI from the previous tutorial, turn this off by highlighting MULTI and then just spin the data wheel to the right until a normal pad number appears.
Select PAD A1 (GSNR) and go to TRIM (mode and PAD 5) so that we can start performing edits on this sample. Press EDIT (F6) and jog wheel to the right until you see ‘BIT REDUCE’. You’ll see the following ‘Sample Edit’ screen:
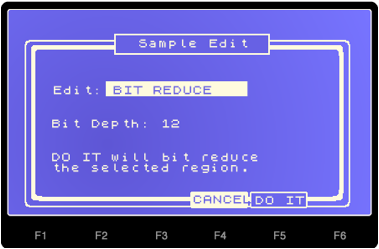
‘Bit depth‘ refers to the bit rate of the sample – we’ll leave this set at ‘12’ for the moment (’12 bit’). Remember that it is usual to work with 16 bit samples in an MPC5000, so anything with a lower bit rate will have reduced quality.
To perform the resample, press DO IT (F5). By reducing to 12 bit, you’ll not hear any hugely obvious change in sound – your sample will become slightly more hissy and you may hear it become slightly more fat and grungy. 12 bit re-sampling is very subtle and a great way to add a bit of grit to your drums without obviously making noticeable changes to the sound.
To take matters further, let’s try 8 bit reduction. First let’s return our sample to its original 16 bit state by pressing the flashing orange UNDO button at the bottom right of your MPC. Now select EDIT > BIT REDUCE, and set ‘Bit Depth’ to 8, and press DO IT. At 8 bit, the bit rate change is more obvious, you’ll hear it affect the reverb tail of your sample which will become crackly and very ‘bitty’. To counter this problem, let’s utilise some more sample editing features.
Return to the main TRIM screen and highlight the end point of the sample. Now using either the data wheel, number pad or the Q2 slider (as discussed in chapter 10 of the book), adjust the end point to approximately 15,000 (it doesn’t need to be completely accurate). Now, discard the unwanted data that occurs after the new end point (EDIT > DISCARD). Optionally, rename your new 8 bit sample by highlighting the current sample name and pressing WINDOW. My version of this sound can be found on pad A2 – I called mine ‘GSNR-8BIT’.
By discarding the end part of the sample, we’ve removed a lot of the distorted reverb tail – however this abrupt end to the snare isn’t great, so we need to create some kind of decay. To tackle this issue we have several options including:
- apply an ‘EDIT > FADE OUT’ to simply fade out the end of the sample
- assign this sample to a pad and adjust the ‘amplitude envelope’ settings to ‘shape’ a new decay curve for the sample.
- add some gentle reverb to mimic the decay of the snare
- create a snare decay using a chopped portion of the actual snare combined with some nifty sequencing
Option 4 is a little too advanced for this part of the book – however, we have an entire tutorial dedicated to this in chapter 28 of Beat Making on the MPC5000, so we’ll leave this for the moment.
To apply a permanent fade out on the ‘8bit’ sample, let’s first make a copy. Highlight the sample name, press WINDOW and press COPY (F5). Call this new sample ‘8bit-fade’. With ‘8bit-fade’ selected, go to EDIT and data wheel to FADE OUT:
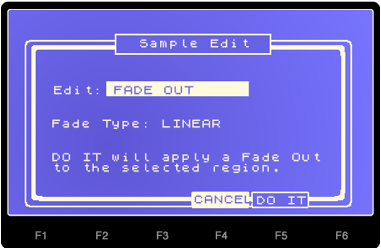
We looked at the ‘FADE OUT’ and ‘FADE IN’ functions in chapter 11. As the name suggests, this editing function will fade our sample out by gradually decreasing the volume to zero over time. Please refer back to chapter 11 for graphical representations of the different fade out curves.
For ‘Fade Type’ there are three options; LINEAR (which fades out the sample very gradually), EXP (which fades out the sample gradually then fades quickly, but finishes gradually), and LOG (which starts fading quickly, slows in the middle, then finishes quickly). As we have the UNDO feature, we can try out all three FADE options to see which one gives the best results. So, try each one, pressing UNDO after previewing each one.
After trying out all three fades, I felt that EXP gives the best results – certainly in terms of providing a snare sample with no distorted reverb tail. So the end result is a nice ‘crunchy’ snare sound. Listen to pad A3 – this is my version of this faded 8-bit snare; I’ve called mine GSNR-8BIT-F.
Using Program Parameters (Amplitude Envelope)
As an alternative to using sample editing fade outs, we could assign our 8 bit sample to a pad and apply some envelope changes to remove the distorted decay. Go to PROGRAM (mode and pad 6), and on pad A4, you’ll see I’ve assigned our ‘unfaded’ 8 bit sample, GSNR-8BIT. Press AmpEnv (F5) to bring up the amplitude envelope screen.
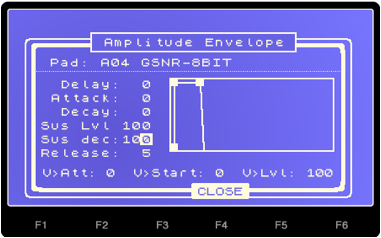
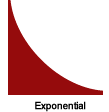
We looked at this screen in detail back in chapter 13. Here we can shape the envelope of each pad to change the way the sound plays. We know from the previous part of the tutorial that an exponential fade out works well here, so let’s try to recreate that type of fade out. As we saw in chapter 13, an exponential fade out curve looks like the following:
To mimic this type of curve, try the following settings:
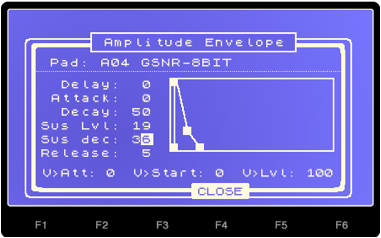
This removes the distorted decay and sounds quite similar to our ‘faded out’ sample on pad A3. My version of this can be found on pad A5.
If you compare the three sounds – original (A1), faded (A3) and the ‘amp envelope’ version (A5), you’ll notice that the side effect of both fading processes is that the new snare sound dry with less reverb to the original. This is usually quite a positive side effect, as it’s better to work with ‘dry’ sounds whenever possible as you can always add effects later. That said, we can add a little subtle reverb to very slightly enhance the decay.
Press pad A6 – here I’ve placed a copy of the 8 bit sample with some ‘AmpEnv’ adjustments as before. This time, I’ve added a small amount of reverb on FX 1, buss A, using the ‘Reverb Small’ patch (please refer back to chapters 18 and 19 for more information on using the MPC5000 effect busses).
If you want to look at the reverb parameters, and select EFFECTS (MODE and pad 11), highlight the reverb patch on FX1, and hit WINDOW. As you can see, the ‘Wet Dry’ mix, decay time and pre delay are all low to ensure the reverberation is very subtle. Some ‘hi cut’ also ensure the decay tail is not too ‘hissy’.
4 Bit Samples
Don’t forget that you don’t have to stop at 8 bit reduction – EDIT > BIT REDUCE gives you the option to reduce samples down to as low as 1 bit. I’ve created a 4 bit version of the original snare on pad A7 – for this one, I not only added some exponential FADE OUT in TRIM > EDIT, but have also added some shaped decay in AmpEnv on the pad itself. The result is a very crunchy snare sound.
The MPC5000 ‘Resampler’ and ‘Decimator’
The effects section of the MPC5000 also features dedicated effects that try to mimic the classic old sampler sound. The ‘resampler’ and ‘decimator’ effects can be added to any pad and offer real time manipulation of the amount of ‘grunging’ added.
Go to pad A9 – here I have our original ‘clean’ snare sound, but this time I’ve added some envelope shaping via ‘AmpEnv’ before we apply effects. So we are already starting with a fairly dry sounding snare. I’ve then applied the ‘Decimator’ effect via FX buss 2 in the MIXER screen, applied as an ‘insert effect’, i.e. DIRECT:OFF.
Go to EFFECT (MODE and pad 11) and on FX2, highlight the decimator bank and hit WINDOW to view the settings:
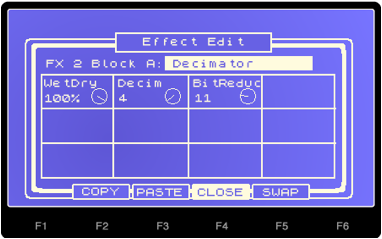
We have a bit reduction down to 11 and a ‘decimator’ of ‘4’. The decimator tends to add a slightly out-of-phase sound to the samples, especially at higher settings – in fact it can be quite similar to ring modulation. However at low levels it does give samples an added grimy dimension.
On pad A10, I’ve added the ‘resampler’ effect via effect bus 3. To view the effect settings, go to EFFECT and then BUS3-4 (F2). The ‘Rate’ controls the sample rate of our sample, which is normally 44.1 kHz – by taking the rate down from 100, you’ll hear the sound get darker and darker as the sample rate is being decreased (the numbers 100 to 0 do not appear to represent the actual sample rate itself though). I settled for a rate reduction value of 37.
The ‘Decim’ option is the ‘Decimator’, again which adds additional digital ‘grunge’ to your sample. I find that the decimator option here is a bit more random compared to the dedicated decimator effect, and its best to just go from 0 to 100 to find a setting that works well. I found that 39 was a real sweet spot to my ears, pure dirt!
Compare the two effected snares – which one sounds the grimiest? Got to be A10 for me. Also remember to utilise the BYPASS option in the EFFECT screen. This way you can turn off a particular effect to compare the clean and effected sound directly.
I look at more drum manipulation techniques in later chapters in the book, including distortion, compression and filtering.
Beat Making on the MPC5000 contains at total of 50 MPC5000 tutorials, covering every single function on the MPC5000, always using practical beat making examples to help you understand how to use the MPC5000 effectively and creatively. Covering topics from beginner right through to advanced beat making techniuqes, each tutorial comes with all the files you need to recreate it in your MPC5000 (700 in total), and everything is written in a clear, step-by-step fashion with no jargon.
A must-have book for any MPC5000 beat maker – available to download instantly after purchase at MPC-Samples.com.
6 Responses
Leave a Reply

Latest Posts

MPC Bible 3, Revision 4 - Clip Matrix, MPC 3.7 + MPC XL

Out Now: MPC Bible 3, Revision 3 With MPC Live 3 MPC3.6 Support

MPC Electric Guitar - The Definitive Electric Guitar Expansion For MPC

Out Now: MPC Bible 3, Revision 2 With MPC3.5 Support

Aug 25, 2014 6:35 pm
Dear tutor,
I was asking about MPC1000 before. Now I have chance to buy almost new MPC5000 for 900 dollars. To be clear. I live in Czech republic. If I buy MPC2500 (which i prefer) for about 700 dollars (average ebay price) it would cost me another 200-250 dollars to get it in Czech. Everybody writes how bad 5000 is. Its not really true, is it? Shall I buy it? I think its better to buy MPC5000 almost new and already in Czech republic, than anything else in US and getting it here expensive way. Are the JJ systems working on 5000 too? Answer will be appreciated. Thank you. Peace.
JV
Aug 28, 2014 10:17 am
MPC5000 is buggy with an unfinished OS. MPC2500 has JJOS which is constantly updated and improved with far superior workflow. For me, the 2500 is the better buy, or an MPC1000 with JJOSXL or JJOS3 would also be great and much cheaper. You should be able to pick up a second hand MPC1000 or MPC2500 with JJOSXL already installed off ebay, just keep looking every day.
Mar 13, 2015 9:19 pm
MPC-Tutor Do You Give Pivate Lessons FOR MPC 5000?? I’m Darvin Rashod Brown on Facebook….Hit me Up Bro!! Let’s Chop it Up!! I Really Need Your Help!!!
Mar 16, 2015 10:34 am
Sorry Darvin, I don’t have enough time these days to offer private lessons, it’s also been many years since I used an MPC5000! If you need help with a specific problem try the MPC5000 sub forum at MPC-Forus.com http://www.mpc-forums.com/viewforum.php?f=29 as well as my book http://www.mpc-samples.com/product.php/157/beat-making-on-the-mpc5000/
Apr 5, 2017 12:30 pm
Please let me know how the save the beats created by the user inside MPC5000.
Your quick reply is eagerly awaited.
Thanks a lot
Apr 5, 2017 12:39 pm
DISK > SAVE > Save entire memory