In my previous tutorial we built an acoustic drum kit which took advantage of the MPC’s ‘velocity switching’ features to recreate the natural changes in timbre we hear when hitting drums at different velocities.
That kit used samples recorded over four dynamic levels (e.g. soft, medium, medium-hard, hard). Now while 4 layer kits sound great, adding even more dynamic layers means we achieve smoother transitions between each layer, leading to a more natural sounding acoustic kit. The problem is that each pad in an MPC drum program only supports a maximum of 4 velocity layers!
In this tutorial I’m going to show you a nice workaround using SIMULTANEOUS PLAY which means you can build a kit with up to 20 velocity layers per drum articulation – the examples are shown for MPC, but will work similarly in the Akai Force (via TRACK EDIT instead of PROGRAM EDIT). These are the same techniques that I used to build the kits in my 1977 Session Kit expansion.
Please note that this tutorial is fairly advanced and assumes you are comfortable with the techniques described in the 4 velocity layer tutorial and MPC program building workflows in general.
Loading The Multisamples
In your MPC, create a new blank project (MENU > NEW PROJECT) and in MAIN ensure that the default blank DRUM program is assigned to track 1 of sequence 1.
Download the tutorial files, unzip and transfer the resulting ‘8 Layer Drum Kit Tutorial’ folder to your MPC disk.
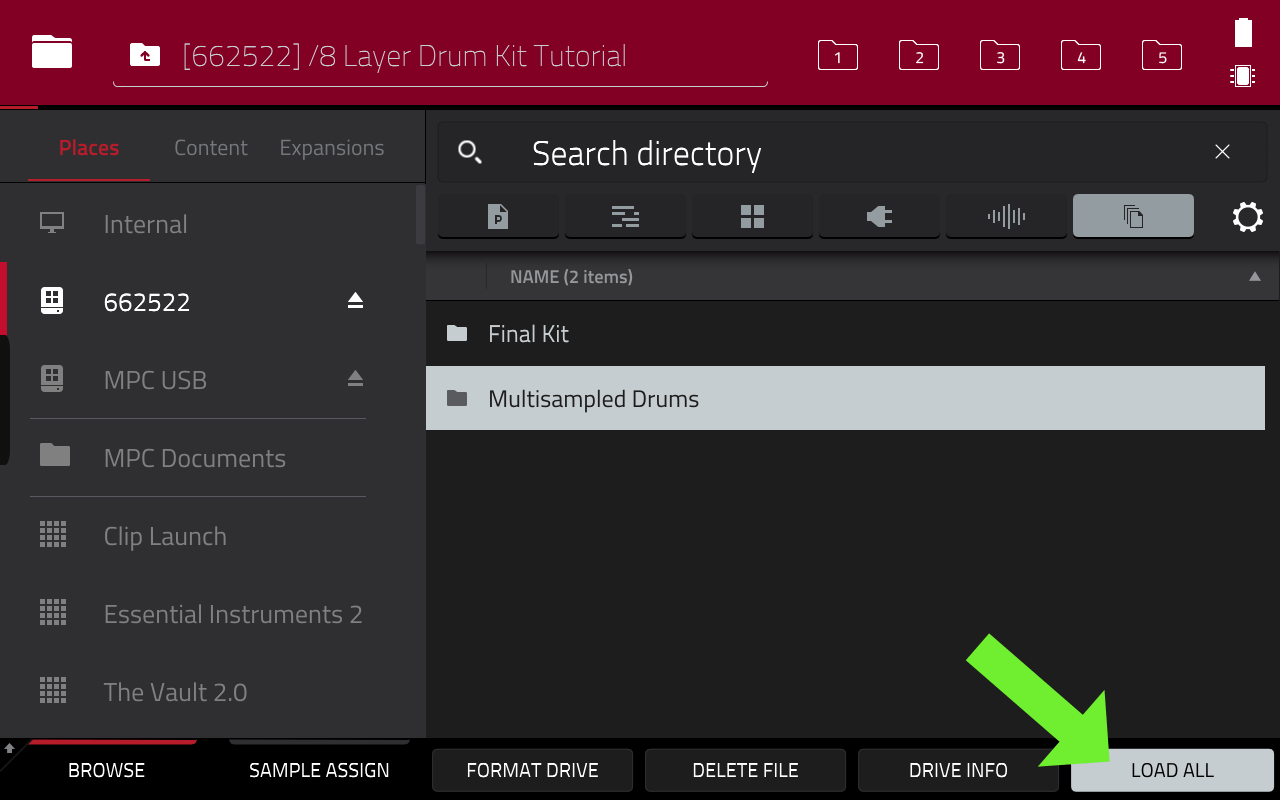
Head over to BROWSER > Places and navigate inside the tutorial folder where you’ll find a sub folder called ‘Multisampled Acoustic Drums’. This contains all the multisampled drum samples we’ll be using in this tutorial.
Tap on this folder to select it, hold down SHIFT and select LOAD ALL.
This will load all the drums directly into your project. You can see all the loaded samples by going to MENU > PROJECT:
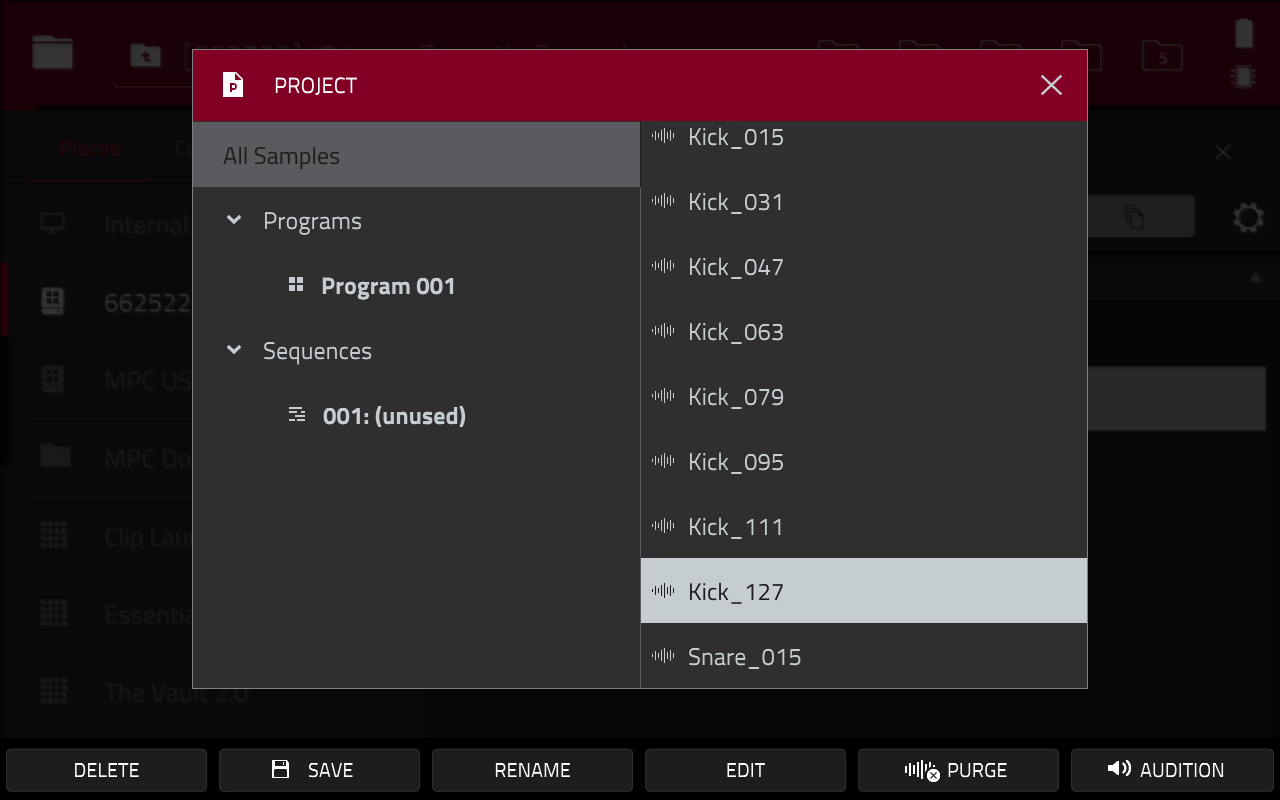
There’s four different instruments in total; kick, snare, closed hat and open hat, and for each instrument there’s 8 unique samples provided, each recorded at a slightly different velocity. I’ve named each sample with a guide velocity in the name, (e.g. Kick_127.wav).
What is ‘velocity’?
Velocity is a measure of how hard a pad (or key) is played. In MIDI terms it is measured on a scale of 1-127, where 127 is the hardest hit.
Configuring Velocity Layers
The basic idea behind an 8 layer kit is that each single drum articulation (kick, snare, closed hat, open hat etc) actually consists of two pads, with each pad contributing 4 velocity layers each, for a total of 8 velocity layers.
The ‘primary’ pad is the one that you actually hit, and is typically placed in pad bank A. The ‘secondary’ pad is hidden away in a different pad bank, it’s never played directly but is automatically triggered whenever the primary pad is hit (using the ‘simultaneous play’ feature). The primary pad handles pad hits in the velocity range of 64-127, while the secondary pad will handle the pad hits in the velocity range 1-63.
Let’s explain this better with a practical example! Make sure your default blank DRUM Program 001 currently selected in MAIN. Press pad A01; this is going to be the ‘primary’ pad for our kick drum.
Now go to PROGRAM EDIT > SAMPLES and press the SAMPLES button three times (you’ll see the third dot highlighted under the ‘SAMPLES’ button):
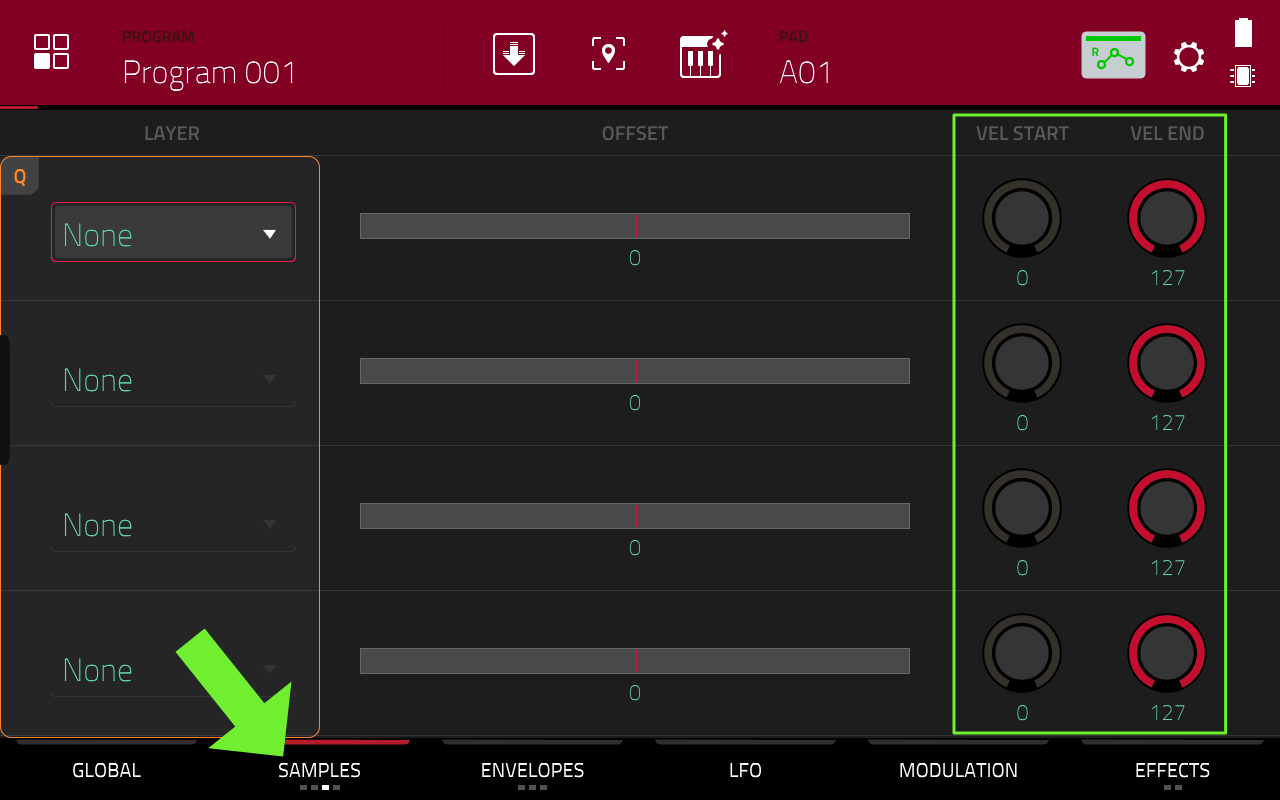
On this screen we can set the velocity ranges for this pad. For LAYER 1, using either the on-screen touch dials, your data wheel or your Q-LINKS (Q-LINK banks 3 and 4), set your velocity range to VEL START: 112, VEL END: 127:
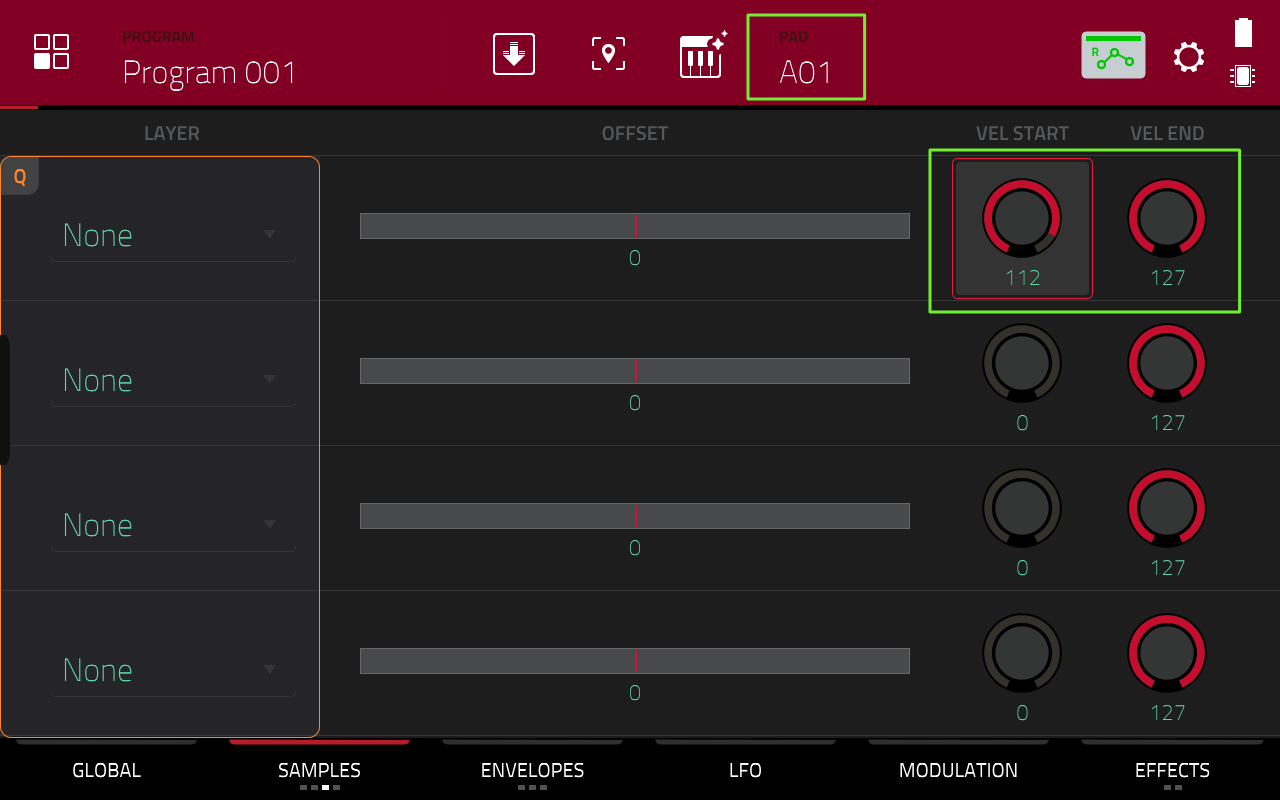
This means that LAYER 1 is only going to play if you hit pad A01 with a velocity of between 112 and 127.
Now select LAYER 2 and set the next velocity range, which is going to cover the next 15 velocity points; 96 to 111:
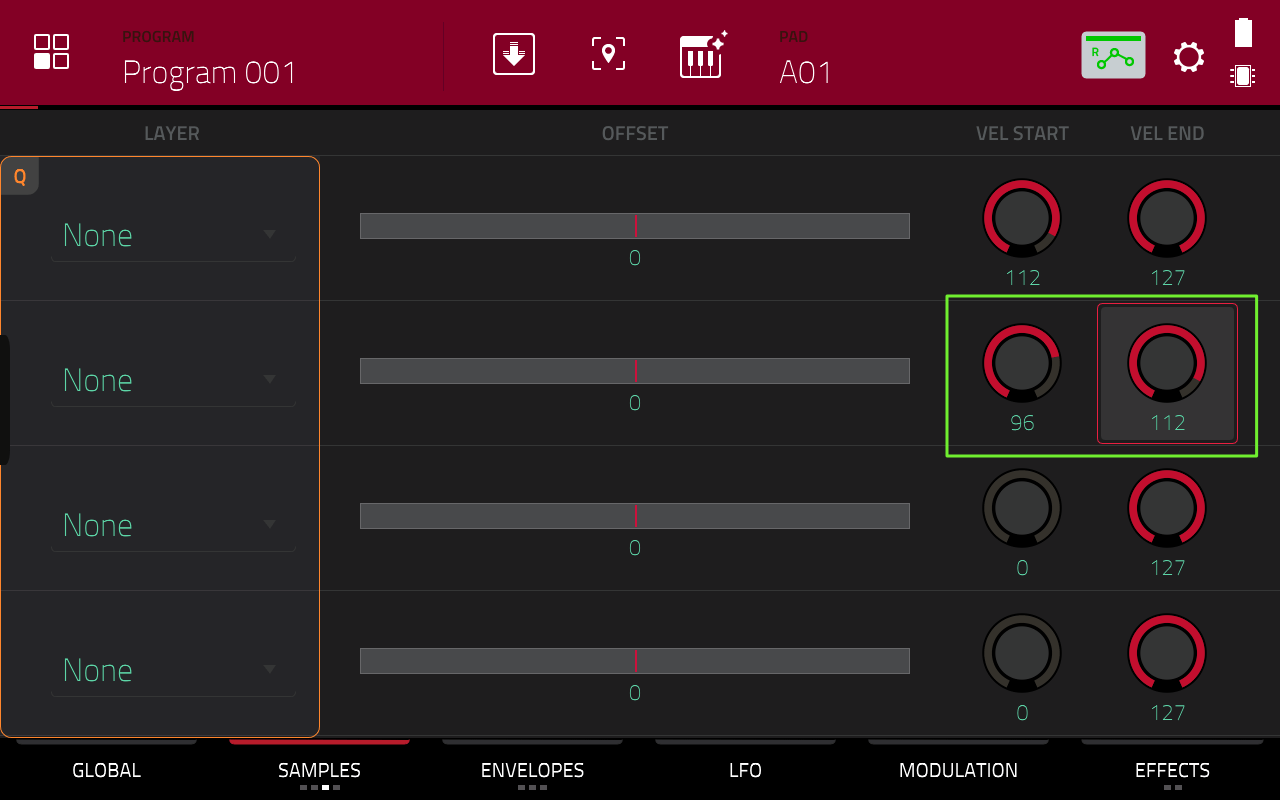
So LAYER 2 is only going to play when we hit pad A01 with a velocity of between 96 and 111.
Now configure the remaining two layers like so:
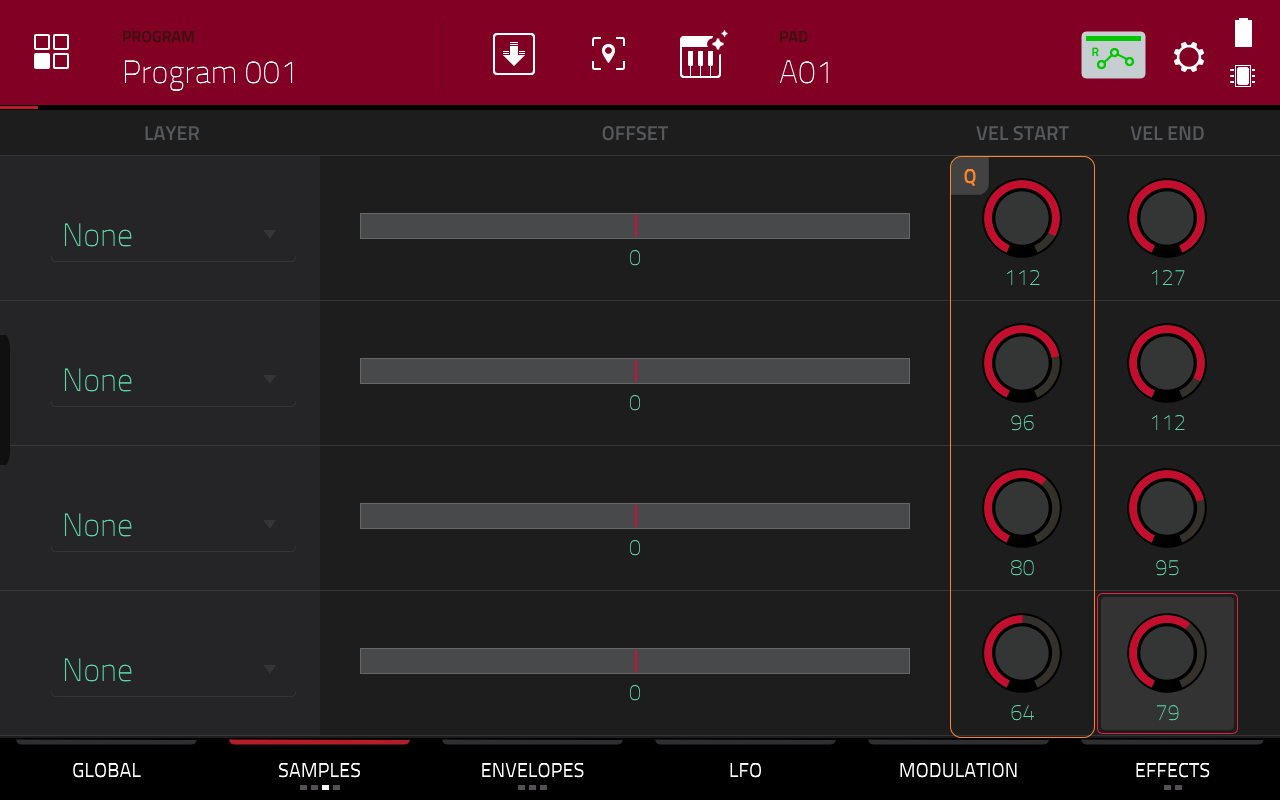
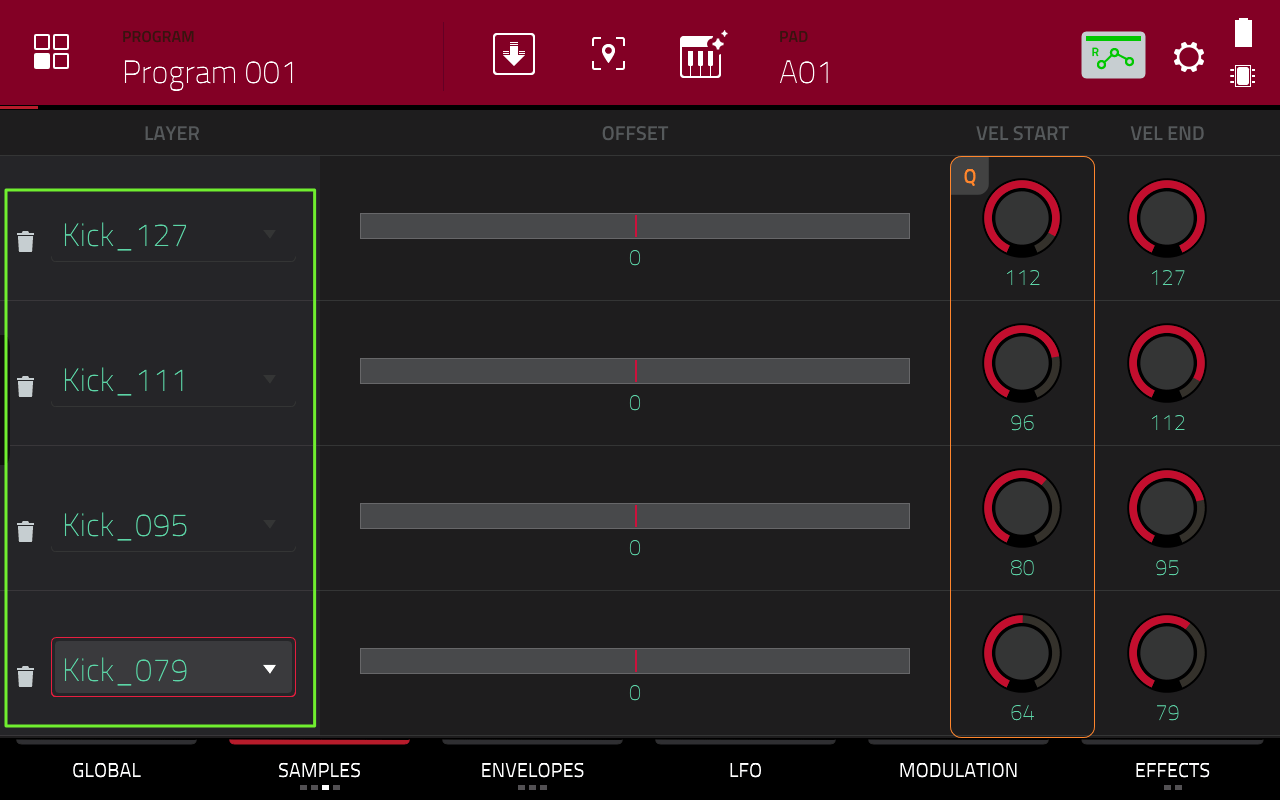
Now let’s assign some samples to these layers – tap on the sample name box for each layer and assign the samples as shown below (notice how the number in the sample name matches the ‘VEL END’ value; this is done purposely to simplify and speed up workflow when assigning many multisamples in kits like this):
So currently we have a 4 velocity layer kick drum on pad A01, but it’s limited to playback for hits only within the total velocity range 64-127. Any hit below a velocity of 64 will currently not produce any sound at all.
Configuring the Secondary Kick Pad
Now let’s set up the ‘secondary’ kick pad, which will handle all hit with a velocity of 63 or less. I like to place my secondary pads completely out of the way in different pad bank, but also like to ‘mirror’ the position to the primary pad.
Select pad bank E and hit pad E01. Now in the SAMPLES screen, set up the velocity ranges for E01 like so:
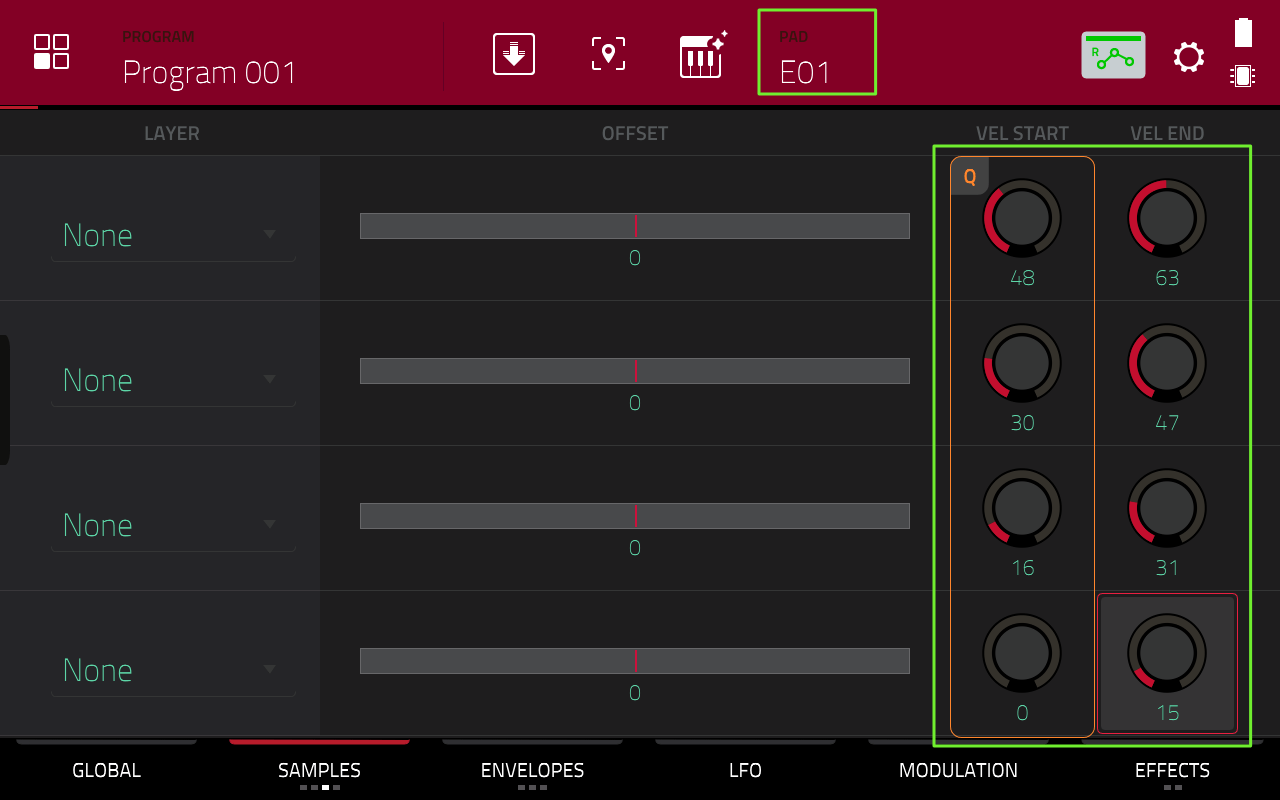
Now assign our remaining 4 kick drum multisamples (as before, just match the number in the file name with the VEL END value on each layer):
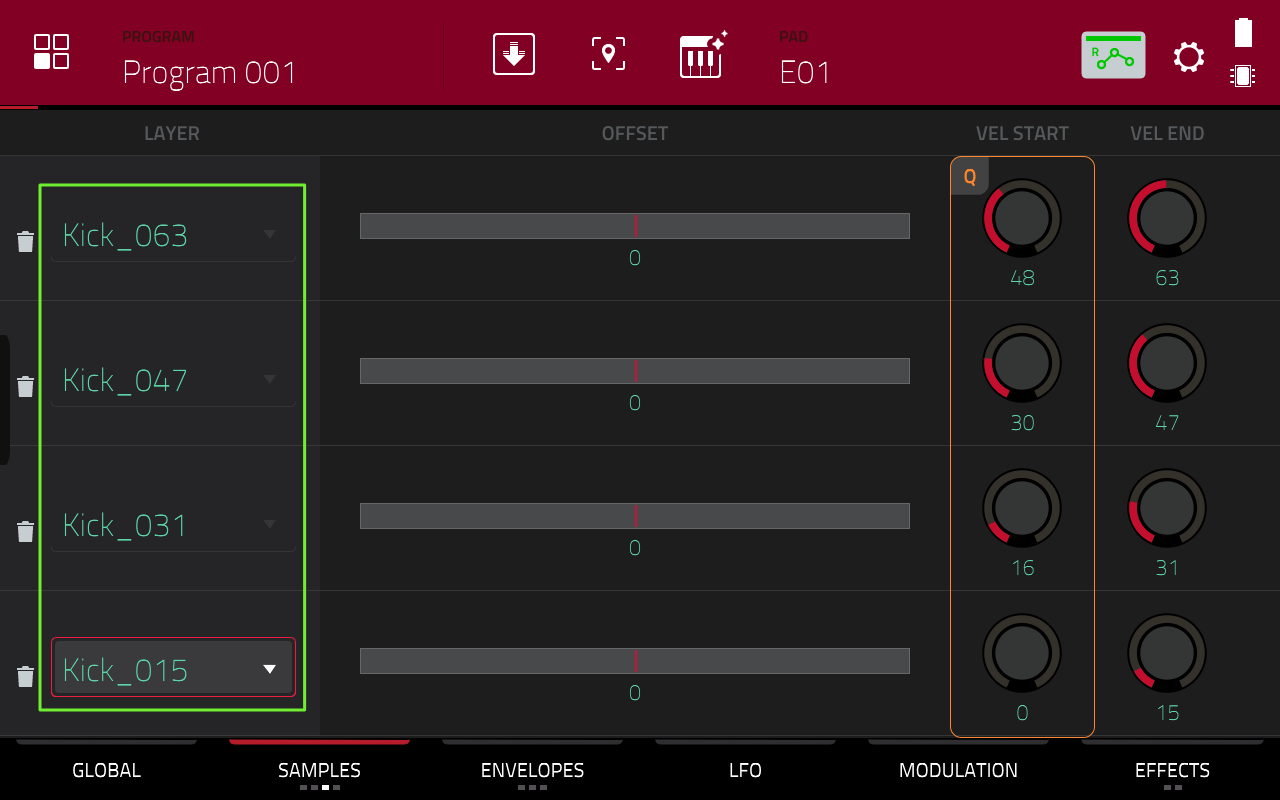
So our secondary kick pad, E01 now covers all velocities between 1 and 63. Any hit above a velocity of 63 on this specific pad will currently not produce any sound.
Configuring Simultaneous Play
As things stand we just have two completely independent pads. Tap our ‘primary’ kick pad A01 and go to PROGRAM EDIT > GLOBAL. On the right hand side we have the SIMULTANEOUS PLAY options. Set the first SIMULTANEOUS PLAY parameter from OFF to E01:
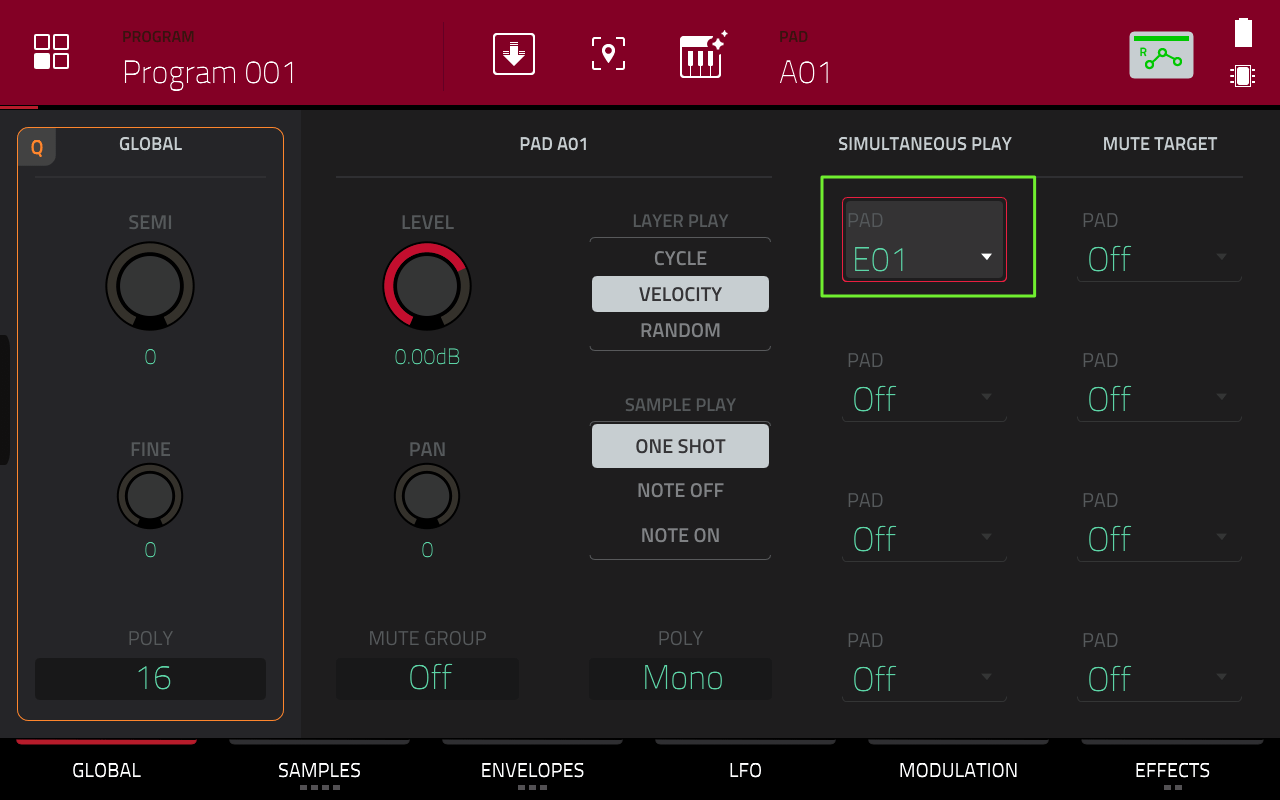
Now whenever you hit pad A01, it will also trigger the secondary pad E01. The layer that actually gets triggered will depend on how hard you hit pad A01.
Let’s test it out. First make sure you have turned off FULL LEVEL, otherwise all your pad hits will be stuck at 127. Now start hitting pad A01 at varying velocity levels; if you hit pad A01 at, say, a velocity of 69 then the sample assigned to layer 4 of pad A01 will be triggered. But if you hit pad A01 at a velocity of 24 then the sample assigned to layer 3 on our secondary pad, E01, will be triggered. We now have an 8 velocity layer kick!
Completing the Kit
At this point you can repeat the same procedure for the snare, closed hat and open hat. So the primary snare pad will be A02 with its ‘simultaneous play’ set to E02. The primary closed hat is A03, the secondary closed hat is E03. And the open hat will use A04 and E04. Once you’ve configured the velocity switching layers remember to assign the samples to the correct layers, matching the velocity number in the file name with the ‘VEL END’ parameter on each layer.
You can check out my completed 8 layer kit by loading ‘8 Layer Drum Kit.xpm’ from the Final Kit sub folder. Here I’ve also added some of my favourite kit tweaks, such as closed hat/open hat muting, improved ‘Velocity > Amp’ and polyphony settings and pad colours. You can find out more about these specific techniques in the MPC Bible. I also discuss mute targets and pad colours in my free Cycle Kit tutorial.
Troubleshooting
The most common issues you may encounter are:
- ‘Silent’ pad hits: make sure you’ve set the correct simultaneous play options for each pad, and also check your velocity switching layers. Also make sure you are playing the ‘primary’ pads in bank A, not the secondary bank E pads.
- No change in timbre when hitting pads at different velocities – make sure ‘full level’ is off (or not set to ‘half level’).
- Open Hats not always muted by closed hats – if you are using ‘mute targets’ to deal with open hat muting, remember that your closed hats are now spread across two pads, and so are your open hats. This means you have to configure both closed hat pads (A03 and E03) to target both open hat pads (A04 and E04). You can analyse my completed kit to see exactly how I did it.
That said, generally speaking for these types of kits it’s often simpler to use mute groups to handle muting.
Workflow Tip – Edit Multiple Pads Together
To keep this tutorial simple I just set up one drum at a time, but once you are comfortable with the basic workflow you can speed up the process by configuring the velocity ranges for multiple pads together. This can be done using the EDIT ZONES function, which I explained in the previous tutorial.
Alternatively you don’t even need the EDIT ZONES screen; while in PROGRAM EDIT just hold down SHIFT and press pads A01, A02, A03 and A04 – you’ll now see the top of the screen shows which pads are currently selected together:

Now when you set the velocity ranges on pad A01 they will also be applied to A02, A03 and A04. To return to the default single pad editing, just SHIFT & tap any pad that is currently selected – you’ll see those pads disappear from the list at the top of the screen. Just be aware that when there’s only a single pad in the list and the EDIT ZONES icon still shows the ‘multiple’ icon like this:
![]()
then you should SHIFT and tap that last pad again (in this example, A01), so the icon changes to the default ‘current’ (single pad) icon:
![]()
Now that you are back to standard single pad editing, don’t forget to set the simultaneous play options (these are unique for each pad so you’ll always have to assign these in single pad mode).
8+ Layer Kits: Pros & Cons
Drum kits utilising 8 or more layers per articulation produce a richer dynamic sound and are perfect for use with multisampled acoustic instruments. And with 4 ‘simultaneous play’ slots available for each primary pad, you can in theory build kits that utilise as much as 20 velocity layers per articulation.
In my tests these kits do not use any extra CPU compared to standard kits, but do remember that more layers means more samples, and hence more memory. If memory usage becomes a problem, remember to use mono instead of stereo samples, with stereo imaging for the kit created using the pan controls in the MPC’s pad mixer (and by use of stereo FX). Also consider limiting the number of layers used for excessively long cymbal samples (ride, crash and open hats), and reserve the 8+ layers for instruments that tend to be much shorter such as closed hats and kicks.
One other thing to remember is that any changes you wish to make to the primary pad will normally have to be replicated to all the ‘simultaneous play’ pads associated with it. For example, if your closed hat on A03 is panned to the left, make sure the secondary closed hat pad on E03 is also panned left by the same amount!
Multisampled Kits and Sample Chains
Stay tuned for the next tutorial in this series, where I explain how we can use ‘sample chains’ to significantly speed up loading times of sample heavy multisampled kits and instruments (as well as some interesting creative sample chain uses that I’m using in my forthcoming expansions).
In the meantime, if you’re looking for some expansions that make use of 8 or more dynamic layers, check out my 1977 Session Kit, The Piano Suite and Electric Keys, all of which also utilize sample chains for rapid loading performance in the MPC and Force browsers.


Leave a Reply