In this first of a 3 part series, we’re going to take a deep dive into the velocity switching techniques I use to create my multisampled acoustic drum kits.
In this first part I’m going to cover the basics of velocity switching by building a simple 4-layer kit from some acoustic multisamples. In part two we’re going to discover a method of increasing the native MPC layer support to 8 (or more) layers, giving even greater realism to our kits. Finally in part 3 I’m going to introduce you to sample chains, which significantly speed up the loading of sample-heavy kits in MPCs and the Force. This tutorial is primarily for standalone MPCs, but can be easily adapted to work in the Akai Force and the MPC Software/MPC Beats.
Why Velocity Switching?
Real acoustic drums are very dynamic instruments and their sound varies quite dramatically depending on how hard you hit them. For example, a hard hit snare is not only loud, it also sounds bright with a sharp ‘crack’ and a long decay. A lightly hit snare on the other hand is not only quieter, it is also it also sounds softer, darker with much less decay. We refer to these changes in sound as a change in ‘timbre’.
While the MPC has features which can be used to artificially emulate these dynamic changes in timbre (using velocity sensitive tuning, filters and envelopes), far more realistic results can be achieved by actually recording each drum at a number of different velocities (soft hit, medium hit, hard hit etc) and combining them together with the MPC’s built in velocity switching functionality.
Loading the Multisamples
Download the tutorial files, unzip and transfer the ‘Velocity Switching Tutorial’ folder to your MPC disk.
In your MPC, start a new project (MENU > NEW PROJECT). Now go to BROWSER > Places, select your MPC disk and enter the Velocity Switching Tutorial’ folder
Here you’ll see the ‘4 Layer Multisampled Drums’ folder which contains all the samples we’ll be working with in this tutorial. Single tap to select it, hold down SHIFT and select LOAD ALL:
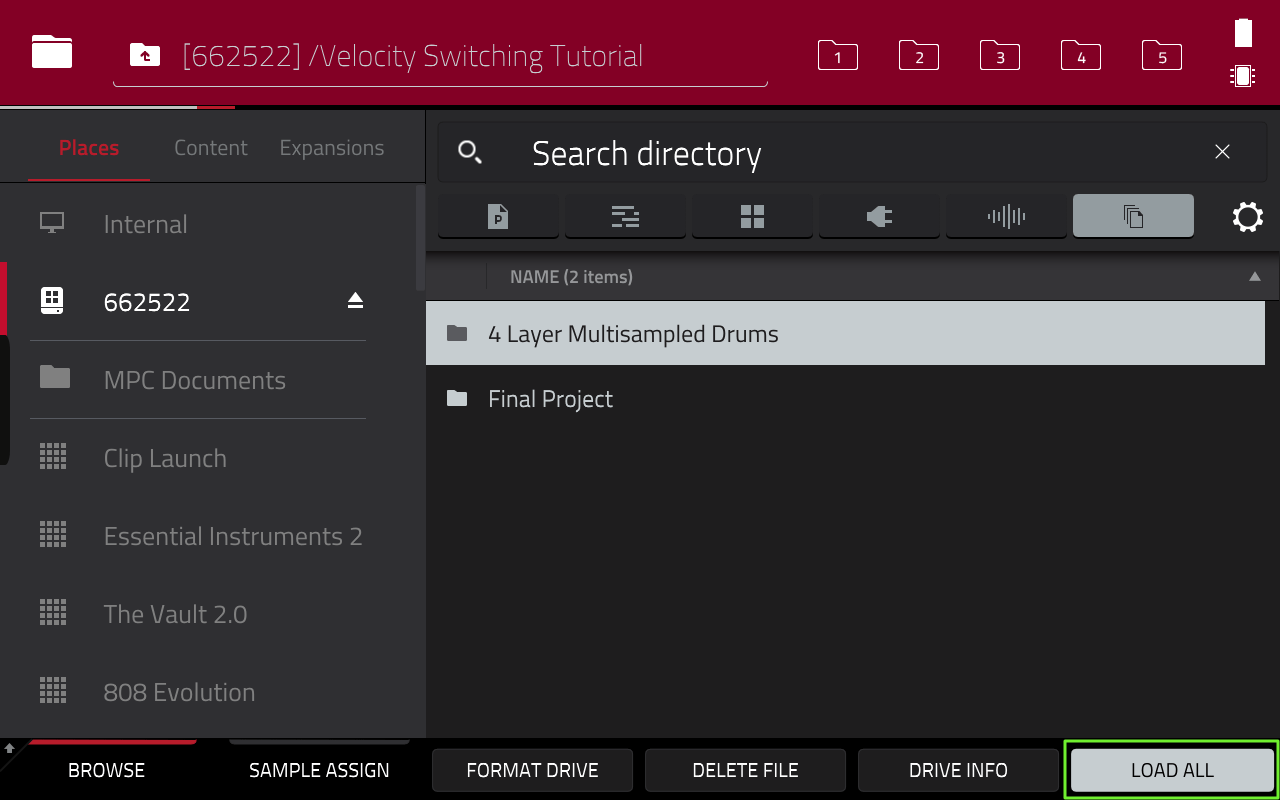
This will load all the multisampled drums directly into your project. You can check the current contents of your project via MENU > PROJECT:
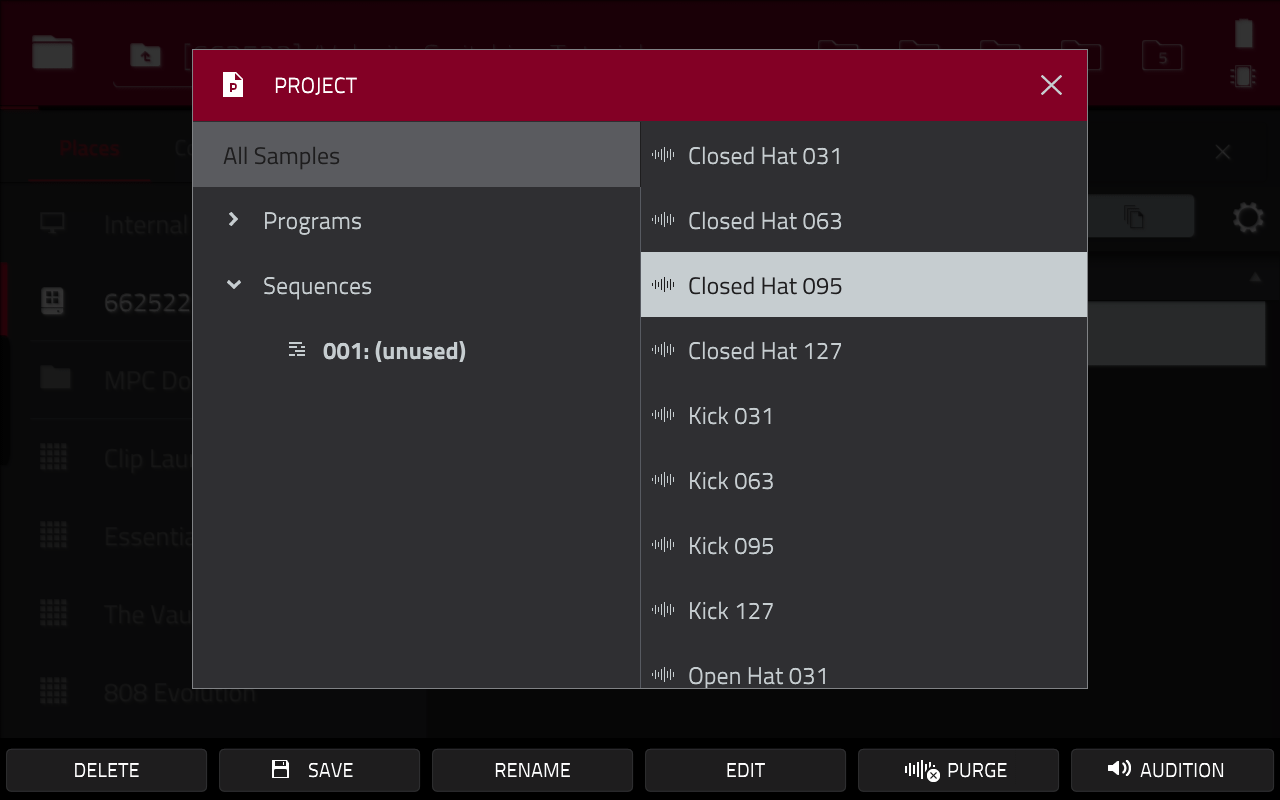
Inside you’ll see there are four unique drum instruments; kick, snare, closed hat and open hat with 4 unique samples provided for each instrument, each recorded at a slightly different velocity. A guideline velocity is included in the filenames themselves – the higher the velocity, the harder the hit; for example, Snare 031 is the lightest hit snare drum, while Snare 127 is the hardest hit snare drum.
Where can I get multisampled acoustic drums from?
To record all my multisampled acoustic kits I hire a local studio and bring in a session drummer, but if you don’t have the budget for this you can find multisampled drums all over the internet, some free, some to purchase. You can also try chopping up live acoustic drum breaks using the MPC’s own chopping functions.
Single tap to preview the samples to hear the variation in timbre changes for each instrument (for auto-play, press the AUDITION button and make sure AUTO is enabled):

Configuring the Pads
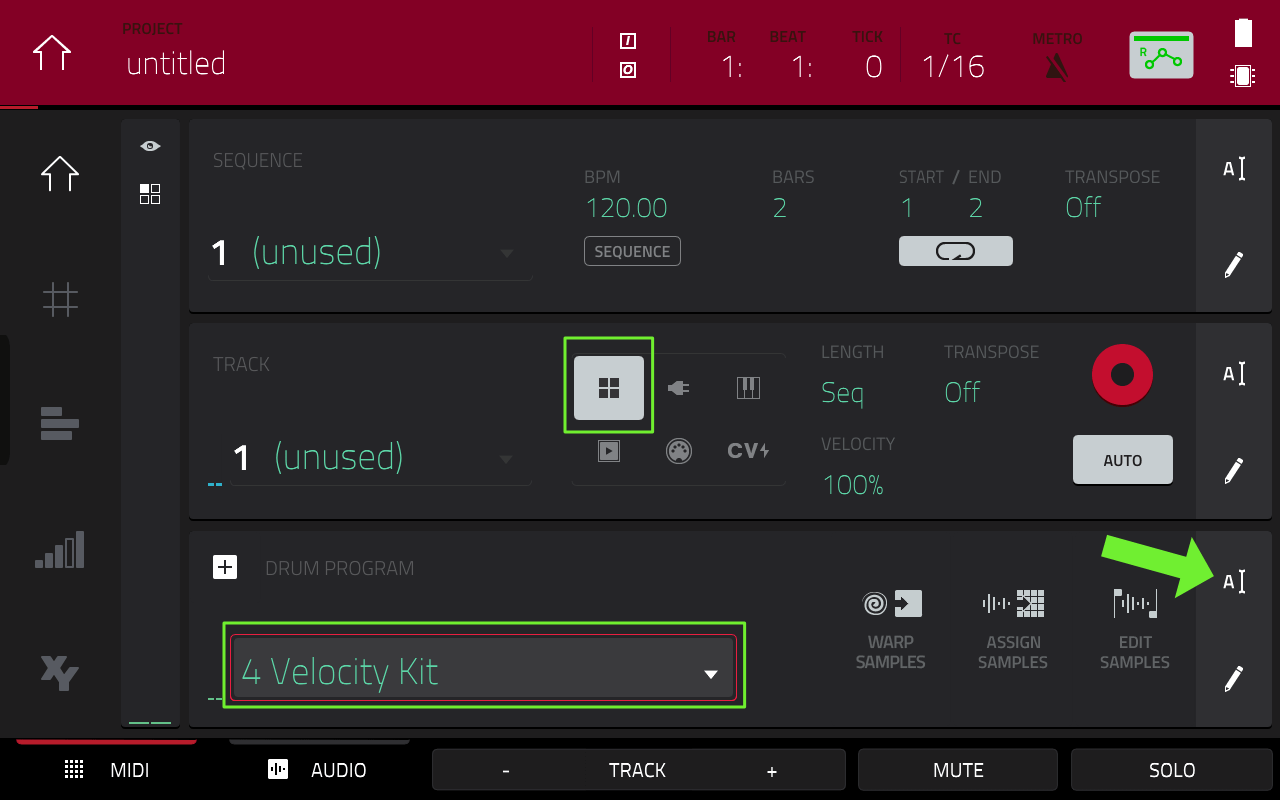
Go to MAIN and make sure track 1 is a ‘DRUM’ type track. Use the A icon on the DRUM PROGRAM row to rename the default program to 4 Velocity Kit:
We’re going to set up this program with kick, snare, closed hat and open hat on pads A01 to A04 respectively. The first step is to set up our velocity switching settings.
Go to PROGRAM EDIT > SAMPLES and press the SAMPLES button two more times to reveal the velocity range page:
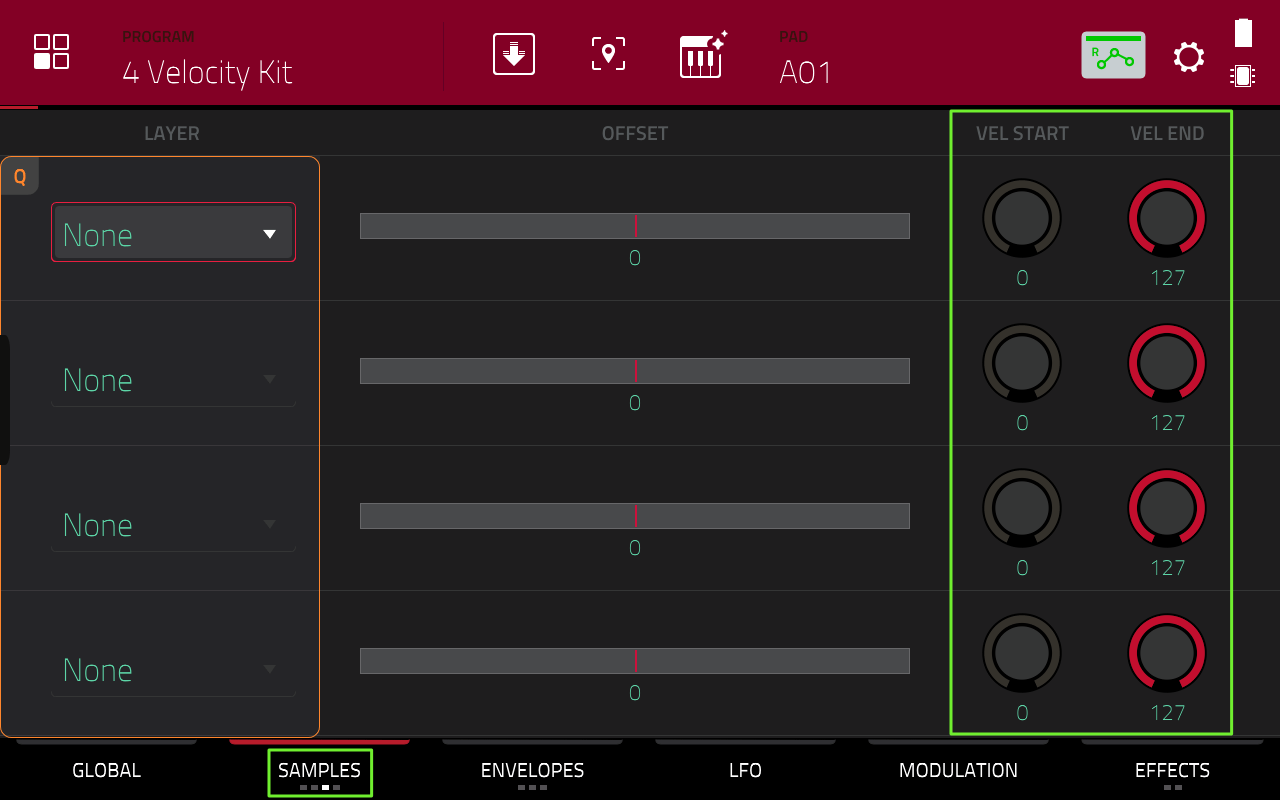
By default each layer in a pad is set to trigger over the entire velocity range (0-127, indicated by the VEL START and VEL END parameters). With this default configuration the pad will simply play all four pad layers together, no matter how hard you hit the pad. This is of course great for drum layering (see my Clap From Hell tutorial). However by limiting the velocity range for each layer we can force the pad to play only a single layer at a time, dependant entirely on how hard we hit the pad.
![]()
This brings up the EDIT ZONES screen; select the MULTIPLE tab. Now tap on pads A01, A02, A03 and A04 so all four are shown in red on screen:
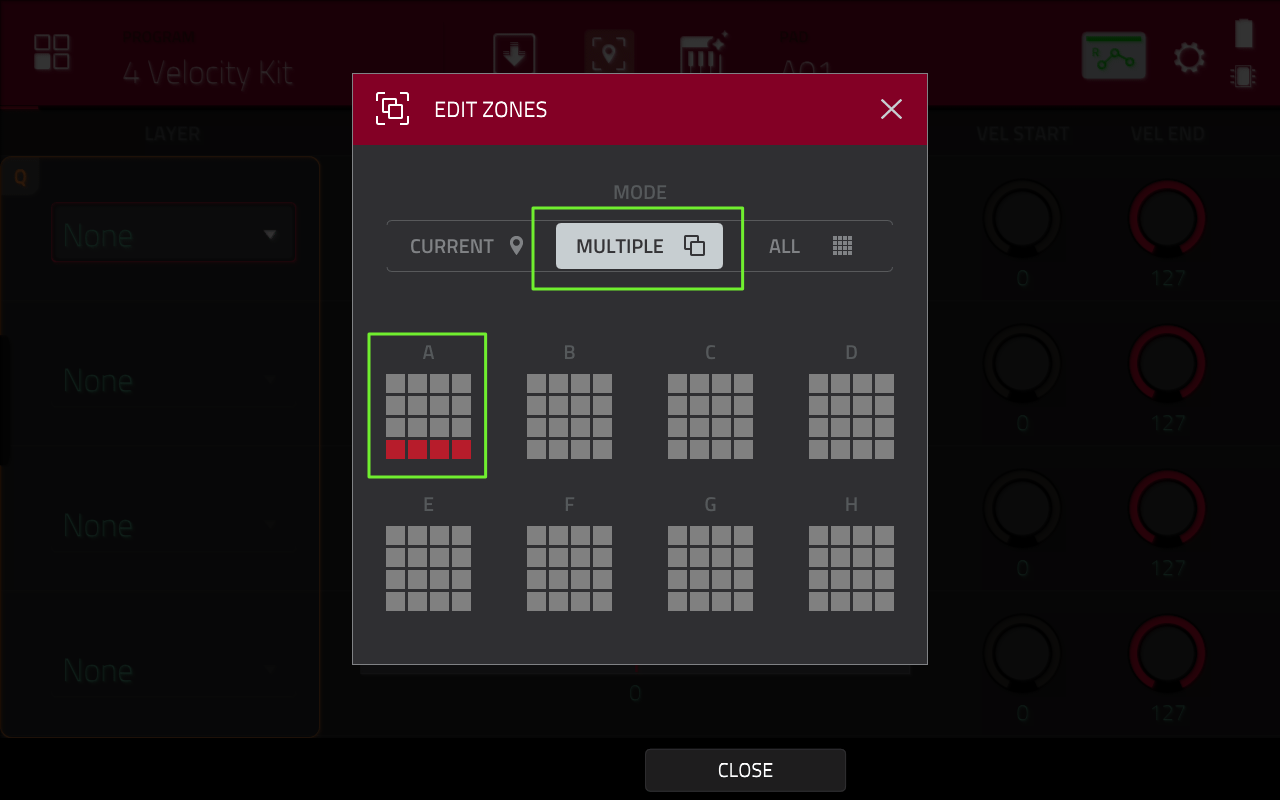
If you hit the wrong pad accidentally, just tap that pad again and it will de-select it from the MULTIPLE screen.
With all four pads selected, hit CLOSE. The top of the PROGRAM EDIT screen now shows the currently selected pads:

When multiple pads are selected like this, any changes you make to program parameters on one pad will be mirrored identically across all the other pads.
Multiple Pad Exclusions
Nearly all program parameters can be edited simultaneously across multiple pads using the MULTIPLE or ALL options in the EDIT ZONES screen (‘ALL’ selects all 128 pads in a program).
However, FX and warp settings are excluded from this feature. I assume this is because adding FX inserts to many pads is a CPU drain so Akai force you to add these one pad at a time to hopefully discourage it.
‘Velocity’ is measured on the scale of 0-127, so let’s divide this range equally over the four pad layers. Configure your pads with the following velocity ranges on each layer:

LAYER 1 is set to cover the velocity range of 96 to 127. This means that any pad hit that has a velocity between 96-127 will trigger the sample assigned to LAYER 1.
LAYER 2 covers velocities 64 to 95. So any pad hit between 64 and 95 will trigger layer 2, and only layer 2. LAYER 3 covers velocities 32 to 63 and LAYER 4 covers 0 to 31.
Alternative Way To Select Multiple Pads
An alternative to the EDIT ZONES screen is to hold down SHIFT and tap on the pads you wish to edit simultaneously. With SHIFT still selected you can tap a pad again to de-select it.
Configuring the Samples
With the velocity ranges for each layer configured, let’s add our samples. Before we do this, we must cancel MULTIPLE mode because we now want to assign unique samples to each individual pad. So, tap on the EDIT ZONES icon again and simply set to CURRENT. Press CLOSE and press pad A01 – you should see the top of the screen now only shows A01 as being selected.
Double tap ‘None’ on LAYER 1 to bring up the sample list (or single tap and turn your data wheel to move through the available samples). Layer 1 needs to serve the hardest hit kick drum, so let’s assign our hardest hit kick sample here, which is Kick127. Then assign our next hardest kick (Kick_95) to LAYER 2. On Layer 3 assign Kick_63. And finally on LAYER 4, assign our softest kick sample, Kick_31:
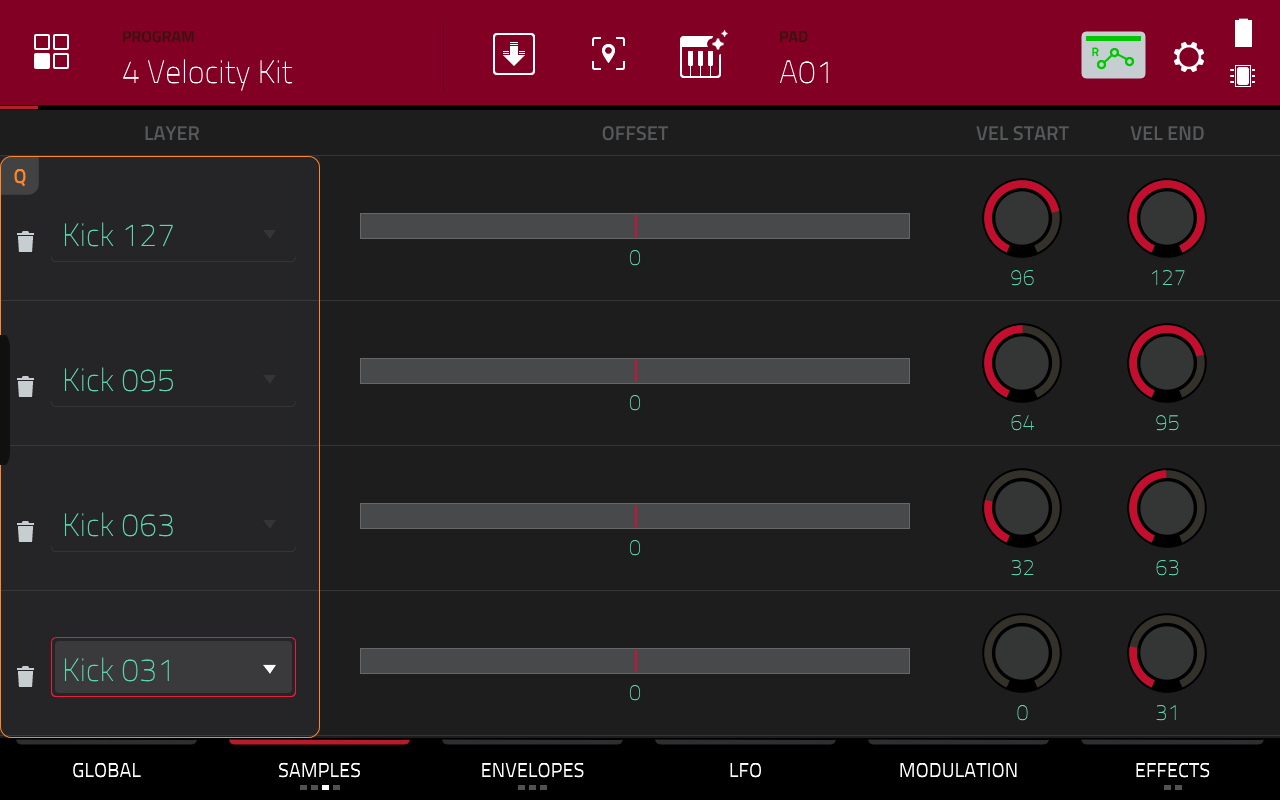
The basic velocity switching configuration for this kick pad is now complete. Make sure FULL LEVEL is turned off and start playing pad A01 at varying velocities. You should hear how the MPC is now triggering different pad layers (and hence different kick dynamics) depending on the velocity you hit the pad.
So for example, if you hit the pad with a velocity of 85, the pad will play the kick assigned to layer 2 (which covers velocities 64-95). Hit the pad at a velocity of 10, and it plays the softest kick on layer 4.
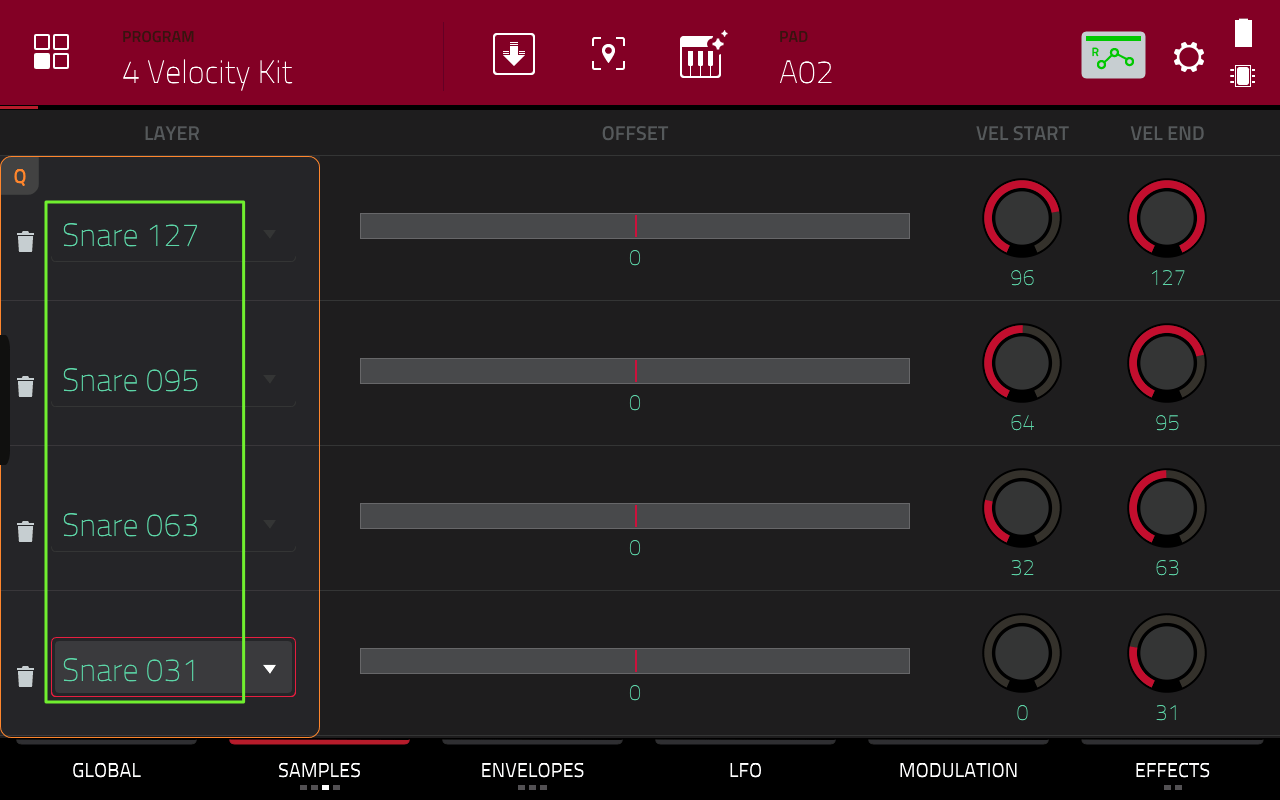
Now select pad A02 and repeat this entire process, but this time assigning our snare samples in descending velocity order like so:
Repeat on pad A03 for the closed hat and pad A04 for the four open hat samples. Have a play of all four pads to hear all the dynamic velocity switching in action.
Tweaking The Kit
Next just a bit of housekeeping. First let’s set the closed hat to ‘choke’ (or ‘mute’) the open hat, this helps emulate the open/close hi hat sound in a real drum kit. Go to PROGRAM EDIT > GLOBAL, select the closed hat on pad A03 and set the first MUTE TARGET from OFF to A04:

Check to see if it’s working by playing the open hat on A04 and quickly hitting the closed hat on A03. You should hear that the closed hat instantly mutes the open hat.
The next tweak is related to the pad polyphony. By default, all pads in a DRUM program are set to play monophonically with themselves; that is, if you play the open hat multiple times in succession, each open hat hit cancels out the previous hit.
While this seems to make sense, in reality it can make most drums sound a little artificial as you can often hear the previous sample being suddenly muted (especially on cymbals, or where a loud hit is followed by a very quiet hit).
Tap on the EDIT ZONES icon and press MULTIPLE again .The MPC should have remembered your previous 4 pad selection, but if it hasn’t just hit all four pads again so they are all selected in the on-screen grid and press CLOSE. Now in the GLOBAL screen, set POLY from Mono to Poly:

One other worthwhile tweak is related to the way the pad’s volume reacts to any velocity changes. By default all pads in an MPC program have a volume output that is completely velocity sensitive. This is what makes the entire pad sound quieter when played at low velocities, and this works well when we only have a single sample assigned to a pad as this emulates the way soft drum hits sound quieter.
The problem is that our dynamically recorded samples already account for these volume changes; that is, the ‘softly’ played samples are already really quiet, while the hard played samples are already much louder, so we don’t really need the pad itself further adjusting the volume of each sample as it makes the softer samples really quiet.
To disable this feature entirely, go to PROGRAM EDIT > MODULATION and in the second VELOCITY SENSITIVITY column, reduce the AMP (‘Amplitude’, i.e. ‘Volume’) setting from 127 to 0:
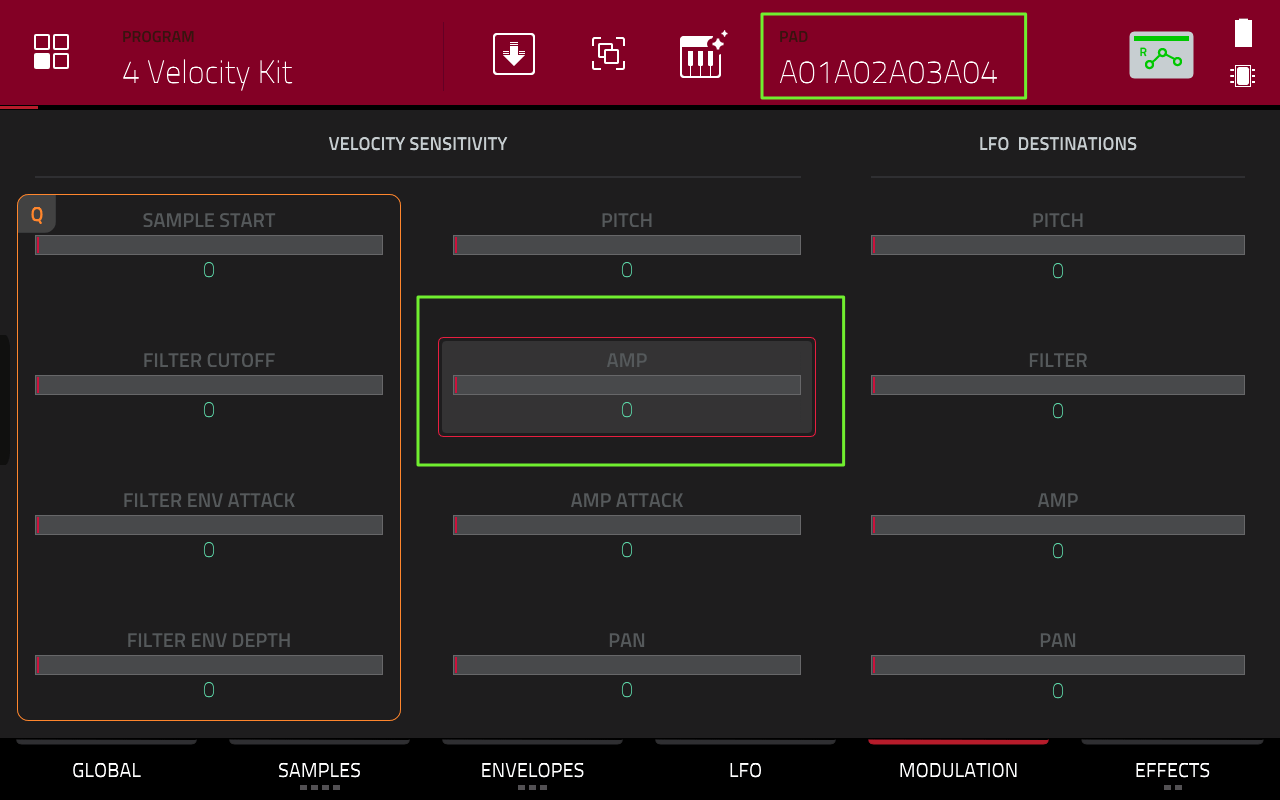
With this set to 0, the pad itself will output at the same volume no matter what velocity you hit the pad. This leaves the output volume entirely in the hands of the samples themselves.
That said, you can try higher AMP settings if you feel the MPC needs to provide some volume adjustment. Remember we only have 4 dynamic layers here, so we’re not perfectly recreating the original dynamic range (the more dynamic layers the better, as we’ll see in part 2). Just experiment until you find the setting that works best for the samples you have, but it’s likely to be quite a low AMP value.
Remember we’re still in MULTIPLE mode, so any changes to the AMP’s velocity sensitivity is reflected across all four pads; if you want to adjust each pad individually, remember to set EDIT ZONES back to CURRENT.
If you want to save your work, either save the entire project, or save the individual program via MENU > SAVE > Drum Program.
Velocity Switching vs ‘Cycles’ or (Round Robins)
In a previous tutorial we used a different technique to build a realistic sounding acoustic drum kit. Here we assigned ‘round robins’ to the pad layers and configured the layers to play in a ‘cycle’. This produced a slightly different ‘take’ of the same drum sound each time the pad was played.
These ‘Cycle kits’ work really well when you intend to hit the pads at the same velocity (often with FULL LEVEL turned on). However they are not as suitable when trying to capture the full dynamic range of an acoustic kit, simply because all the lower velocity hits are ‘emulated’ using velocity sensitive program parameters (e.g. velocity sensitive filtering and attack, and so on – I cover these techniques in a lot of detail in the MPC Bible).
In an ideal world we would combine both techniques on each pad so each velocity switching layer would also contain a number of round robins, but unfortunately the MPC does not support this. One workaround is to include separate ‘ghost’ note pads which feature lower velocity round robins (I use this technique in my Dirty Drummer kits), but ideally Akai will eventually implement the option of combining round robins and velocity switching on a single pad.
4-Layer vs Single Layer Kits
Head back to the BROWSER and from the tutorial folder enter the Final Project folder and load up the project file Comparison.xpj. This project contains two identical drum sequences which both contain the same MIDI drum pattern on track 1 – you can view the pattern via GRID EDIT:

As you can see, the pattern itself is very ‘dynamic’ with a wide range of different velocities (it’s from my Funk Drum Patterns expansion and was created from a real drum performance). Press MAIN, select sequence 1 and press PLAY START. This sequence uses my own version of the 4 Layer Kit we built in this tutorial.
Now select sequence 2 and press PLAY START. This version of the sequence uses a single layer version of the kit which I built using only the hardest velocity samples. I’ve also re-enabled the AMP velocity sensitivity to at least give it a bit of a chance against the 4 layer kit.
Compare the two sequences; you should hear that the first sequence sounds more realistic especially at the lower velocities and snare rolls. While sequence 2 is just playing hard velocity hits at a reduced volume, sequence 1 is playing samples that were actually recorded at these lower velocities so they possess the more natural and realistic timbre changes.
Increasing the Layers For Even More Realism
In part 2 of this series I show you a trick that uses ‘simultaneous play’ workaround the 4 layer pad limit, giving us 8 (or more) dynamic layers per pad, as seen in my 1977 Session Kit expansion.
One Response
Leave a Reply

Latest Posts

"Electric Bass 3 - Now With MPC Sample & MPC3 Support
MPC Bible 3, Revision 6 - MPC Oscillators, MPC 3.9, MPC One G2 + MPC Key 37 G2

Downbeat Kit 3 - Acoustic Drum Kit Expansion For MPC3

MPC Bible 3, Revision 4 - Clip Matrix, MPC 3.7 + MPC XL

Jun 4, 2023 6:23 pm
Appreciate all your info and hard work. And your drum kits are Grade A! Thank you!