Do you back up your MPC projects regularly, or is this one of those ‘I’ll definitely do that later’ tasks that you never get round to? Backing up your work is probably the last thing you want to do at the end of a long day in the studio, but what’s going to happen to all your MPC projects should your disk ever fail? How much of your hard work are you willing to lose?
Maybe one day Akai will implement a fully automated cloud backup system for standalone MPCs, but in the meantime let’s look at possible back up strategies for standalone MPC and Akai Force users, as well as some useful tips to mitigate data loss in general.
Step 1: Stop Saving to the Internal Disk
Before we go any further, let’s start our backup strategy with perhaps the most vital step. You may have already seen this advice repeated ‘ad-infinitum’ across social media, and for many good reasons. Apart from ensuring your MPC runs smoothly and without any hiccups the key point from a backup perspective is that the internal drive on your MPC cannot be directly accessed for backup purposes .
When you connect your MPC to your computer via USB (using ‘controller mode), the internal ‘factory’ drive (the one that contains your ‘MPC Documents’ folder) is completely invisible so any work you save on this drive cannot be directly backed up.
Hence the essential first step of an MPC backup strategy is to stop saving to the internal MPC disk and instead save all your work to one or more ‘attached disks’ (e.g SD cards, USB drives or if you have one, an internally installed ‘SATA’ disk). These disks will appear whenever you connect your MPC to your computer via USB, at which point their contents can be easily backed up.
Which type of attached disk type to go for? Well each disk type has its own pros and cons and I cover this in more detail in my ‘Standalone MPC Disk’ guide.
Already saved some projects to your internal disk? No problem. While there’s no dedicated file moving functionality in the MPC browser, you can load up a project into memory and go to ‘MENU > SAVE > Project As’ and simply re-save that project to your preferred attached disk. Repeat this for all your ‘internally saved’ projects.
Step 2 – Regularly Save Your Active Project
If you’ve ever worked on a project for hours and then had a power failure, or your MPC suddenly crashed, you’ll know how important it is to be continually saving your work at regular intervals. You can manually save via MENU > SAVE > Project, but you can also configure the MPC to do it for you.
Simply go to MENU > PROJECT LOAD/SAVE > AUTO SAVE:
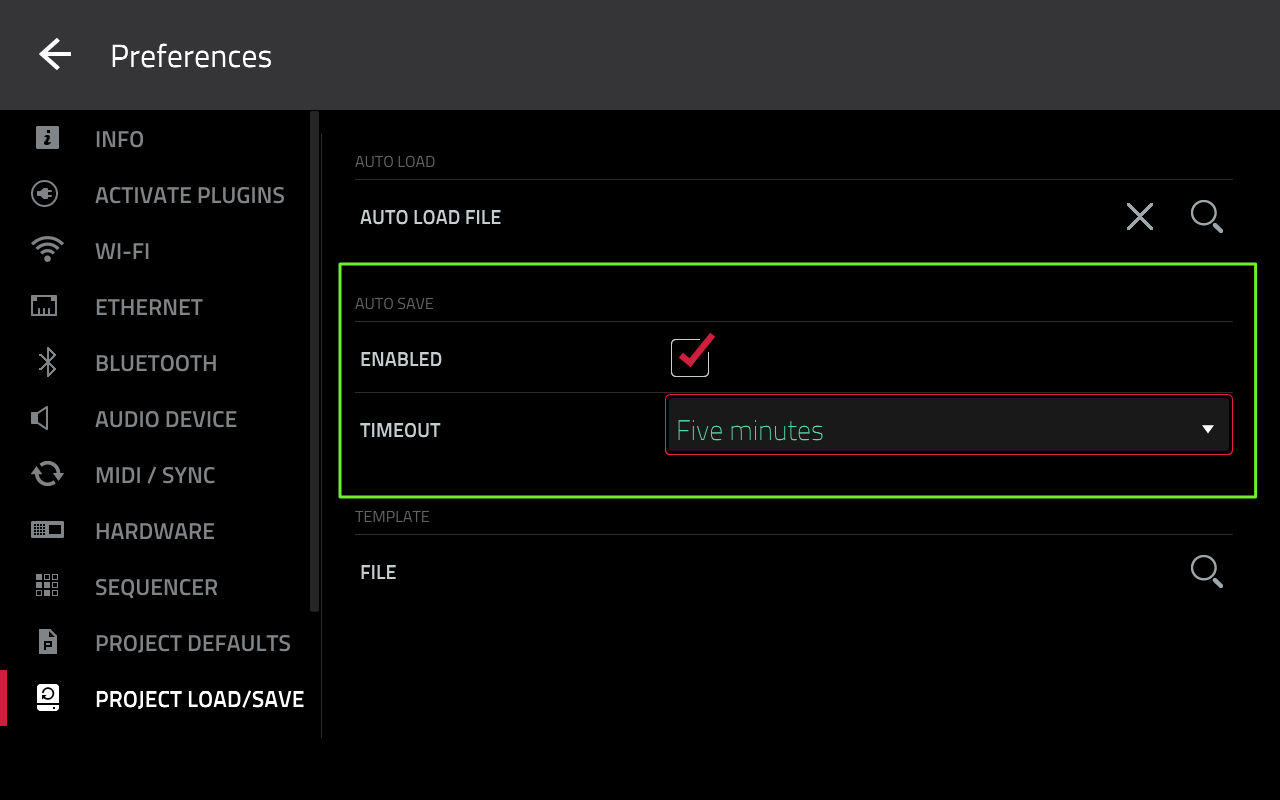
Check ‘ ENABLED’ and set a TIMEOUT (e.g. 5 Minutes). Now the MPC Will automatically save your current project every five minutes, so worse case scenario is that should your MPC crash, you’ll only lose the last 5 minutes of work. When you next load that project you’ll be asked if you want to load the last ‘auto save’ version.
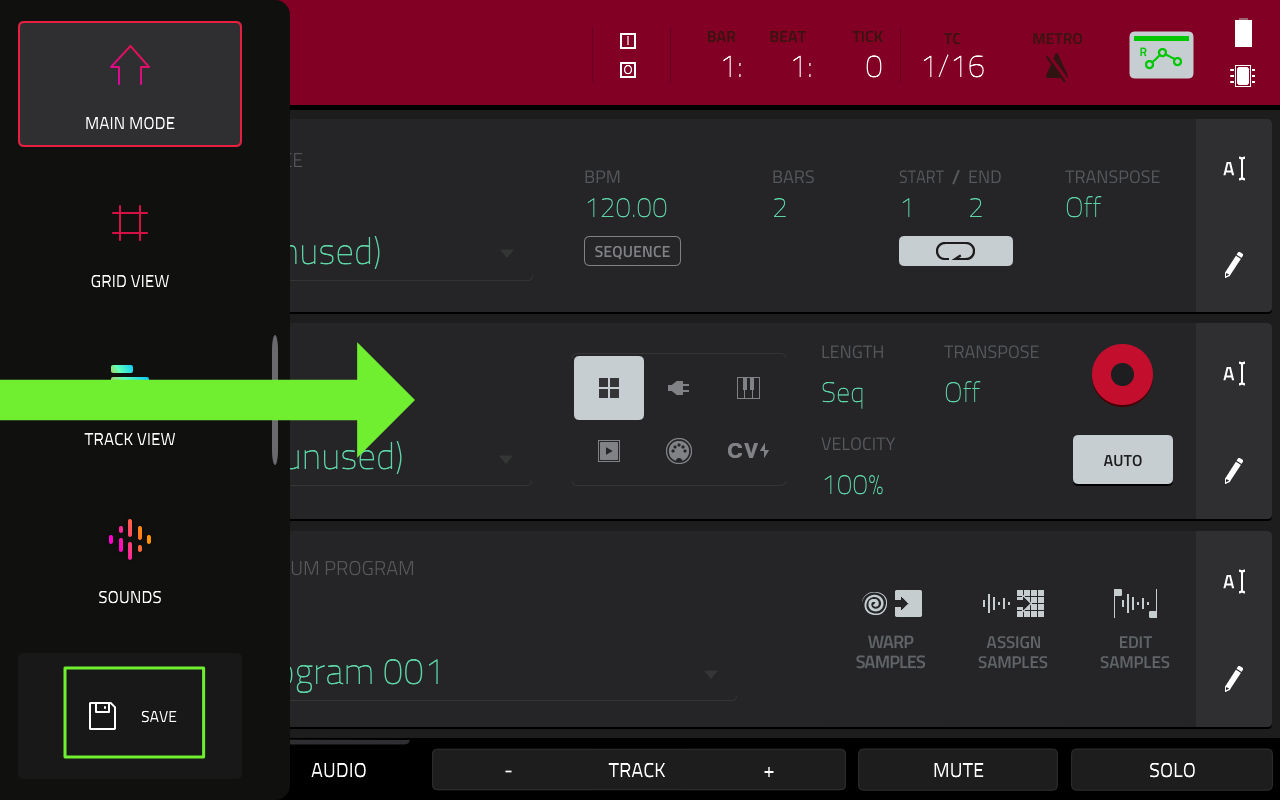
Just be aware that whenever auto save runs it temporarily freezes your MPC until the saving process is completed. So if you prefer to stick with manual saving, consider setting a shortcut to the ‘SAVE’ screen on the left hand pull out menu – in MENU, press EDIT and drag the SAVE icon to the far left hand side of the screen:
![]()
Now whenever you wish to save, drag your finger from the left hand edge of the screen to reveal the pull out menu:
Step 3: Connect Your MPC disk to Your Computer
With all your important now regularly saved to your preferred attached disk, you are now free to formulate a practical MPC backup workflow. The most important part of any backup solution is to keep it as simple and hassle-free as possible. If it becomes too much of a chore, you’ll just not bother with it.
The main requirement here is to connect your MPC disks to a computer – from here you can either manually backup your work (by copying and pasting from MPC disk to a separate backup disk), or you can use computer software to completely automate the backup process for you.
So, what’s the best way to actually connect your MPC disks to a computer? Well, you could physically remove an SD card or USB drive from your MPC and connect the disks directly to a spare port on your computer. However this is generally a bit of a pain and it’s not possible to do this with an internally installed SATA drive.
Instead, we’ll use Controller Mode (or ‘ Computer mode’ in the Force). With this method you leave your disks connected to your MPC and instead connect your MPC itself to your computer using a USB cable.
Once connected, in your MPC/Force, go to MENU and hit the MPC CHIP icon at the top right of the screen:
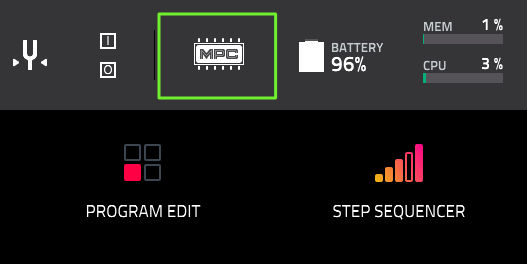
Now select ‘ Controller Mode’ (‘or ‘Computer Mode’ in the Akai Force).
In your computer open up Finder (on a Mac) or File Explorer (Windows) and you should see your MPC disk(s) appear as removable drives alongside all the other drives currently attached to your computer.
If you have multiple disks attached to your MPC (e.g. SD card, USB disk, and perhaps also an internal SATA disk), then all these disks will appear here.
Remember that when you connect a disk to your computer it should be ‘ejected’ within your computer OS before it is physically disconnected – see the note at the end of this article for more details.
Step 4: Choosing Your Backup Method
With your MPC disk(s) now connected to your computer and available as removable disks, we can now proceed with backing up your work. There’s three main options here:
1. Manual Backup – simply copy the folders you need to backup and paste them to a preferred location on your computer (e.g. a ‘backup’ folder on a USB drive). Requires ongoing effort to actually perform the backup.
2. Automated Cloud Back Up – Automatically back up your MPC disk to the cloud using services such as Google Drive and Dropbox. Has the advantage of being completely ‘off site’ so are immune to any local catastrophes such as backup disk failure, fire, theft etc. Limited free storage space (but extra space fairly cheap)
3. Automated Local Backup – automatically back up your MPC disk to other local disks or network drives using dedicated backup software. No storage limitations and full control of your data as there’s no third party servers involved. No ongoing fees, but you will have to budget for the purchase of a backup disk and an initial purchase fee for the app itself.
Step 5: Cloud Backup Example
There’s many cloud providers out there and most of them can be used to backup removable disks on your computer, typically running the backup process whenever that disks is connected. I’m going to use Google Drive in the following example, but I can confirm that this workflow also works with Dropbox and Mega, and most likely other providers (the key criteria is that they support backup of removable disks).
Most of you probably already have a Google account, if not you can easily set one up and you’ll immediately get 15GB of cloud storage for free (as well as a Gmail address). Now download and install the free Google Drive desktop app; launch the app and log in with your Google account details.
Connect your MPC to your computer via controller mode and make sure your ‘MPC disk’ (e.g. SD card etc) is attached; at this point you should see a pop up screen in your computer which will take you to preferences; if not, just open the Google Drive app and select the Preferences screen:
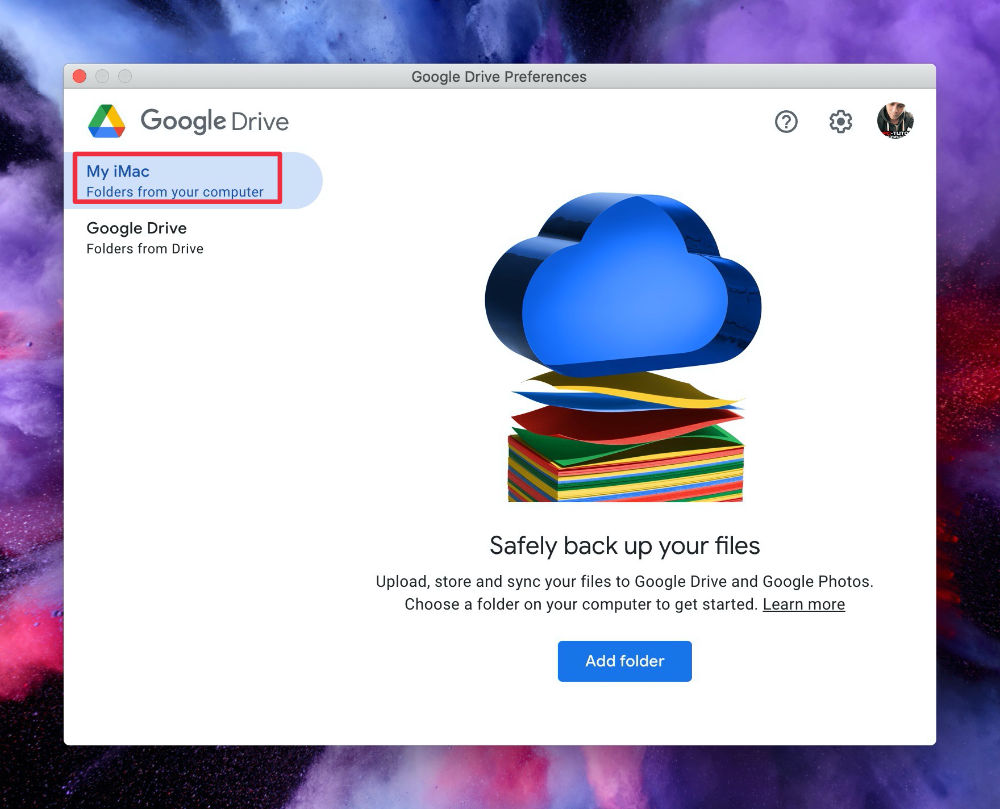
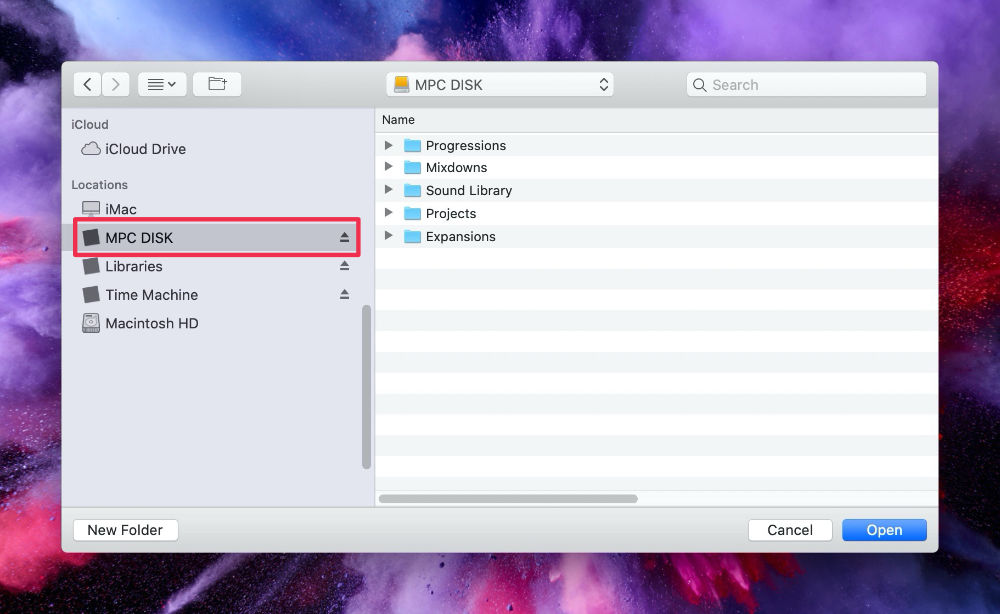
Hit ‘ Add Folder’ and select your MPC disk:
Hit ‘ Open’ to back up the entire disk or if you prefer, first select a specific folder for backup (e.g. the folder that holds your projects).
Now select ‘ Sync With Google Drive’ and hit Done .
The procedure is very similar with Dropbox and Mega, so whichever service you go for your MPC disk is now set to automatically backup to your cloud account whenever you connect that disk to your computer. If disaster strikes, simply download the previously backed up content from the cloud and copy to your new MPC disk.
Step 6: Locally Managed Backup Software
As an alternative to the cloud backup providers you could use specialist disk backup software and save your backups locally. If you are on a Mac you might have assumed Time Machine could handle this, but unfortunately it currently it only supports backing up to disks formatted in Mac OS Extended format (which to MPCs is read only) or to APFS format (unreadable by an MPC).
I’ve personally used an app called ‘ Carbon Copy Cloner’ for many years now which I primarily use to make backups of my Mac boot disk. (this is not an affiliate link, I’m just a happy user). Apart from your main boot disk it can also automatically back up any disk connected to your computer, which includes your MPC disk.
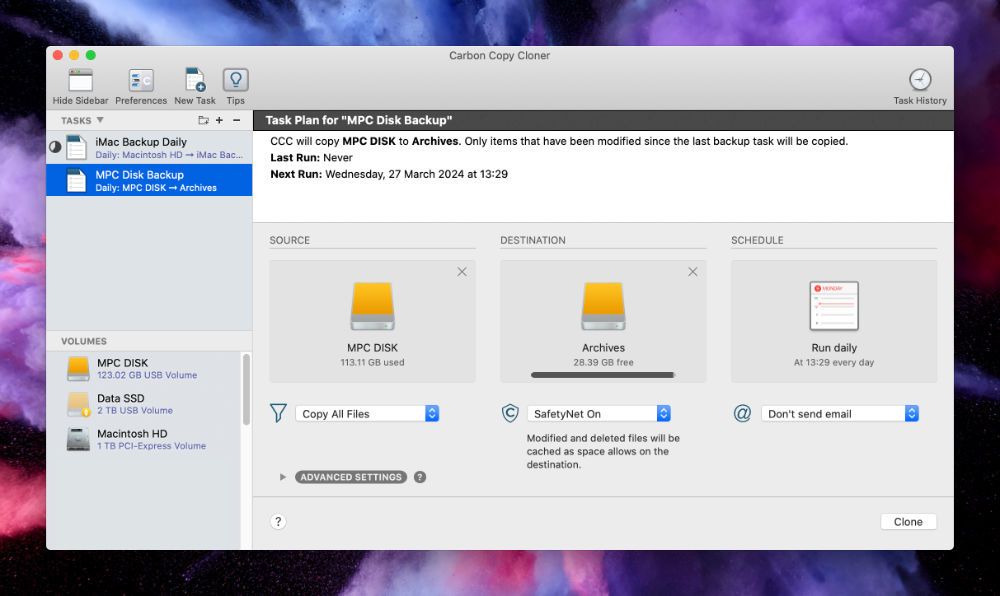
The software can be configured to back up your MPC disk on any schedule you wish, including hourly. And if your MPC is not connected to your computer it will simply run the scheduled backup the next time you do connect it.
Remember that with any local backup system you’ll need to supply disks to be used for the actual backups (I mostly use portable USB drives, but you can back up to other computers on your network, or to dedicated network storage).
Windows Users: Apart from the various cloud backup services I’ve mentioned which work on Mac and PC, there’s likely many Windows backup applications that perform similar operations to Carbon Copy Cloner. Unfortunately I don’t personally use Windows so if anyone knows of a good Windows app that can perform automated backups of removable drives, please let me know in the comments.
Other Important Considerations
Beyond the points covered so far, there’s a few more things to bear in mind to hopefully avoid or remedy any potential data problems.
Always Correctly ‘Eject’ Your MPC disks
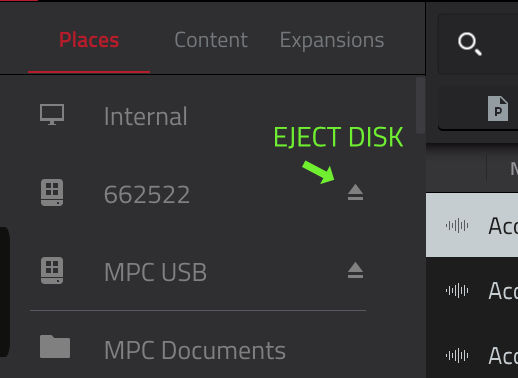
Disks don’t last forever and they will almost certainly die at some point, but mistreating your disks is a sure fire way to kill them off quickly. The most important thing to remember is to correctly ‘eject’ your disk from the software before physically removing it from the drive or before you disconnect from controller mode. Ejecting within the software ensures that no device is currently accessing data on the disk; removing a disk while data is being accessed can corrupt the data or even permanently damage the disk.
Ejecting is achieved in the MPC/Force using the ‘eject’ icon in BROWSER > Places :
In your computer you will see a similar ‘eject’ icon next to the drive icon in Mac Finder. In Windows, use the ‘ Safely Remove Hardware’ option in the taskbar. Wait until the disk disappears from the list of drives before physically removing it from your MPC or computer.
Look Out For The Warning Signs
Disks don’t always die suddenly, more often than not they slowly begin to exhibit signs of corruption before the inevitable failure. Early warning signs include projects suddenly throwing up ‘missing file’ warnings (which could be a sign of corrupted disk sectors), samples not loading correctly, problems saving projects, system hangs and problems mounting your disk in the first place.
At this point you should definitely be performing a complete and immediate backup of the disk and consider whether it’s time to switch to a different ‘primary’ MPC disk.
Data Recovery & Disk Repairs
Sometimes reformatting the drive in your computer’s disk utility or using some kind of dedicated repair software can fix some disk issues, although in my experience once a disk starts playing up any fixes are only short lived and it’s generally better to assume the disk is no longer fit for purpose.
Don’t forget that even without any backups it might still be possible to recover data lost to disk failures (or from accidental deletion). There are plenty of data recovery apps or third party services which may be able to salvage data for you – but don’t rely on this option, it’s better to just maintain your own regular backups!
Using ‘modified’ MPC/Force firmware
You may have heard about the various custom MPC firmware versions out there, some people call them ‘hacked’ firmware, some use the term ‘modified’. These are simply the standard MPC (or Force) firmware with a slight modification that enables ‘SSH access’ to your MPC.
One of the many things you can do with an MPC running a modified firmware is to directly access the internal disk as well as all the attached drives using SSH over your home network, giving you the option to perform backup of the internal disk using SFTP apps (e.g. Cyberduck) or via the Linux app ‘rsync’.
bjonnh has written an article about using rsync so if you are a bit of a Linux boffin and are interested in pursuing SSH backups, this would be a good place to start investigating.
Will we ever see a native backup system inside the MPC?
The MPC already connects to third party services, including Splice and Akai’s own plugin authorisation and download systems, so it probably isn’t too much of a leap for Akai to implement some kind of cloud backup solution using the publicly available APIs that most cloud providers make available. This way the MPC can just backup to the cloud whenever it is turned on in standalone mode. So for example you could go to MENU > PREFERENCES > BACKUP, select your cloud provider (e.g. Dropbox), and then choose the folders you want to backup to the cloud.
Alternatively (or additionally) the backup could be saved to another locally attached disk (e.g. a 2TB USB drive, or an internal SATA drive).
Another option for MPC users could be a backup app built into the MPC Software. So whenever you connect via controller mode the MPC Software itself performs an automated backup of your MPC, saving to one of the drives on your computer (or even to a cloud provider).
If any of that sounds like a great idea, make sure you let Akai know and send them a feature suggestion!

Latest Posts
MPC Bible 3, Revision 6 - MPC Oscillators, MPC 3.9, MPC One G2 + MPC Key 37 G2

Downbeat Kit 3 - Acoustic Drum Kit Expansion For MPC3

MPC Bible 3, Revision 4 - Clip Matrix, MPC 3.7 + MPC XL

Out Now: MPC Bible 3, Revision 3 With MPC Live 3 MPC3.6 Support

Leave a Reply