In this beginner’s MPC Renaissance/MPC Studio/MPC Element tutorial we’re going to look at building a simple but very usable drum kit with some sounds that I’ve chopped out of a live drum break. You can read many more tutorials like this in my book, ‘The MPC Renaissance & MPC Studio Bible‘.
Loading the Sounds
First download the tutorial files and extract this zip archive to a location on your computer.
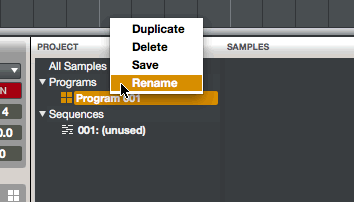
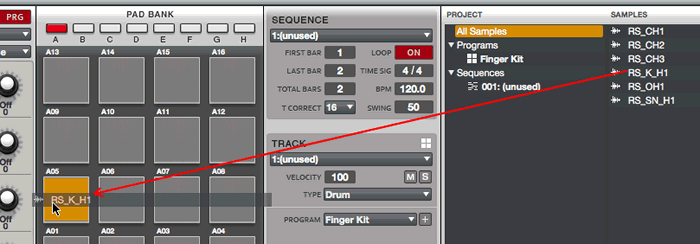
In the MPC Software, create a new blank project (CMD & N for Macs, CTRL & N for Windows). In MAIN mode, rename the default drum program from Program 001 to ‘Finger Kit’ (right click on the program name in the Project Information panel and select ‘Rename’).
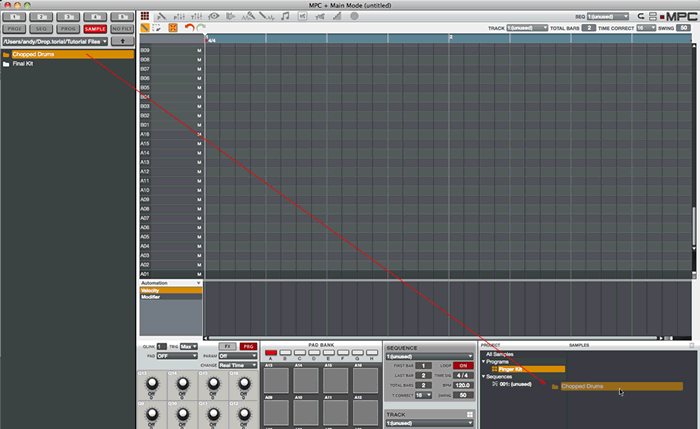
In the File Browser, navigate to the location where you extracted the tutorial files and highlight the ‘Chopped Sounds’ folder. To load all the sounds inside this folder into your project, simply left click and drag the entire folder to your Project Information panel:
Click on the ‘Samples’ header so that all the currently loaded samples in this project are listed:
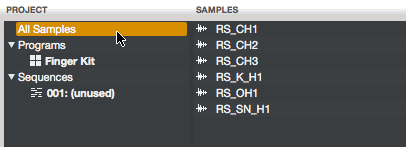
You can preview each sound by clicking the small waveform to the left of each sample name; we have a kick, a snare, three ‘takes’ of the same closed hat, an open hat and a crash.
Assigning the sounds
When it comes to assigning the kick, snare, closed hat and open hat to specific pads, the choice is really down to your own personal preference.
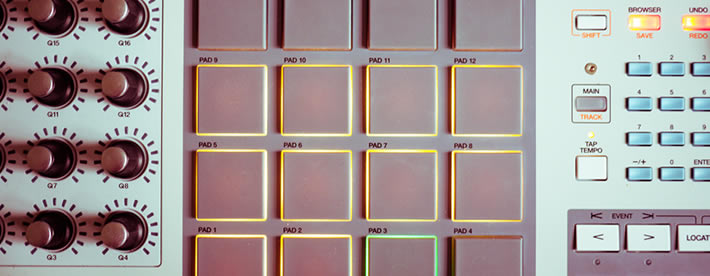
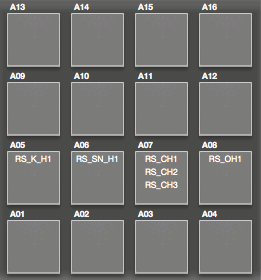
Many people assign these sounds to pads A01 to A04 on the bottom row of the MPC, some assign the up the first column (A01, A05, A09, A13). I actually prefer to assign them across the second row – A05 to A08, as I find it more flexible and efficient when finger drumming. Having my hands centred around the second row gives my fingers very easy access to the additional samples on row 1 and row 3 without having to perform large stretches or change my hand position.
There’s many ways to assign sounds to pads in the Ren/Studio, but let’s look at the two I use most often. To assign the kick RS_K_H1 to pad A05 within the MPC Software MAIN mode, simply drag this sound directly from the Project Information panel to pad A05:
Alternatively, we can assign samples directly in Program Edit mode. In the hardware press pad A05 and then press the PROG EDIT button. Now hit Samples (F2).
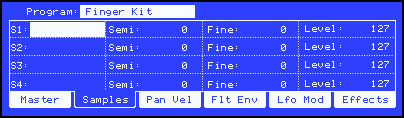
We want to assign our kick to the S1 field (layer 1). One way to do this is to use the cursor keys to navigate to S1 and then turn the data wheel clockwise until the S1 field reads S1: RS_K_H1. The other method is to turn the Q13 dial clockwise until the RS_K_H1 sample appears (on the MPC Studio, Q13 is the default top Q Link).
Now assign the snare RS_SN_H1 to pad A06, the closed hat RS_CH_H1 to pad A07 and the open hat RS_OH_H1 to pad A08. Try these pads out – it’s a nice and simple drum kit.
The Open Hat Mute
To create the illusion of a real hi hat opening then closing, we need the closed hat on A07 to be able to ‘mute’ the open hat on A08. We do this using ‘pad mutes’.
The idea behind a pad mute is simple; the playback of one sample is instantly muted the moment the another specific pad is played. There are actually a few ways this can be accomplished in an MPC, but the two most appropriate for a drum kit are mute targets and mute groups.
Mute Groups
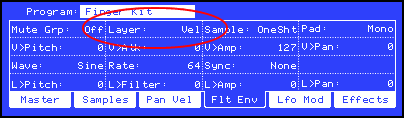
Select the open hat on pad A08 and in PROG EDIT, go to Lfo Mod (F5). Currently the top left cell, Mute Grp (Mute Group) is set to ‘Off’. Turn the Q13 dial clockwise and you’ll see that you can set any number from 1 to 32 here:

Set the Mute Grp for pad A08 (the open hat) to 1. Now select pad A07 (the closed hat) and set this to mute group 1 as well.
With both pads set to the same mute group, try hitting A08 followed by A07 and you’ll instantly hear that the closed hat is ‘muting’ the open hat for you. If you were to add other pads to this same mute group they could also mute this open hat – just be aware that when using mute groups, all samples in that group will mute each other.
Mute Targets
Mute targets work in a similar way except this time we can set up a one way mute. First, turn your mute groups back to OFF on A07 and A08 and then select pad A07. Now go to the Master screen (F1) and look at the bottom row:
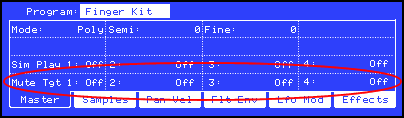
Here we can set up to four mute targets for our closed hat. Any pad number we enter here will be muted by our A07 closed hat. So for the Mute Tgt 1 enter ‘A08′ using Q1 dial or cursor/data wheel combination.
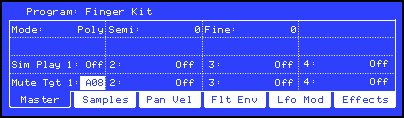
Now hit A08 quickly followed by A07 and the mute works perfectly.
If you want A07 to mute other sounds, you can add up to three further mute targets using the remaining cells in that bottom row. However, that’s the maximum, so in this respect mute groups win hands down. But if you just want a ‘one way’ mute, mute targets is definitely the one to go for.
The Program Mixer
An important part of making a realistic drum kit is to ensure the ‘mix’ is perfectly set up – for example, each sound must be at the correct volume relative to the other pads. While we are able to adjust individual layer ‘levels’ in PROG EDIT, we adjust pad volumes in the dedicated program mixer.
The program mixer may look a little scary, but it’s actually very intuitive and easy to use. To access the program mixer, hit the PROG MIX button. Here’s the view in the MPC Software:
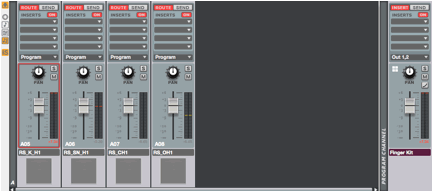
On the left we have the pad channels. These allow you to independently control the level, pan and effects on each individual pad. On the right is the program channel; this controls the level, pan and effects for the entire program – so for example, you could use this to apply the same effect across all pads, or easily raise/lower the volume of the entire program.
Your program mixer may not look identical, this will be due to the current display filters you have set. At the top left of the program mixer panel, you’ll see the filter buttons:

Selecting ‘Show All Pads With Samples’ will only show the pad channels for pads in our program that are actively being used. You can also filter by pads that have events in the sequence itself, but that’s not something we need in this tutorial.
Let’s take a closer look at the pad channels:
At the top we can apply insert and send effects, we can then change the channel routing (currently set to ‘Program’ – we’ll leave this untouched). Then you have your standard mixer options of pan (the dial), level (the slider), solo ‘S’ (so only that one channel can be heard) and mute ‘M’ (to silence all outgoing audio from this particular channel).
We also have metering for each channel that accurately shows the output level so you can avoid clipping. The peak output level is indicated by a ‘sticky’ line and clipping level is shown in red text at the bottom of the meter (see channel A05 above, with a clipped level of +8.73). To reset the peak output level for any channel, simply double click in the meter display itself.
Finally there’s even a preview pad at the bottom which you can press with your mouse (of course you can just hit the actual pad as per usual).
This is the LCD screen representation – now let’s make some adjustments to our program.
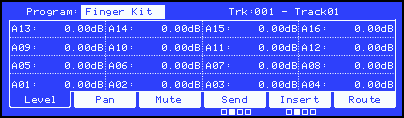
Adjusting Level
The default page is Level (F1). As you may expect, simply select the required Q-Link for the pad you wish to adjust or use the cursor to highlight it and then turn using the data wheel.
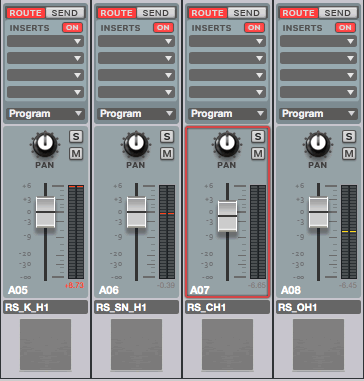
It should be clear that the hi hats are a bit too loud for the kit, so we’re going to drop the volume on pads A07 and A08. Start with the closed hat on A07 and start bring it down with Q7 – keep comparing the volume with the kick and the snare until you feel you have the correct balance – try a volume of 80. As the open hat is the same hi hat, you can be pretty sure it will require that same or very similar setting, so use Q8 to set the volume for A08 to 80.
You can of course do all this in the MPC Software simply by click-dragging the screen faders down. Play your kit sounds to hear the overall balance change – sounds good to me.
Adjusting Stereo Field
Currently all the sounds in our kit are mono and if you listen through headphones, each drum sample plays at the same volume in both left and right ears. In a real drum kit, the hi hats are typically positioned more to one side compared to the snare and kick, so to mimic this we often tend to pan the hats slightly to one side of the stereo field. To change the pan for the hats, hit F2 (Pan).
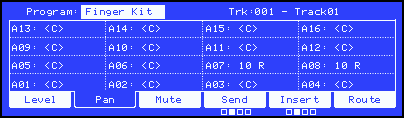
You can use Q7 and Q8 to control pads A07 and A08 respectively. Set both pads to a right pan of R10.
Adding More Realism Using Drum Multisamples
In the tutorial download, there were three different closed hat samples; these are all the same hi hat but if you listen to each of them they all sound a little different. This variance in the sound of your instruments is referred to a change in timbre.
Changes in timbre can be quite extreme, especially when comparing a ‘soft’ hit to a ‘hard’ hit, but even if the instrument is hit consistently in the same place and at the same velocity, there will still be slight variances in the timbre. By utilising multiple timbres of each instrument in an MPC drum kit we can create a more natural sounding drum kit capable of adding more realistic expression.
There are a number of ways we can incorporate this timbre variations in an MPC DRUM program, and I cover all of these in detail in my ‘Sampling: Laid Bare’ book, but to finish off this tutorial, I’ll show you the very cool Round Robin.
MPC Round Robins
In a drum kit, a round robin works best when you have multiple ‘takes’ of an instrument played at a similar velocity, which is what we have with the three closed hats we previously loaded. The idea behind the round robin is for the closed hat pad to play back a different hat ‘take’ each time the pad is hit, which in turn makes this closed hat pad sound much more realistic because the timbre of the hat is changing each time you play it.
The first task is to assign our all three of these closed hat takes to our existing closed hat pad, A07. We’ve already assigned RS_CH_H1 to the default ‘Layer 1‘, so we’ll now assign the two others to some spare layers on this pad.
We can assign RS_CH_H2 to A07 layer 2 directly in PROG EDIT just as we did previously when we assigned a sample to layer 1. This time in the hardware you’ll need to assign the RS_CH_H2 sample to the ‘S2′ field while in the MPC Software you’ll need to select RS_CH_H2 from the ‘LAYER 2‘ drop down box.
Now, if you instead choose the click and drag option in MAIN mode you’ll have to modify the technique very slightly. In order to assign this sample to layer 2 on A07, simply hold down the ‘shift’ key on your computer keyboard (not the SHIFT key in your MPC hardware). With this still held down, left click and drag the RS_CH_H2 sample over to pad A07 and you’ll see a red band appear on the pad:

As you move up and down the pad, you’ll see the band change to one of four positions – this indicates which sample layer you’ll be assigning this sample to. With your sample positioned correctly over layer 2 (the second layer from the top), release the left mouse button. Repeat this process for layer 3 using the RS_CH_H3 sample:
If you play the pad now, all three layers will play simultaneously. To change this behaviour, we need to adjust the ‘Layer Play’ settings. In the hardware these are accessed in PROG EDIT by going to Lfo Mod (F5) and looking specifically at the top row, cell 2 (optionally controlled via the Q14 dial).
‘Layer Play’ has three options; Velo (Velocity Switch,) Cyc (Cycle) and Ran (Random) – it’s the last two that currently interest us.
The cycle option will play each layer in turn each time you hit the pad. So for example, if you had chopped up the James Brown ‘one, two, three, hit me‘ sample, you could assign the word ‘one’ to layer 1, ‘two’ to layer 2, ‘three’ to layer 3 and ‘hit me’ to layer 4. Then if you stuck that same pad four times in succession, it would play the words in order. This is the traditional ’round robin’.
Random play, as you’d imagine, simply plays back a random layer each time the pad is hit. So instead of ‘one-two-three-hit me’ you might get ‘three-hit me-two-one’.
Either of these settings will work fine for our hi hat timbres – you could argue that cycle will always ensure that each pad hit will produce a different sample every time, while with random there’s a possibility that you could get the same sample play a few times in succession, so I’ll typically use the cycle option.
So, set Layer Play for A07 to either Ran or Cyc using either the Q14 dial, cursor/data wheel or +/- buttons.
Now hit pad A07 several times in succession to hear your cycling or random layer play in action. If you had four samples you could use all four assigned to the four layers, and if you have two, you can just use those two – it doesn’t matter if some layers are blank, the MPC will just ignore them.
At this point save the kit by right clicking the program name in the Project Information panel, or by selecting ‘File > Save Current Program’ (it will also be saved if you save the entire project – CMD & S or CTRL & S).
You can check out my version by loading up the program file ‘Finger Kit-B.XPM’ from the ‘Final Kit’ folder (assign it to track 1 in MAIN mode to make it the currently ‘active’ program).
Taking It Further
This has been a quick introduction to some of the core principles of MPC drum kit building, but there’s plenty more advanced drum kit building techniques covered in my book, ‘The MPC Renaissance & MPC Studio Bible‘, where I’ll combine Round Robins with techniques such as velocity switching and real time timbre emulation to create realistic and expressive finger drumming kits.
The book also covers every other aspect of sample editing and program building in the MPC Software including drum layering, instrument multisampling, advanced chopping techniques, creative use of effects, filters, LFO and much, much more.
3 Responses
Leave a Reply


Feb 19, 2015 4:36 pm
Hey man, I’m trying to find some good info on how to integrate the MPC studio with FL studio.
I want to use it for it’s ease of use, and the note repeat function. I can get the MPC to work as a controller with the pads and control something like FPC, but no qunatize, no note repeat…..
The drums/note repeat/16 levels are the main thing I would like to use the MPC inside FL for, but having a SUPER easy sample chopper is nice too and would expand my sound.
I can record the audio output of the MPC software plugin, but ideally I’d like to be able to have all the sounds from the MPC on their own mixer tracks, with MIDI i can control all inside FL.
The MPC workflow is sick, but I just know FL so well and I can really tweak and do some of my signature stuff inside FL.
Apr 9, 2016 3:47 pm
Can I assign Latin Percusion (Toontrack) instrument to pads in Akai MPC Element using MPC Essentials?