In this hands-on MPC Touch review I take a close look at the latest MPC Software controller from Akai, uniquely sporting a 7 inch touchscreen and the latest pad technology. Is this the innovative and ground-breaking MPC we’ve all been waiting for?
MPC Touch Review: General Build & Design
The first thing I thought as I pulled the MPC Touch out of its box was how sturdy it felt. Nice and solid, no creaks and what appears to be a full metal casing. The weight feels just ‘right’, remaining fully portable without feeling toy-like, and certainly a step up from the plastic MPC Studio.
To accommodate the touchscreen, the MPC Touch is fairly elongated in design compared to other MPCs, but it works well and whilst not a space saving as the MPC Studio, its definitely not a ‘big’ controller and will happily find a comfortable place to sit on most people’s main work desk.
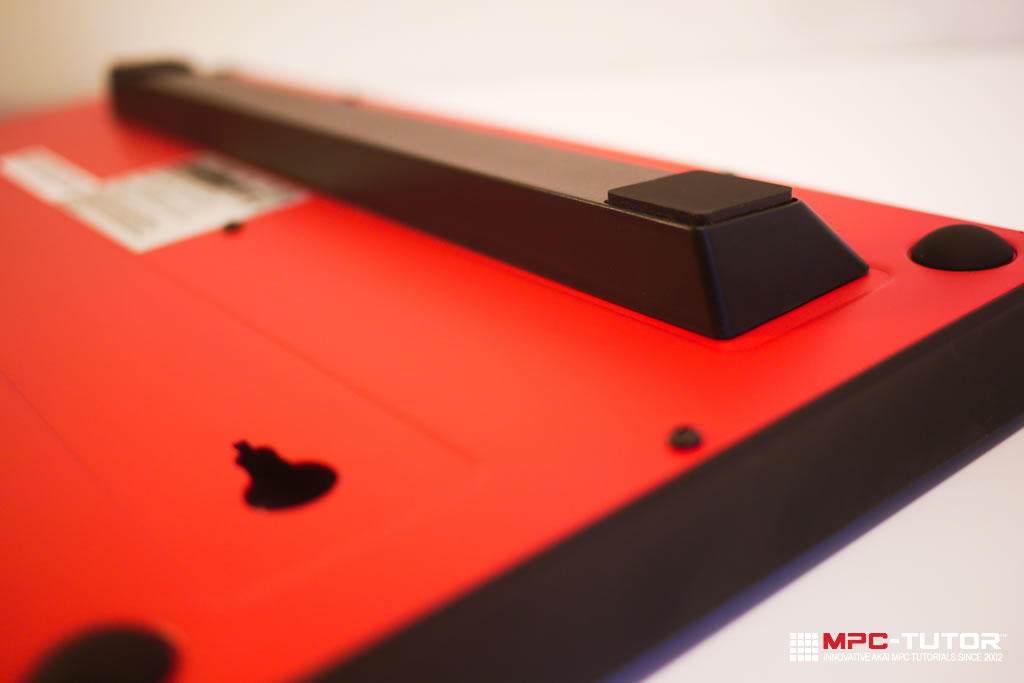
On the underside you’ll find some half spherical rubber feet and, on my wooden desk I found the MPC Touch would stay exactly where I wanted it to be while in use. There’s also some holes on the underside to install the included plastic stand which places the entire unit at a slight angle.
Despite initial concerns online that this stand seemed somewhat unstable, I can confirm that the Touch remains steady as a rock with the stand attached, although ultimately this stand is only adding a very slight tilt to the unit, but I suspect anything steeper was going to introduce instability when bashing the pads.
Something certainly has to be said about the MPC Touch’s looks. Svelte, dark and mean, this is definitely unlike any previous MPC before it. If looks are important to you then the MPC Touch is definitely going to complete your ensemble, although you should bear in mind that both the matt paintwork and matt rubber pads are absolute dirt and dust magnets, so if you want your MPC to look pristine, keep both you and your studio dust and grime free.
The back panel sports the audio inputs and outputs of the built-in audio interface, along with the USB port (which carries all the data back and forth between your computer), a power supply input (for the included standard PSU), record and master volume controls, 3.5mm headphone socket and MIDI in and out ports for attaching hardware MIDI devices (cables are included that convert these 3.5mm ports into proper MIDI sockets).
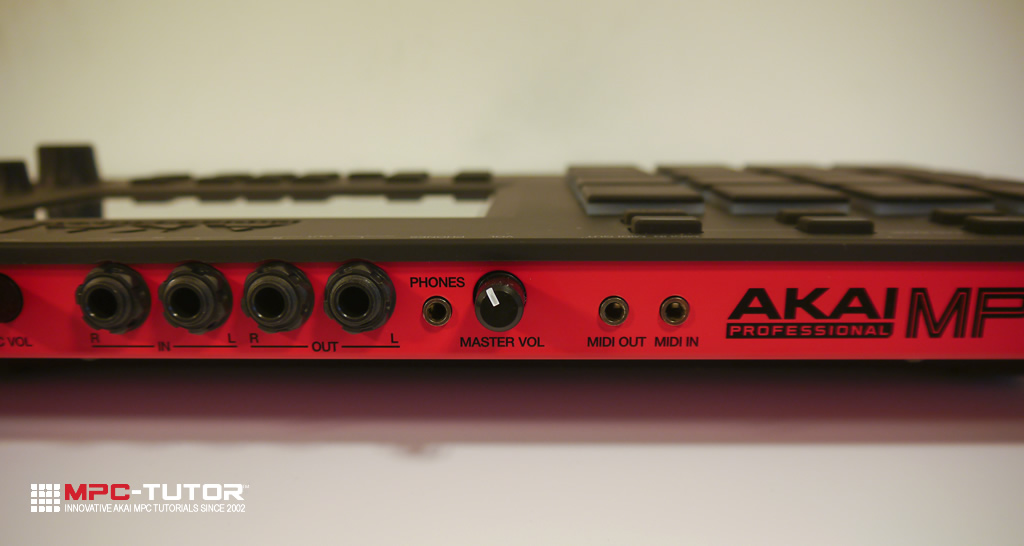
This is obviously not the cornucopia of audio options offered by the MPC Renaissance, with the MPC Touch lacking dedicated phono and mic inputs, only two analogue audio outs (versus four on the MPC Renaissance) and no S/PDIF in/out; this means sampling analogue line-level sources only.
To many this may prove too limiting to be the only audio interface in their studio, but remember that using the MPC Touch’s built-in audio interface is entirely optional; the MPC Software can be configured to use any audio interface currently attached to your computer, and can even use multiple devices to handle different duties (i.e. one for incoming audio, one for outgoing audio, another for MIDI etc).
However I do wonder if it would have been better to follow the MPC Studio’s (and Maschine’s) lead and just not bother with an interface at all; this way people with existing interfaces aren’t paying for something they don’t need while newcomers to audio production are free to select an interface that better suits their specific needs. Without the interface I’m sure we could see at least $70/£50 knocked off the retail price. Of course there are workarounds for the lack of some inputs; for example many people already have a pre-amp for their turntable (often by using a DJ mixer to bring the phono signal up to line level), or these days are just as likely to have a USB turntable so can bypass the controller completely.
It’s also worth noting that unlike the MPC Renaissance there is no built in USB hub, so by using the MPC Touch you will lose a USB port on your computer.
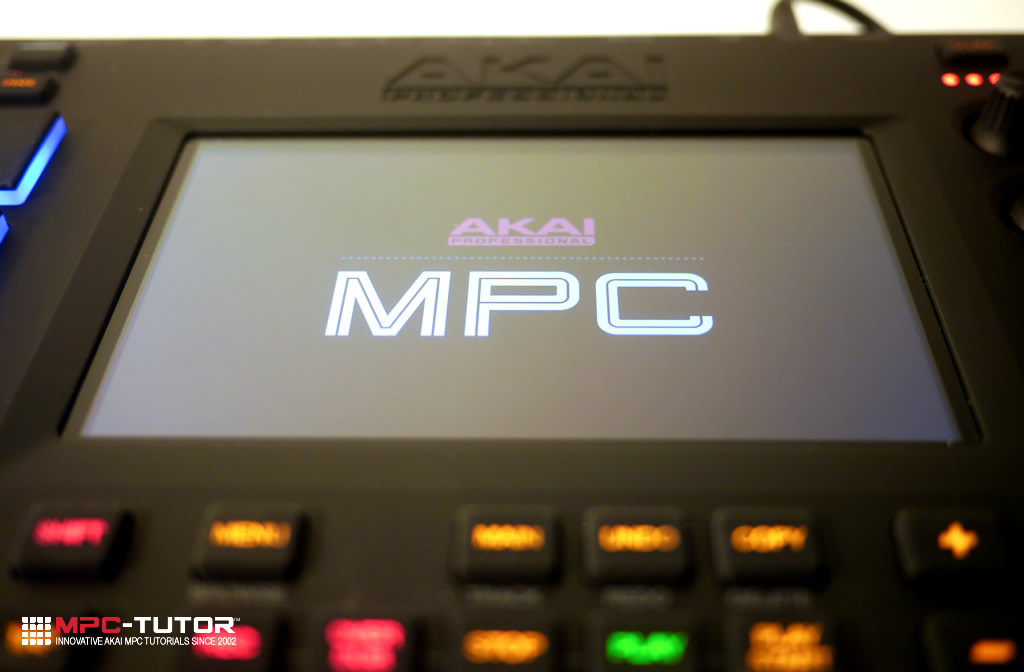
The MPC Touch Screen
The LCD screen itself is a 7” model which proudly sits to the right of the unit, between the pads and the Q-Links. I’m no expert on LCD screens, but this one appears to be fairly generic – so while this is clearly not intended to compete with an iPad screen, for it’s intended use the brightness, colours, screen resolution and viewing angles appear perfectly fine.
The screen itself is fairly shiny and and like the majority of touch screens on phones and tablets is somewhat of a fingerprint magnet (a handy cleaning cloth is provided in the box), so if you are working near a window or directly under lighting you may have to carefully angle the MPC Touch to avoid any nasty reflections.
There doesn’t seem to be any mention of gorilla glass being used for this screen, so it’s probably worth buying a touch screen protector to avoid getting any nasty scratches. Amazon and Ebay stock a few generic ‘tablet’ protectors that can be cut to size – just make sure you grab a universal-style one without any pre-cut web cam holes. A screen protector can also help reduce reflections; look for one with an anti-glare finish.
Later in the review I’ll take a closer look at the actual Touch UI, which is the software inside the Touch that allows you to control the MPC Software.
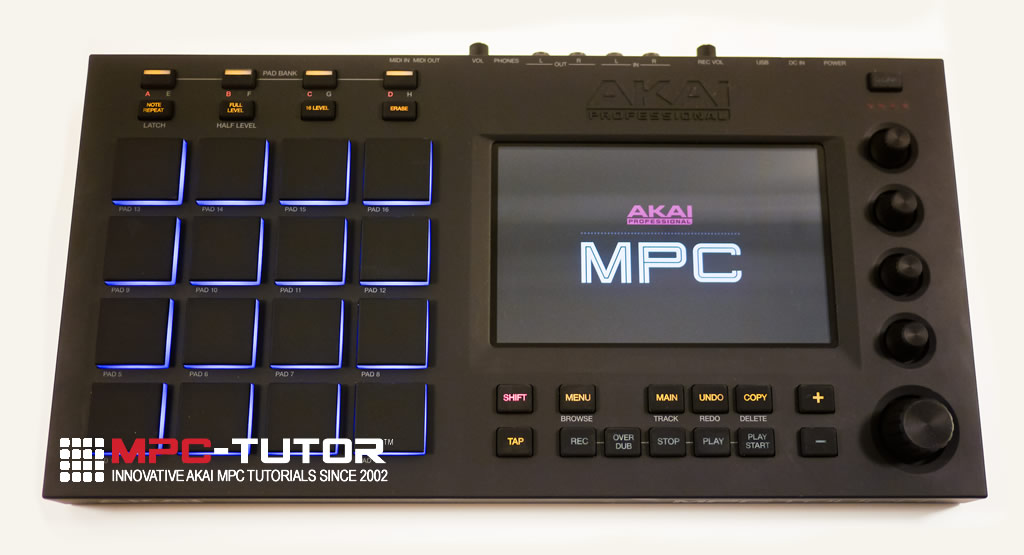
The MPC Touch pads
I absolutely love the MPC Touch pads, they are satisfyingly solid, very responsive and quite simply a joy to play. If you like to play with FULL LEVEL turned off, they will happily pick up every nuance in your playing.
The pads themselves are very much of the extra thick ‘fat’ variety and I think we have MPCstuff.com to thank for inspiring this particular feature. Standing several millimetres higher than the pads on the Renaissance, the MPC Touch pads immediately look like they mean business. As with the Ren and Studio, the MPC Touch pads feature a solid opaque rubber top layer with a transparent second layer that allows them to illuminate at your command.
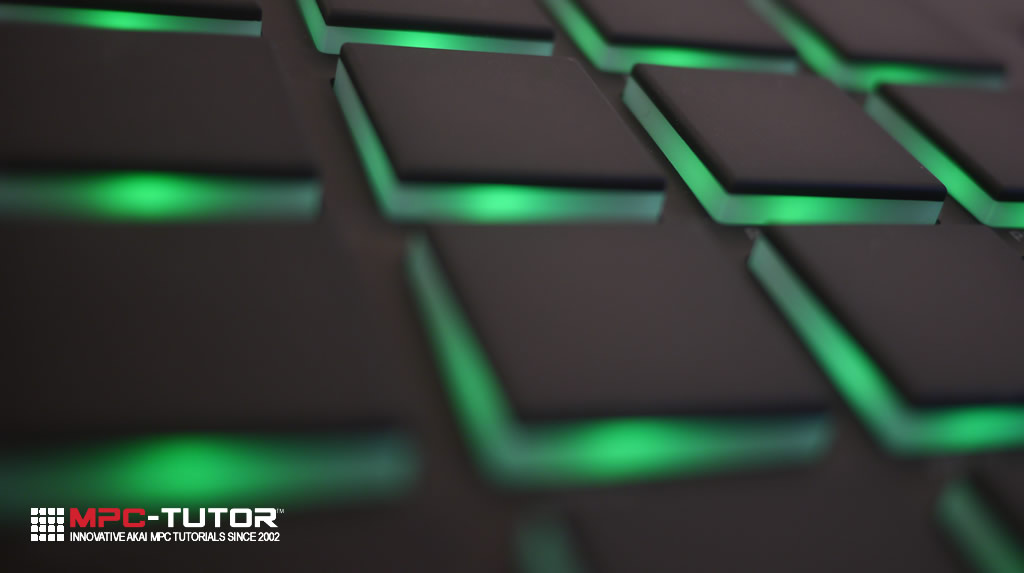
Pad colours are controlled within the MPC Software and here the MPC Touch can happily stick two fingers up to his MPC-siblings as the Touch pads support a full RGB pallette of colours. That means that in addition to the familiar red, orange, green and yellows we now have all the colours of the rainbow plus a view extra shades thrown in, including white and grey.
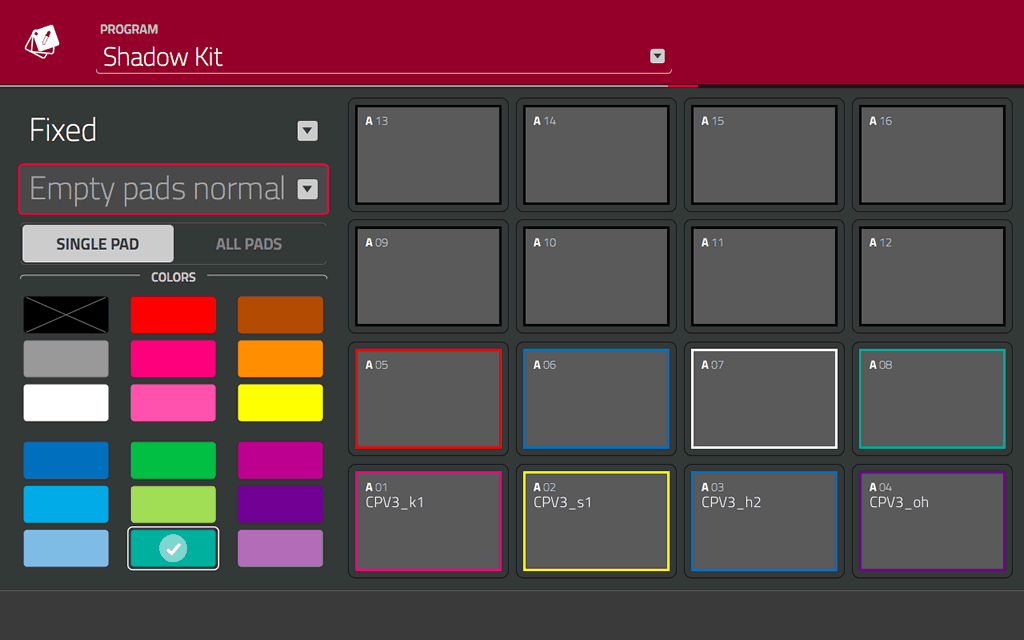
There are many different ways of controlling pad colour, either with continually fixed colours or a number of velocity dependant changes, all of which can be applied the same across all pads or with unique settings on a pad-by-pad basis. Pad colours clearly come into their own when performing live and can be used to organise pads into sample types (custom pad colour assignments are saved within each kit), or of course used purely for eye candy purposes.
The biggest downside in the move from grey to black pads is that black rubber is a huge dust and dirt magnet and inevitably it didn’t take long for the pads to look fairly grubby. This is of course a problem with any black rubber and I have similar issues with my MPC4000’s black pads. I found a quick run over the pads with some sticky tape is the easiest way to clean them up.
I would point out that if you are a legacy MPC user who loves the very soft, spongy pad feel (and there are people who soak and boil their pads in an attempt to soften them up), then you might want to try the MPC Touch pads before buying to ensure you can live with a more solid style of rubber.
MPC Touch Buttons
The MPC Touch has a number of dedicated buttons for certain functionality, such as transport control (PLAY, REC, etc), pad bank selection, full level, tap tempo, note repeat etc. All these buttons are of the soft rubber variety with the button’s name illuminating in the centre. They certainly add to the MPC Touch’s sleek look but from a practical point of view they wouldn’t be my first choice, I prefer the style of buttons found on the MPC Renaissance, with their harder plastic and a nice positive, solid ‘click’ when engaged.
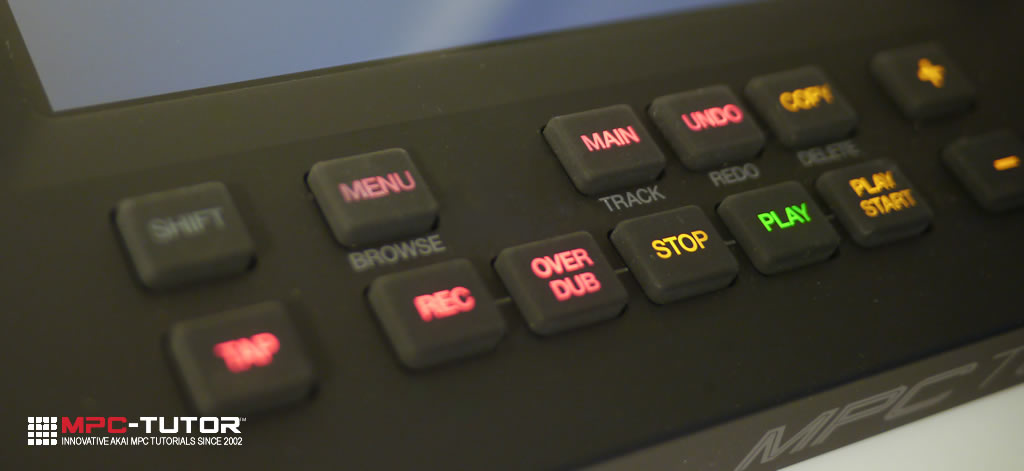
Don’t get me wrong, these buttons do the job, but they just inspire a little less confidence when pressing them and tend to be quite unforgiving if you don’t touch the button dead centre.
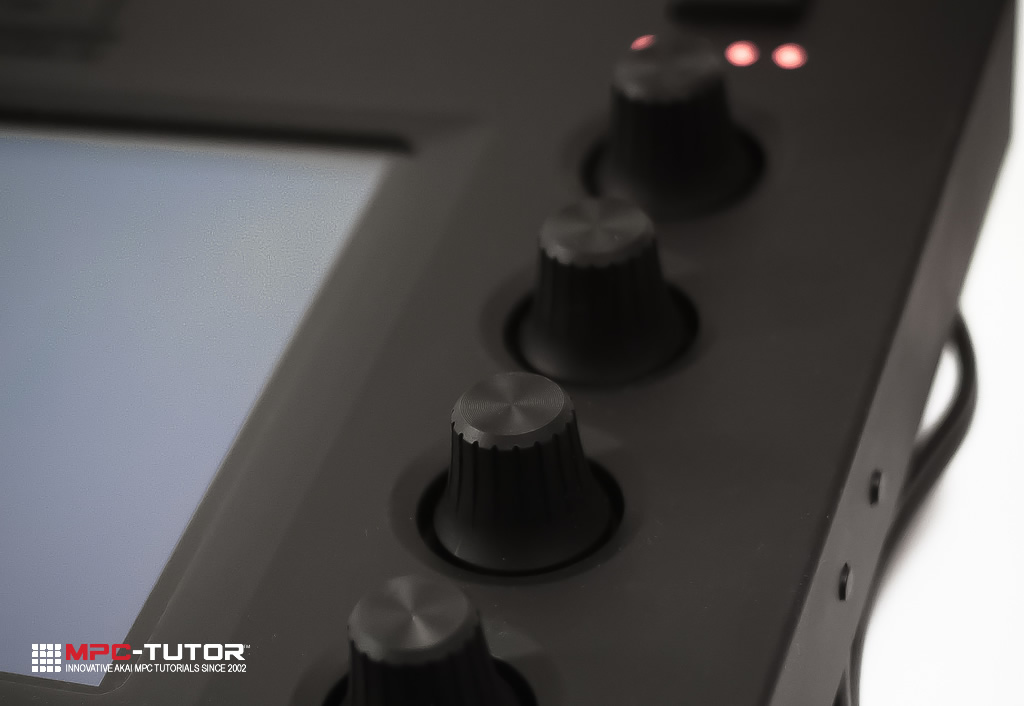
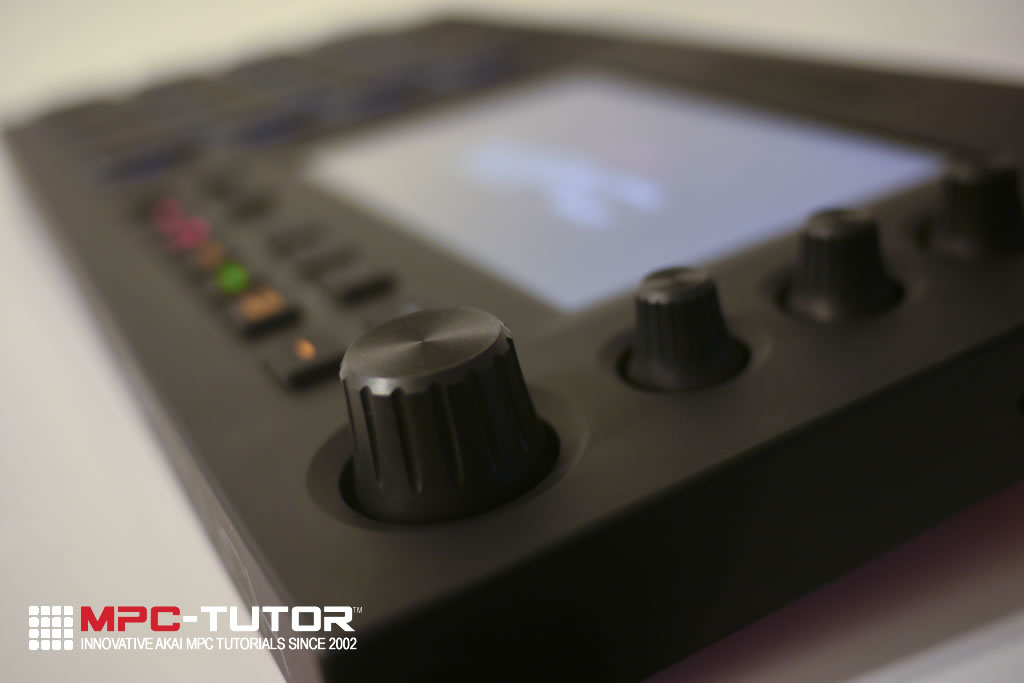
The Q Links & Data Wheel
There are two types of dial present on the MPC Touch; the Q links and the data wheel. These are all of the raised variety, with Akai thankfully avoiding the ghastly flat Q-Links of the MPC Studio, featuring indentations to ensure your finger doesn’t slip when turning.
The Q links are a similar size to those found on the Renaissance, with a smooth and ‘click-free’ gliding action. They have a nice and satisfying amount of resistance in use and you feel in complete control when using them.
The data wheel is decent enough, it’s a good size and will certainly get the job done, however it’s maybe a little too light for my liking and certainly has some degree of wobble when in use. So while a massive improvement on the terrible MPC Studio data wheel it’s not quite a satisfying in use compared to the one found on the MPC Renaissance.
The MPC Touch UI (TUI)
The Touch User Interface (TUI) is the touch screen representation of the MPC Software, but rather than just mirror the computer MPC Software, Akai have created a completely different touch-friendly’ interface. Now I’m not going to review every feature of the MPC Software here, I’ll leave that to a separate dedicated review, instead I’m going to look at some of the more ‘touch specific’ aspects of the Touch UI – this was at version 1.9.1 at the original time of writing, but I have since updated this review in places to cover the 1.9.2 update (which came out only a few days after this review originally went live).
First hit the dedicated ‘MENU’ button to bring up the main menu page where you can access the various different editing ‘modes’ of the MPC Software (unlike the MPC Renaissance, there are no dedicated buttons for each mode):
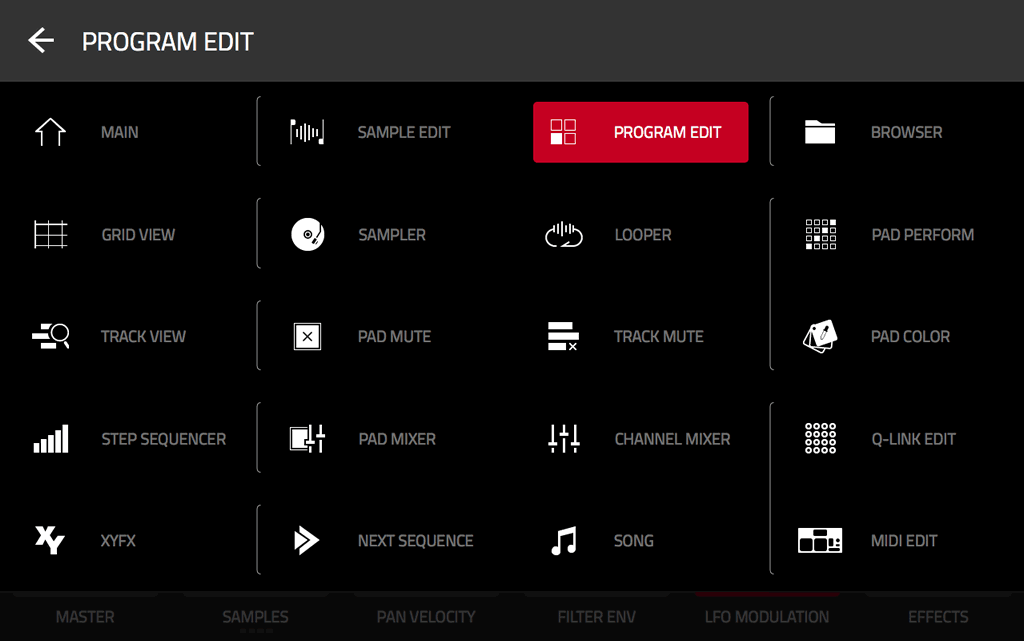
The Touch UI is structured identically to the LCD interface found on the MPC Renaissance and MPC Studio, so after selecting a mode you are taken to that mode’s main screen where a series of related sub-screen are available via the included ‘virtual F keys’.
So for example, to edit the current program, hit the PROGRAM EDIT icon and you’ll be taken to the ‘MASTER’ screen of Program Edit:
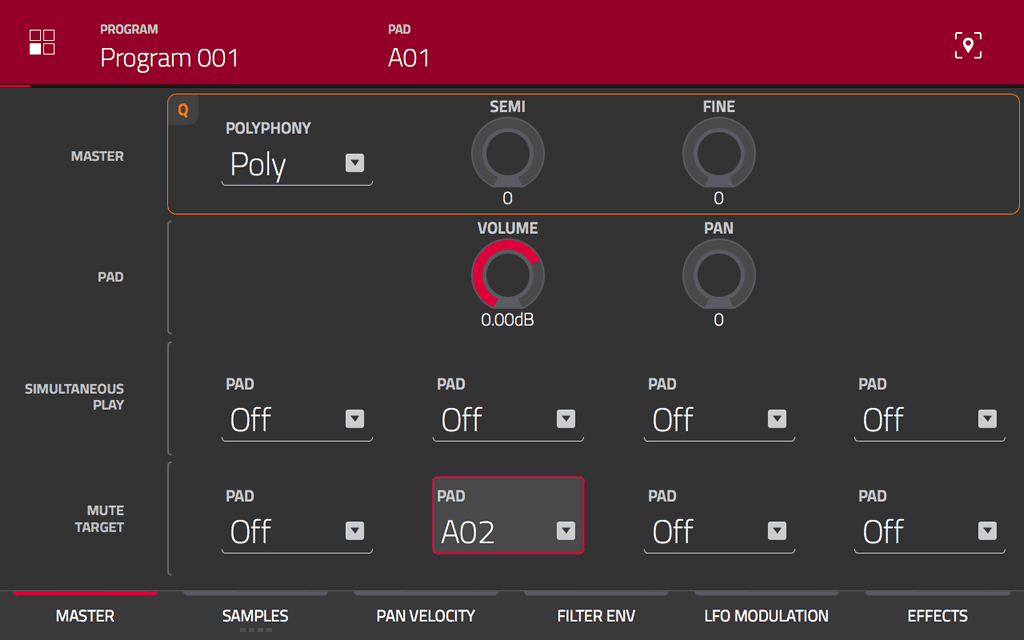
Along the bottom you can see the sub-screen tabs for all the different areas of Program Edit. Users of the MPC Renaissance and MPC Studio will recognise this as fundamentally mirroring the way their LCD interface is structured, albeit substituting the reliance on the cursor or Q links in favour of touch-friendly navigation.
Many touch screen dials and sliders can be instantly tweaked by simply ‘adjusting’ them with your finger, although this can sometimes be quite fiddly so for greater accuracy you can double tap the dial to bring up an enlarged pop up version (pushing down the data wheel will produce the same effect, although the parameter needs to first be selected by single tapping it).
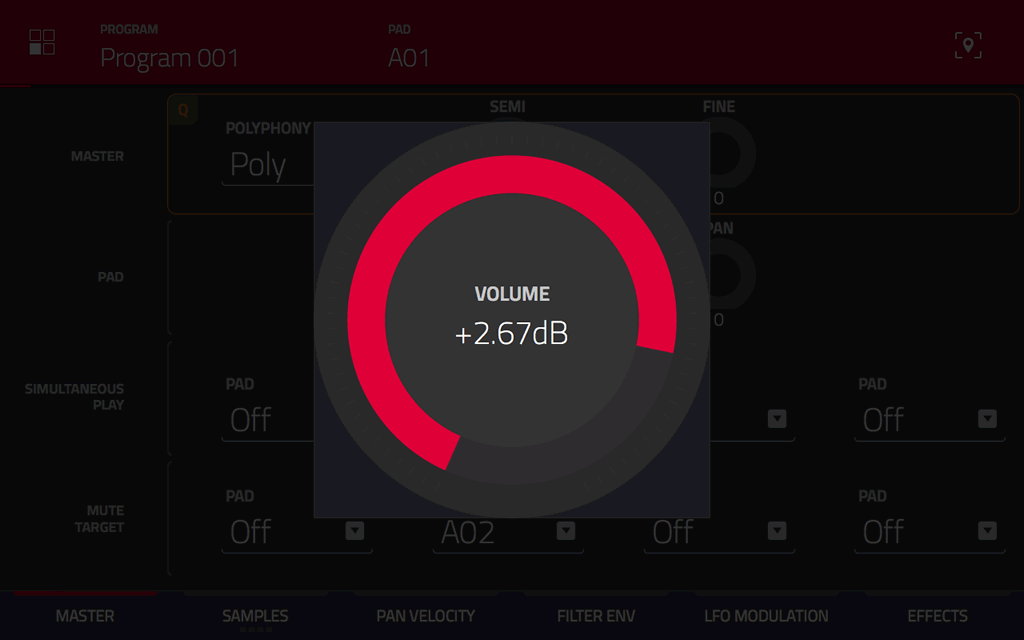
Double-clicking numerical values produce a number pad:
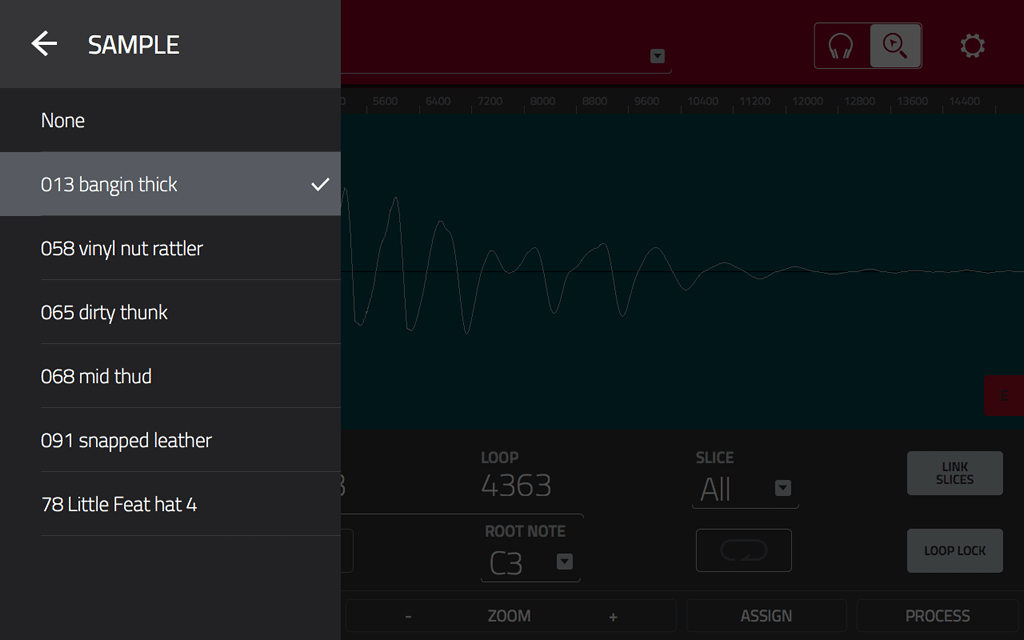
For parameters where a fixed selection of values are offered (e.g. when selecting a sample or program from the project pool) you’ll be presented with a drop down select box:
There are alternatives to working exclusively in the touch environment, and many people may actually prefer a more ‘hybrid’ approach where you single-tap an on-screen parameter to select it and then use the data wheel to make the adjustments. This is similar to the old legacy MPC ‘cursor key/data wheel’ combination, but with the touchscreen there isn’t any need for the cursors anymore, so the workflow is significantly quicker.
You can also use the Q-links to make parameter adjustments as for most screens the sixteen q-links are automatically mapped to sixteen parameters. However while this is certainly very efficient in the MPC Renaissance with its sixteen physical Q-links, it takes more work on the MPC Touch due to there only being four physical Q-Links (the other twelve Q-Links are accessed by first pressing the dedicated Q Link button to change the ‘active’ column’). Also on the MPC Renaissance LCD display the parameters are arranged in a clear 4 x 4 grid mirroring the Q link arrangement; in the Touch UI parameters are arranged in a more freeform manner, so it’s difficult to see which Q-Link is assigned to which parameter.
Now while the rather functional ‘parameter’ pages offer very little, if any, ground-breaking improvements over the traditional hardware UI, there’s obviously other areas where the Touch UI proudly shines, from the tactile ‘drawing’ of filter and amplitude envelopes, all the way up to to the ‘headline’ touch features of waveform ‘pinch and zoom’ and drag scrolling, adding and editing sequencer events in the grid editor and real time control of effects parameters and filters in the new XYFX screen, and I’ll take a look at those in the next section.
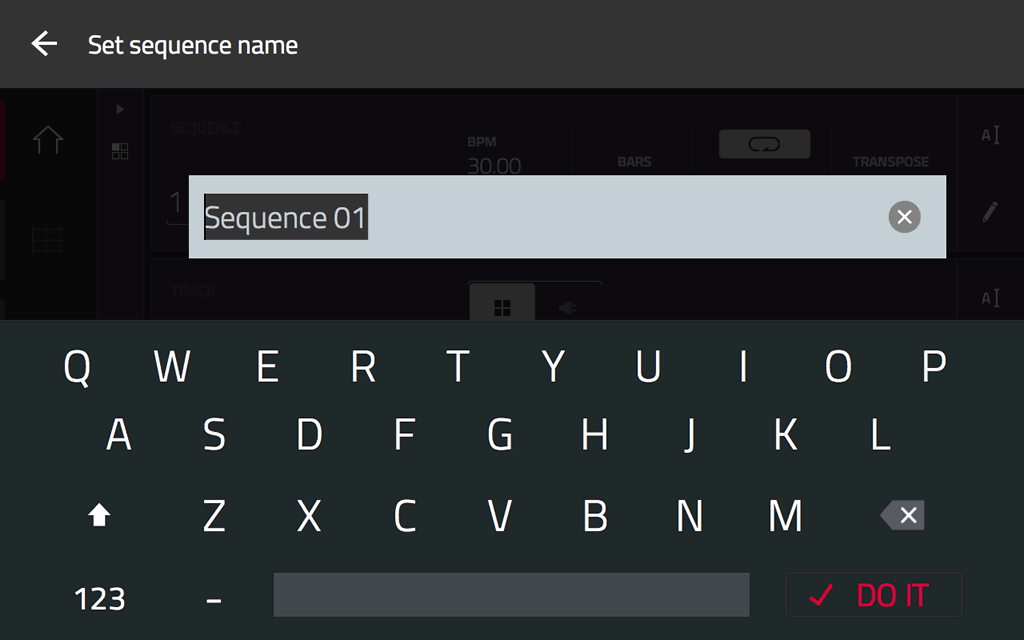
But it’s perhaps the most humble of additions to the MPC Touch that brought a satisfied smile to my face – the ability to now name files from the hardware, a feature always conspicuously missing from the Ren/Studio UI. File renaming is available whenever you see the text icon, and a quick tap brings up a small on-screen keyboard.
Here’s hoping that Akai come up with a solution for hardware naming on the MPC Renaissance and MPC Studio as well!
Hands-on Sample Editing
One of the biggest benefactors of the touchscreen tech is SAMPLE EDIT, now offering the user a very wide range of editing options depending on your own preferred workflow. For example you can still magnify the current waveform using Q-link ‘Q4’, or you can use the ZOOM +/- buttons, which are now entirely ‘virtual’ (remember there are no longer any F buttons), but as you’ve no doubt seen in the promo videos, you can now ‘pinch and zoom’ to change your zoom levels, and it’s clear many will gravitate to this workflow option.
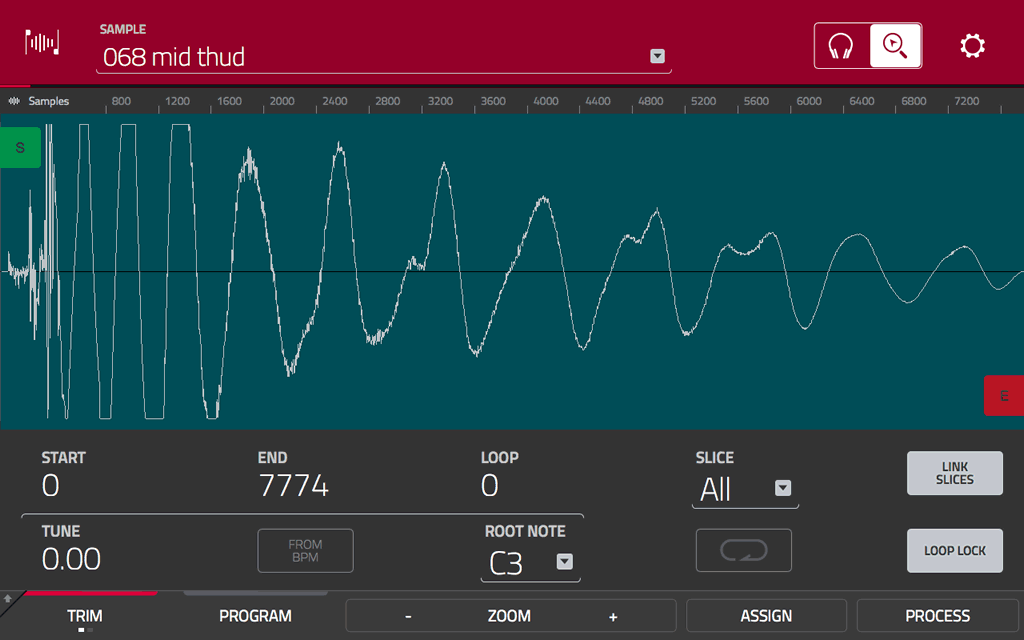
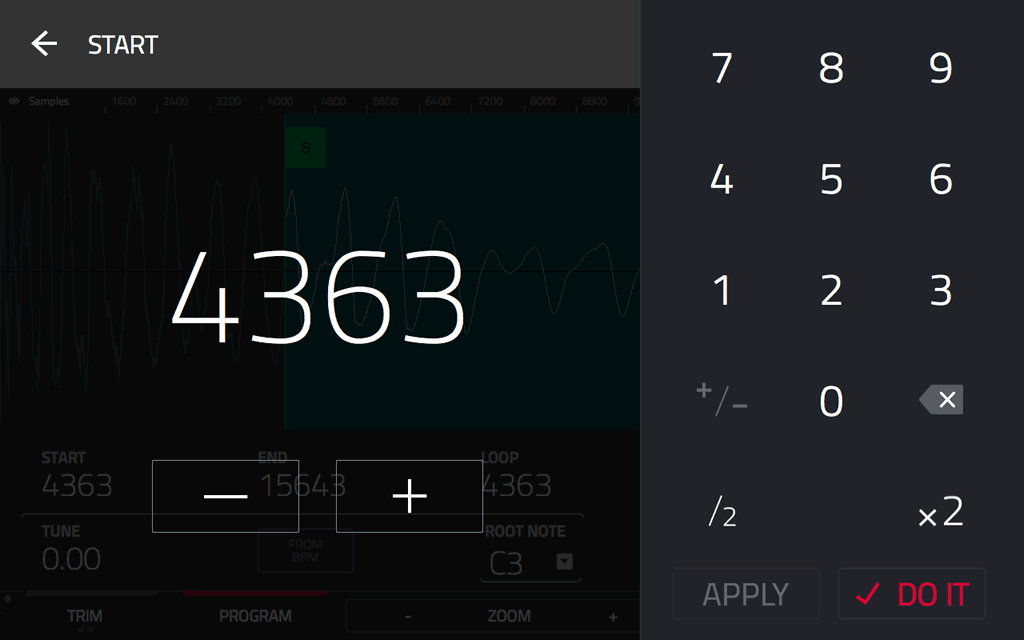
Editing a sample has also become a more tactile proposition with plenty of options to suit all workflow preferences. For example to edit a ‘start point’ marker you can:
- Drag the edit point marker to the position you wish, directly on the touchscreen using your finger
- Use the first column of Q link dials to move at various resolutions (as you would on the Ren and Studio)
- Touch the start point parameter to select it, which makes it editable by turning the data wheel
- Double tap the start point to bring up a number pad for numerical entry
Touchscreen responsiveness on the whole feels fine, but after watching the official Akai demo videos there was some concern in the community that there appeared to be some ‘lag’ when editing sample waveforms, so this was the first thing I checked after installing the Touch.
What I found was that pinch-zoom was fine, as was dragging edit point markers slowly, but if you try speeding up the drag the marker appears to be having trouble keeping up with my finger. In the following video notice how when my finger stops dead, the marker continues moving until it finally catches up:
Let’s be clear, this doesn’t stop me eventually making an accurate edit because you would naturally make the final edit much more slowly and carefully, and at those slow speeds the marker seems to have no problem keeping up with your finger, so it doesn’t equate to a big deal in practice and I’m sure this is an area that will get tweaked in the future. Other than this I have generally found ithe Touch UI to be very nippy and responsive.
XYFX
The MPC Touch also comes with a completely new mode called XYFX, which is simply an interface to perform real-time effect or filter parameter changes by dragging your finger around the screen (think Korg Kaoss).
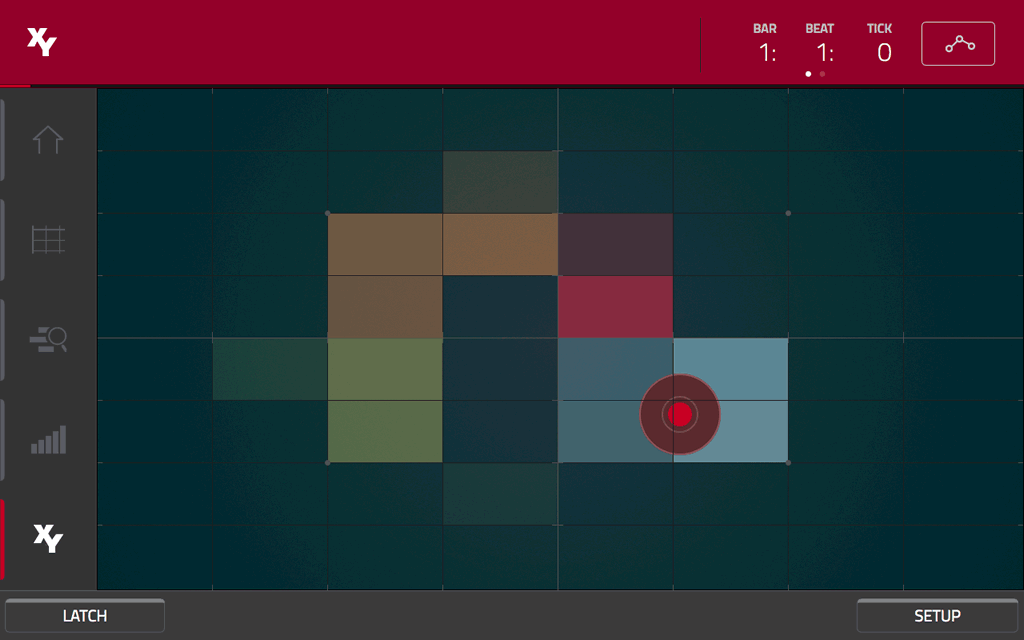
Parameters that can be controlled include hi/low/band pass filters, phaser, flanger or delay, plus various preset combinations such as ‘delay LPF’, with different parameters being changed on the X and Y axis of the screen:
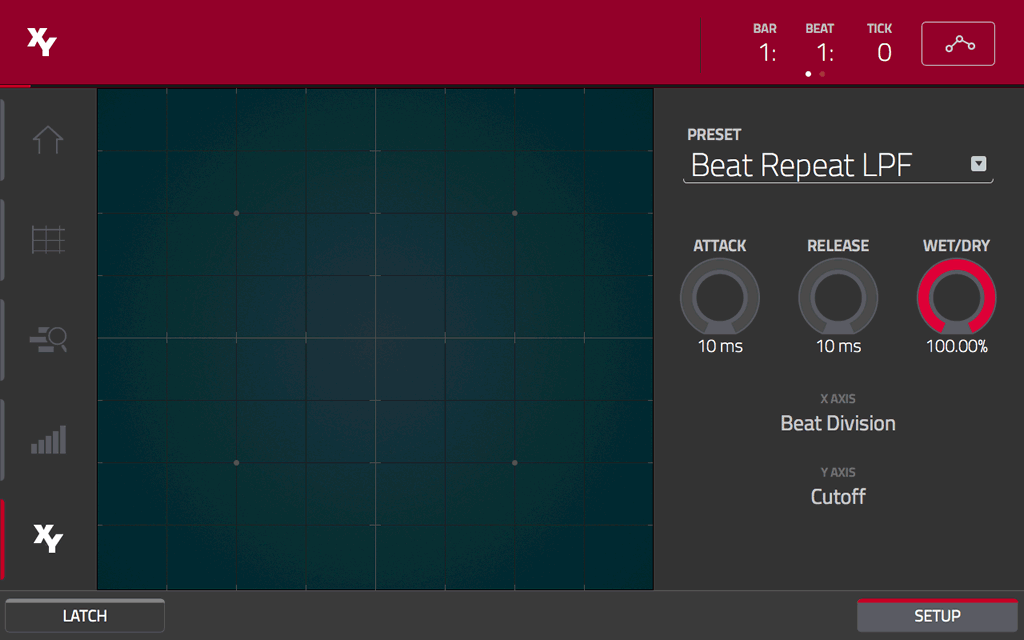
This is a fun feature which provides an alternative approach compared to the Q links and will no doubt will be seen in many live performances. It’s worth pointing out that the ‘floaty’ feel when moving your finger across the touchscreen is also present here, however I get the distinct impression that in the XYFX screen it is more ‘by design’ to improve the ‘eye candy’ factor – there’s certainly no real requirement for the XYFX movements to be millimetre accurate in this screen.
Grid Editor
The GRID EDITOR is another mode that feels right at home in the touch environment, allowing you to quickly and easily add, edit and move events within your sequence, fully benefiting from pinch and zoom abilities to get close to each event for more accurate editing:
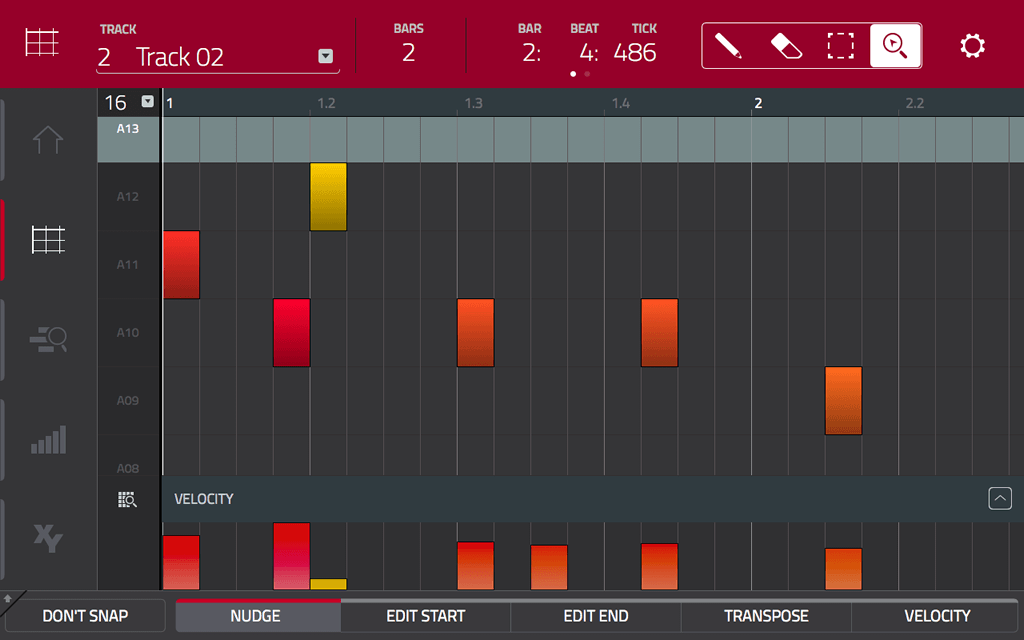
Select the pencil tool and touch the screen to add an event. Choose the ‘select’ tool and drag the event around the grid, or press NUDGE and use the data wheel. Select EDIT END and move the data wheel to adjust the length of the event. It’s a little bit convoluted, but my first impression is that it’s a fair way to tackle touch version of the Grid Editor, and no doubt it will get tweaked based on user feedback.
It’s worth noting though that if you require very precise control over sequencer events you’ll find that the Touch UI is currently somewhat lacking as there is no list editor in the Touch UI, and as such there’s no way to add or edit events such as MIDI CC or filter envelopes and also no way to perform finer edits on existing note data, as the minimum editing unit at 996 PPQN is 4 ‘ticks’ instead of 1 tick (even with timing correct set to OFF). The included manual confirms this is the case, yet provides no explanation as to why this isn’t possible. This problem is also present in the MPC Software computer GUI, although you can get 1 tick accuracy in the List Editor, so the software is clearly capable of handling this accuracy at its core. So for some unknown reason it’s not allowing it via the Grid interface itself. Odd.
The Step Sequencer
The Step Sequencer is the MPC Touch’s recreation of drum machine step sequencer, and this is definitely a lot of fun on the MPC Touch.
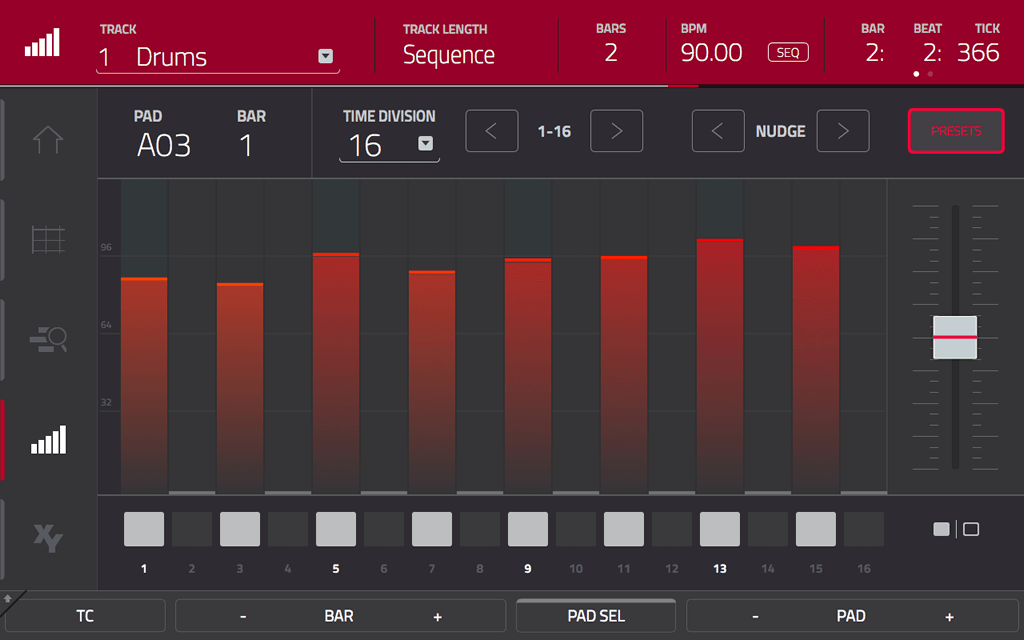
Events associated with a particular pad (A03 on track 1 in the example above) can be added or removed within the selected time division in real time using the pads or by using the touchscreen itself, and velocities of individual events tweaked by directly manipulating them in the Touch UI, or as a group using the provided virtual slider – this slider can be changed to show a list of presets that will instantly adjust velocities to a specified pattern – a ‘sawtooth’ velocity pattern is shown below):
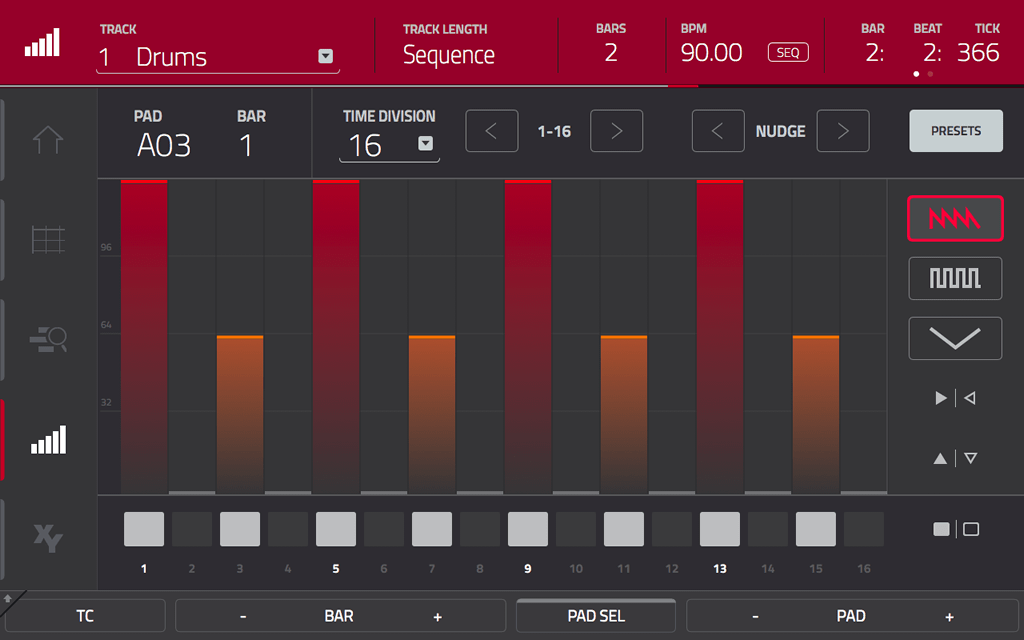
Other preset examples include a ‘flip’ (existing velocities are inverted), ‘reflect’ (events in the first half of the bar are swapped around with the events in the second half of the bar), and different descending/ascending ‘steps’ of velocities. Additionally you can completely ‘invert’ the events themselves, so time divisions that currently have events get wiped while time divisions that had no events get given events at 127 velocity – you can also nudge all events by time division to help experiment with different offset timings.
This all provides a great way to experiment on the fly with your sequences, although I suspect this is going to have varying appeal depending on your personal preferences when it comes to sequence creation. I definitely want to spend more quality time with this before make my complete judgement on it as step sequencing has never previously been my ‘go-to’ for sequence creation, but without doubt it seems a lot more fun on the MPC Touch, and plenty of scope for lots of creative ‘accidents’.
It’s worth noting that the vertical menu bar on the left hand side also provides instant access to other related modes, namely MAIN, GRID EDIT, TRACK VIEW and XYFX, so it’s nice and quick to switch from one style of sequence editing to another; this entire ‘hands-on sequencing hub’ definitely gives the MPC Touch an extra creative dimension compared to previous MPCs.
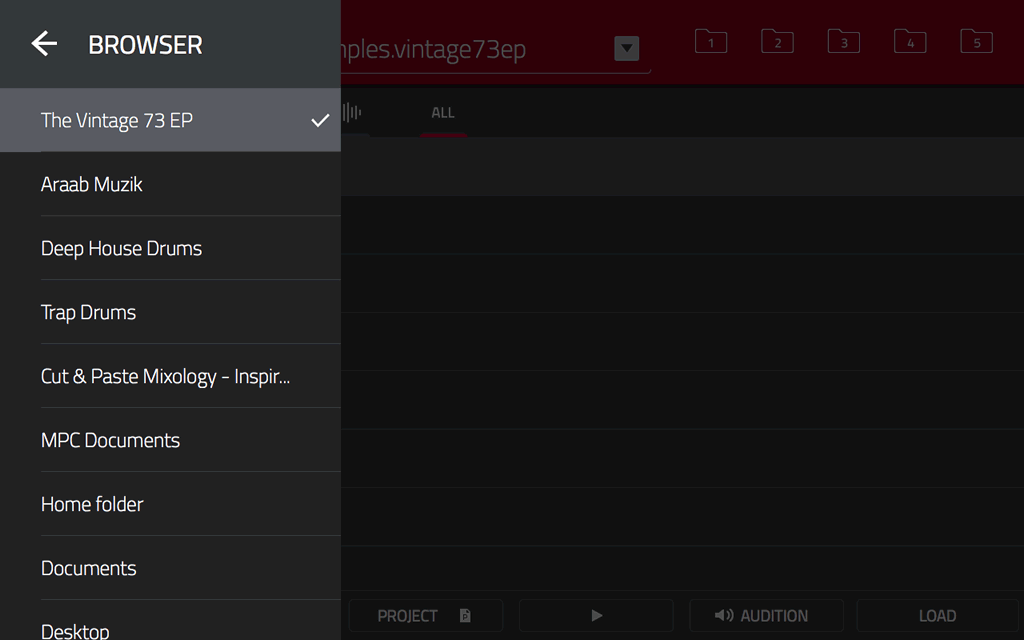
The File Browser
The File Browser of the MPC Software is currently a rather basic, bare-bones system that to date has always seemed a bit of an afterthought and in most people’s eyes is in need of some serious attention. But within the Touch UI its deficiencies are unfortunately further amplified.
The browser itself is still entirely ‘folder’ based, there’s no catalogued and tagged ‘User’ library like we have in Maschine, so the first thing you need to do is manually navigate to the folder on your hard drive containing the kits or samples you wish to load, or (if previously set) you can use one of five configurable location shortcuts.
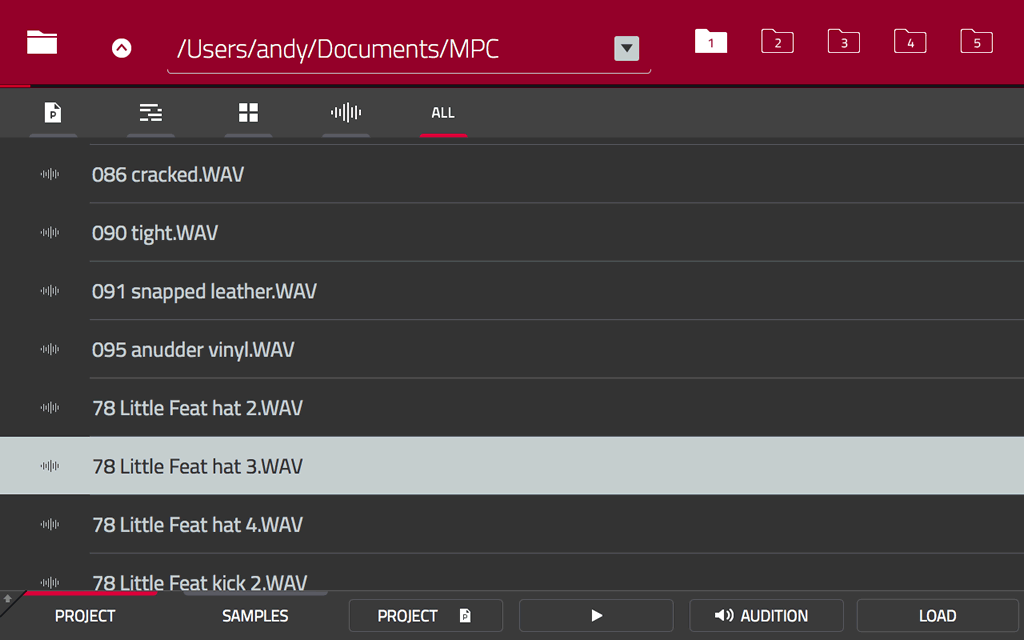
While we have filters to limit the display of a folder to ‘file type’ (project, programs, sequences, samples), navigating through a folder containing 1000s of samples is already a pain in the computer GUI but it’s an absolute dog on the MPC Touch. In the Touch UI, you can move down the list by dragging with your finger or by using the data wheel – both of which are incredibly slow, however as pointed out to me in the comments, you can speed up scrolling by using multiple fingers, with four finger dragging being the fastest and easiest way to get to the bottom of a long samples list.
But ultimately the whole experience feels clunky and it’s clear that this browser is simply crying out for a live search function to filter by search term as you type, and a sample tagging feature would also be fully appreciated – apart from helping to navigate large folders of samples, these features will also open the floodgates to being able easily search your entire user library in one go. Edit: it was announced at Winter NAMM 2016 that the File Browser is going to get a complete overhaul to include ‘search and better sorting’, probably MPC Software 2.x.
As was the case with the Ren and Studio, the whole Browser loading process itself is more limited in the hardware compared to the computer GUI, with no drag and drop to pad option and no way to select multiple but specific files for mass loading (you can load a single file or an entire folder in one action).
People familiar with the computer GUI will be aware that there are actually two different browsers in the MPC Software. The Expansion Browser is used exclusively to manage plugin based MPC Expansions such as the pre-installed ‘Hybrid 3’ synth or installable sample based MPC Expansions (either commercial or user created).
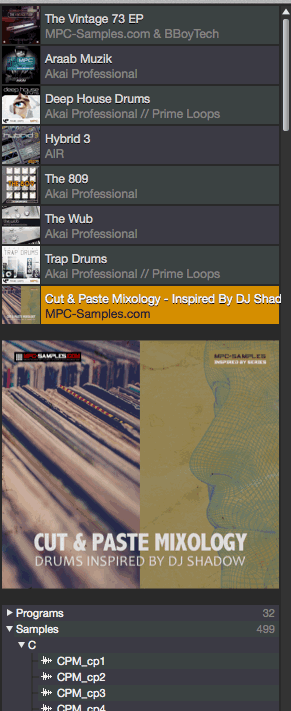
The Expansion Browser is a fairly basic implementation and clearly a work in progress, although it is now possible to use a convoluted file name ‘separator’ system that displays neatly organised categories of samples instead of a monstrous list. However in the MPC Touch there currently is no Expansion Browser available (it’s worth noting that it’s not available in the Ren or Studio hardware either).
You can however still access your sample based expansions from the File Browser using the provided drop down menu shortcuts, but these just take you directly to the actual folder on your system drive where the expansion pack is stored, so once again you are faced with the same limitations of any other folder navigating experience, amplified by the fact that Expansion packs put all their many 1000s of samples in a single folder, so you’re back to endless scrolling once again.
The MPC Touch & Plugins
The MPC Software supports use of both effect and instrument plugins, coming pre-installed with a suite of usable effects covering all the basic production essentials. There’s also the infamous ‘Vintage’ effects that mimic the sound of old classic samplers (which can now be assigned to any effect insert just like any other plugin effect), and software instruments like Hybrid3 and the Wub which provide editable synth sounds for any ‘Plugin’ type track; plus of course support for most third party VST, AU and AAX plugins.
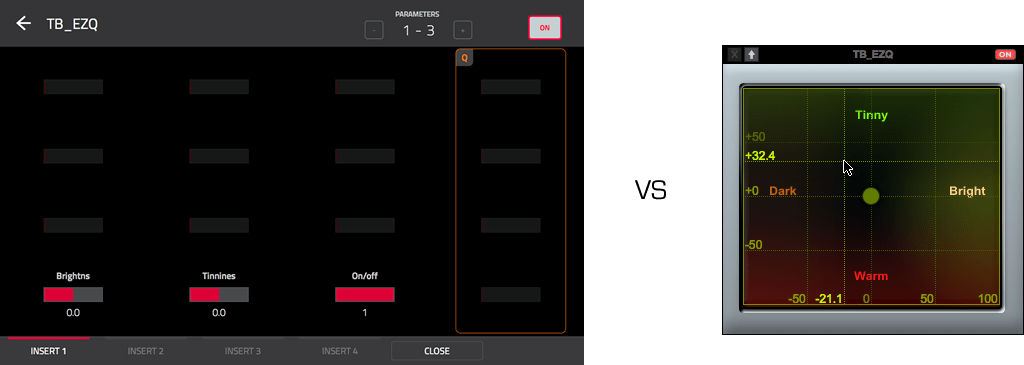
It’s worth noting that when editing plugin settings, the Touch UI is not capable of displaying the plugin’s native GUI, instead displaying a standard set of editable dials. For many plugins this is not a problem at all, but if your plugin was designed with GUI interaction in mind, for example the XYFX-similar interface of Tonebooster’s EZQ, then you will no doubt find yourself heading over to your computer to continue the more practical use of the plugin.
Er…Is the MPC Touch Standalone?
It seems the most commonly asked question upon the MPC Touch’s release was the inevitable ‘Is The MPC Touch standalone?’. Well we now very much know it isn’t, but it’s clear that the intent of the new MPC controllers is to at least provide an experience that appears standalone in day-to-day use, with the end user immersing themselves entirely into the hardware experience. So while the MPC controller may be literally chained to your computer, can we just go ahead and switch off the computer monitor and make a beat entirely within the MPC Touch?
Well it’s certainly better than the MPC Studio and MPC Renaissance, especially as we even have file naming from the hardware – it’s not necessarily always going to provide the most feature-packed or optimised experience as some MPC Software features simply work better on a computer (e.g. plugin GUI, File and Expansion browsers) and there are some handy workflow shortcuts that don’t have a direct Touch UI equivalent, such as being able to select specific multiple files for loading, drag and drop to pad, pad swap etc.
It’s worth remembering that many of those missing GUI shortcuts will still have the respective ‘longcut’ that can be accomplished via the Touch UI – for example instead of loading four samples at once in the GUI you just have to load those four samples individually in the TUI.
So what is currently stopping the Touch UI becoming ‘virtual’ standalone? Well, we’ve already seen that there is no list editor, and GRID EDIT limits the smallest editing resolution to 4 ticks, so a trip to the computer GUI is required if you need that level of control. This may not be something some people ever need and many may be more than happy with the level of accuracy that the touch grid editor provides.
The provided menu shortcut to ‘Q LINK Edit’ currently leads to a ‘Coming Soon’ page, so currently setting up the Q links for some real time manipulation of program parameters is not possible within the Touch. Similarly access to MIDI Control Mode (configuring the Touch to control specific functionality in a DAW like Logic or Ableton) is also ‘coming soon’, so that all needs to be set up in the computer GUI.
A biggie is that currently there is no Keygroup Program Edit – another ‘Coming Soon’ page unfortunately – I’m very surprised this is missing from initial release and I’ve not seen anyone mention this in any review, so it makes me wonder how many people are actually using keygroups. So currently you can load an existing keygroup program from the MPC Touch, but you cannot perform any edits to it. You can create a blank keygroup program from the MAIN page, but you cannot actually assign ay samples or keygroups to it in the Touch UI! The only option for keygroup editing is to head back to the computer GUI. EDIT: Keygroup Edit now added in 1.9.2!
This obviously isn’t ideal, plus the GUI for Keygroup Edit isn’t particularly great – for example I tried adding a velocity zone running from 31 to 65, which in the computer GUI is done by ‘dragging’ the existing value up or down, but the GUI doesn’t let me set a value of 65, only 64 or 66. Very frustrating – the only way to achieve a value of 65 is to use my MPC Studio or MPC Renaissance, both of which do have keygroup program edit!
Access to the main ‘Preferences’ page to configure audio, midi, plugins, sync and global preferences is also still an exclusive GUI option only – but not really a huge dealbreaker, as once you’ve set preferences it’s unlikely that you’ll go back any time soon.
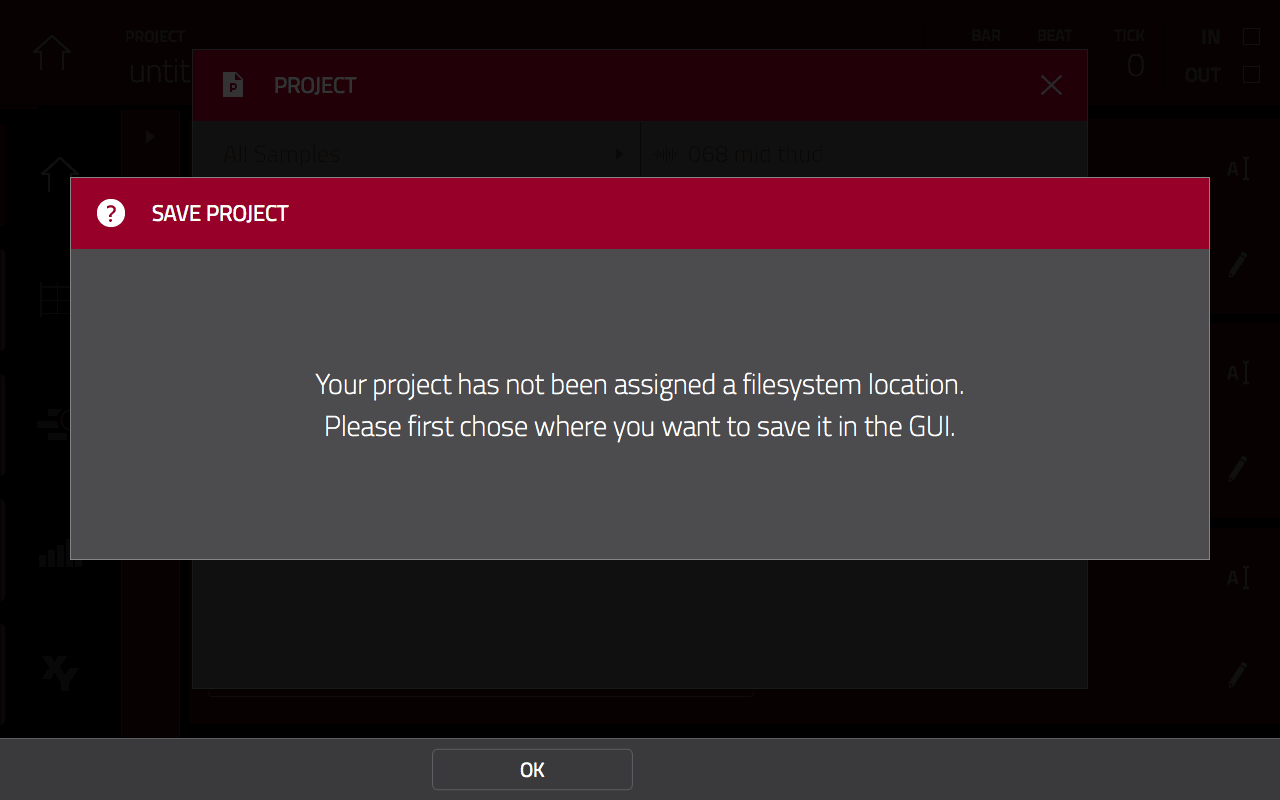
Finally, although it might seem such a minor omission, you still cannot initially save a new project from the hardware. Basically if you create a new project and go to the ‘Save’ option in the Touch UI, you are greeted with a message telling you to first head over to the computer GUI to select a saving location. Once you’ve saved it in the computer GUI you can perform subsequent saves in the Touch, it’s just that initial save that’s not possible.
Room For Improvement?
So it’s clear that Akai still cannot claim a fully immersive experience just yet – obviously we’re currently dealing with the first public release of the Touch UI so there was always going to be the need for some tweaks and it was almost inevitable that some features would be missing for us early adopters, it was the same with the original release of the MPC Software.
Hopefully all these issues will be addressed in the coming months, and to be fair since the release of the MPC Software Akai have certainly shown a dedication to providing regular and useful updates, some of them quite epic, although many heavily requested features do remain missing, such as the unrelenting demand for audio tracks.
If I had one overall gripe with the Touch UI it’s that I find the touchscreen experience a little cramped and somewhat fiddly in places. Perhaps the Touch UI could do with some design tweaks here to use bigger buttons, or maybe it just needs a bigger touchscreen. Food for though for a possible future ‘flagship’, or maybe it’s just early days and I just need to become more accustomed to using the Touch UI?
MPC Touch vs MPC Renaisance vs MPC Studio?
If you are looking to buy a controller for the MPC Software I feel I can confidently say that the MPC Touch is definitely the far better choice over an MPC Studio – it’s still portable, has better data wheel and Q links, better pads, an audio interface and of course the big touchscreen. It does however cost nearly double what the Studio currently costs (in the UK at least), so clearly it’s a step up in budget, and of course it’s ultimately controlling the exact same MPC Software as the MPC Studio does.
When it comes to the MPC Renaissance the choice is not as clear cut, as I do feel the MPC Touch is not intended to sit in the ‘flagship’ class like the Renaissance does. From a hardware perspective the Touch is generally lacking compared to the Ren – there’s less audio outs, no dedicated phono, or mic inputs, no digital in/out, less Q-links, lower grade hardware buttons, no full size MIDI ports, no footswitch, headphones around the back not front, and no palm rest.
If these things carry importance to you, then you’ll need to weigh up the Touch’s benefits carefully. I also feel it is unlikely that many Renaissance owners are going to abandon their Ren just yet, although I suspect some of them will be tempted to purchase a Touch in addition to their Ren. Also consider the possibility that a proper ‘touch’ flagship could eventually appear – I personally have no idea what Akai’s plans are, but the general vibe in the MPC user community assumes that should the Touch be a success, a ‘Renaissance Touch’ must surely follow, and winter NAMM is just round the corner…
MPC Touch Review: Summary
I must admit I was initially sceptical about the MPC Touch, however now I have one sitting here in front of me my first impressions have on the whole been very good – it’s not perfect, nothing is, but most of those problematic areas can hopefully be improved with some good (and hopefully free) software updates.
So does the touchscreen currently revolutionise the MPC experience? Well personally I feel it would be hard to argue that the touchscreen is a gimmick or ‘toy’ – it’s clearly a useful additional feature to have on an MPC and will at the very least speed up parts of your workflow, and with the more tactile sequencing modes it definitely adds additional layers of creativity. Just remember that some modes (i.e. those consisting of a collection of dials or editable parameters) never really had much to gain from the touchscreen in the first place, but I must admit that even the simple ‘hybrid’ approach to parameter editing (tap parameter and adjust with data wheel) has already become a firm favourite for me. However it’s important to remember that if you regularly deal with keygroup programs you will have no ability to edit those programs in the Touch UI, so you will definitely be waiting with baited breath for a future update to address this issue.
But all in all, the MPC Touch is definitely a big step in the right direction and it’s good to see Akai finally looking beyond the legacy blueprint that perhaps made some of their previous MPCs seems less than inspiring. With the MPC Touch I think we finally have an MPC that Akai can quietly describe as ‘innovative’ without having to cross their fingers behind their back. But is it a ‘game-changer’? I guess we’ll have to wait and see.
Already have an MPC Touch? Check out my complete hands-on guide to the MPC Touch – ‘The MPC Touch Bible‘!
8 Responses
Leave a Reply


Jan 15, 2016 8:47 pm
Thanks for the honest review. Although the screen looks sick and I love the idea of better pads, I see no reason to purchase it. It doesn’t replace my MPC Ren for numerous crucial reasons, some of which you mentioned. And it doesn’t replace my MPC Studio because the Touch requires wall power, therefore it’s not portable. I’ll still be waiting for the new flagship because the Touch falls short in too many essential categories.
Jan 29, 2016 6:40 pm
Cool review. I already own one since December last year and I can say its better than described here also the scroll feature can be sped up by using two fingers vs one, three goes even faster and four is ridiculously fast. P3ace
Jan 29, 2016 6:47 pm
Thanks for the tip regarding multi-finger scrolling!
Mar 4, 2016 3:22 pm
Hey Tutor thanks for the review….seems like this Mpc TOUCH thing looks like akai’s version of MASCHINE – same format only with the pads on the other side. Man why don’t these akai-dudes stick to their guns and do what they’ve been doing over the last decades – create great machines?? step your game up, improve the ren, make it standalone, add analog converters to it whatever 🙂 what is this copy-paste thing wanna be maschine thing supposed to be? in Lord Finesse Words: akai, please do you and “get yours and stop sweatin’ (what) the next man (does)”. peace
Apr 12, 2016 8:20 pm
How I wish you worked for Akai. I agree with every letter of every word you just said. Why cant they see this.
Mar 16, 2016 3:10 pm
hi i hope anyone can answer my question which o couldnt figure out haha. When you program a pattern in iets stepsequencer or some bars in the grid editor does that get transferred to the grid /piano roll in your daw or is there an easy way tot move it there without exporting and loading it into the daw ? Can i use the mpc touch as a direct midicontroller for editing the piano roll / step sequencer of my daw ? That would be so liberating for me 🙂
May 25, 2017 7:45 am
I love mpc touch just dont know how to load and pull up sounds
May 14, 2021 7:43 am
i own the touch and its really an amaizing tool…i dont need a stand alone as i use the mpc vst software within my daw and it really gives it that mpc touch