
This MPC2500 tutorial is taken from my critically acclaimed MPC2500 tutorial book, ‘Beat Making on the MPC2500‘, which is fully compatible with both Akai OS and the free JJOS. After chopping a snare from a loop, you’ll find that in most cases, the original decay/reverb tail is removed – this MPC2500 tutorial shows you how to get that snare tail back using some clever sequencing. This MPC2500 tutorial also works with the MPC1000.
Why Do We Lose The Snare Tail?
Chopping snares from a drum loop usually has one big problem – the reverb tail on the snare is usually chopped off because it continues decaying in the background as the next hi hat or kick of the break comes in – hence most chopped snares can sound a little short, especially ones that were chopped from a break with lots of reverb. There are a few ways we can ‘attend’ to this problem within an MPC.
- we can adjust the ‘decay’ parameter in PROGRAM to manually fade out the end to the chopped sample, however this is a ‘subtractive’ method and makes the sample even shorter (JJOS users can also use the FADE OUT option in TRIM > EDIT). It also makes the snare sound much ‘drier’.
- we can add a reverb to the chopped snare, but to ensure the rest of the chops still sound ‘part’ of the same break, we will most likely need the same reverb adding to those chops as well, and you may not want to add additional reverb to the other samples
- we can chop the same in the CHOPSHOP screen and use the ‘Release’ option to add some time stretched decay
- we can use some sequencing tricks to manually create an artificial decay.
In this tutorial, I want to look at the last option – the sequencing trick.
First off we’ll use the example of sound ‘SNARET’ from the tutorial files. Load this snare into memory and assign it to PAD A1 on a new, blank program. Have a listen to the snare – it doesn’t end very nicely, it’s quite abrupt (just as many snares sound when chopped out of a loop). To recreate the reverb tail for this sample, you could try the following.
Open up the sample in the TRIM screen. Highlight the ‘St:’ point and using the data wheel or Q1 slider, set a new start point around 6000 – this basically ignores the initial portion of the snare and just leaves us with a tail section – press ‘PLAY FROM’ (pad 15) to preview this.
As you can hear (headphones will help), there is just a small amount of snare tail just audible. Select EDIT and jog wheel to EXTRACT. Highlight ‘New sample:‘ and give this sample the name ‘TAIL’. Press DO IT to create our TAIL sample. Now return to our ‘SNARET’ sample and return the start point to 0.
Go to your new program and assign your ‘TAIL’ sample to pad A2. Open up the ‘Amp Envelope’ screen (highlight Lvl and WINDOW) and change the attack parameter from 0 to 9 – this will smooth out the start of the tail sample so it blends nicely with our ‘SNARET’ sample.
Now select PAD A1, highlight Lvl and change the decay value from 5 to something around 30 – this will also help our two samples blend nicely together.
Open up your sequencer and start a new blank sequence – call it ‘TAIL’. Set the BPM to 80 and set your timing to ‘1/32(3)‘. Open up STEP EDIT, press OVERDUB, and at 1.00.00, add a copy of pad A1 at full 127 velocity (just press pad A1).
Now press the right hand STEP button (SHIFT and BAR in the MPC1000) to advance the step editor forward to the next quantise point (01.01.08). This time, place a copy of your tail sample from PAD A2. Set its velocity to around 80. Move on to the next quantise point and repeat this, except this time reduce the volume to around 60. Continue this for around 10 quantise points, gradually decreasing the volume of the TAIL sample each time until you end at a velocity of 1.
Alternatively, you can enable ‘Auto step increment’ to avoid having to press the STEP button each time. To do this, in STEP EDIT, highlight the top left time field and press WINDOW.

Set ‘Auto Step increment’ to YES. You can leave the duration field ‘AS PLAYED’ as we are only dealing with a one shot sample. Now you can return to your sequence and each time you enter a note event, your MPC will automatically progress onto the next step.
Press PLAY START on your sequencer. You should hear a pretty realistic reverb tail. You might need to mess around with the volume settings of the TAIL instances in order to produce the most realistic decay curve, but you can certainly hear what a difference these additional samples make.
If you would like to hear my version, simply load up the project file ‘TAIL’.
At this stage, let’s turn this sequence into a unique sample using the internal re-sampling feature (as seen in the last chapter). You may wish to go to OTHER (MODE and pad 10) and set the MPC master level to 0dB, thus ensuring your resampled audio is fairly loud.
Go to the RECORD screen (MODE and pad 5). In the top left of the screen is the ‘Input’ parameter – highlight this and select MAIN OUT. Now go to ‘Mode’ and change this to MONO L (we only need to use mono for a snare). Leave everything else as it is.
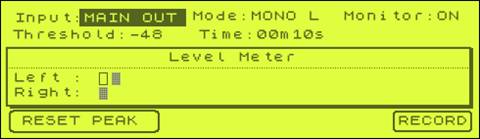
Arm the sampler (RECORD – F6) and press PLAY START on your sequencer – as soon as the sound plays, your sampler will begin recording. Once the sound has played through, press STOP on the sequencer and then press KEEP on our sample screen.
Go to TRIM and edit this sample – you might want to normalise it also (EDIT > NORMALIZE). Name this sample TAIL-FINAL – you can find my version in the tutorial folder.


Leave a Reply