Updated for new features introduced into MPC Software 1.8! This tutorial is adapted from my MPC Renaissance & MPC Studio tutorial book ‘Sampling Laid Bare’, a book which covers all aspects of sampling, sound design and program creation in the MPC Software. In this short excerpt, I look at some of the ways in which we can use DRUM programs to design our own unique drum samples. This tutorial is also compatible with the MPC Essentials software.
What is Drum Layering?
Drum layering is the skill of blending together two or more drum sounds to create a completely new sample; as a producer, it’s your way of defining your own unique drum sound. Drum layering can be as basic as taking a snare and a clap and playing them simultaneously, or it can be a more complex procedure where you carefully bring together many different sounds and textures to build an intricate collage, which can be further tweaked, eq’d and processed.
Within an MPC DRUM program there are two distinct ways in which we can combine multiple sounds together, the first method utilises ‘sample layers’.
A Simple Drum Layer
Before we proceed, download the tutorial files, and extract them to your desktop. Now create a new blank project; in the MPC Software, either go to File > New Project or hit CMD & N (Mac) or CTRL & N (Windows). Now go to your Browser and navigate to the folder containing the example files for this tutorial. Load up the program ‘Drum Layering.xpm’ – to do this in the MPC Software, you can simply drag the XPM file directly to track 1 in the current blank sequence, as this will also make this newly loaded program the currently ‘active’ program for editing purposes.
Alternatively, in your MPC Renaissance/MPC Studio controller, use the BROWSER to navigate to the tutorials folder, highlight the ‘Drum Layering.XPM’ file and press Load (F6).
This program file has loaded a bunch of drum sounds into your project – there’s a kick on A01, a snare on A05 and a clap on A09 – these are going to be our reference sounds, and we’ll use these for comparison purposes during our drum layering experiments.
Press the PROG EDIT button in your MPC Renaissance/MPC Studio to enter ‘Program Edit’ mode (if the Drum Layering program is not selected, use your cursor keys to highlight the very top row of your LCD and turn the data wheel until it reads ‘Drum Layering’).
Each pad in our MPC has four layers, and each layer can hold one unique sample. The ‘default’ sample layer is layer 1, which is the ‘S1’ parameter in the Samples screen (F2).
Select pad A06. Assign the wood_snare sample to layer 1 (this is the same snare that is already on pad A05). To do this, you can use the CURSOR buttons to navigate to the S1 field on your LCD screen and then spin the data wheel until the wood_snare sample appears, or you can just spin the Q13 Q-Link dial (on the MPC Studio, this is the top Q Link dial).
Now let’s assign the classic-clap sample (which is also already on pad A09) to layer 2 (S2) on pad A06. To do this, press pad A06, cursor down so that ‘S2:’ is selected and spin your data wheel until it reads ‘S2: classic-clap’ – or use the Q9 Q-Link (the Q-Link second from the top in the MPC Studio).
Once this is set, just hit pad A06 and you’ll hear both sounds play together – congratulations, you’ve just layered two sounds. The end result is a completely different sounding snare (or a different sounding clap, depending on which way you wish to look at it!). Now compare this new sound on A06 to the original reference files on pads A05 and A09. Of course, this is as basic as layering gets – however there are a few ways we can start ‘tweaking’ this layered sample, and one is to manipulate certain parameters on each individual layer.
Drag & Drop To Layers
So far we’ve been using the hardware to assign sounds to layers, but don’t forget that we can also assign samples to specific layers within the computer environment using drag and drop from the File Browser. While dragging your sound to a pad, hold down the shift key on your computer keyboard. You’ll see a red bar appear on the target pad:

Simply move your mouse up and down the pad and you’ll see there are four possible positions shown – to assign a pad to layer 2, simply release your mouse while it hovers over the second red layer (keep shift held down).
Additionally, you can drag multiple sounds to multiple layers. Hold down CMD (Mac) or CTRL (PC) while you click on the sounds you wish to assign multiple sounds from the BROWSER, now drag them over to your pad and hold down the shift key on your computer keyboard. Decide which layer you wish to assign the first sound to (ass indicated by the red bar) and then drop them onto that layer (still holding down shift). The MPC will now assign these sounds to successive layers on a single pad, starting at the layer you are pointing to:

If there’s more samples than available layers, the spare samples simply get put on the layers on the next pad.
Adjusting the Level
I feel the clap is perhaps a little too loud compared to the snare, so to reduce the volume of the clap sample on layer 2, we need to adjust the Level setting on column 4 of layer 2. You can use the cursor and data wheel combination to adjust this, or turn the Q12 Q-Link dial. On the MPC Studio, this requires you turn the SCROLL dial three clicks clockwise and turn the dial second from the top. Set a level of 85.
Have a listen to the result by hitting pad A06. Now you might feel that the clap sample cannot be heard anymore – however, we have our reference pad on A05 which only contains the raw snare, so compare this to our layered pad A06 and you’ll hear the subtle difference this clap is making to our snare sound – it’s giving it more body and crunch.
Changing the Pitch (Tuning)
We can also adjust the tuning for each layer independently. Let’s do this on pad A07, this way we can keep our first example untouched on pad A6. Rather than recreate all the existing sample assignments and level settings manually, we can use the ‘Copy Pad’ screen by double tapping the PAD ASSIGN button (or use SHIFT and PAD ASSIGN).

Hit pad A06 to set this as the ‘From Pad’. This means you will be copying the entire pad, including sample assignment and all program parameters. Now cursor down one line so ‘To Pads’ is selected. You’ll see a long white rectangle appear.
You can now hit any pads you wish to copy pad A06 to. We’re just going to hit pad A07 (if you make a mistake and hit the wrong pad, simply hit it again to remove it from the list). Now press Do It and PROG EDIT to return to program edit mode.
So with pad A07 select, let’s tune down the clap to give it a sligjly darker, deeper feel. To do this, change the ‘Semi’ value on layer 2 to -5 using your cursor/data wheel or via the Q10 Q-Link dial (in the MPC Studio, turn the SCROLL one click clockwise and turn the Q-Link second from top). Now play pad A07 and listen to the way it has changed our snare-clap drum layer – it gives the snare extra depth and even more ‘body’.
Adding More Layers
Let’s add an additional layer to our drum layering experiment. Once again, let’s use the ‘PAD COPY’ screen, but this time copy pad A07 to pad A08. Back in the PROG EDIT > Samples (F2) page, let’s assign clap_decay to layer 3 of pad A08. As before, you can either cursor down to the S3 parameter and spin the data wheel, or this time use the Q5 Q-Link (second from bottom Q-Link on the Studio).
This clap sounds a bit loud, so adjust its level to 83.
Manipulating Stereo Width
A common trick in drum layering is to pan each layer in a different part of the stereo field, giving your resulting sound much more complexity – it also gives you an opportunity to transform a collection of mono sounds into a single stereo sound, as currently all the sounds we’ve used in pad A08 are all in mono, so the resulting pad sound is still mono.
Copy pad A08 to pad A12 using the PAD COPY screen. Back in PROG EDIT, go to the Pan Vel screen (F3), select pad A12 and using the Q9 Q-Link adjust the ‘Pan’ for the clap on layer 2 (S2) to be 15L, and with Q5 set the ‘Pan’ for the clap on layer 3 (S3) to be 25R. Have a listen to the result on pad A12 and compare it to the original on A08 – try listening to it on headphones to hear the difference. The new sound on A12 has much more presence and stereo width.

Layer Offsetting
MPC Software 1.8 saw the introduction of a new feature called ‘layer offset’. This feature allows us to delay the playback of the sample assigned to a layer.
Firstly, assign the classic_clap sample to both layer 1 and layer 2 on pad A11. Listen and you’ll hear a louder version of the clap on pad A09 (it may also sound a little phased).
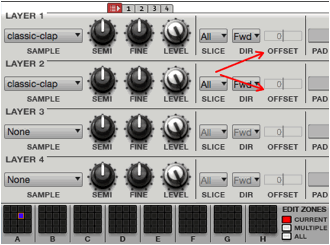
Now let’s adjust the layer offset on pad A11. In the MPC Software you’ll see the offset settings highlighted below:
To access the offset settings in the LCD, first press Samples (F1) to view the standard Samples screen:
Notice how the ‘Samples’ tab has four squares underneath? These are the sub tabs to allow access to additional features – to access the second sub-tab, press F2 once again. In the MPC Software, this has the action of simplifying the Prog Edit display to remove unnecessary clutter:
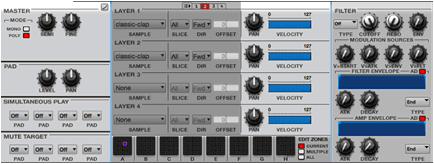
As the tabs show, there are 4 different displays available, each one optimised for different parameters:
If you press each one you’ll see that the MPC Software reveals and hides different elements each time. To return to the full display, just hit the initial tab with the black triangle within it. For the moment, leave tab 2 selected.
What we want to do now is to offset just one of the layers so it ‘comes in’ a little later compared to the other layer. To do this, select the Offset parameter for layer 2 (S2) and start turning the data wheel anti-clockwise so the offset value is becoming increasingly negative.
You can change the offset value more quickly by using Q-Link Q12 or with your mouse in the MPC Software – hover over the offset area until you see the up/down arrow cursor appear; now click and drag down to lower the value, or drag up to increase the value.
You can also enter a value by left clicking in the offset box, entering the number required and hit the return key on your computer.
At lower negative values (e.g. -120), the two layers are just phasing, however as you reach -1200 or greater, the phasing is gone and now we are instead getting a different type of sound. This is the familiar ‘dragging’ clap sound. Pick a value that sounds good to your ears, I set mine to -1427. But don’t forget to experiment with even greater negative offsets, for example –5838 exaggerates the delay effect between the two layers and gives another interesting variation (I’ve placed this version on pad A3).
Finally let’s reduce the overall level of this entire pad as the layering has increased the output level a little, so go to the Master screen (F1) and set the Level to 76; the levels on pad A11 and pad A09 are now very similar.
The Limitations of Pad Layers
So far in this chapter we have been modifying each layer in our pad slightly differently using panning, level and tuning. But what about applying something like a low pass filter to only one layer? Well unfortunately that’s just not possible – program parameters such as filters and amp envelope are applied to the entire pad, they cannot be applied to an individual layer – it’s all layers, or nothing.
This is definitely not ideal, as when performing more advanced drum layering techniques we would want to ‘shape’ and effect each layered sample differently – for example, we may want to build a layered snare that used the ‘crack’ of one snare sample, mixed with the body of a clap sample and the decay of a rim shot. We can do this using the ‘Amp Envelope’ that we discussed in previous chapter – but in order to do this, we’ll have to look at an alternative function found in DRUM programs.
Layering With Simultaneous Play
Simultaneous play is where we configure one pad to automatically trigger the simultaneous playback of up to four other pads. Using this method we can ‘layer’ together entire pads rather than just the sample layers within a single pad. This way, we can shape each individual pad using every single program parameter available to us, and then layer each pad together to create some pretty awesome layering possibilities.
Select pad A13 and assign the wood_snare sample to layer 1. Now select A14 and assign the classic_clap sample to layer 1. These are going to be the pads we trigger using simultaneous play.
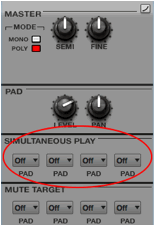
Select pad A16 and in Prog Edit, press ‘Master’ (F1):
You’ll see this in the MPC Software:
At this point, note that pad A16 currently has no samples assigned to it, so hitting this pad produces no sound at all.
The ‘Simultaneous Play’ option simple to use. Cursor down to ‘Sim Play 1’ and change this from ‘Off’ to A13 using the cursor/data wheel, or the Q5 Q-Link. Now trigger A16 again, and you’ll hear the wood_snare assigned to A13 play back. All that is happening is that whenever pad A16 is played, it ‘simultaneously’ triggers pad A13 as well.
With A16 selected again, set the ‘Sim Play’ slot ‘2’ (Q6) to read A14 (the pad containing classic_clap).
Now when you re-trigger A16, you can now hear the sounds on A13 and A14 play together. Just remember that only A16 will trigger A13 and A14 pads simultaneously.
Now, obviously any parameter changes you make to A13 and A14 will also affect our ‘simultaneous play’ pad A16. So, go to Samples (F2) and drop the ‘Semi’ value for the clap on A13 to -5 and now have another listen to A16. At the moment this actually just seems a more convoluted method of creating the exact same layered sound we previously made on pad A07 using ‘sample layers’ – compare A16 to A07, they are identical. However the real benefit of using Simultaneous Play is that we can now start using the ‘pad’ parameters like filters and Amp Envelope to shape our ‘layers’ individually.
‘Painting’ With Sample Elements
By manipulating the attack and/or decay on one (or both) of the samples in your layer, you can mould each layer exactly to how you want it and then ‘combine’ your two moulded sounds via ‘Simultaneous Play’ in pad A16.
Select the clap ‘clap_decay’ on A14 and go to the Flt Env screen (F4). We’re going to use the default ‘AD’ (Attack-Decay) envelope. Now begin hitting pad A14 while you slowly and gradually adjust the Amp Attack value (Q1), continually previewing the pad while you do. Carefully listen out for the point where the attack of the clap is effectively removed – a setting of 78 should do the trick. So here on pad A14, we have created the ‘decay’ part of our layered sound.
Now over to the snare on pad A13, where I want to keep that lovely attack and lose the decay. This time, let’s use the other Amp Envelope available to us – the AHDS envelope. To access this, we need to change the Amp Envelope ‘type’.
To set this in the LCD, first press the Flt Env button (F4) and notice that the WINDOW button lights up. Hit WINDOW and you’ll see the following:

To enter AHDS mode, set ‘Volume Envelope AD Mode: OFF’ (this should probably be called ‘Amplitude Envelope AD Mode’) and press CLOSE. You can also do this direct in the computer by clicking in the red square at the top right of the AD envelope to make it white:

Take a look at the waveform. We now have four parameters to adjust. Attack is the same as we’ve seen in the AD envelope. We then have hold (H), decay (D) and Sustain (S). Let’s see how these all work to allow us to ‘shape’ our snare.
Firstly, turn Q4 anticlockwise until the sustain value is down to zero:

If you listen to pad A13, it’s nothing but a short click. By giving the sample no sustain whatsoever, we’ve removed pretty much all the sound from our sample apart from a very brief initial attack.
Now turn the decay (Q3) to a value of 59:

If you preview A13 now, you can hear a bit more of the attack. As you can see from the envelope graph, the decay is controlling the way the sound makes it’s way to the sustain portion of the envelope. The higher the decay value, the longer it takes for the sound to reach the sustain you’ve set. With a sustain of zero, the decay portion is basically controlling a standard fade out, similar to the decay of the AD envelope.
Now I want to hear a bit more body from our snare, so gradually increase the ‘Hold’ value using Q2 to a value of 16.

As you can see from the graph, the hold value is literally ‘holding’ the initial volume before letting the decay portion take over. The higher the hold value, the more of the sample will play before it enters the decay portion of the envelope. Preview A13 and you should hear that by ‘holding’ the sample for a while, it’s allowing us to control the amount of snare ‘body’ that will be heard before the sound fades out in the DS portion of our AHDS envelope.
This is pretty sweet as it gives you a very nice way to precisely mould your sounds. Compare the snare on A13 to the original snare on A05. Our new version is tighter and has minimal decay – it’s mostly attack and body.
If you wanted more body, simply increase the hold value a bit more. If you want a longer decay, increase the decay value. Have a listen to the layered sound on A16 and compare it to the ‘sample layer’ version we made previously on pad A07. Our new A16 version has a much more natural sounding body portion as basically we’ve reduced the overlap of the two samples in this central area.
You can now tweak your Amp Envelop settings on each pad to adjust the end result to your exact needs.
And there’s no need to stop at snares and claps – try the same technique with kicks. Take a booming bass drum and layer it with a thin old vinyl kick – try shaving off the attack on the booming kick and maybe take a little decay off the vinyl kick and you should get a nice crunchy kick drum with plenty of low end.
The Next Level
This tutorial was adapted from chapter 5 of my MPC Renaissance/MPC Studio tutorial book, ‘Sampling Laid Bare’. Also discussed in this chapter are more advanced aspects of program-based sound design including the use of filters in drum layering, combining both ‘Sample Layers’ and ‘Simultaneous Play’ to produce much more complex drum layering experiments, the use of LFO for advanced modulation-based sound design, and using insert effects such as compression, EQ and distortion to create a variety of essential sounds.
The entire book includes step-by-step workshops in all aspects of sampling, sound design and program building in the MPC Renaissance and MPC Studio, covering a wide range of topics such as chopping, sample editing, building finger drumming kits, multisampling and creating realistic instrument programs. You can get more information about the book from MPC-Samples.com.







Jul 26, 2013 10:10 pm
Thanks for sharing some knowledge Tutor !
Real layering/Sound design with simultaneous play, different effects and envellopes can be used so, way more creative than 4-Layer on 1 pad. For Sure !
Mar 19, 2014 1:29 am
Hey how are you, I’m new to the renisance and would like alil help with sampling and bring up sounds, I was about to bring up drum sounds but not the sounds in noise disc, or the other discs. ? I tryed to drag and drop like I did with drum sounds and it didn’t work. The waves wouldn’t do anything.
Also the mpc renesance won’t except update.
Jun 6, 2014 5:33 am
HOW DO YOU BREAK DOWN A BEAT ON A MPC STUDIO
Mar 8, 2016 1:23 am
i wanted to if there is a way to cycle between each sample after they are all layered to one pad.. for e.g. every time i hit that pad i want it to cycle between the 4 sounds individually 1st hit-kick , 2nd hit – snare , and so on.. just like in that mpc 5000.. i have a Ren.. thank u.. anticipating ur reply..
Mar 11, 2016 11:37 am
Yes, set ‘layer play’ from VEL to CYC. Detailed tutorials in my book: http://www.mpc-tutor.com/product/mpc-renaissance-mpc-studio-sampling-laid-bare/