This MPC2000XL chopping tutorial is adapted from my comprehensive MPC2000XL tutorial book, Beat Making on the MPC2000XL. Here we will go through the process of chopping up a break in the MPC2000XL ‘zone’ page. Once chopped, we’ll recreate the break with our new chop program and an MPC sequence, and finally we’ll use the zone function to create a cool stuttered break.
Chopping Samples in an MPC2000XL
Looping a drum beat is fun, but using that same 2 bar loop within your whole track can be pretty boring. By chopping up a break beat loop, we can create something unique, something that can change throughout the track. We can also get rid of vinyl pops and crackle by selecting only certain elements of a beat – and finally we can create some interesting special effects.
Methods for Chopping Breaks
Why do we want to chop a break? Well, normally it’s because we wish to use the drum sounds within the break and generally keep the same atmosphere and production associated with the break, but we need the break to either ‘fit’ into an existing sequence or we would like to change the groove or note order of the break. We may also wish to perform special tricks to the break or we may simply wish to extract a particular drum sound from the break to use in one of our own beats. Perhaps your break contains some nasty pops and scratches that you would like to remove, or maybe you just want to make a boring old 2 bar loop a little more interesting. There are lots of other reasons for chopping up breaks – for a start, it’s a lot of fun and it can be a challenge to transform something quite familiar into something that sounds completely different.
So how do we go about chopping a break? Looking back at 012 ‘Editing samples Part 2’, we came across the ‘Section New Sound’ function in the Sample Edit screen – this provides us with one method of chopping a break – this function allows us to select a section of a break and turn just this section into a completely new sample. So in theory, you could keep selecting different sections within your break and creating new samples from it. That’s okay and we shall use this later to do some small chops, but our MPC has a quicker way of chopping an entire break into manageable chunks – the Zone function.
Zone Function Overview
The MPC zone function takes any sample (it doesn’t have to be a drum loop) and automatically creates separate sections or ‘zones’ within that sample, each one of these zones will eventually be a completely new sample in its own right. Each zone is completely editable using the same trimming techniques discussed in previous tutorials. After creating your set of zones, they are automatically assigned to a new program (in running order) so you can immediately start creating a new groove out of them. The easiest way to see how the zone function works is to work through an example.
Load up the drum beat ‘SIMPLE.SND’ from the tutorial files and assign it to any pad. This beat has been trimmed and looped already for you using the techniques covered in previous tutorials. If you go to PARAMS in the TRIM screen you’ll see that the loop is 4 beats long (1 bar) and is 63.9 BPM. Keep your finger on a pad and listen to the beat looping. It’s a nice beat (you may recognise it), but it wont sound that good looped in its current state because that roll at the end will become very annoying after a while…
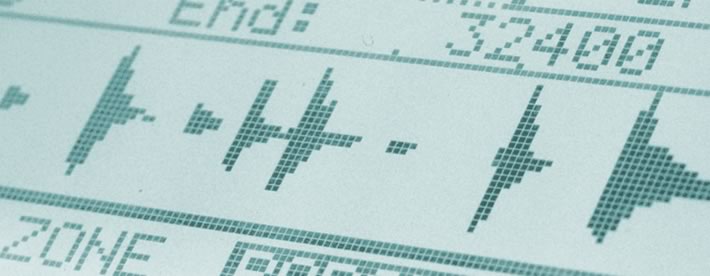
Press the ZONE button (F3). This is the Zone screen, where we can slice our loop up quickly into smaller parts.
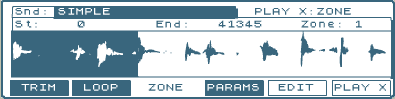
Looking at this screen shot, you can see that the name of the sample is shown in the usual place at the top left corner. To the right you will see the PLAY X parameter. Initially, this will be set to ALL. This means that when you press ‘PLAY X’ (F6) you will hear all of the sample. Highlight this field and jog wheel once to the right so it says ‘ZONE’. This means that when we press PLAY X (F6), it will play only the zone we have selected within our sample.
Navigate so that ‘Zone: 1’ is selected. Now jog wheel to the right and you’ll see the number increase – at the same time, the highlighted ‘zone’ within the sample also changes. What you are doing here is simply running through all the existing zones that our MPC has set by default. You’ll see that there are 16. Go through each zone and press PLAY X to hear what each zone initially sounds like.
How does an MPC decide where to place the zones?
If you’ve ever used the computer software ‘ Propellerheads Recycle’, you’ll know that Recycle analyses the peaks of the drum beat waveform and automatically slices your beat into perfect zones. The MPC on the other hand does not do this – in fact it is blissfully unaware of the exact position of your drum hits. The MPC simply takes the length of the sample and divides it into equally spaced zones.
So if a sample was 1000 samples long and we sliced it into 10 zones, each zone would be 100 samples wide. This means that 90% of the time, we need to make some manual adjustments to the width of the zones as some drum hits will be cut off slightly.
With the ‘Zone:’ field still highlighted, press OPEN. Here you can change the number of zones available. Using the jog wheel or the number pad, change the number of zones to 4 and press DO IT. Now if you spin the jog wheel on the zone parameter, it will show all the zones available as being 4. As you can see, each zone is a lot larger now, as the beat has been evenly sliced into 4 rather than 16 zones. As this loop is 4 beats (or one bar) long (as shown in PARAMS) we can safely assume that each of these slices can represent one beat.
With Zone 1 selected , press F6 (PLAY X). This is what our first slice will sound like. Listen to the other 3, and you’ll notice that Zone 3 is slightly cut off at the start. Looking at Zone 2, we can see that the start of the third beat is actually contained within zone 2. Why is this? Well most drum beats are played by real drummers. Real drummers don’t play to a quantise template, they sometimes hit a snare slightly behind or ahead of the beat, giving the music some swing and feeling – and even the tightest drummers simply make the odd ‘mistake’. When cutting up drum breaks recorded by real drummers it is quite common to find that certain hits don’t ‘line up’ exactly on the beat. So, the MPC divides your loop into equal parts based on the number of zones you select. This is why some hits will get cut off and this is why you need to adjust your zones.
Adjusting Zones
This is pretty simple. It’s the same method as you would use in sample trimming, except this time you need to adjust the start and end points of multiple zones instead of just the one ‘zone’ present in the main TRIM screen. The procedure is simply
- select a zone
- navigate to its start point (‘St‘)
- hit OPEN to reveal the ‘fine’ adjustment window
- trim to the start of the hit using your jog wheel – you’ll only need to make a minor adjustment in most cases
- go to the end point of the same zone, hit open and repeat the procedure.
Let’s adjust the zones in our sample now. Go to Zone 1, and select the end point and hit OPEN window (we don’t need to trim the start point for this zone as it is the beginning of the sample and we’ve already trimmed that when looping). The end point is currently at 41345, and as you can see, this is slightly cutting off the start of the next zone. Move the jog wheel until you are at the start of the hit, (around 41166) and return to the MAIN screen. Now zone 1 is perfectly edited and in the process, you’ve also made sure the start of zone 2 is perfectly trimmed.
Select Zone 2, select its end point, and repeat the adjustment for this zone, making sure that the end zone of zone 2 does not fall on the drum hit that is supposed to be at the start of zone 3 (around 81710). Go through all 4 zones to make sure everything is as perfect as possible.
Slicing
To finally slice your zones, hit EDIT. You’ll see this following screen:
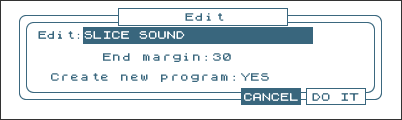
Here you need to set your End Margin. Adding an end margin is supposed to help stop gaps forming in your sequenced beats due to the abrupt way that your slices get chopped. The end margin for each zone is actually ‘borrowed’ from the zone preceding that zone. So setting an end margin of ’30’ will actually take 30 sample points from zone 2 and add it to the end of zone 1. It will also take 30 sample points from zone 3 and add it to the end of zone 2 and so on. Only your last zone does not get anything added as there is no zone in front of it to ‘borrow’ anything from.
Unfortunately, this is not the ideal solution to the problem of cutting off the end of slices too abruptly – it leaves a small click at the end of each sample which can be noticeable in certain situations. We’ll look at ways of overcoming this problem later.
Set your End Margin to 35 as this is a good compromise, and keep ‘Create New Program‘ set to YES. This tells your MPC to create a new program out of your slices. Press DO IT, and the MPC slices your beat, creating a new program with your four slices on PADS A1 – A4. To see your new program you’ll have to manually go into PROGRAM (SHIFT & 6) and select the DRUM number that is currently highlighted along the bottom row.
If you like, load up the ‘simpleA.PGM‘ file from the tutorial files. This is my version of the chopped up beat (but you can use your version if you wish). Play the pads A1 to A4 to hear your cuts/slices. You’ll notice that the pad A1 chop has a small tick after it, don’t worry about that for the moment, we’ll deal with that later.
Recreating The Original Break
First, let’s recreate our original break within our sequencer. Go to a blank sequence and set the BPM to 63.9, set the timing to 1/8 and make sure that track 1 is assigned to the DRUM holder that your chopped beat is stored in. Now, remember that we chopped our break into 4 slices and our break was exactly 4 beats long – that means each slice is one beat. So let’s place each one of these slices exactly on a beat.
In your ‘Now:‘ field (top right of your main sequence page), you have 3 sets of numbers, 001.01.00, which we saw in previous tutorials represents the Bar (001), beat (01) and tick (00) position. So beat 1 is represented by 001.01.00. Beat 2 is represented by 001.02.00. Beat 3 is 001.03.00 and beat 4 is 001.04.00. So to place our zones ‘on the beat’ simply go into step edit and add our slices at these four points.
Make sure you are at the start of your sequence and press STEP (F1). Enter your first slice here (pad A1). Now navigate to 001.02.00. The easiest way to do this is to use the STEP cursors above the REC button – as your timing is set to 1/8, this involves press the right STEP key four times. Enter your second slice here (pad A2). Enter pad A3 at 001.03.00 and pad A4 at 001.04.00.
You can load the sequence BEAT1.MID from the tutorial files to hear my version. Whichever sequence you use, press PLAY – doesn’t sound quite right, does it? Some of the beats seem to come in a little too late…
Fixing The Timing
Remember that we had to adjust our zone positions earlier. We did this because our hits didn’t fall exactly ‘on the beat’. To recreate our original beat, we cannot simply place all chops exactly at 001.01.00, 001.02.00 etc, we would need to place some slightly before in each case, as the original drummer was playing slightly ahead of the beat – remember, drummers do not obey strict quantise points – this is what gives real drum performances their feel.
Load up BEAT2.MID. This time, I’ve placed the chops 2, 3 and 4 slightly behind the beat by setting the ‘timing’ field to ‘OFF’ and using step edit to place the notes in their new position. That sounds a lot better!
Arranging the chops this way has kept the original feel of the beat – but the real fun with chopping is when you begin to rearrange your slices, change the ‘feel’ of the break, or even chop it down further to create individual drum hits that can be used to build a drum kits – once you have a drum kit you free to write completely new breaks entire from scratch. I cover all these techniques in great detail in the complete book. But before we finish this tutorial, I wanted to show you a very very cool trick that can be made entirely within the zone screen in only a few seconds.
Choppy, Stuttering Loops
If you like DJ Shadow, here’s an effect that you may hear on some of his early tracks. A stuttering break is very easy to make with an XL – it uses the fact that within the zone screen, you can take any slice and perform an edit to that particular slice only (while leaving the rest of the sample intact).
Load up ‘STUTTER.snd‘ from the tutorial files. Press TRIM (shift and 5) and then press F3 to go to the ZONE screen.
We want to slice our sample as many times as possible, so we’ll leave it set to the default number of zones, 16. Go to the top right of the screen and highlight ‘PLAY X‘ and use your jog wheel to change this to ‘PLAY X: ZONE‘ – this means whenever we press ‘PLAY X‘ (F6), it will play our selected zone. Now the great thing about this technique is that you don’t really have to worry about your zone start and end points being perfectly set, so in most cases you can leave them at their defaults.
To create the stuttering effect, we’re simply going to select alternate chops and mute them. This can be done using the ‘SILENCE’ function available in the EDIT screen. First highlight ZONE 2 and press EDIT (F5). This will, by default bring up the SLICE SOUND page, but we do not want this screen – jog wheel three notches to the left so that you are in the SILENCE SECTION screen:
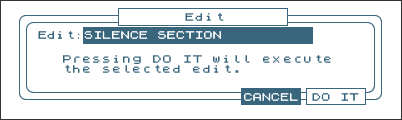
To silence this slice only, simply press DO IT – this is because any sample edit function in your MPC will only ever apply itself to the audio between the currently selected ‘start’ and ‘end’ points. When dealing with zones, this is simply the start and end point of the currently selected zone.
After pressing DO IT, you will return to the ZONE screen where you’ll see that ZONE 2 appears to be blank. Press F6 (PLAY X) and you’ll hear nothing. Now continue to do this for every other slice – i.e. 4, 6, 8, 10, 12, 14, 16. Once you’ve muted (‘silenced’) all these zones, just hit your pad and the break will play from start to end, stuttering away quite happily – you can now save your new stutter break to disk. To hear my version, load up ‘STUT2.snd‘ from the tutorials folder.
Beat Making on the MPC2000XL
This tutorial is one of 48 MPC2000XL tutorials you can find in my definitive guide to using the Akai MPC2000XL – in it I cover everything you’ll ever need to know from the very basics right through to advanced sequencing, kit building and sample editing. The aim of the book is to encourage as much creativity as possible, so all important MPC2000XL functionality is taught by using practical, real world beat making examples, with clear, step-by-step tutorials and all the files you need to recreate the projects in your MPC while you read. Beat Making on the MPC2000XL is an instant digital download, available from my site, MPC-Samples.com.
One Response
Leave a Reply
Latest Posts

"Electric Bass 3 - Now With MPC Sample & MPC3 Support
MPC Bible 3, Revision 6 - MPC Oscillators, MPC 3.9, MPC One G2 + MPC Key 37 G2

Downbeat Kit 3 - Acoustic Drum Kit Expansion For MPC3

MPC Bible 3, Revision 4 - Clip Matrix, MPC 3.7 + MPC XL

Sep 1, 2014 9:02 pm
Wonderful site!!! I love my mpc and I love your site too!!!