Update: Since the release of firmware 2.3, the workflow described in this tutorial is now superseded by my new Autosampler tutorial!
This has been my most requested MPC X & MPC Live tutorial ever – how to create ‘standalone’ MPC instruments from your favourite VST plugins!
We all know that we can’t use plugin instruments while in ‘standalone mode’ in our MPC X & MPC Live, but we can quite literally ‘clone’ those plugins by multisampling them and creating native MPC ‘keygroup’ instruments from those samples.
So I thought it would be pretty cool to come up with a really quick ‘plugin cloning’ solution for the MPC X/MPC Live community, so here it is, the ‘VST-2-MPC’ workflow that will allow anyone to clone their favourite plugin patch using nothing but an MPC X/MPC Live in under 3 minutes!
This 10 step workflow handles the bulk of the work for you, it even renames all your samples and automatically maps them to a fully working keygroup program!
Before You Start
The first thing to do is download the workflow files and extracted the contents to any location on your computer (e.g. Desktop).
Fire up MPC Software 2.x and connect your MPC Live/X via USB to your computer and turn on your MPC. Go to MENU and hit the ‘MPC’ chip near the top right of the screen and select CONTROLLER MODE.
Now this workflow can be completed entirely in the computer GUI (there’s one task that has to be done in the GUI) but on the whole I’m going to explain the workflow from the hardware/touchscreen UI as that’s what most MPC X and MPC Live users are used to.
Please note that to keep this tutorial as compact as possible I do assume you already have a working knowledge of the MPC X or MPC Live; if you need more help understanding topics such as multisampling, keygroup editing, sample editing and sequencing then check out my hands-on tutorial guide, ‘The MPC X & MPC Live Bible‘.
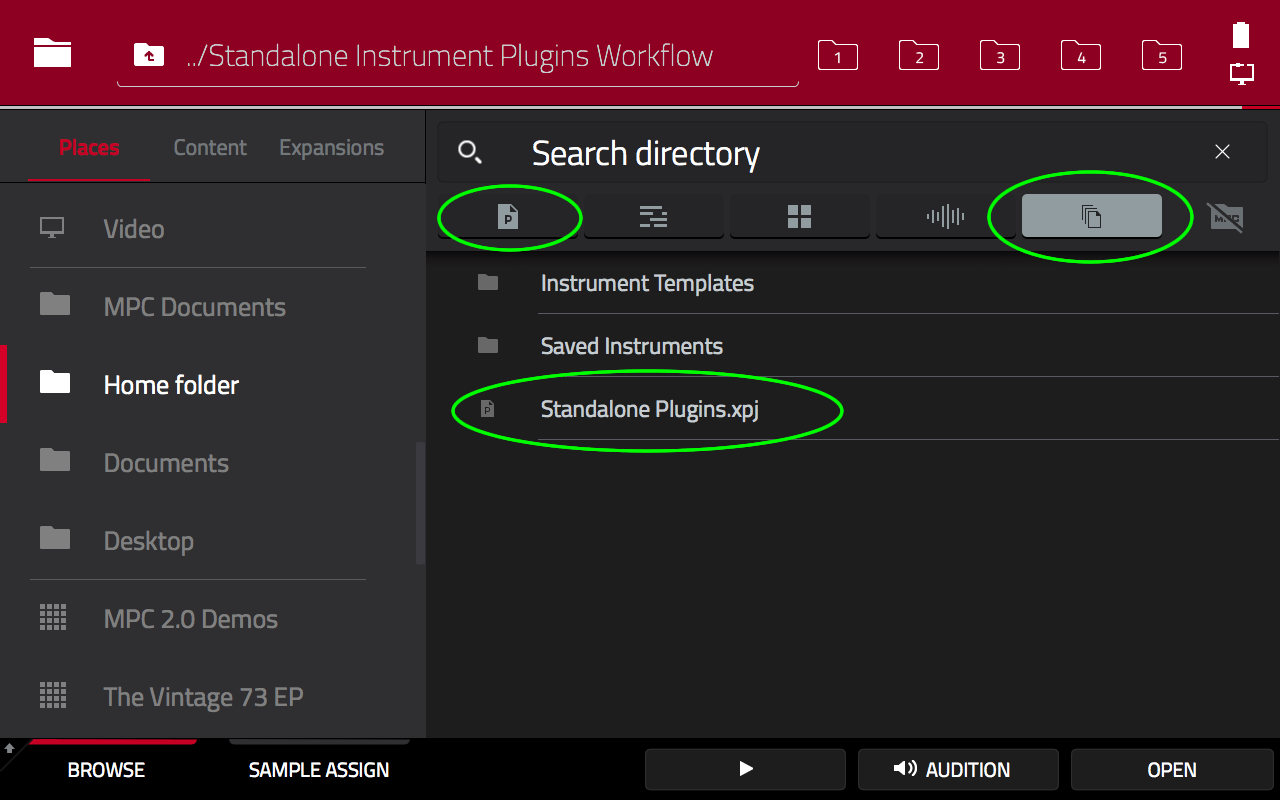
Step 1: Load the Project Template
Go to the BROWSER and navigate to the location on your computer where you extracted the workflow files. Enter the folder ‘Standalone Instrument Plugins Workflow‘ and double tap the ‘Standalone Plugins.xpj‘ project file (make sure ‘NO FILTER’ or PROJECTS is selected at the top of the BROWSER):
The project loads up a 100 BPM sequence called 5 Semitone 1v and sets track 1 as a ‘Plugin‘ track (currently no plugin assigned):

Step 2: Choose & Configure Your Plugin Patch
You’ll now need to assign a plugin to this track. I’m going to use the ‘Hybrid 3‘ plugin simply because this is built in to all installations of the MPC Software, however once you’re familiar with the workflow you can use this template to sample any patch from any plugin you wish; VST, AU and AAX – as long as the plugin is recognised by your MPC, you’re good to go.
While you can configure your plugin from the hardware UI, I recommend you head over to the computer GUI as it handles the plugin interface so much better.
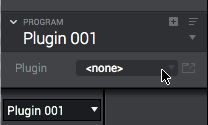
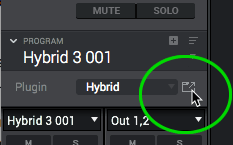
In Main Mode in the computer GUI, make sure the Inspector on the left hand side is open – if it isn’t, hit i on your keyboard. Click the PLUGIN <none> box to open the Plugin selection window:
If you have TYPE and MANUFACTURER grouping enabled (bottom left of screen), you’ll find Hybrid 3 inside ‘MPC Expansions > AIR Music Technology‘:

Double click Hybrid 3 to assign it to our PLUGIN track. Now you need to select a patch you wish to ‘clone’. Click on the Plugin Window icon in the Inspector:
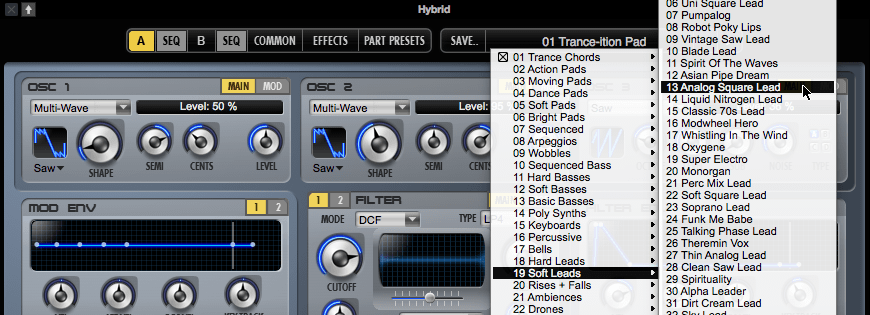
This will open the Plugin Window. Tap on the patch selector in the top right of the screen and from the ‘Soft Leads’ group select ’13 Analog Square Lead’.
Select pad BANK D or E on your hardware and play a few pads to preview the lead patch. When multisampling it’s often a good idea to sample your instruments as dry as possible as you can always add effects like reverbs, delays and chorus to your MPC instrument program at a later date, so head over to the EFFECTS tab in the Hybrid plugin GUI.
At the top you’ll see there are no effect inserts applied to parts A or B. However head down to the ‘MASTER‘ effects at the bottom where you can toggle through the three master effects using the tabs on the right; CHORUS, DELAY & REVERB.
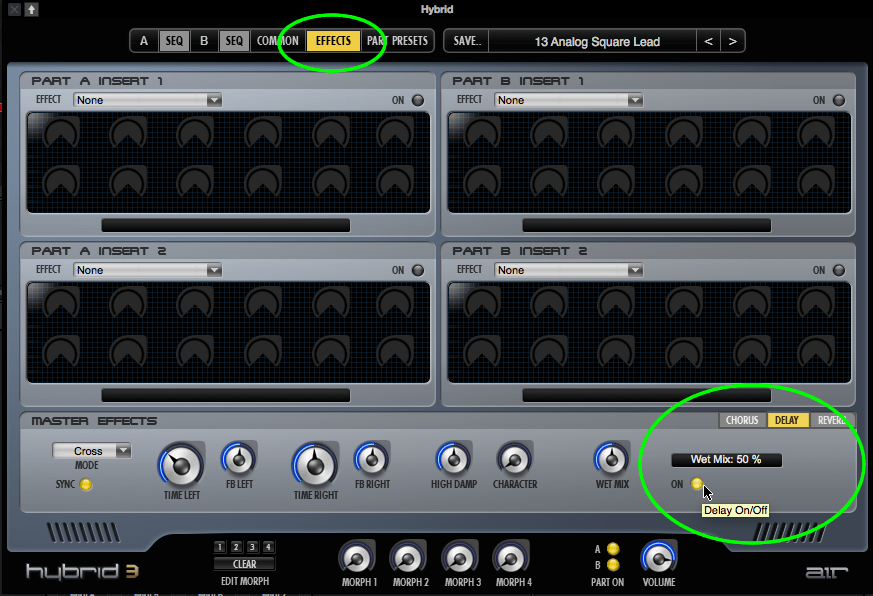
As you can see, the DELAY and CHORUS are active, so for both effects click ‘ON‘ so the yellow light turns off. Close your plugin window.
Step 3: Configuring Your Sequence
Back in the hardware UI, head over to MENU > GRID VIEW for sequence 1 (5 Semitone 1v):

As you can see this is a 52 bar sequence containing 26 two bar long note events, each at full velocity. As the sequence name suggests, these events are added every 5 ‘semitones’ and effectively cover the entire note range of the MPC. (The 1v refers to this just recording a single velocity of each note).
Hit PLAY START; with the default tempo (100 BPM) each note in the sequence plays for 5 seconds. If you wish to adjust this you can just change the sequence tempo – pick a slower tempo of longer notes, faster tempo for shorter notes. I’ll explain this in more detail in the second example.
You’ve also probably notice that those really low bass notes in BANK A are just too low to be usable, but we’ll easily deal with those later (the template system gets messed up if we start deleting bars from the beginning of our sequence).
Step 4: Check Your Levels
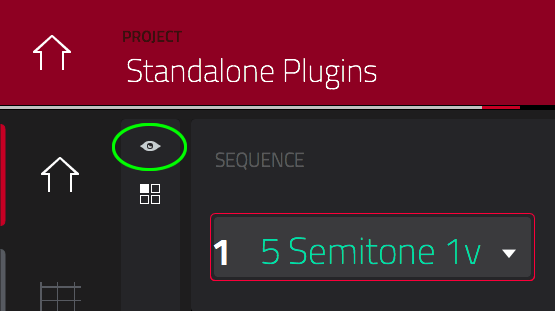
In MAIN, tap the ‘eye’ icon near the top left of the screen to reveal the program channel strip:
Hit PLAY START and observe your LEVEL METER:
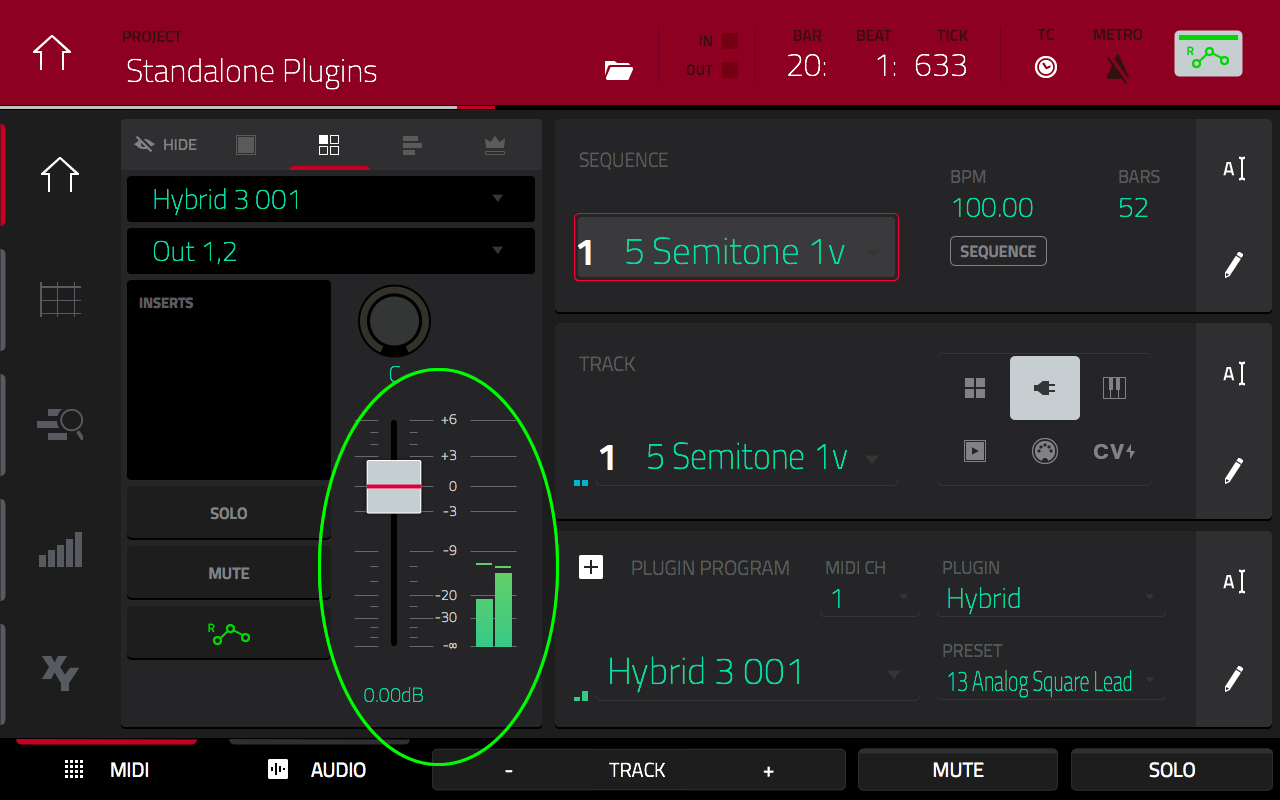
Adjust the slider to set a level that ensures there’s no clipping (i.e. the levels don’t go to the red). Alternatively, perform this in MENU > CHANNEL MIXER.
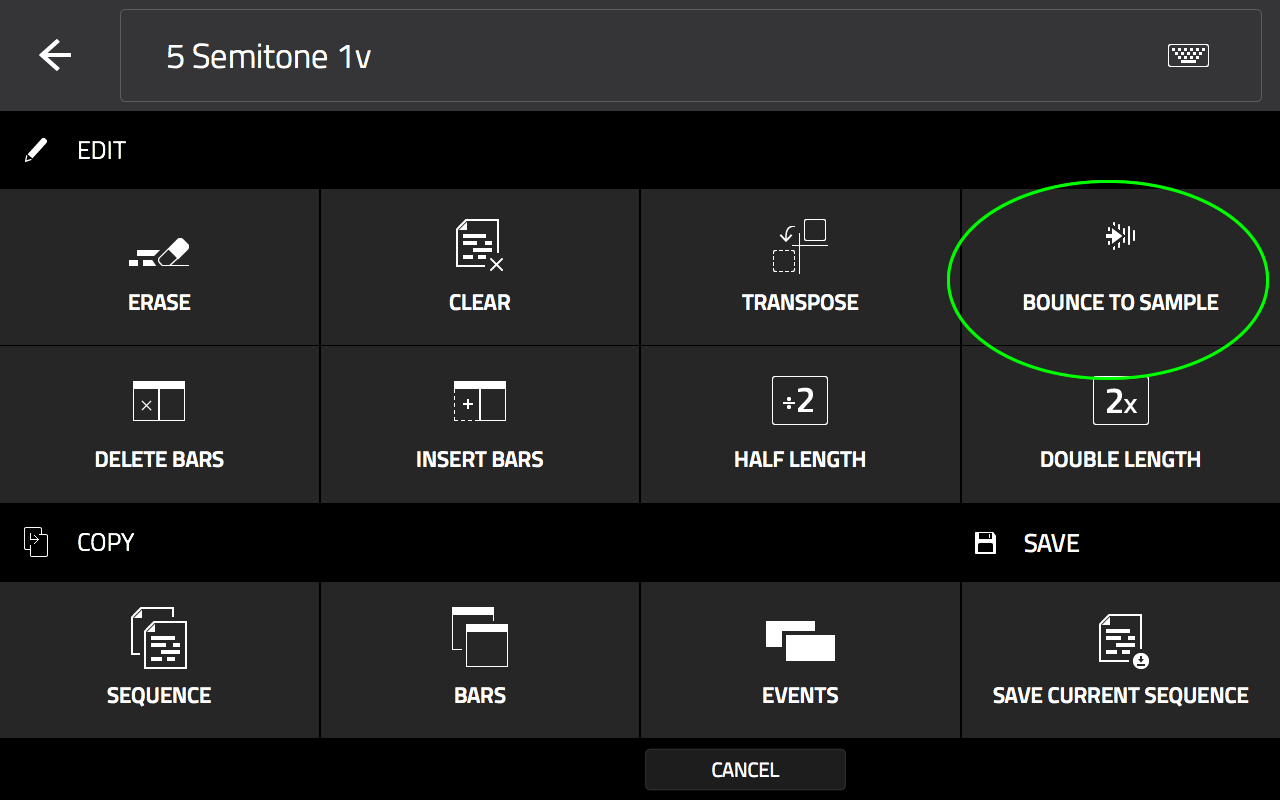
Step 5: Bounce Your Track
We’re now going to bounce this sequence to create an audio sample from it. To do this in the hardware UI simply go to MAIN > top pencil icon > EDIT > BOUNCE TO SAMPLE
Head over to SAMPLE EDIT; there should only be one sample in memory ‘Bounce – 5 Semitone 1v‘:
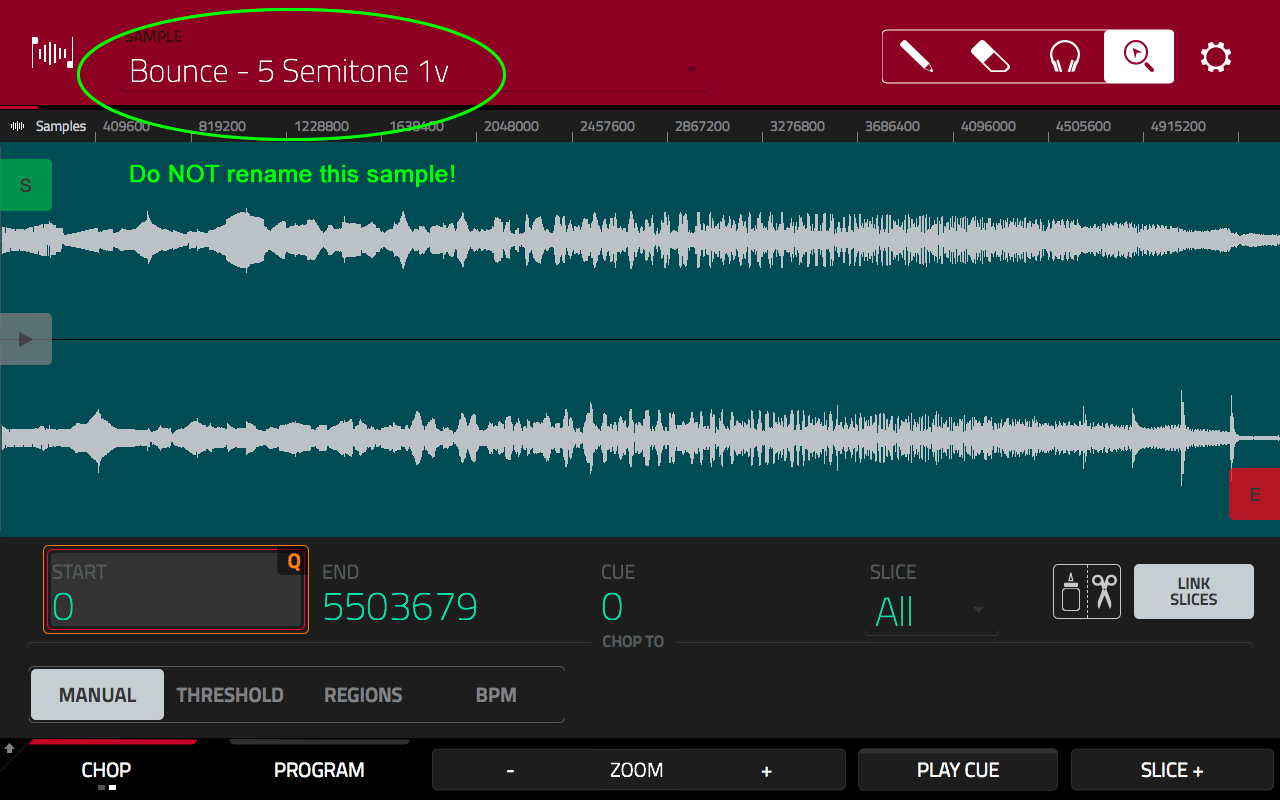
VERY IMPORTANT: Do not change the name of this sample!
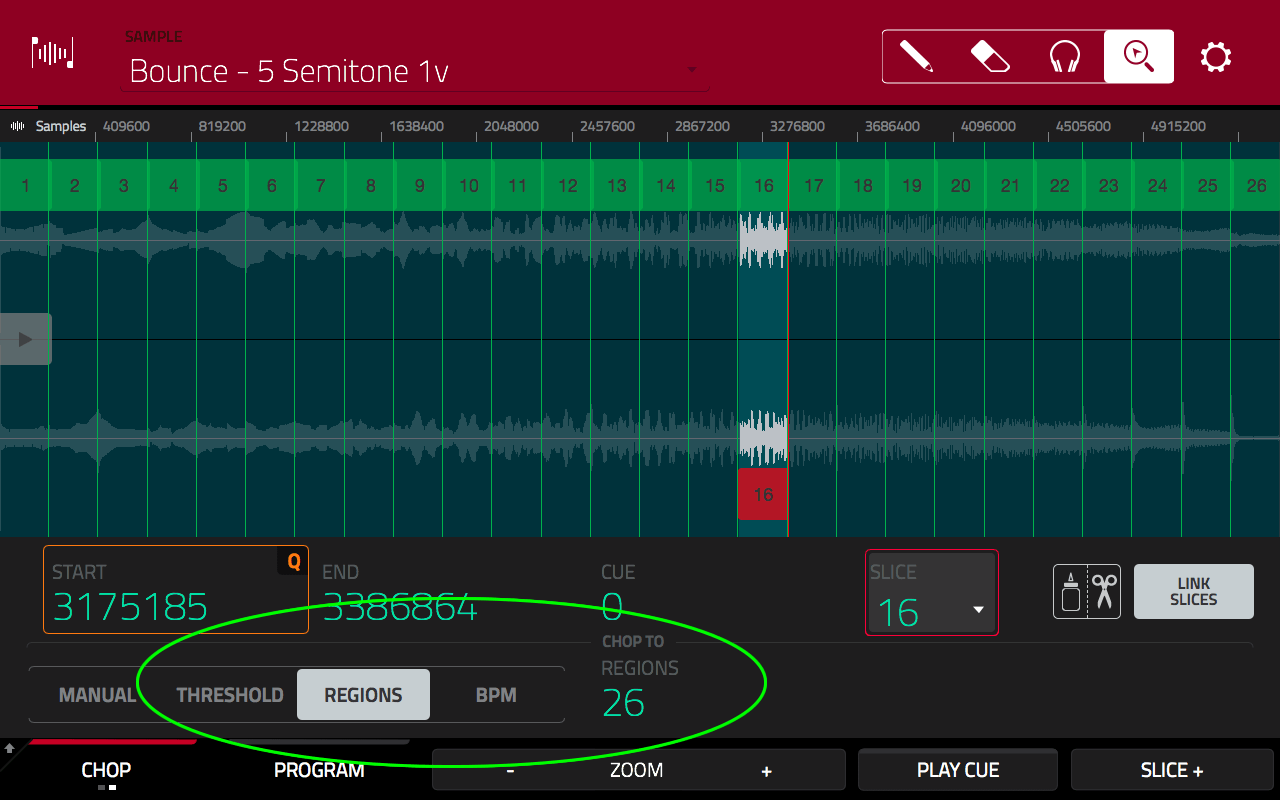
Step 6: Create Your Chops
Press TRIM again to enter CHOP mode. Remember how our sequence contained 26 events? The means we need to create 26 chop regions. Select REGIONS as the chop method and set CHOP TO REGIONS to 26.
Perfect. Now hold down SHIFT and hit CONVERT. Choose ‘New program with new samples‘:
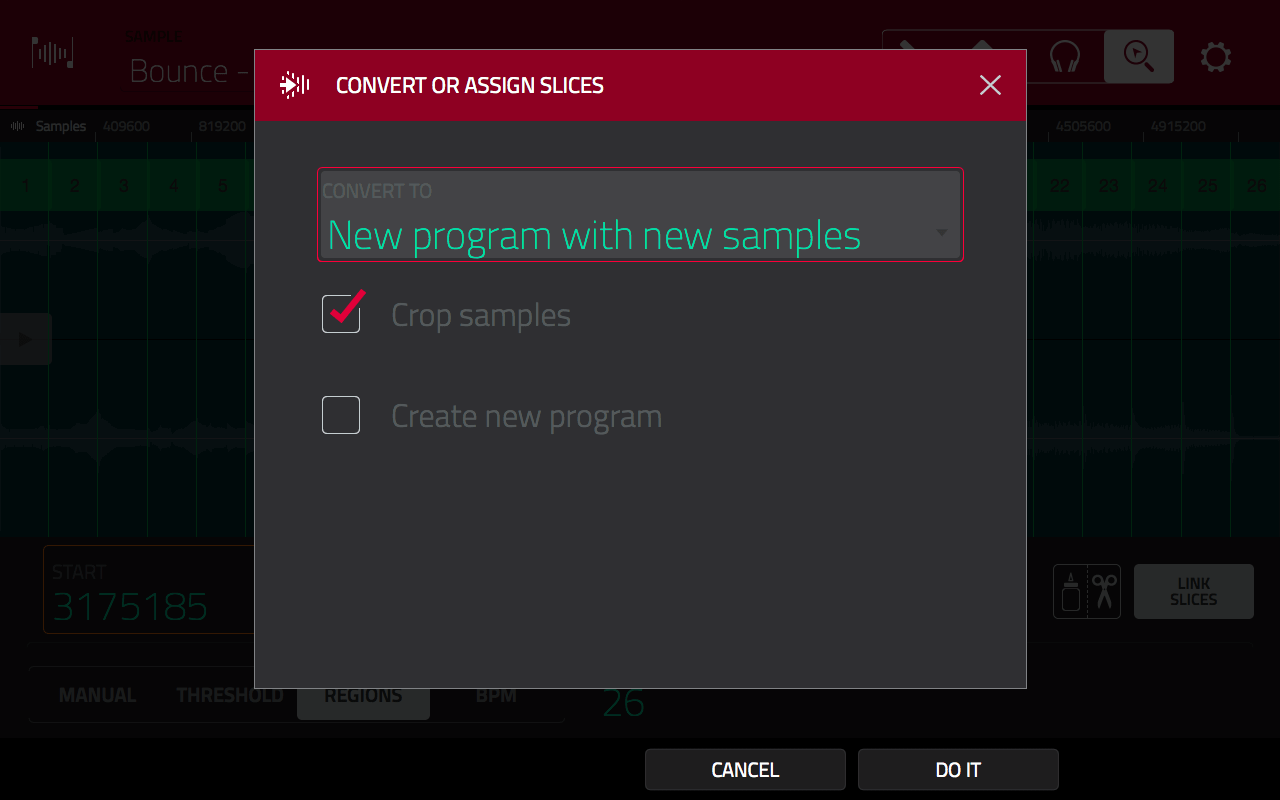
Make sure you check ‘Crop Samples‘ (we definitely want to create individual samples) and uncheck ‘Create new Program’. Hit DO IT to create your chops.
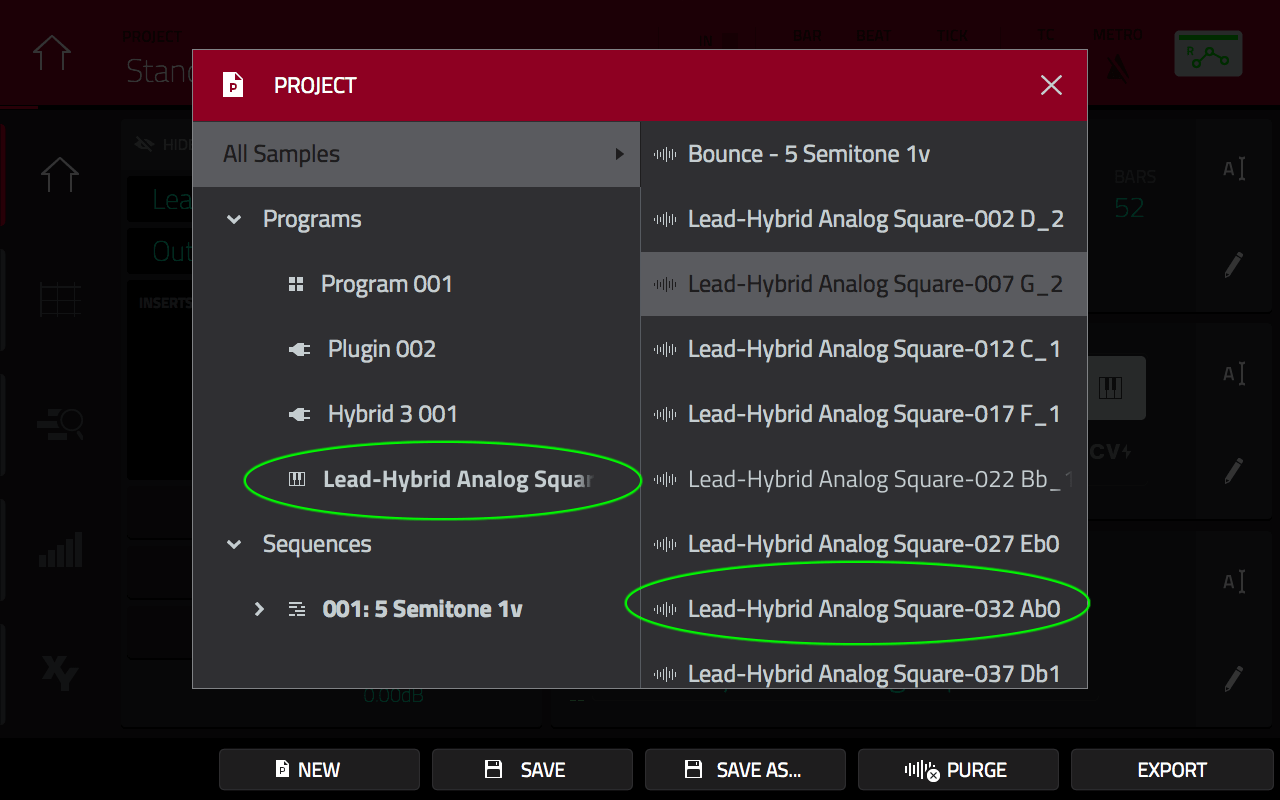
Go to MAIN and hit the folder icon at the top centre of the screen to view the PROJECT panel:
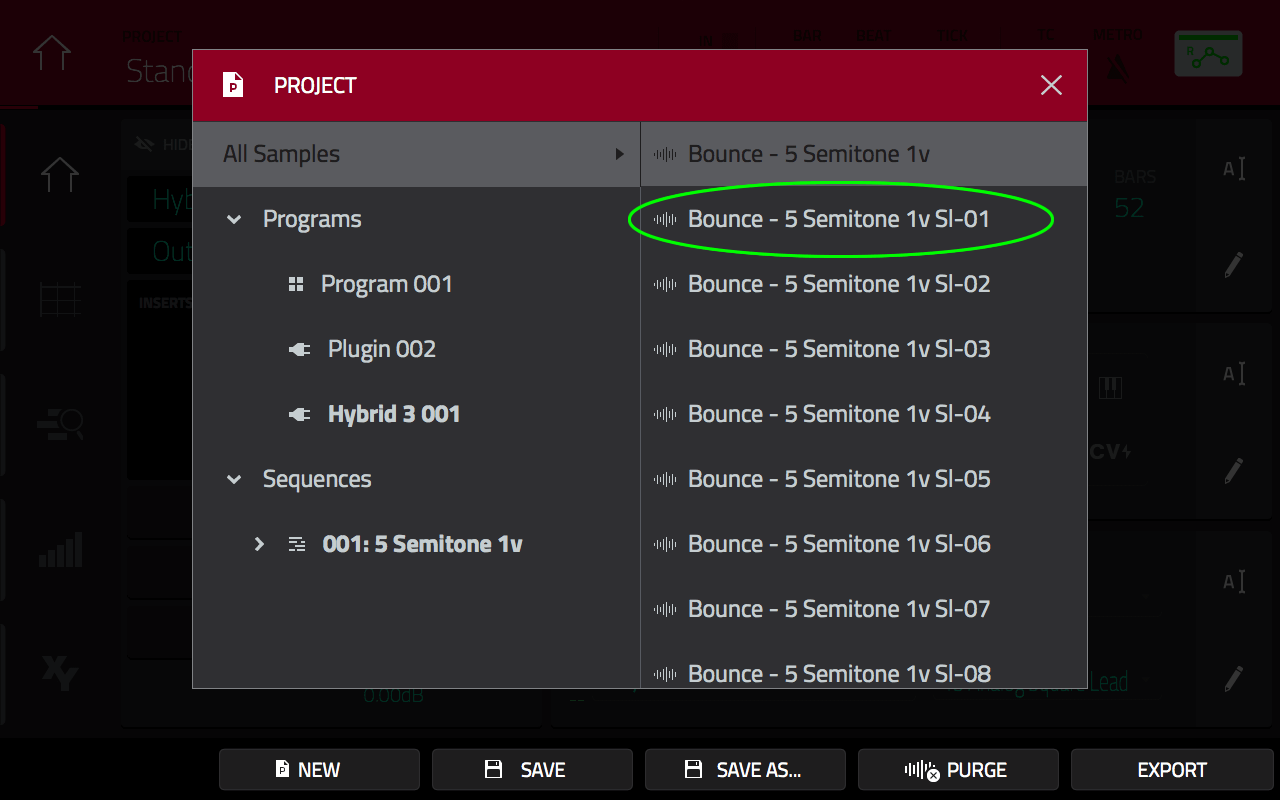
Make sure ‘All Samples‘ is selected on the left and you should see all your chops on the right (the samples ending in ‘Sl1‘, ‘Sl2‘ etc). Each one of these is a note from your multisampled Hybrid patch.
Step 7: Import Your Instrument Program Template
Head back to the BROWSER and open the ‘Instrument Templates‘ folder. Double tap the 5 Semitone 1v.xpm program and you will see this – don’t press anything else yet!

VERY IMPORTANT: It is vital that you select CANCEL here, do NOT press REPLACE. For some reason, pressing REPLACE causes the MPC to completely crash. So press CANCEL – this will load the keygroup program into memory.
Now go to MAIN, change track 1 to a KEYGROUP type track (just tap the keygroup icon). The newly loaded 5 Semitone 1v program should automatically assign itself to the track:
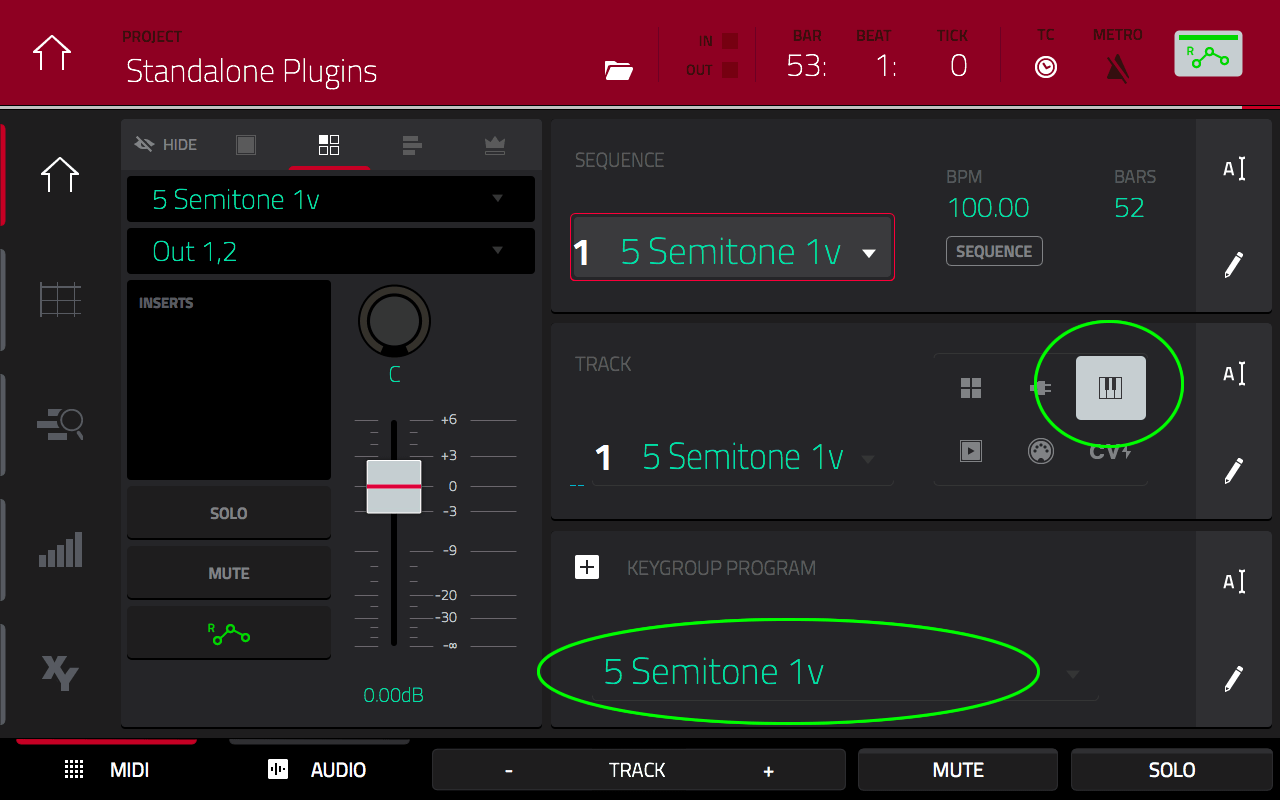
Here’s the magic – select, say, BANK D and start playing your pads; you should hear your new multisampled lead patch program in action!
How does this work? Well this ‘5 semitone’ program template contains 26 key groups to match the 26 sample chops we created via the ‘5 Semitone’ sequence. Each keygroup has a ‘key range’ of 5 semitones and is coded with the correct ‘root note’ to match the note that will be assigned to it. Here’s how keygroup 2 is set up (root note G-2):
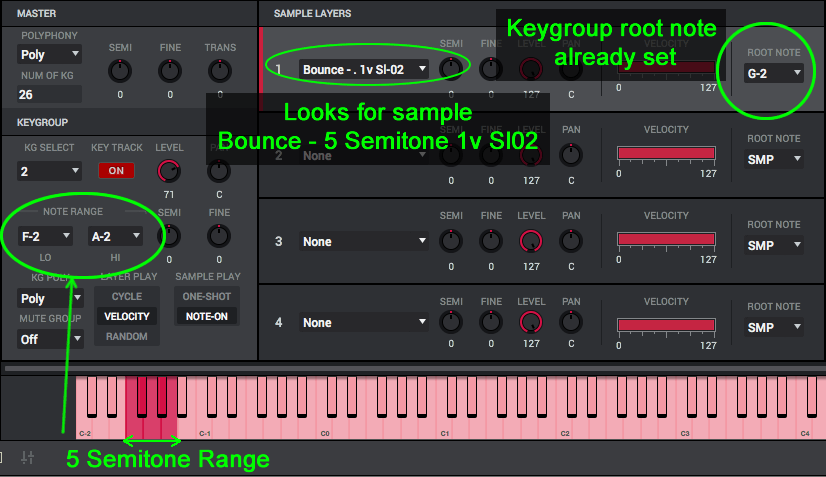
Now, remember I said that you must never rename the original ‘bounced’ sample? That’s because when the MPC creates all those chops from that sample it uses a predictable naming structure, so we always know what the names of the 26 chops will be. So in the program keygroup 1 always looks for a sample 5 Semitone 1v Sl-1, while keygroup 2 looks for 5 Semitone 1v Sl-2 and so on.
When you load that program into your project the MPC realises that all the samples are already there in memory and immediately attaches them to your program. This means you don’t have to spend any time creating keygroups, assigning samples, or setting up root notes; the program does everything for you – but it only works if you don’t change the name of the bounced sample (nor any other names in the templates!).
Step 8: Tidy Sample Names
At this point your program and all the samples have the generic template names ut it’s ridiculously easy to fix this.
First, give your new keygroup program a more useful name, for example, ‘Hybrid Analog Square’, or if you want to use Akai’s tagging standard, ‘Lead-Hybrid Analog Square‘.
This can be done via MAIN > KEYGROUP PROGRAM row > ‘A‘ icon’:

Now the clever bit. In the computer GUI, go to ‘Edit > Program > Tidy Keygroup Sample Names‘ and take a look at the Project panel:
The MPC has now renamed all your note samples using the ‘program name’ followed by the the MIDI note number and pitch of the note the sample represents.
Step 9. Save Your Program
Don’t forget to save this new program along with all its samples! In MAIN, hit the pencil icon on the KEYGROUP PROGRAM row and select SAVE CURRENT PROGRAM.
As part of the tutorial download I’ve included a separate ‘Saved Instruments‘ folder which you could use to save instruments to, otherwise just save them wherever you wish.
Step 10: Reset The Project Template
Now that your plugin patch has been cloned and the MPC instrument saved, you can move onto multisampling another patch. But before you start, you’ll need to reset the project template.
The easiest way to do this is to just re-load the original Standalone Plugins.xpj file, either from the BROWSER or just drag it from your computer directly into the MPC Software GUI.
All done – you’re now ready to clone your next plugin patch by repeating steps 2-10 as many times are you need to.
Customizing Your Sequence Template
Let’s see how easy it is to customise this workflow to suit ay type of sound. First, make sure you’ve performed a ‘reset’ by loading the Standalone Plugins.xpj.
Assign an instance of Hybrid to track 1, this time select ‘Basic Basses > 13 Knocking PWM Bass’. As before, head over to the plugin’s ‘EFFECTS‘ section and disable the CHORUS, DELAY and REVERB.
Press PLAY START and have a listen to the bass patch. Unlike the previous example, the notes in this patch do not play for as long as you hold down the pads, instead they fade out quite quickly (after approximately 2 seconds).
While you can just go ahead and create your bounced chops with the default sequence settings, each note is going to be sampled for 5 seconds which means you’ll have a long empty gap at the end of each sample. This is not very efficient in terms of memory usage, and while we can edit the individual samples (either at the chop stage or after they’ve been chopped), it’s a lot easier to adjust our sequence instead.
In MAIN, start to increase the BPM from the default 100.00. If you increase the tempo to 200 BPM (i.e. twice the tempo), you’ll get notes that are half as long, i.e. 2.5 seconds.
Hit PLAY and listen carefully, we want to make sure the bass note has completely faded out before the next note plays. Sounds pretty good to me!
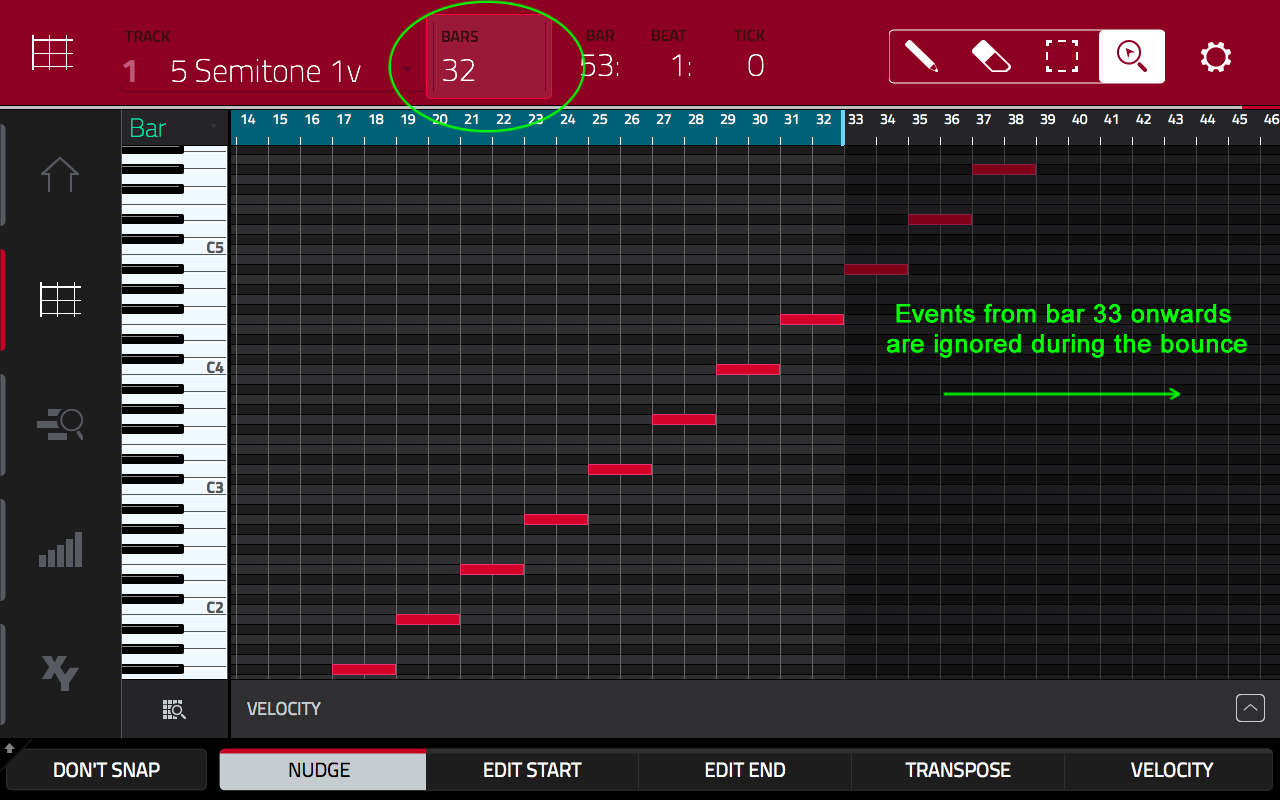
The next tweak you could perform is to remove those really high notes from the sequence. After all, this is a bass, not a lead so do we really need all those squeaky notes in banks G and H?
I reckon the last event worth sampling is the one at bar 31, so in GRID VIEW, change BARS from 52 to 32. As you can see, all the events from bar 33 onwards are now disabled and will not be included in our bounced track.
Now repeat the rest of the workflow exactly as you did before – the end result is a perfect clone of the original bass patch – if you want to ‘tag’ the program, use ‘Bass-‘ at the beginning, e.g. Bass-Hybrid PWM Bass.xpm.
Customizing Your Instrument Programs
The keygroup instruments you create are just standard MPC Keygroup programs, so you can tweak these to further customise your instruments. Let’s take a look at four easy tweaks you might want to make:
Adding Effects
We previously disabled the effects from our plugin patch as ideally we want to be able to control this kind of thing at the program level. Adding effects to your program is very easy. Make sure your program is assigned to the currently active sequence track and with the channel strip open in MAIN, tap in the INSERTS box to reveal the Inserts window.
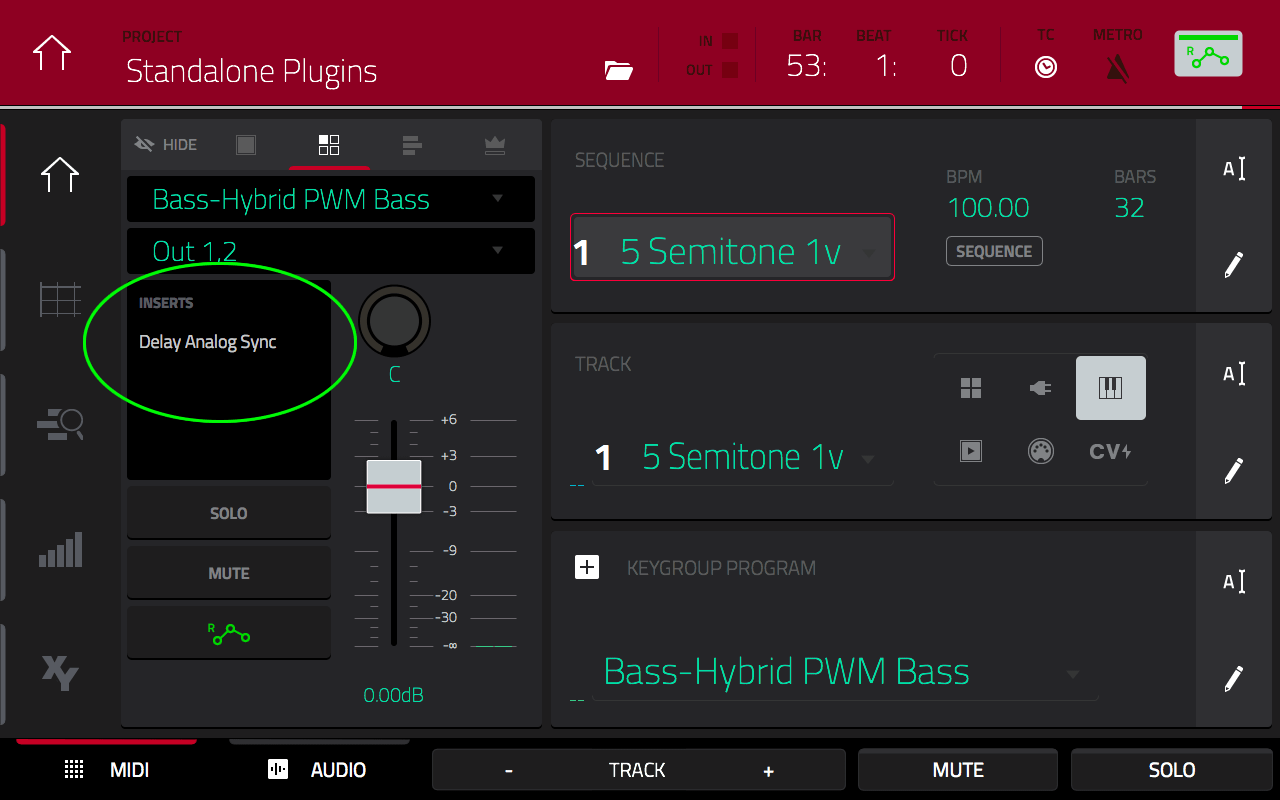
Here you can choose to add up to 4 insert effects. Remember to retain ‘standalone’ compatibility, you must choose Internal or Vintage Effects, not VSTs or AUs.
Adjusting The Release
The generic template has a fairly short release on all keygroups, but for some sounds (such as pads or strings) you’ll need something much longer; this way, when you ‘release’ the note you’ll get a nice amount of gentle fade out. Go to PROGRAM EDIT > FILTER/ENV:
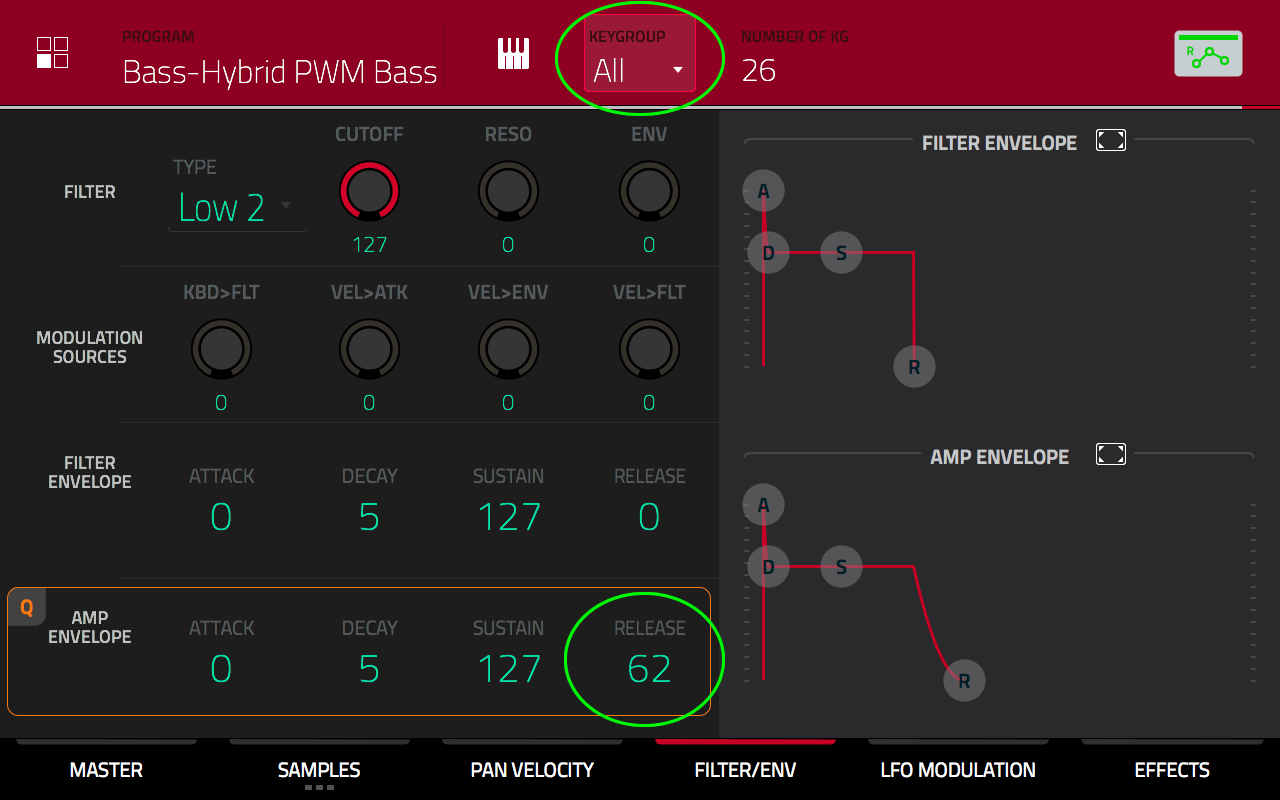
At the top of the page, tap on the ‘KEYGROUP‘ box and turn the data wheel anticlockwise to select ‘All‘ – now any changes you make to the envelope will apply to all keygroups.
Under AMP ENVELOPE, tap on the RELEASE value and adjust this to suit your sound – keep previewing the sound with your pads as you adjust the release.
Don’t forget you can of course adjust the other envelope settings to further customise your instrument – for example increasing the ATTACK value will produce a softer, more gentle start to each note.
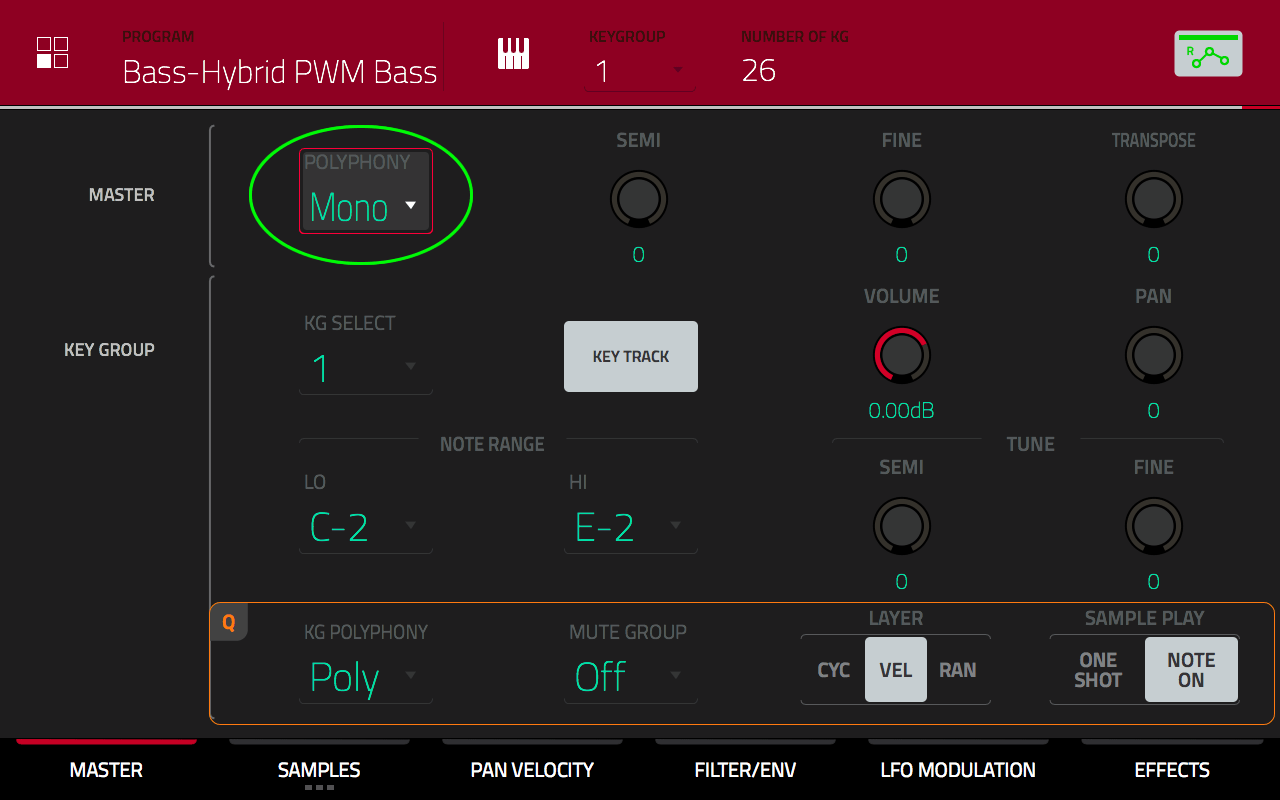
Creating a Monophonic Instrument
Many lead patches benefit from being ‘monophonic’ which means they can only play a single note at a time. Go to PROGRAM EDIT > MASTER and change POLYPHONY from ‘Poly’ to ‘Mono‘.
Removing Unwanted Samples
Before we bounced our bass patch sequence we reduced the number of bars to avoid recording the excessively high notes. What we couldn’t do at that stage was remove the excessively low notes as this would have messed up the automatic slide labelling and assignment in the templates.
Now we can’t actually fully ‘delete’ keygroups from the start of a program, but we can remove the unwanted samples from them – if a keygroup has no samples, it effectively becomes ‘disabled’.
Go to PROGRAM EDIT > SAMPLES and at the top of the screen select KEYGROUP 1.

In LAYER 1, single tap the trashcan icon to the left of the sample name to remove the sample assigned to this keygroup. Repeat for all the key groups you wish to disable. Once you’ve removed all the samples, re-save the keygroup program.
Converting To Mono
The MPC always bounces sequences in stereo, but in order to save memory we can often get away with using mono samples in our instruments. You can of course convert your stereo ‘chops’ to mono at a later date, but it’s easier to convert the entire bounce sample before chopping it. In SAMPLE EDIT > TRIM, select ‘PROCESS > STEREO TO MONO’.
You can choose to SUM both channels or use just LEFT or RIGHT, the best option will vary depending on the patch so you might have to experiment.
The most important thing to remember is that your newly created mono bounce will no longer have the correct name for our workflow template, so you’ll need to delete the original stereo bounce first and then rename the mono version back to ‘Bounce – 5 Semitone 1v‘.
Program Previews
If you want to hear an audio preview of your new instrument each time it’s selected in the BROWSER, you’ll need to create a ‘Program Preview‘ for each one. I’ve covered creating program previews in my Expansion Pack tutorial, and the method is the same for the MPC X/MPC Live browser, i.e. create your audio demos, rename them to match the program name, and place them in a [Previews] folder in the same directory as the instruments.
Advanced Multisampling Options
That’s it for this tutorial, but there’s plenty more advanced options you could consider as you get more comfortable with the multisampling workflow. You could for example create custom templates to multisample more notes (e.g. every 3 semitones, or even chromatically), or to record over multiple dynamic levels.
You could also sustain loop your sounds so they play back for as long as you hold down your pads (which will also save memory). You could set up velocity sensitive filters to emulate natural timbre changes, configure LFO to mimic tremolo and vibrato settings on electric pianos, and much much more. I cover many of these techniques and more in my hands-on guide to the new standalone MPCs, the ‘MPC X & MPC Live Bible‘.
42 Responses
Leave a Reply

Latest Posts
MPC Bible 3, Revision 6 - MPC Oscillators, MPC 3.9, MPC One G2 + MPC Key 37 G2

Downbeat Kit 3 - Acoustic Drum Kit Expansion For MPC3

MPC Bible 3, Revision 4 - Clip Matrix, MPC 3.7 + MPC XL

Out Now: MPC Bible 3, Revision 3 With MPC Live 3 MPC3.6 Support

Feb 2, 2018 8:28 pm
BOH! This is very exciting, thanks for the info!
Feb 2, 2018 9:58 pm
This is great, thanks! Trying to think of what would need to change to get this to work with external hardware… would it just be recording the audio track to a sample and renaming it to fit with the template? Anything else?
Feb 2, 2018 11:12 pm
Yes, you could route the synth output into the MPC audio Inputs and record it in the SAMPLER screen. Give the recording the name ‘Bounce – 5 Semitone 1v’ and make sure the start point was properly trimmed before chopping.
Feb 3, 2018 9:52 pm
This is so useful and thanks for the tutorial files.
Feb 4, 2018 9:51 pm
This is a very great tutorial, as you always do. I am with you since the late 1990s as I was working round with my 2000XL and I was always reading your tutorials and advices, thank you for that, I really appreciate your work!
Now I am working with an MPC live and some great electric rhode-piano VSTs (often and before your above tutorial only in controler-mode). The given tutorial does not realy work in those cases, because when you working with some rhode plugins, they have those multiple dynamic and velocity levels (as you already mentioned above at the advanced multisamples options!) which bring out different styles of tones, the harder you hit the hammer, guess you know!
I am an owner of your great new MPC-live bible and working around with it, but I can not figure out how to mutisample a rhode plugin as a keygroup covering multiple velocity levels. Can you please give me some advices for that, or even the site in the bible, where I can find informations for that.
I also guess there more MPC heads out there who would really appreciate informations about that.
Maybe you have another of your great templates which covers that problem and provides the oppurtunity to multisample VSTs covering different velocity levels.
I hope you can, want and will help me solving that problem, as you always did in the past man (and that without even knowing me at all).
Best wishes
Kros
Feb 4, 2018 9:57 pm
Hi, thanks I appreciate the feedback. I am hoping to extend the idea to multiple velocities using multiple tracks and the exploded track export option. If I can work out a good solution I will include it in the next edition of the MPC X/Live Bible.
Feb 4, 2018 11:08 pm
Thank you very much for your quick reply (I appreciate that) – but I just got it made by using your 5 semitone template and different velocity takes in the VST and arranging them in the keygroup.
Nethertheless I am looking forward for your updated bible, cause it takes a lot of time using my method. I am going to build up a chromatically template to multisamlpe all my VST in best condition.
Keep going and thank you for the above given templates and all the helpful tutorials over the last years! You are my man!
Feb 5, 2018 10:07 pm
Actually — i think once you built the template, not too hard. Could possibly be a single run, the sequence repeated 4 times at different velocities, then the name scheme would work in the layers. Maybe?
Feb 23, 2018 11:11 am
thank you so much for this hack I’ve been doing this the long and hard way you’ve just made my life soo much easier and I am very grateful thank you again.
Mar 6, 2018 6:55 pm
Hi its a great tool to create custom tones in mpc live , i followed all the steps as u said but in my mpc 2.1 software the tidy key group sample names , page under tools menu is greyed out and i am unable to select that , its a tedious job to rename all the samples manually , kindly help me to figure out what went wrong
Mar 6, 2018 7:18 pm
Hi kindly ignore my last question , it was my mistake not to select the new programme after sampling now everything works fine , you are really awesome now i could convert lot of my favourite vst to mpc live thanks a ton
Mar 12, 2018 7:02 am
Any chance you turn this into a video?
May 2, 2018 11:34 pm
Hi, Tanks for this solution.
I have a question. I cannot use my keyboard midi to play the notes.
Just working with the pad. Is any available solution?
Thanks
May 2, 2018 11:46 pm
It’s just a standard keygroup program so can be played with a MIDI control keyboard. You don’t say what MPC, whether it’s a USB, bluetooth or MIDI port connection and which environment you are using, so not much info to go on. If ‘standalone’, make sure your keyboard is class compliant and receiving enough power. If controller mode, make sure it is configured as a MIDI input source in Preferences > MIDI.
May 3, 2018 9:11 am
Correct, Thank you
May 3, 2018 9:19 am
Hello, I have a problem with this.
For first time it works well, but no more.
I try to shutdown and reset the mpc, but I have a problem.
When I Double tap the 5 Semitone 1v.xpm for import my instrument template it doesn’t ask me if i want to replace, and it doesn’t load the instrument. I have the problem is here.
Another diference, when I Go to MAIN and hit the folder icon at the top centre of the screen to view the PROJECT panel: I have more elements ( Bounce – 5 Semitone 1v(2) Si-) , ( Bounce – 5 Semitone 1v(3) Si-), ( Bounce – 5 Semitone 1v(4) Si- XX) …. Each one for every time that I try to do and export samples. Maybe the problem is here?
What can I do? Thank you
May 3, 2018 9:32 am
OK, I reply myself.
At step 5, I had “Bounce – 5 Semitone 1v(6)” name.
I changed it to “Bounce – 5 Semitone 1v” and now it works.
THANK YOU
May 3, 2018 9:35 am
It’s important that you ‘reset’ the entire workflow after each clone you perform otherwise the MPC will append a (1) to the end of the bounce file name. So after the first clone, drag the Standalone plugins.xpj file back into the software and start with a completely fresh set up. Alternatively you can manually rename the bounce (as you’ve done) or you could delete the original bounce before generating the new one.
May 22, 2018 6:24 am
THANK YOU for this! I like my Live a lot, but coming from Maschine, I feel like the default instruments are really weak. I’ve been wondering if this was possible, and BOOM, here it is. Grabbed some old Korg stuff, some Zebra. Just awesome. This article is INVALUABLE!!!
Jun 6, 2018 4:12 pm
Its possible to run a drum vst like supeior drummer 3 or Addictive Drums 2 o EZDrummer 2 in standalone mode? Theres a possible way to do this? I want to purchase an mpc live but I see it only has 6-8 acoustic drum kits. I want more choices.
Cheers!!
Jun 6, 2018 4:17 pm
No, you can’t run plugins in standalone mode, that’s why I developed this workflow. If you need dedicated multisampled acoustic drum kits for the Live/X we make plenty: http://www.mpc-samples.com/section.php/79/0/mpc-x-mpc-live-tutorials-sounds-expansions/
Jun 14, 2018 3:38 am
Hello, as with this converting option or bounce to sample it always converts to 16bit wave files. Is there a way to have it convert to 24bit ? I know in settings you can select 24 bit for sampling but it must be only for information coming into the mpc Live via the 1/4 inch / rca jacks.
Jun 14, 2018 8:13 am
It’s a bug in the MPC Software, no matter what settings you have, the bounce is always 16 bit. I’ve reported it several times.
Jun 21, 2018 8:31 am
YO! Much love. Really appreciate this hack.
Jun 21, 2018 8:34 am
Thanks!
Jul 3, 2018 5:43 pm
Thanks for the tutorial.
I have a problem.
I want to create a standalone instrument with the Effects that I applied from VST and i Can’t.
If I export from Absynth or Loom its sounds very different with the original.
How can I make exactly the same sound in standalone mode?
thanks
Jul 6, 2018 5:49 pm
This is awesome thank you kindly!
Aug 26, 2018 6:36 am
Love everything the company is doing. Maybe Somwkne else asked and I missed it but can I crest Multisample keygroups in MPC 2.2? All I have is the Studio, no high end stuff. Thanks in advance. Keep up the good work
Sep 20, 2018 2:46 am
Hello, I am following your instructions but I am a bit new to the MPC family. I’m stuck on the “Instrument templates” folder part. I cannot find that folder. Where is it located? Do I have to create it? [email protected] please contact me as I cannot figure this part out!
Sep 20, 2018 10:14 am
The folder is in the zip file you download for this project.
Oct 8, 2018 8:20 am
Hi
Thanks for this but I need to point out two pitfalls that I encountered. First was I was stuck at step 7 for a while after I did my first run through. I figured out it is because you have to delete the bounce file after each go otherwise it adds a 1 to the file name and step 7, the keygroup wont map to the sample.
The second is I just bounced 15 patches……Into the same folder. Because all the sample names are the same, Bounce – 5 Semitone 1v Sl-01 etc…over 4-5 hours I only have one instrument, named differently 15 times.
Oct 8, 2018 8:48 am
The first problem should not happen if you are following the 10 steps correctly. You must reset the project before you even think about starting another bounce – please see ‘step 10’. After reloading the ‘Standalone Plugins.xpj’ file, the old bounce will be removed automatically. If you are having to manually delete it then you must be skipping step 10.
The second problem sounds like you are missing out step 8, where you should be renaming both your program and all your samples using the ‘Tidy Keygroup Samples’ option. Once this is done your new program will have uniquely named samples so you can, if you wish, save them to the same folder as all other instruments.
Oct 8, 2018 8:51 am
and…………………..I realised its because I didnt change the sample names, just the keygroup name. Awesome
Dec 27, 2018 1:58 pm
Hi! Thanks for this Christmas present. It is one for me! 😀 But i have one problem. When i say “convert” it chops the samples, but they aren´t assigned to the keygroup Programm. Where did i fail??
Greets
Dec 27, 2018 2:28 pm
Now i got it but i cant find that “tidy keygroup sample names” button in the tools menu.
Dec 27, 2018 2:39 pm
Now i got it again. 😀 the “tidy up keygroup samples” button can be found in under “edit” -> “programm” -> “tidy up keygroup samples”
Big thanks !! now i can dive in 😀 😀
Dec 28, 2018 5:26 pm
Hi, looks like they moved that function to a new location in MPC Software 2.3, I’ve updated the article to reflect that change. Thanks for pointing it out.
Jan 11, 2019 2:37 am
Is this still necessary in 2.3 with auto sampling now available ? If so, whats the difference
Jan 11, 2019 5:33 pm
Not necessary, no, although some people have experienced glitches and bugs with Autosampler when trying to sample some VSTs (Kontakt seems to be the most commonly reported). This method doesn’t seem to have that problem. But these days Autosampler should be the first port of call.
Mar 27, 2019 4:00 pm
Doesn´t work for me anymore…no matter why. If i load the “5semitone1v” Programm it does not ask for replacing samples…the Programm istantly opens and no samples are loaded. Any sugesstions?
Greets Toby
Jul 27, 2020 3:25 pm
Can mpc live II work with vst3? I read that it does not read vst3 but only vst2.
(I apologize for my poor english language)
Sep 16, 2021 2:03 am
When it all said and done makes more sense to just use the unit with the MPC software as a VST.
The desire for standalone workflow is still funny when you compare all the tradeoffs you make.
I honestly wish they would have kept making controllers for the software while adding new features instead of making people believe a lesser product is good just because you don’t have to connect it to the computer.
Wonder how long it will be for the no computer phase to die down again?.