In this MPC X, MPC One, MPC Key & MPC Live tutorial adapted from my book, ‘The MPC Bible‘, I’m going to take a look at the Autosampler feature which, much like my existing VST2MPC workflow, allows you to ‘clone’ your favourite VST/AU instrument patches so they can be used as standard ‘keygroup’ programs in standalone mode.
Why Use Autosampler?
The MPC X, MPC One, MPCKey 61 and MPC Live all contain a number of ‘internal’ synth plugins, however there is still no support for loading any third party plugins, nor is there any standalone support for the MPC Software’s built-in ‘Hybrid 3’ synth.
However, we do have the Autosampler. This is able to create a standard MPC keygroup program from any plugin (or even from an attached hardware synth). The resulting keygroup program is fully ‘portable’, being 100% compatible with standalone and controller modes and can be customised with effects, filters and modulation just like any other MPC sample program.
Autosampler is, on the whole, a quicker and more robust option in comparison to my VST2MPC Workflow, although you might find that currently some plugins give you ‘glitchy’ results in Autosampler – in which case the VST2MPC Workflow remains a good option to consider (although if you use Kontakt, you might want to check the potential fix for these issues).
Working in Controller Mode
Now, as we are going to be sampling an MPC Software plugin we’ll need to leave standalone mode and enter controller mode. Firstly, connect your MPC to your computer using a USB cable and fire up the MPC Software application. In your MPC enter controller mode. To do this go to MENU and tap on the MPC chip icon:
Now tap on the CONTROLLER MODE button to enter controller mode. At this point you should be able to continue using your touchscreen to control the MPC, but you are now controlling the MPC Software application on your computer.
Step 1. Select & Prepare Your Plugin Patch
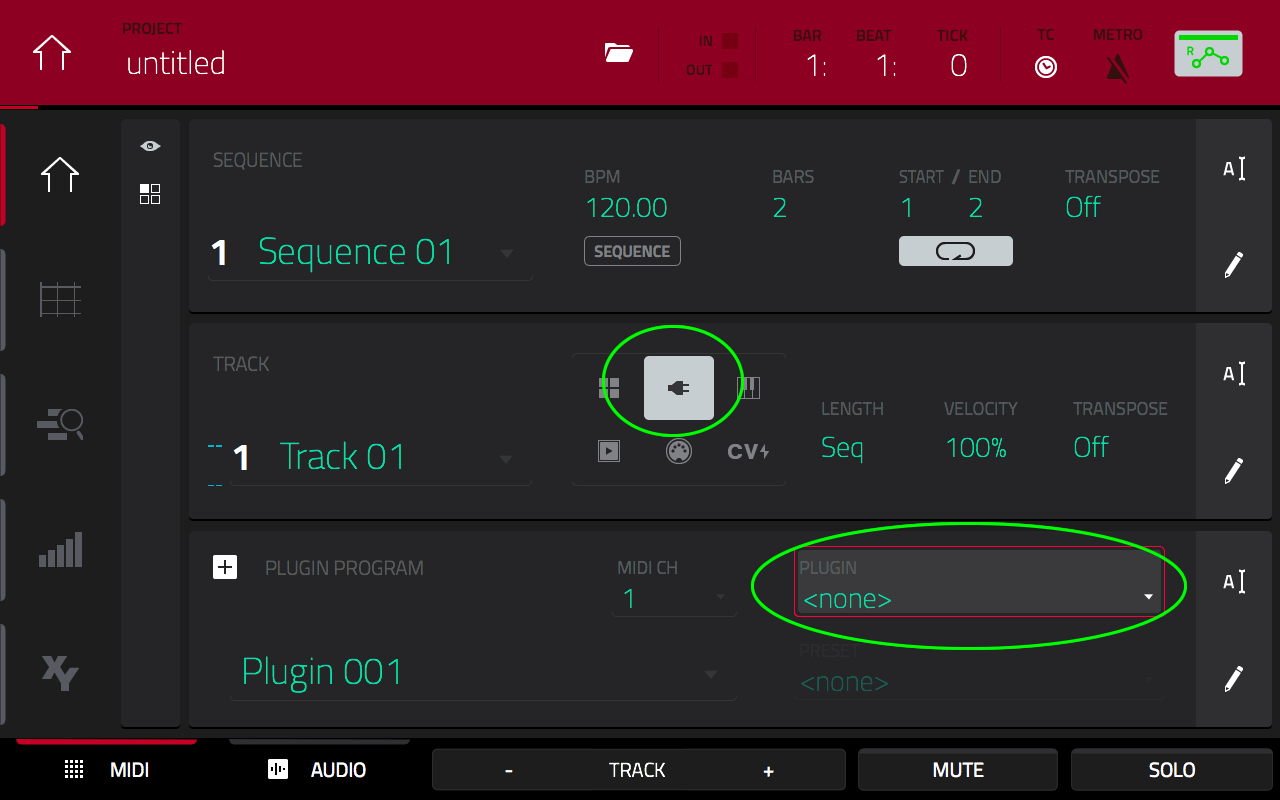
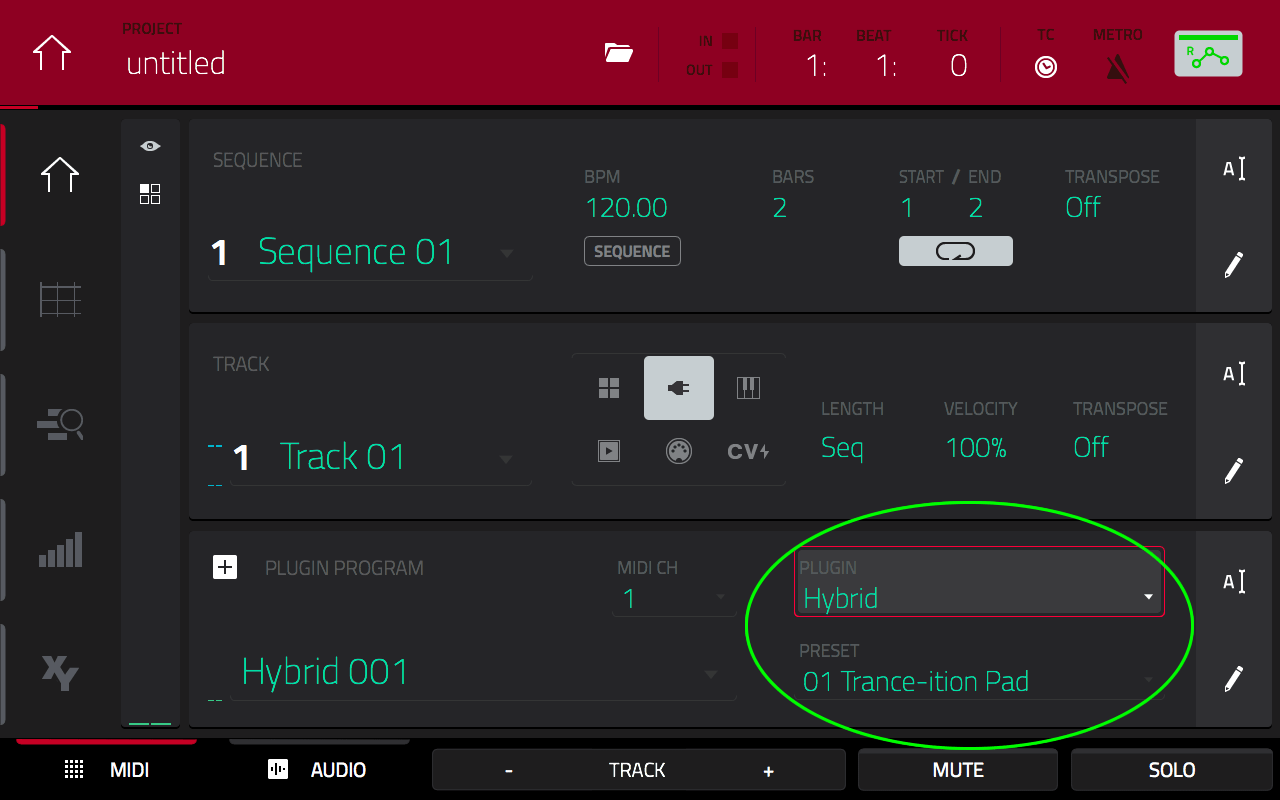
Start with a new blank project. In sequence 1, select the empty track 1 and change the track type to PLUGIN. To add an instance of Hybrid 3 to this track, first double tap the PLUGIN parameter.
In the screenshot below I have selected the TYPE and MANUFACTURER filters at the bottom of the screen to organise my system plugins, otherwise you’ll potentially have a huge list of plugins sorted alphabetically.
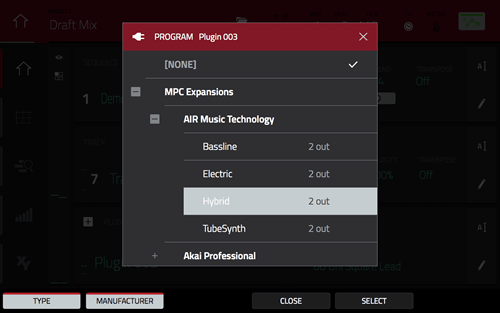
Click on ‘MPC Expansions > AIR Music Technology > Hybrid and choose ‘SELECT‘:
Next, let’s find ourselves a nice bass patch.
Choosing a Good Patch For Multisampling
Not all patches are suitable for multisampling. Because you will inevitably be tuning samples in your resulting keygroup program you can’t really choose any patch that contains ‘tempo’ elements, for example ‘arpeggiated’ patches, or ‘sequenced’ patches (of which Hybrid has many), as the tuning process will change the tempo of the notes, leaving you with multiple BPMs. If you do want to multisample something with clear tempo elements then consider sampling ‘chromatically (every note) – this is achieved with an Autosampler Note Stride of ‘1’ (we’ll look at Note Stride very soon).
Unlike the new Electric and Tubesynth plugins, there’s no nice GUI for Hybrid in the touchscreen interface, so to make life easier we’ll just head over to the MPC Software GUI and click on the Plugin Window icon in the Inspector:

This will open the Plugin Window.
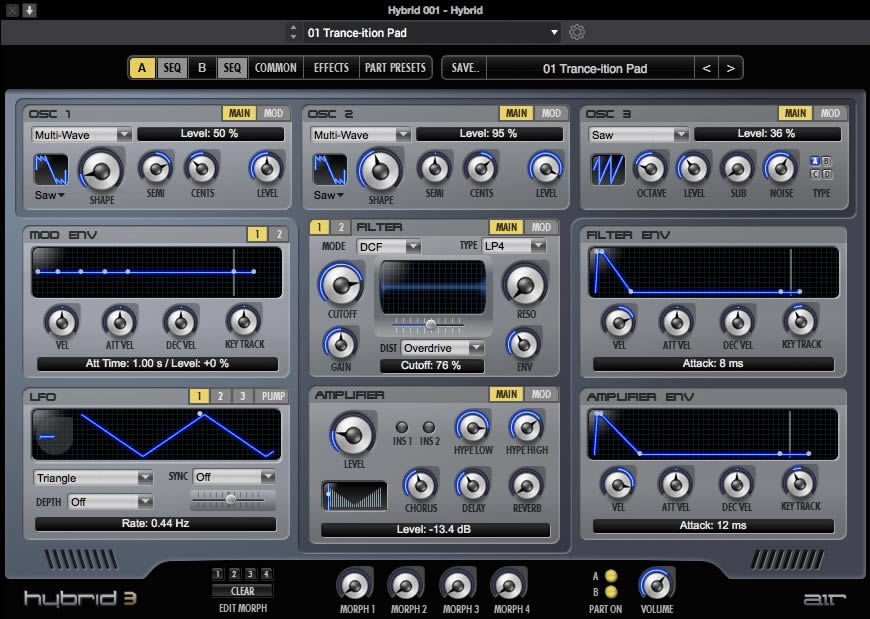
From the preset drop down, select ‘Soft Basses > 47 Sluggish Pulse Bass’ :

Play a few of the pads to get a feel of the patch. Now it’s usually a good idea to multisample patches as ‘dry’ as possible; that means disabling any ambience effects such as reverbs and delays. It’s better to have the flexibility of adding ambience to the final instrument program rather than having it permanently ‘baked’ into the samples themselves. Delays, chorus and phase can also cause a number of issues when tuning your samples and sustain looping, so I will often disable these effects as well.
When to Keep Effects?
If you record samples with ambience already added you are ‘stuck’ with that level of ambience on your resulting program. So if you want to use that patch in a song and realise it sounds too ‘wet’ there’s not much you can do about it as the ambience was permanently recorded into the audio. Then again, if your plugin has world class reverb you might decide it’s worth the risk leaving it on the patch because the ‘internal’ MPC reverbs are admittedly not that great.
Effects like chorus and phasers can introduce a lot of stereo movement which may or may not represent an issue when it comes to tuning and looping your multisamples, but if you feel these effects are an important part of the original sound that you want to capture then you should probably leave them in. When it comes to other types of effects, you can usually leave those without too many problems, especially effects like distortion, EQ etc.
To double check what, if any, effects your Hybrid patch has, quickly tap on the EFFECTS tab:
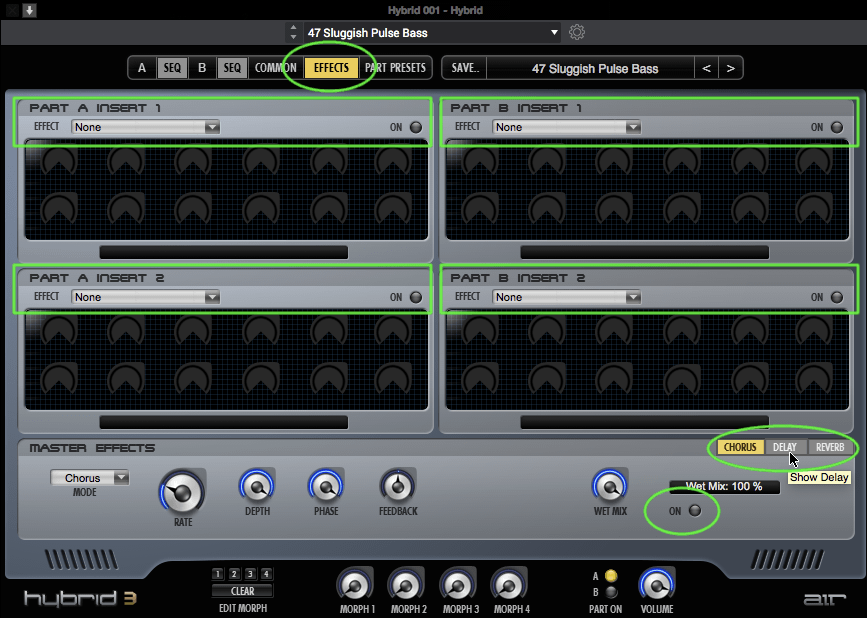
All the INSERTS are turned off, but don’t forget the MASTER EFFECTS section at the bottom. To the right are the three effect tabs; CHORUS, DELAY and REVERB. Click on each of these to confirm that they are all turned off (the ‘ON’ should not be lit).
Close your plugin window – you can now return to the hardware UI.
Step 2. Find the Useable Note Range
Most synth patches will spread themselves across the entire pad range of the MPC (notes ‘C-2’ to ‘G8’) but you’ll normally find that the sounds at the extremes of this huge note range are quite often unusable, either being barely audible rumbles, or ear-piercing squeals.
Additionally in the case of a bass patch, the actual range of notes that you could comfortably call ‘bass notes’ is even more restricted – it’s fair to say that a significant portion of the higher notes are simply not bass notes at all.
There’s no point wasting memory on notes we’re never going to use, so I find it worthwhile spending a few seconds discovering a patch’s Usable Note Range. To do this, start at BANK A and work your way up the pad banks playing all the pads until you find the lowest and highest ‘usable’ pads for this patch.
In my opinion, the usable pad range for this patch is B09 to E09.
Now, when we launch AUTOSAMPLER we’ll need to enter our note range in terms of musical pitches rather than pad numbers, so to find out what our ‘note’ range is, go to GRID VIEW and hit pad B09 and you’ll see on screen that this is a note C0.
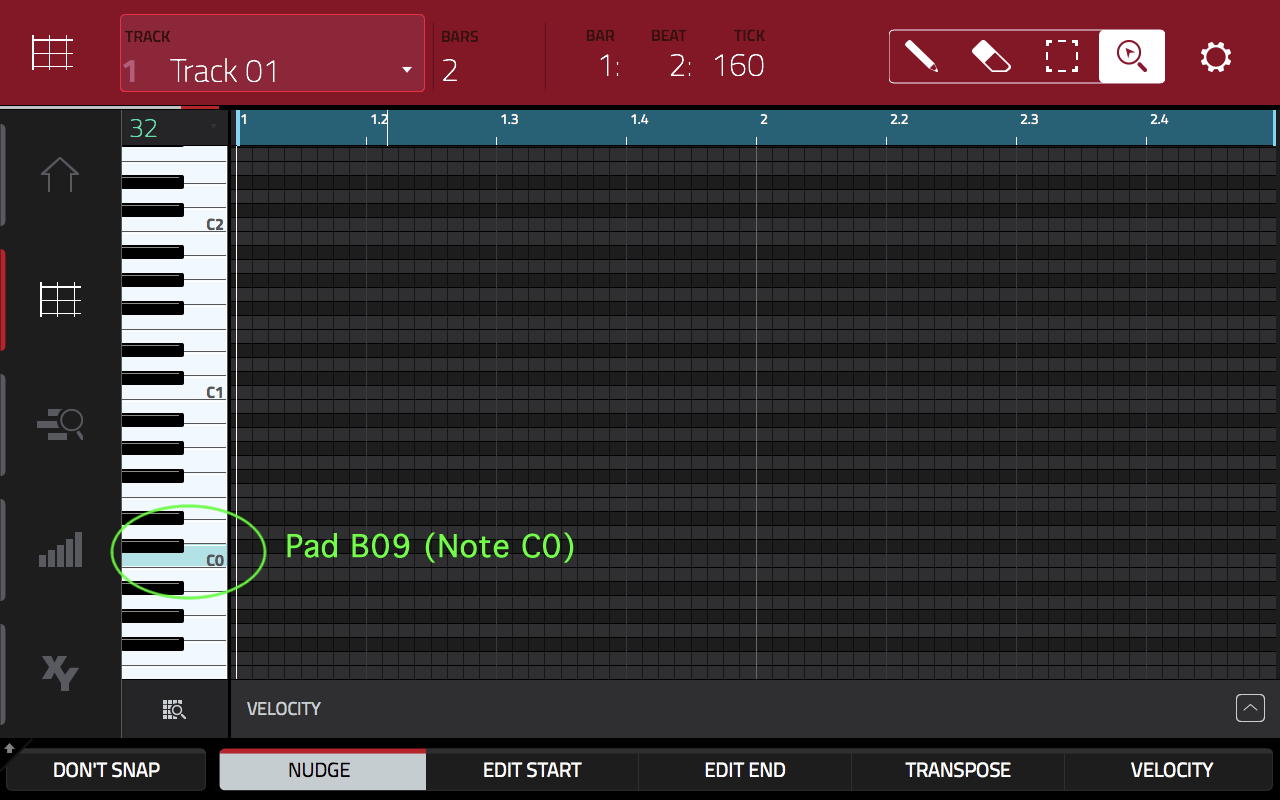
Now repeat this for pad E09; this is a C4. Hence our Usable Note Range is C0 to C4 (remember this, we’ll need it very soon!).
Step 3. Configure Input Recording Settings
Go to MENU > SAMPLER (MENU + pad 9). The first decision to make is whether to sample our instrument in stereo or mono. We should only ever consider sampling in stereo if the original patch is truly stereo (i.e. differing audio signals in the left and right channels). If it’s mono (the same signal in both left and right channels) then we can instantly reduce the memory footprint of our resulting program by 50%.
In the top left of the screen, set the recording inputs to Resample L + R; this will route both left and right channels of our bass patch into the SAMPLER. Now start hitting any pad and observe the LEVEL METER – you should see that the left and right channels of this patch are identical:
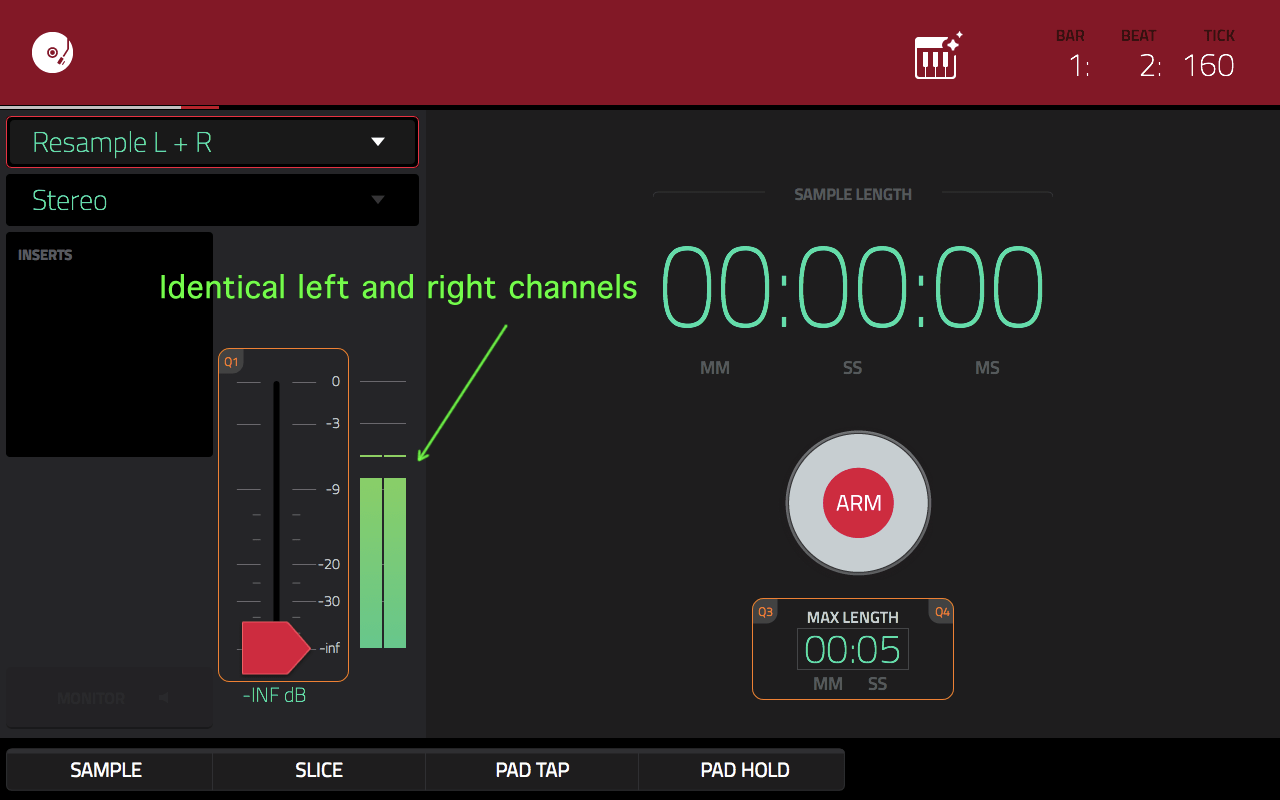
This is a good indicator that we are most likely dealing with a mono patch. However we can perform another test to confirm. If you have some headphones handy, put them on now.
Now, while continuing to preview the same pad, change the input setting to Resample L – now only the left channel of the patch is channelled through the Sampler. Now set to Resample R to only hear the right channel. To my ears there is absolutely no audible difference between the three different settings, confirming that this is indeed a mono patch.
As this is a mono patch, we only need to sample a single input, so set the Input to Resample L. And immediately underneath, set the target file from ‘Stereo’ to ‘Mono’.

So with the above settings we’re going to internally ‘resample’ our bass patch only through the ‘left’ channel, with each note being recorded as a ‘mono’ (single channel) sample.
Step 4. Launch Autosampler
To launch Autosampler, tap on the keyboard icon at the top right of the SAMPLER screen:

At the top of the Autosampler screen you’ll see a summary of which source is going to be recorded via the TRACK NAME and PROGRAM NAME:

‘RECORD FROM’ shows that Autosampler has adopted the recording input settings we configured in the SAMPLER screen (Resample L).
Step 5. Configure Note Range
The ‘Note Range’ defines the range of notes that the Autosampler will record – this is where our ‘Usable Note Range’ comes into play. We previously calculated in Step 2 that we only want to record the notes C0 to C4.
So set MIN NOTE to C0 (this is the lowest note we’ll sample) and MAX NOTE to C4 (this is the highest note we’ll sample).
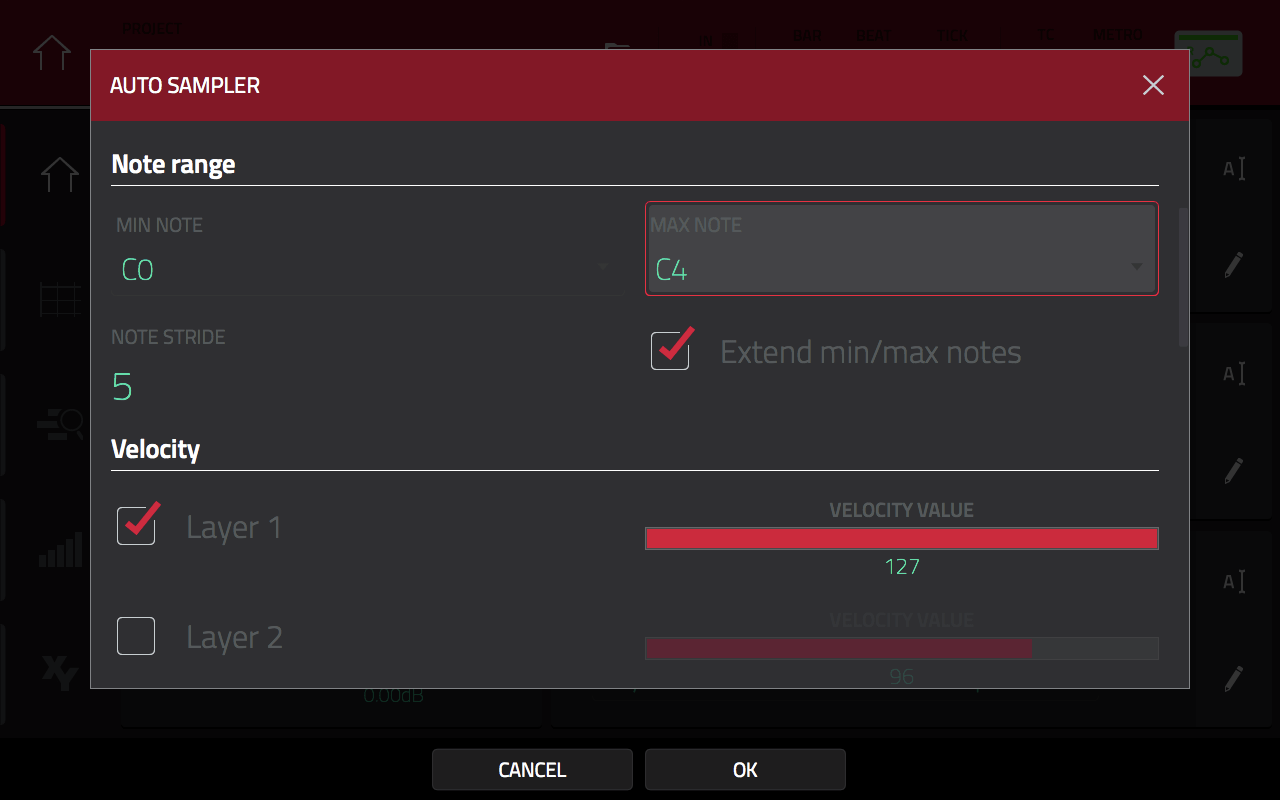
Now check ‘Extend min/max notes’. I’ll show you what this does later when we examine our program in PROGRAM EDIT.
Step 6. Configure Note Stride
In chapter 10 of the MPC Bible we’ll learn that when building keygroup programs we can often minimise memory and CPU usage by sampling just a selection of notes from an instrument and then use sample tuning to replicate the missing notes.
In Autosampler, the ‘Note Stride’ parameter refers to the semitone interval between actual notes we sample. With a note stride of ‘1’, the MPC will sample every 1 semitone, i.e. every single note in the defined note range (i.e. chromatic sampling).
With a note stride of ‘3’, the MPC will only sample every third note. The MPC then uses the ‘tuning’ feature of keygroup programs to mimic the missing notes.
Note Stride is all about finding a good compromise between sound quality and memory usage. While acoustic instruments will definitely benefit from a note stride of 1 or 2, in my experience most synth instruments can take a fair amount of tuning before you’ll notice any drop in sound quality, so a note stride of around 4 or 5 can usually achieve good results with a low memory footprint.
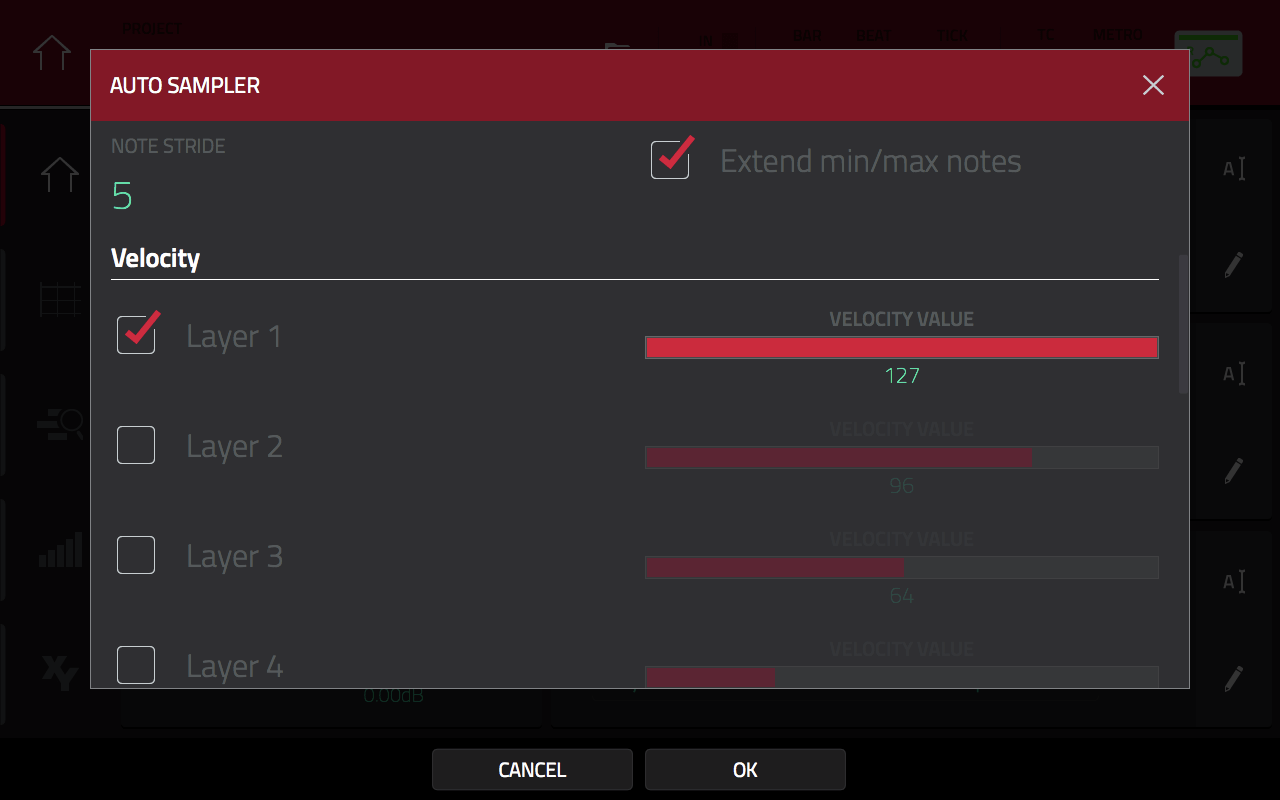
For our bass patch, set a NOTE STRIDE of 5.
Step 7. Set Velocity Settings
The Velocity settings allow us to record each note over 4 different dynamic levels which our MPC program than then play back using ‘velocity switching’. This is very handy when sampling acoustic instruments as it captures all the natural changes in acoustic tone and timbre but it is also useful when dealing with synth patches that contain complex velocity-sensitive modulations that are tricky or even impossible to replicate using the MPC’s own modulation capabilities.
However, after listening to the original patch it sounds like it uses a very simple ‘velocity sensitive filter’ so I’m confident we can just sample a single velocity and then add our own velocity sensitive modulation from within the MPC keygroup program itself. So leave this section with just ‘Layer 1’ checked and a VELOCITY VALUE of 127 (i.e. just sample one layer at maximum velocity).
Step 8. Sampling & Looping Settings
The Sampling and Looping sections allow you to configure the playback duration and looping settings for each note.
If you hold down any pad in the current patch you’ll realise that the notes ‘sustain’ for as long as you hold down the pad. This type of sustaining behaviour is very common in synth patches. When dealing with a sustaining patch like this you have two options:
- You can just record the sample for a few seconds and hope each note is enough for your typical usage (quick and easy, but potentially quite memory inefficient and might limit the instrument’s use in some songs that require extra long notes)
- You can try to replicate the original note sustain by ‘sustain looping’ each individual sample (this can be hit and miss with many sounds and memory efficiency dependant on the complexity of the sample).
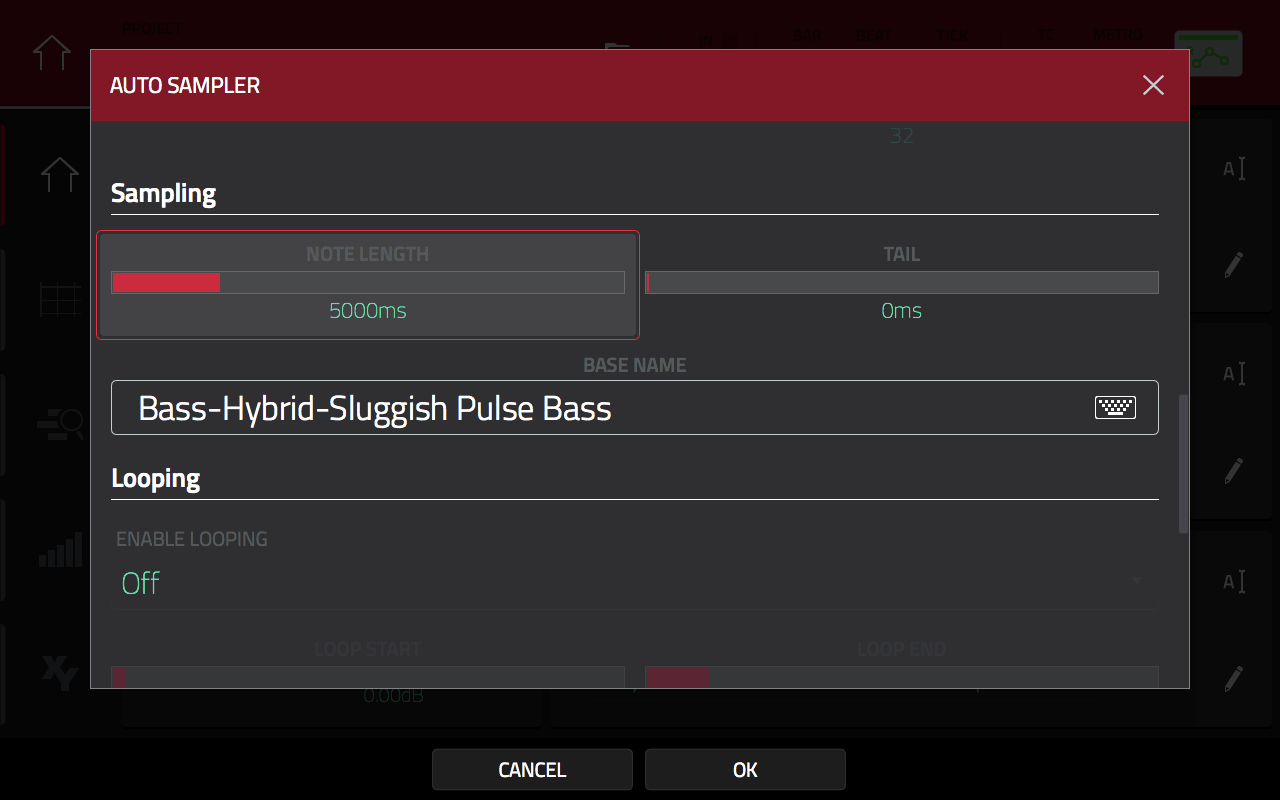
For this tutorial I’m just going for the ‘quick and easy’ option, so set a NOTE LENGTH of 5000ms (5 seconds) and set ENABLE LOOPING to OFF (I discuss sustain looping in more detail in the MPC X & MPC Live Bible).
The TAIL setting is used to add some decay to the end of each sample and might be useful when sampling ‘one shot’ samples that have long decay tails or ambience added. However a ‘tail’ is usually unnecessary if you’ve disabled all ambience FX; we’ll also be configuring a note ‘release’ in the final program itself using the ADSR envelope; this will add a ‘dynamic’ tail to all our notes. So leave TAIL as 0ms.
BASE NAME will not only set the name of the resulting program, it will also set the name for each sample (the MPC will just append the pitch to the end of each sample). I like to use the MPC ‘tagging’ and ‘grouping’ system where possible as this helps organise your programs and sounds in both Expansion and Media browsers in the MPC Software, plus this also gives you a phrase to search for in the hardware BROWSER.
Rename this program Bass-Hybrid-Sluggish Pulse Bass. This will tag it as a ‘Bass’ program in the Media Browser. In the Expansion browser this is going to place a program called ‘Sluggish Pulse Bass’ in a sub category called ‘Hybrid’ in a main category called ‘Bass’.
Check out my Expansions Guide for more details on file ‘tagging’. But remember, you can of course pick any naming system you want as ultimately it’s your sound library!
Finally, check ‘Auto trim start’ to have the MPC automatically trim the beginning of the sample as tightly as possible.
Step 9. Make The Program
Check the box ‘Make current program’, otherwise Autosampler just creates the samples without auto assigning them to a ready-made keygroup program. Hit OK to begin the Autosampling process.
Unlike audio track bouncing, Autosampling is a ‘real time’ sampling process, so you’ll have to wait patiently while the MPC records every requested note in real time.
Step 10. Try out your new Autosampled program!
After autosampling, head back to MAIN and you should find that the MPC has changed your original plugin track to a KEYGROUP track and assigned the newly created ‘autosampled’ program to this track.
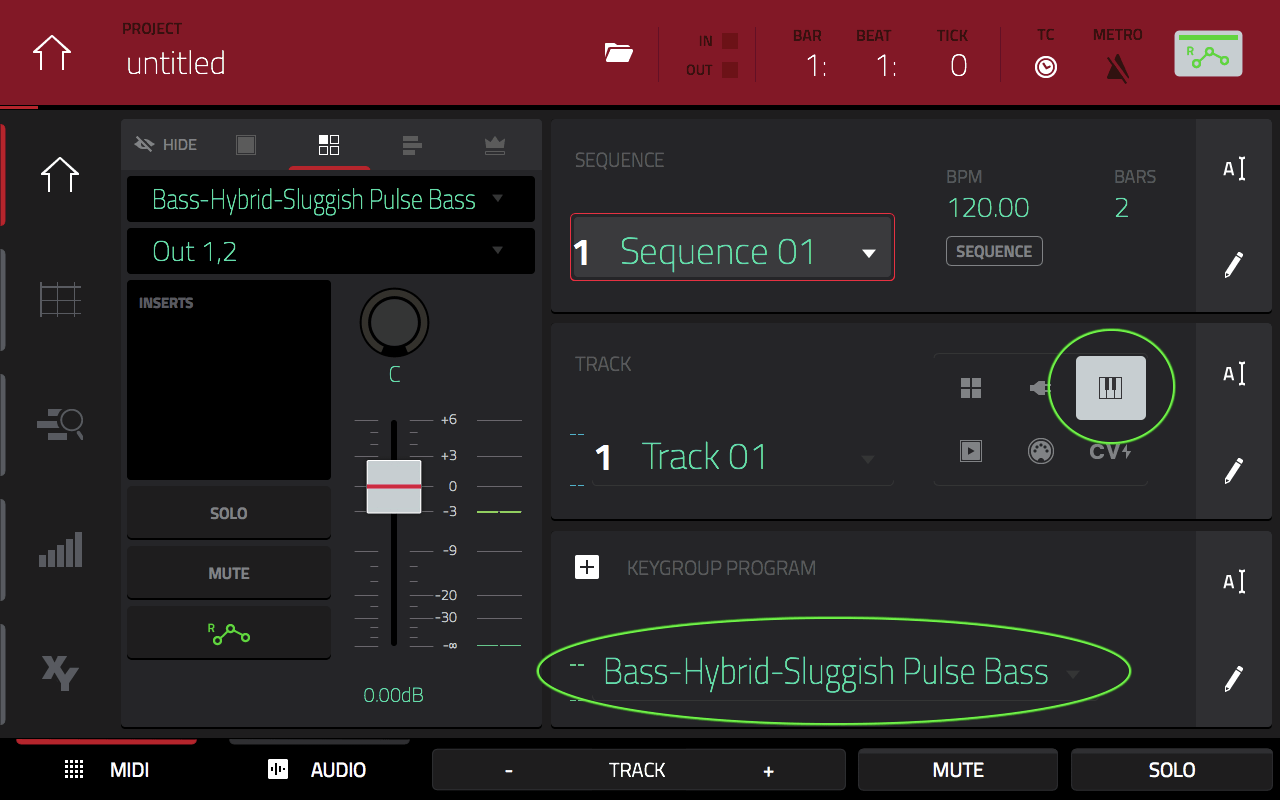
Hit some pads to hear the auto sampled program in action. Tap the PLUGIN button to switch the track back to the original Hybrid plugin track and compare the difference. Sounds pretty good! There is however a few minor differences, but we can easily fix these in PROGRAM EDIT.
Setting Polyphony
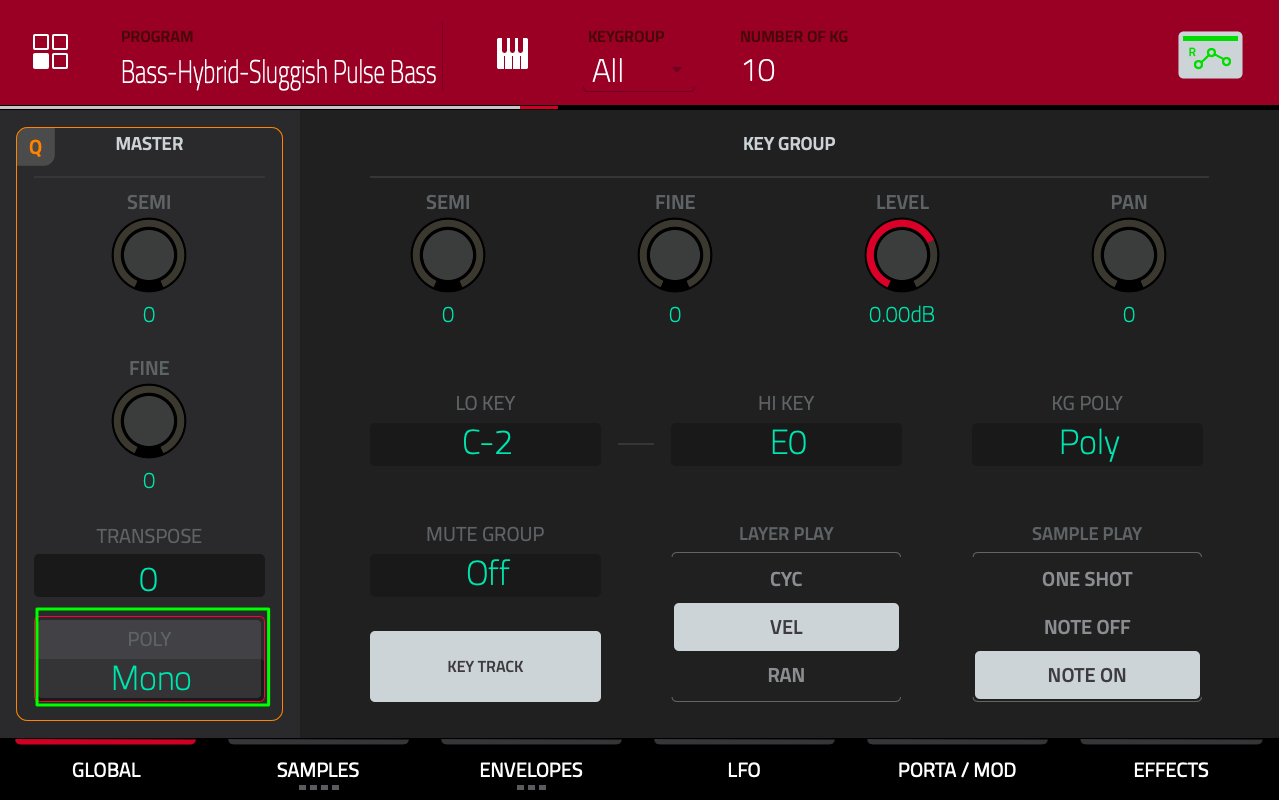
Head over to PROGRAM EDIT > GLOBAL (this was called the ‘master’ screen in earlier firmware versions). Now you might have noticed that the original Hybrid patch was set to playback ‘monophonically’, i.e. only one note can play at a time. This is a very common feature of synth bass patches. So to mimic this in our keygroup, set the POLYPHONY to Mono.
The Effect of Using ‘Extend Max/Min notes’
With keygroup 1 selected notice how the ‘LO’ NOTE RANGE parameter is C-2, even though the lowest note we sampled was C0?

Now select the final keygroup, 10. Notice how the HI NOTE RANGE value is G8, even though the highest note sampled was C4?

By selecting the ‘Extend Max/Min notes’ configuration option in the Autosampler screen, the MPC has extended the first and last key groups to cover the full pad range (C-2 to G8), but only by tuning the C0 and C4 samples. This doesn’t use any extra memory but does give you additional notes should you need them. Obviously we have some crazy amounts of tuning here so some of the more extreme notes sound poor but it’s certainly gives us some ‘free’ additional notes outside the original note range that we sampled.
Adjusting the Envelope
If you compare the new program to the original plugin patch you might hear a slight difference in the note ‘release’ – our auto sampled program has a slight ‘click’ whenever you release the pad. This is easily fixed by adjusting the amp envelope. Go to ENVELOPES so that ENV:AMP is now displayed:

Select KEYGROUP: All at the top of the screen so our ADSR adjustment is mirrored across all our keygroups.
Now our original synth patch does not have a long release, in fact it’s actually quite short, so let’s set a RELEASE value in our Amplitude Envelope that just removes that little click whenever we release the pad. Increase the AMP ENVELOPE RELEASE to 40.
Adding a Velocity Sensitive Filter
Return to MAIN and change track 1 back to a PLUGIN type so we can hear the original Hybrid plugin.
Now turn off FULL LEVEL and hit any pad with differing velocity levels. Try starting softly and gradually hitting it harder and harder. You should hear that the softer pad hits are much darker, with the hard hits relatively bright. This is because the original patch uses velocity sensitive filtering.
Change the track type back to KEYGROUP and head over to PROGRAM EDIT and press ENVELOPES twice to display the ENV:FILTER screen :
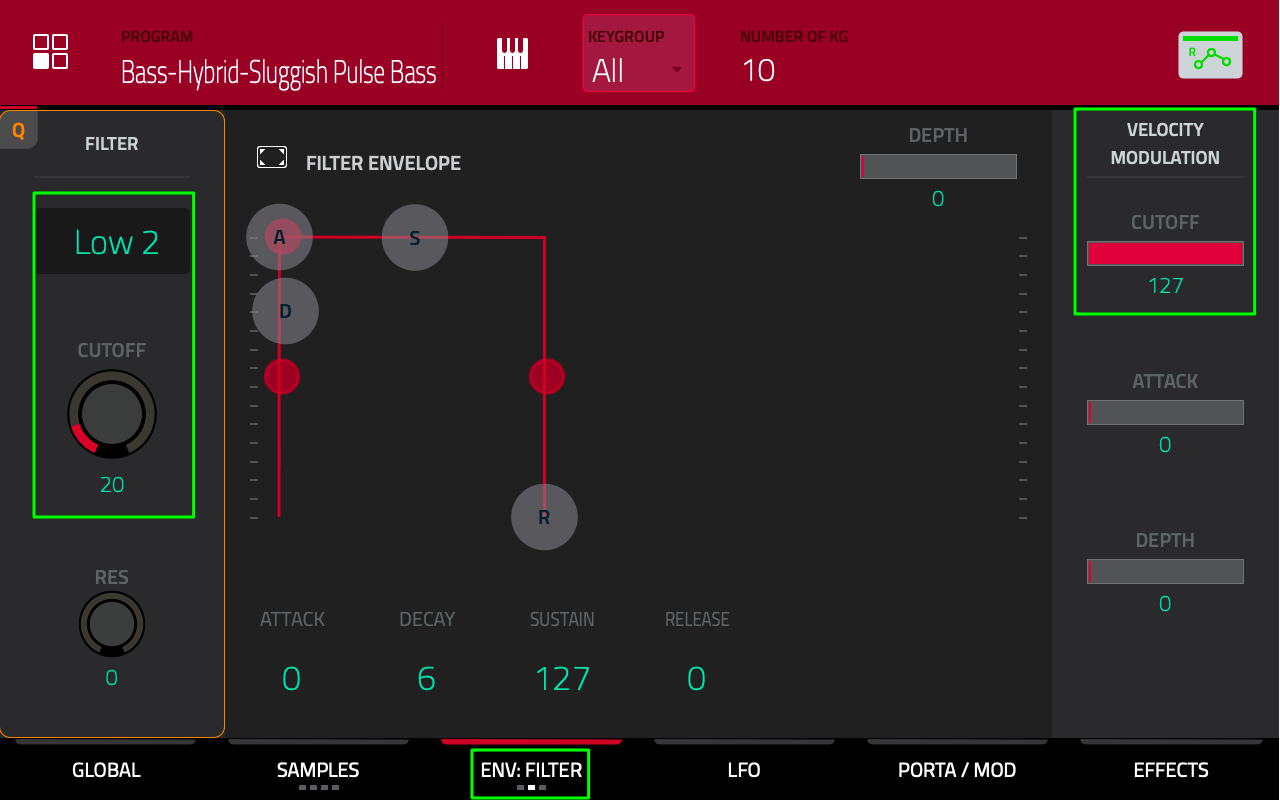
Make sure KEYGROUP is set to ALL. Now set the filter to TYPE: Low 2 (low pass, 2 pole), with a CUTOFF of 20.
At the moment this will just heavily filter all our sounds. To activate the velocity sensitive aspect of this filter, change the VELOCITY MODULATION: CUTOFF parameter to 127. This will ensure that at the hardest velocity of 127, the filter will be set to a CUTOFF of 127 (i.e. effectively turned off), while at the softest hits, the CUTOFF will be a minimum of 20 (i.e. lots of filtering).
Saving Your Program
Of course you can set up your program any way you wish, it doesn’t have to completely mimic the original patch – you can now add reverb, delay or any other internal effect to the program, tweak the filters, adjust LFO and envelopes and add pad colors, just like we do in many tutorials throughout the MPC Bible.
Once you’ve finished tweaking your program, always remember to save it; MAIN > bottom pencil icon > SAVE CURRENT PROGRAM.
You can load up my version from the tutorial files – it’s size (including the program file) is only 7.6 MB! That’s tiny, and it leaves plenty of room in memory for all your other instruments, loops and audio tracks.
Glitchy Kontakt Autosampling?
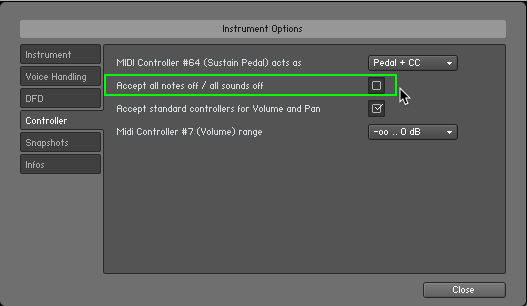
There’s been many reports that Autosampler often doesn’t play nicely with some Kontakt instruments, either giving glitchy results or not recording any audio at all. SFTRAXx recently posted a potential fix to this problem on my forums. After loading your Kontakt instrument, hit the instrument’s Wrench to bring up the ‘Instrument Options‘ window. Now select the ‘Controller‘ tab and uncheck the ‘Accept all notes off / all sound off’ option.
If this fixes your Kontakt Autosampling problems, let me know in the comments.
More Advanced Autosampling
Throughout the MPC Bible we cover more advanced Autosampling examples including how to autosample external hardware synths (even iPad synths), creating memory efficient ‘multi-velocity’ patches, dealing with ‘one shot’ patches, techniques for multisampling acoustic instruments, as well as diving deep into MPC program synthesis to create our own unique ‘MPC synth’ patches from single cycle waveforms.
The entire book covers every aspect of ‘standalone’ MPC production, from sequencing through to sound design, chopping to entire song creation and everything in-between. Find out more here, where you can download more example tutorials and read reviews of the book from fellow MPC users.
18 Responses
Leave a Reply

Latest Posts
MPC Bible 3, Revision 6 - MPC Oscillators, MPC 3.9, MPC One G2 + MPC Key 37 G2

Downbeat Kit 3 - Acoustic Drum Kit Expansion For MPC3

MPC Bible 3, Revision 4 - Clip Matrix, MPC 3.7 + MPC XL

Out Now: MPC Bible 3, Revision 3 With MPC Live 3 MPC3.6 Support

Jul 9, 2019 2:18 am
Whoa. Autosampling is the MPC’s killer app. I haven’t seen a sampler that comes close!
Feb 12, 2020 8:38 pm
Will this work for MPC one?
Feb 12, 2020 9:05 pm
Yes
Mar 20, 2020 7:44 pm
Will this work for drum VST’s like Kvlt Drums? If so, is it the same procedure?
Apr 3, 2020 7:25 am
Workable on the Force?
Dec 5, 2020 8:40 pm
Thanks for this Tutorial! But how can I use different CC than velocity as a parameter for a Layer? Eg some hardware synth using CC74 or somewhat for cutoff and I can’t route velocity to cutoff inside this synth…?
Dec 12, 2020 2:50 pm
The ‘accept all notes’ option did indeed fix autosampler not being able to record the Kontakt VST
Mar 1, 2021 8:05 pm
Everything well explained! Thanks a lot, works awesome. One question though. After i saved my new keygroup, i played with it in standalone. I recorded some melody but i was not able to put any Effects on it from the Program Edit. Did i forgot something? Or is it true that no effects can be applied? I´m not able to put Delay, Reverb or anything else from the effects…Thanks!
Mar 21, 2021 11:51 pm
Great Knowledge man frreal. do you do private one on one teaching lessons. t
Thanks.
Aug 21, 2021 6:12 am
The Autosampler with external Gear dont work by me he records nothing no sound at all.
With the resample function it worked !
Aug 21, 2021 3:25 pm
Hi, I’ve just double checked that this is still working for external gear with the latest MPC 2.10, and it’s working 100% for me. First connect the audio out of your device into the MPC audio inputs. Then make sure your external MIDI device is being triggered by the current sequencer track – ie. set it to MIDI track type, set the correct MIDI out port details. Hit some pads and you should hear your external synth triggered. Then go to SAMPLER and set INPUT to match the MPC audio inputs you used for your synth. Go to AUTOSAMPLER and begin autosampling.
Dec 25, 2021 8:12 am
Thats are good news thank you i buy a mpc live mk2 soon and hope it will work because i have a waldorf blofeld. I tested it for a while i choose note range c2 – c4 but no sound will recorded or
some crackle was recorded. I think the problem is in these note ranges and the option extends max/min notes i will test all these things because i think the mpc is a beast of a good sampler
Mfg
MicroBot
Aug 21, 2021 6:34 pm
When I load a saved autosampled keygroup in standalone mode, I can see the samples, but no sound will play when I hit the pads. Very frustrating.
Aug 21, 2021 6:40 pm
If you look at the resulting samples in SAMPLE EDIT is there a waveform or are they just blank? I’m trying to work out if it’s the recording process itself or perhaps the finished keygroup program that is the problem. Also when configuring the recording, what is the highest velocity you are recording at? 127 or are you setting it lower? Is this an external synth or a plugin? Before recording go to the SAMPLER screen and play some pads – is the level meter moving? Can you hear anything (with MONITOR: IN)?
Jan 23, 2022 4:20 am
Hey I have the same issue.
I followed the Bible instructions. When I,m about to autosample my external synth, I can hear it play through the MPC. So everything works fine with the monitor and audio track. But once I start autosample, I cannot ear anything in my headphones. When the process is finished there is this new keygroup program but absolutely no sound.!
I was trying to sample from a Modal Skulpt synth through MIDI!
Thx
May 14, 2022 7:26 pm
How can I map an external controller knob to the keygroup filter? Is this possible?
May 28, 2022 3:32 pm
Hi MPC tutor thank you for this guide i appreciate it.I am a piano player and would like to auto sample a piano vst.
What are the best settings to auto sample a piano vst i keep getting low memory when i sample a keyscape preset and 73% memory when i sample a kontakt piano preset. All the effects are off as well and i sample about 5 octaves that start at C0 and stop at C6 or C5.
Feb 25, 2023 7:53 am
killer tutorial! thanks! Andy Avgousti rocks!