
This MPC 5000 tutorial covers the important technique of MPC 5000 drum layering which can give you endless new drum sounds from just a few ‘base’ sounds. This tutorial is adapted from my 400 page ebook, Beat Making on the MPC5000, the complete and definitive resource for MPC 5000 owners which teaches essential and creative MPC 5000 beat making skills.
Layering Drum Sounds in an MPC 5000
Layering samples in an MPC5000 is a great way to produce completely new sounds from your existing drum sounds. The simplest way to layer sounds is to just take two or more samples and place them on top of each other. Within your MPC, there are a couple of ways you can layer drum sounds, the first one I’ll talk about is the built in ‘layer’ option within each pad in a program.
Each pad on your MPC is capable of playing up to four samples (‘layers’) at the same time – you can use any samples you wish, as long as they have been loaded into memory. Load up the program LAYER1.50s from the tutorial files – I’ve assigned a snare to PAD A1 and a clap to PAD A2. In this example we’re going to layer these two sounds on PAD A3.
Press MODE and pad 6 to enter the PROGRAM screen, select PAD A1 and listen to the snare – it’s quite a chunky snare with very little bit of decay. Now have a listen to the clap on PAD A2 – it’s a typical clap sound, quite light with some decay to it. Go to PAD A3 and move your cursor down to line 1 and jog wheel to the right to assign our SN10 snare sample here. Now cursor down to line 2 and assign our CLP10 clap sample here:
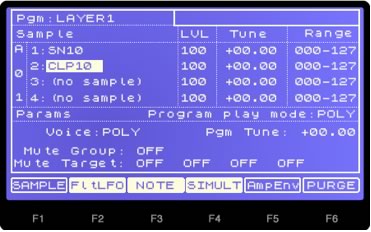
Once this is set, just hit PAD A3 and you’ll hear both sounds play together – congratulations, you’ve just layered two sounds. The end result is a completely different sounding snare. Of course, this is as basic as it gets but layers do allow us to control some parameters for each individual layer separately.
Each of our layers has its own level (volume control). By default, I feel the clap is perhaps a little too loud compared to the snare, so highlight the ‘LVL’ parameter for the CLP10 sample and reduce it from 100 to 60. Now you might feel that the clap sample cannot be heard anymore, but if you compare A3 to pad A1, you’ll hear the subtle difference this clap is making to our snare sound – it’s giving it more ‘air’ and makes it sound a little brighter. We can also adjust the tuning for each layer independently. Highlight the ‘Tune’ parameter for our CLP10 sample and lower this to -12.00. This sounds really good, it gives the snare a real presence and makes it sound less like a rim hit while keeping that nice ‘crack’ you tend to get with a rim shot.
I added my version to pad A4.
Converting Mono to Stereo Using Layers
Load up KICK1 from the tutorial folder. This is a mono kick, but we can easily turn it into a stereo kick with a thumping wide presence, which can be used as a special effect in any beat. Create a new blank program by highlighting the current program name, press WINDOW, NEW (F3), DO IT and assign KICK1 to layer 1 on pad A1. Then assign the same KICK1 to layer 2 on that same pad. As is always the case when you play two identical sounds together at the exact same time, you’ll experience some phasing, where the two layered samples begin to sound metallic – however, the technique we’ll use to create the stereo layered sample will stop the phasing occurring.
With the name ‘KICK1’ highlighted on pad A1, press WINDOW to bring up the PLAY MODE screen. Here, change the panning for layer 1 to ‘L50’ – this is a hard left pan. Then set the panning for layer 2 to ‘R50’ – a hard right pan.
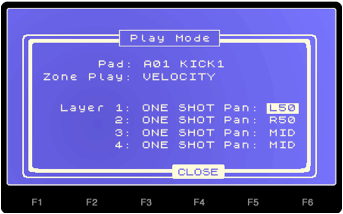
Press CLOSE (F4). Now preview your layered pad – the phasing has gone and we are left with a very wide, huge kick drum. My version of this program can be found by loading up the wide-kick.50s program from the tutorial files.
More Complex Layering Using SIMULT
So far, being able to change the volume, tuning and panning of each layer independently will give us plenty of scope when it comes to layering drum sounds (or any other type of sound). But there are plenty of other parameters that we can change within a program, such as attack, decay, filter, and even effect settings via the mixer. However, if you try changing the attack, decay or filter on PAD A3, you’ll find that these changed settings affect all the layers on that pad; it’s not possible to edit each individual layer separately with these parameters. This isn’t ideal, so if we want to really push our drum layering experiments, we need to look at an alternative to the ‘layering’ feature; SIMULT.
SIMULT (short for ‘simultaneous’) is a little different to the ‘Layers’ option. With layers, you simply assign any sample from memory onto a pad, with SIMULT, you can set one pad to play ‘simultaneously’ with any 4 other pads within that same program – this means you can still layer samples but this time have individual control over all settings for each sample in the layer.
To explain this more clearly, go to the SIMULT sub folder from the tutorial download and load up the program ‘SIMULT.50s’. This program features eight different snare & claps samples, each assigned to pads A1 – A8. Select PAD A09 – this is the pad we’re going to create our layered sample on, I’ll call it the ‘master’ pad. Firstly, assign sample MTSNR3 to pad A9. Now press SIMULT (F4) and you’ll see the following:
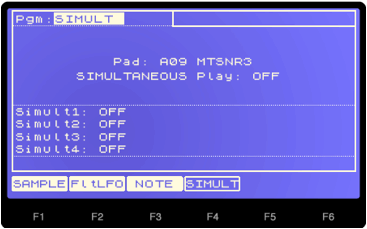
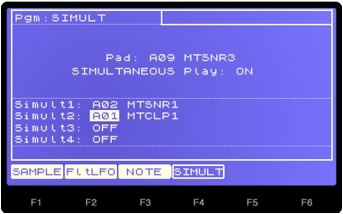
First, let’s turn on SIMULT for this pad, so select ‘SIMULTANEOUS Play: OFF’ and change this to read ‘ON’. Now cursor down to Simult1: OFF. To play a pad simultaneously with this current ‘master’ pad, simply touch the pad you wish to be assigned to ‘Simult1’ – so let’s try pad A2 (MTSNR1). With that assigned to Simult1, press SAMPLE (F1) to return to the main program screen. Now press pad A9, and you’ll hear both A9 and A2 playing together.
Now I feel that the initial attack portion of the MTSNR1 sample on pad A2 is a little harsh, so let’s get rid of it. Press pad A2, select AmpEnv (F5) and set the attack to 30. Now play pad A9 – it plays both samples as before, and this time plays the pad A2 sample with the adjusted attack settings.
Finally on pad A2, drop the tuning to -04.00, as this will give us a little more grit on our layered pad. Play pad A9 again to hear the difference. Go back to the SIMULT screen on pad A9 and this time, assign our clap sample MTCLP1 (pad A01) to Simult2.
Press SAMPLE (F1) to return to the main program screen and preview our new three sample layer. The clap could do with some taming, so select pad A1, go to FltLFO (F2) and change the LOW PASS filter ‘Freq’ from 100 to 75. After listening to pad A9, I feel that the pad A2 layer is a little loud, so try dropping the ‘Lvl’ for pad A2 down to 77. Sounds go to me.
What happens if you change any of the program parameter settings on pad A9? Well, it only changes the ‘master’ sound that is assigned to this specific pad, i.e. MTSNR3. So, drop the tuning on pad A9, and you can hear only MTSNR3 (the samples on layer 1) is affected, while the sounds being drawn from pads A1 and A2 are unaffected.
What about adding effects to one of the layers? No problem – select pad A08 and go to the MIXER screen (MODE and pad 7). Set the FX parameter to read ‘1’ and push up the effect ‘SEND’ to full.
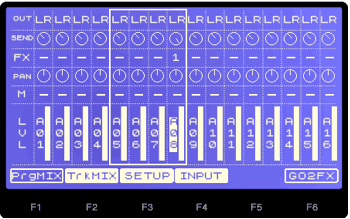
Now press GO2FX (F6), and for FX1, select the ‘Auto Wah’ effect – leave all the effect settings as they are. Press CLOSE (F4). Now return to the PROGRAM screen (mode and pad 6). Preview pad A8 – the auto wah gives the snare a fantastic sound. With pad A8 still selected, go to SIMULT (F4); set ‘Simultaneous Play: ON’ and on Simult 1, assign pad A06 (MTSNR5). Press SAMPLE (F1) to return to the program screen and preview the layered sound on pad A8. At this point you can tweak the layers to your liking. The ‘auto wah’ sound from A8 can do with some taming, so drop the ‘Lvl’ on A8 to 55. I also dropped the tuning down to -02.00.
And there’s no reason why you can’t also use normal ‘Layers’ function in unison. With A08 selected, cursor down to ‘Layer 2’ and assign the clap sample MTCLP1.

Sounds great – don’t stop there; scroll through all the sounds in memory until you find the sweet layer. For example, using MTSNR14 as the ‘layer 2’ sample works great as well, and basically most of the samples tend to work well.
You can load up the project file SIMULT001.prj to see my version of the layers.
MPC5000 Drum Sounds Made For Drum Layering
One of the problems with layering drums is that often layers will ‘phase’, there will be frequency clashes, nasty artefacts and gain boosts, some of which are very hard (if not impossible) to remedy in an MPC5000. I have two downloadable drum kit packs over at MPC-Samples.com, the ‘Infinity Kit‘ and ‘Infinity Kit Vol 2‘, both of which feature 192 drum sounds, all of which have been specially processed to guarantee trouble-free drum layering, no matter which sounds you layer with each other.
You simply load up some drums, assign any of them to the layers on an MPC5000 pad (or use SIMULT) and thanks to the careful frequency manipulation processing we’ve applied, the layers work perfectly every time. Go to the Infinity Kit product page at MPC-Samples.com to download some example ‘Infinity’ drum sounds including a ‘layer’ program that contains some example drum layer combinations using the MPC5000 pad zone function.

Latest Posts

"Electric Bass 3 - Now With MPC Sample & MPC3 Support

MPC Bible 3, Revision 6 - MPC Oscillators, MPC 3.9, MPC One G2 + MPC Key 37 G2

Downbeat Kit 3 - Acoustic Drum Kit Expansion For MPC3

MPC Bible 3, Revision 4 - Clip Matrix, MPC 3.7 + MPC XL

One Response
Leave a Reply