This MPC MIDI tutorial is suitable for all the current standalone touchscreen MPCs; MPC X, MPC One, MPC Key 61, MPC Live and MPC Live II running MPC Firmware 2.8 or greater (the screenshots have been updated to the newer layout in MPC 2.11). You can download the tutorial files here, but to recreate the examples you’ll need to attach a MIDI controller to your MPC (and for the last part you’ll need two controllers connected).
What is a MIDI Controller?
At the heart of the MPC is a powerful MIDI sequencer which can trigger sounds from any MIDI enabled sound source, be it internal samples assigned to a KEYGROUP program, sounds generated by an internal plugin synth or sounds generated by attached hardware synths. Even the events used to play back the drum sounds in a DRUM program are still MIDI events.
The MIDI events used to trigger all these sounds all initially need to be inputted into the MPC sequencer. This can be done programatically using the GRID, LIST EDIT, step sequencer or even by loading MIDI files, but MIDI events can also be recorded or performed in real time directly into the sequencer. The most common way for inputing these events is to use the MPC pads – in fact, the MPC pads are the MPC’s own built in MIDI controller.
Why Use an External MIDI Controller?
The pads are perfect for playing drums but often don’t have the necessary expressiveness when playing melodic instruments. We have workarounds such as PAD PERFORM and the arpeggiator, but for many instrument performances it’s often preferable to use an external MIDI controller, typically a MIDI keyboard with more playable keys, mod wheels, pitch bend control etc.
And as we’ll see, we can easily hook up multiple controllers to the MPC giving us the flexibility to assign different types of controllers to different instruments.
MPC Keys owners: In this tutorial, you can substitute the built in keys for many of the examples, but you can also use these instructions to add additional controllers to your set up. To use the built-in keys as one of the controllers in this tutorial, make sure ‘KEYBOARD CONTROL > Keyboard Route‘ is set to Tracks.
Connecting a MIDI Keyboard Via USB
If you have a ‘class compliant’ USB MIDI control keyboard with a USB output then it should be compatible with your MPC (it’s always worth asking around on MPC-Forums.com or one of the MPC Facebook groups just to double check compatibility before purchasing).
To attach a USB MIDI Controller, simply connect the USB ‘B’ port of your controller to a spare USB ‘A’ port on your MPC. Here’s the set up using my Arturia Minilab 2

Don’t have a spare USB A port on your MPC? Simply use a USB hub to give you additional USB ports. It’s worth using a powered USB hub to ensure all your USB gear receives enough juice – I have this 7 port RSHTECH USB 3.0 hub which has a solid metal construction and works well.
After connecting your keyboard via USB you should find that it is immediately usable – hit the keys and they will begin playing notes from whatever program is selected in the current MIDI sequence.
Connecting a MIDI Controller via Bluetooth
The MPC X, MPC Live, MPC Key and MPC Live II all have bluetooth support which allows you to connect a bluetooth enabled MIDI controller (sorry, no but there’s no bluetooth for the MPC One). Bluetooth MIDI controllers include the Korg MicroAir 2 series (I personally have the 37 key model) and the Akai LPK25 Wireless (I believe this one is now discontinued).
Connecting via bluetooth is really easy. In your MPC, head over to MENU and hit the PREFERENCES cogwheel at the top centre of the screen. Now tap on BLUETOOTH and turn it ON.
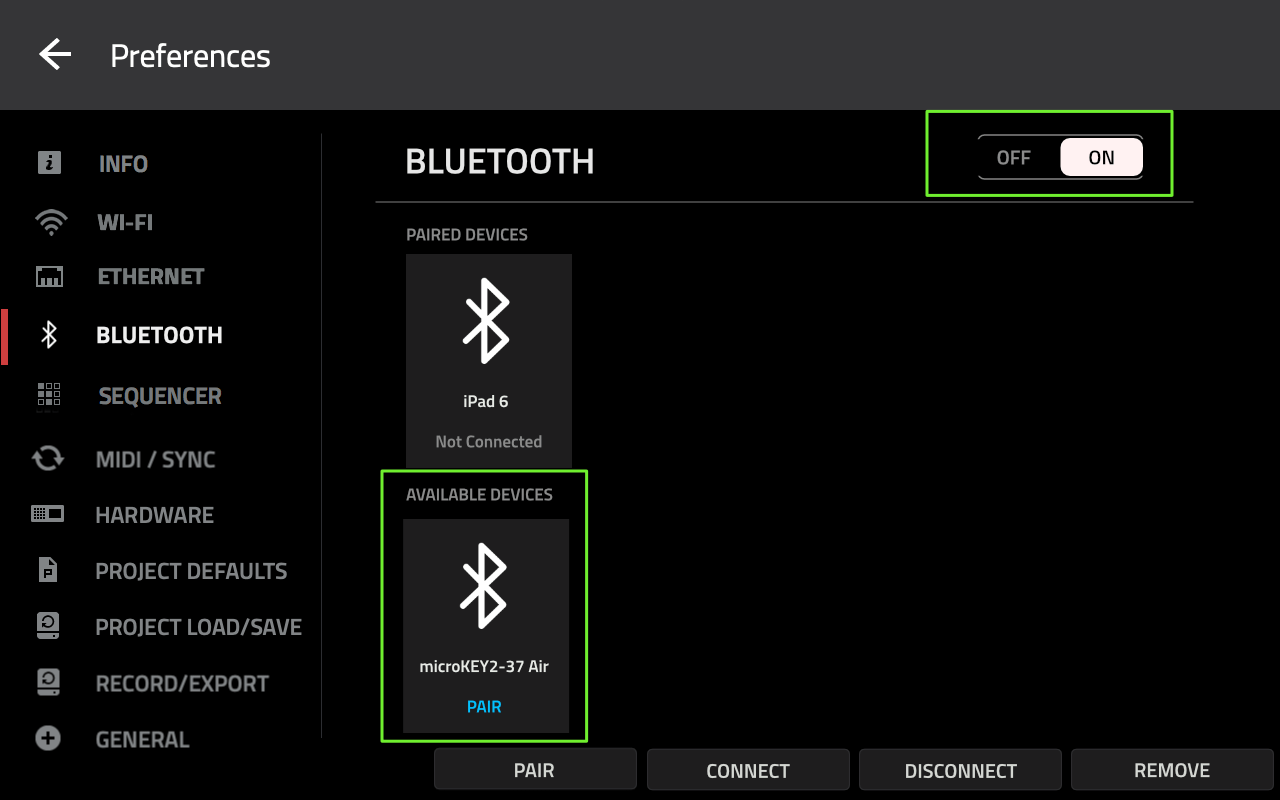
Now switch on your bluetooth MIDI controller and enable pairing mode (it will probably do this automatically). Your MPC should now see your bluetooth controller – tap on the device in the AVAILABLE DEVICES section and hit PAIR. Your keyboard should pair and connect to the MPC, now appearing under the ‘PAIRED DEVICES’ section.
You might get a ‘pairing failed’ message, but ignore that and just hit CONNECT; the two should connect with each other. Once this initial pairing has been performed your bluetooth keyboard should now be automatically detected by your MPC whenever you switch on the keyboard.
Once the bluetooth keyboard is connected to the MPC you should be immediately able to play the program assigned to the current track in your sequencer.
Connecting a Controller Via MIDI Cables
If your controller is ‘old school’ and only has a traditional 5 pin MIDI output port then you simply connect this to the 5 pin MIDI pint port on your MPC using a standard MIDI cable. The original MPC Live requires that you use the provided jack-to-MIDI converters or you can use a MIDI cable with these built in.

Again, once connected there is no software configuration required, your controller will now play the currently selected track in your sequence.
Viewing Your Current MIDI Connections
You can view all your currently attached controllers by going to PREFERENCES > MIDI /SYNC. In the screenshot below (under INPUT PORTS) I have connected my Korg MicroKey Air 2 via Bluetooth, and by Arturia Minilab 2 (via USB).
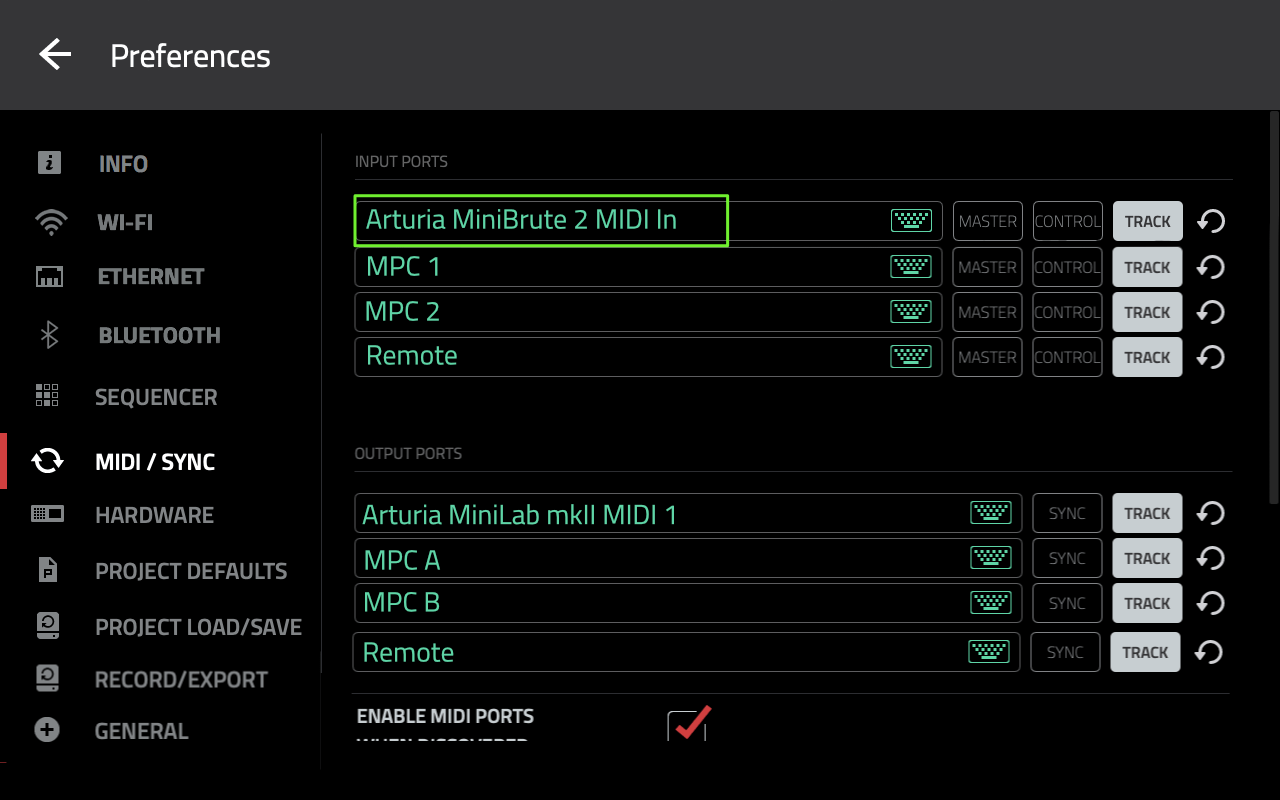
MPC 1 and MPC 2 refer to the MPC’s 5 pin MIDI ports (you’ll only see MIDI 1 on the MPC One). If you have attached a controller via any of these two ports you can hit the keyboard icon on that row and give that port a more useful name (in the next section we’ll see why the names can be useful).
Assigning a Track to a Specific MIDI Controller
Let’s take a look at how we can customise the configuration of connected MIDI controllers. Make sure you’ve downloaded the tutorial files and transferred them to your MPC disk. You’ll also need to connect a MIDI controller to your MPC using any of the options above, i.e. USB, Bluetooth or MIDI cable.
Go to the BROWSER and from the tutorial files folder load up the MIDI Controllers.xpj project file – in MAIN, select sequence 1.
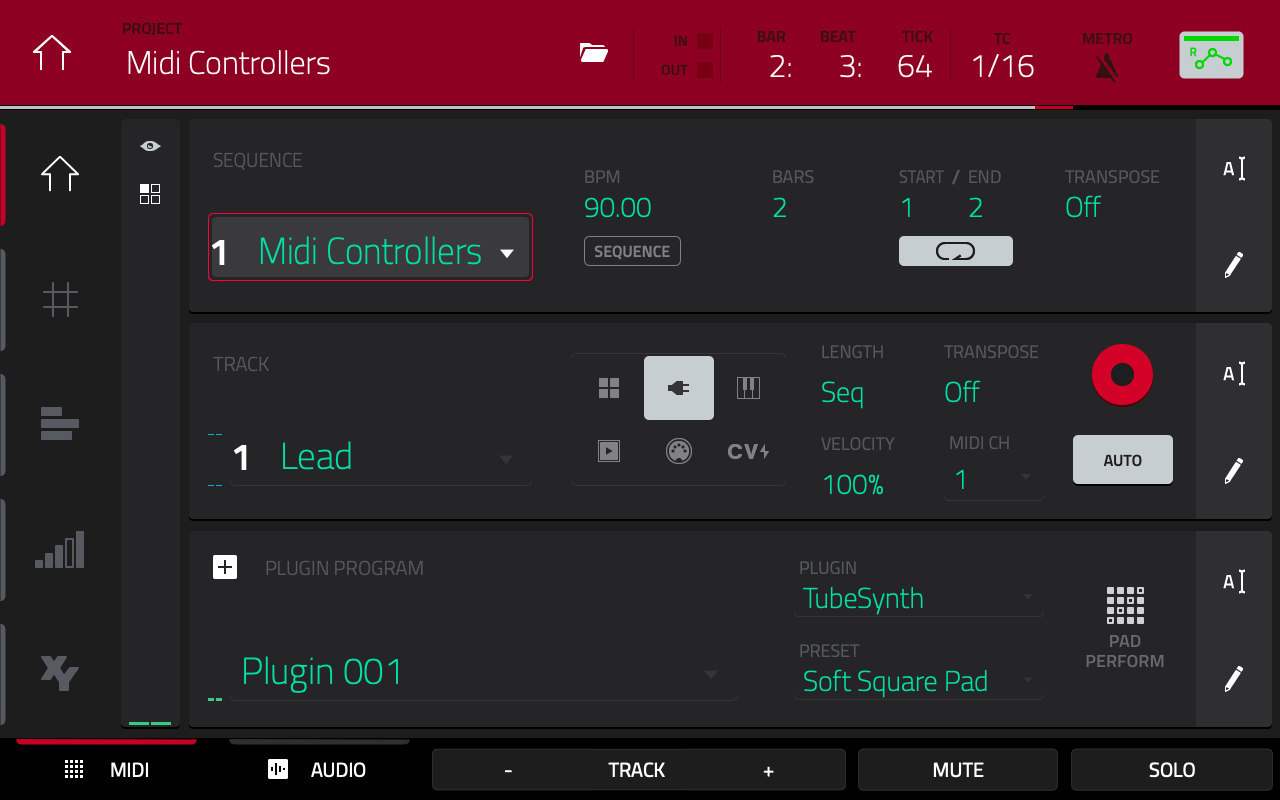
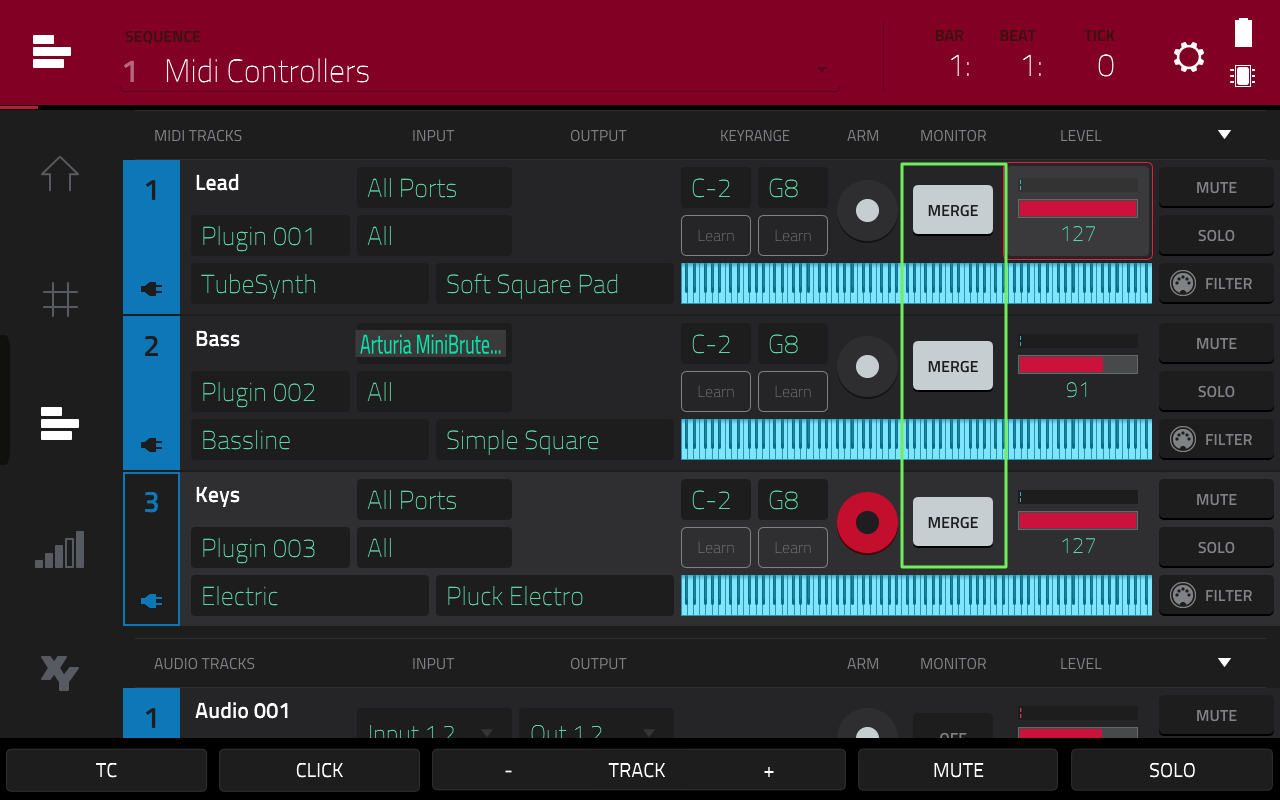
Here we have a sequence with three tracks; track 1 (Lead) is a PLUGIN track assigned to a TubeSynth lead patch, track 2 (Bass) is a PLUGIN track assigned to a Bassline bass patch and track 3 (Keys) is an electric piano patch from the Electric plugin.
Now, the default action for an attached MIDI controller is to always control the program assigned to the currently selected track in your sequence. So select track 1 and play some keys on your controller; you should hear the lead patch assigned to track 1. And if you play the pads, you should also hear the lead sound play.
Now select track 2; the controller (and pads) play just the bass patch assigned to that track. Finally select track 3 and your controller (and pads) will now play the electric piano patch.
So at the moment your controller is acting in the exact same way as the MPC pads, controlling whatever track is currently selected in your active sequence.
The MPC pads will always work this way (i.e. controlling the currently selected track), but we have much more control over any attached MIDI controllers. For example, we could configure our controller can only control a specific track in our sequence, no matter which track is currently active.
For example, let’s set up our controller to only control track 2 (the bass). This would be quite useful in a live situation because it would always ensure that your controller is going to play that bass sound, no matter what track was selected in your sequence. This will also mean you could for example select the lead sound on track 1 and play that with the pads with your left hand while playing the bass line with your controller in the right.
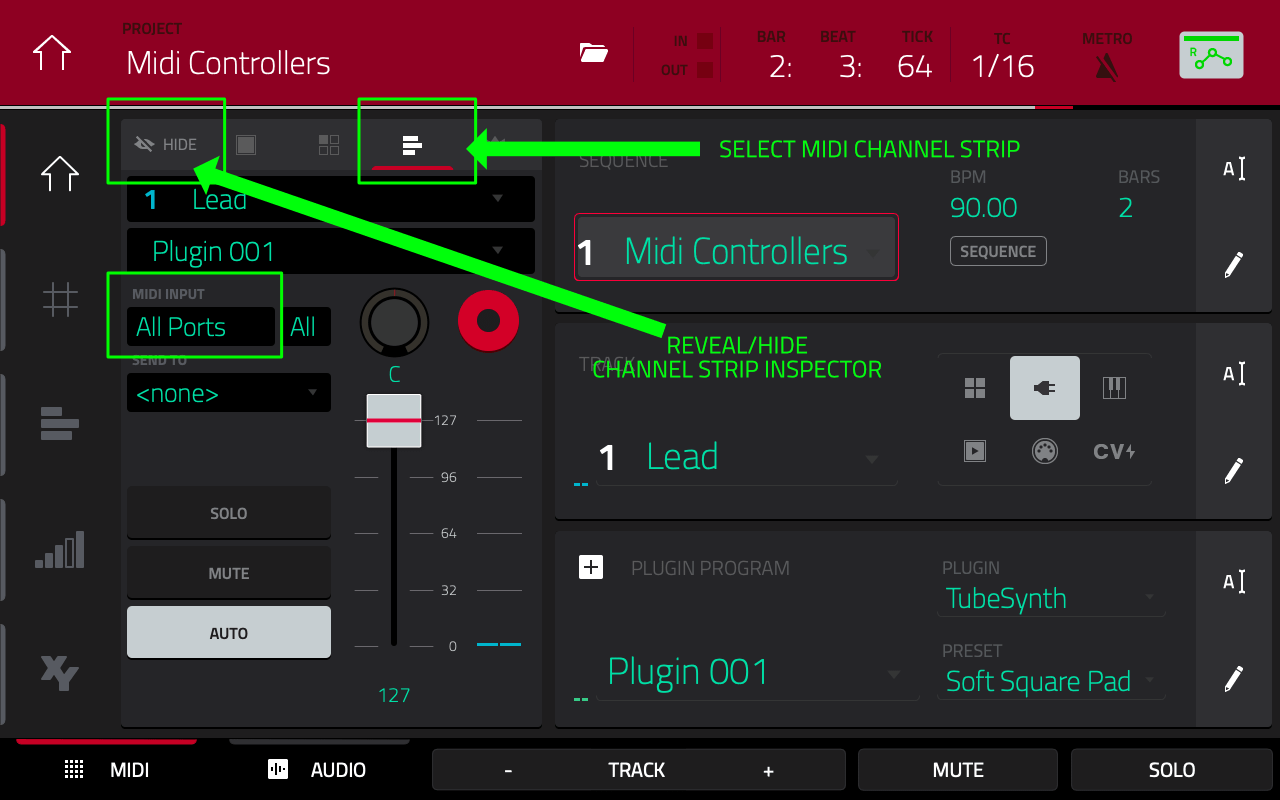
In MAIN (with track 1 selected) hit the eyeball icon to reveal the Channel Strip Inspector. By default this will reveal the ‘Program’ channel strip, so make sure you select the MIDI Channel icon (highlighted in green below):
By default, MIDI INPUT for a track is set to ‘All Ports’. Change this <none>.
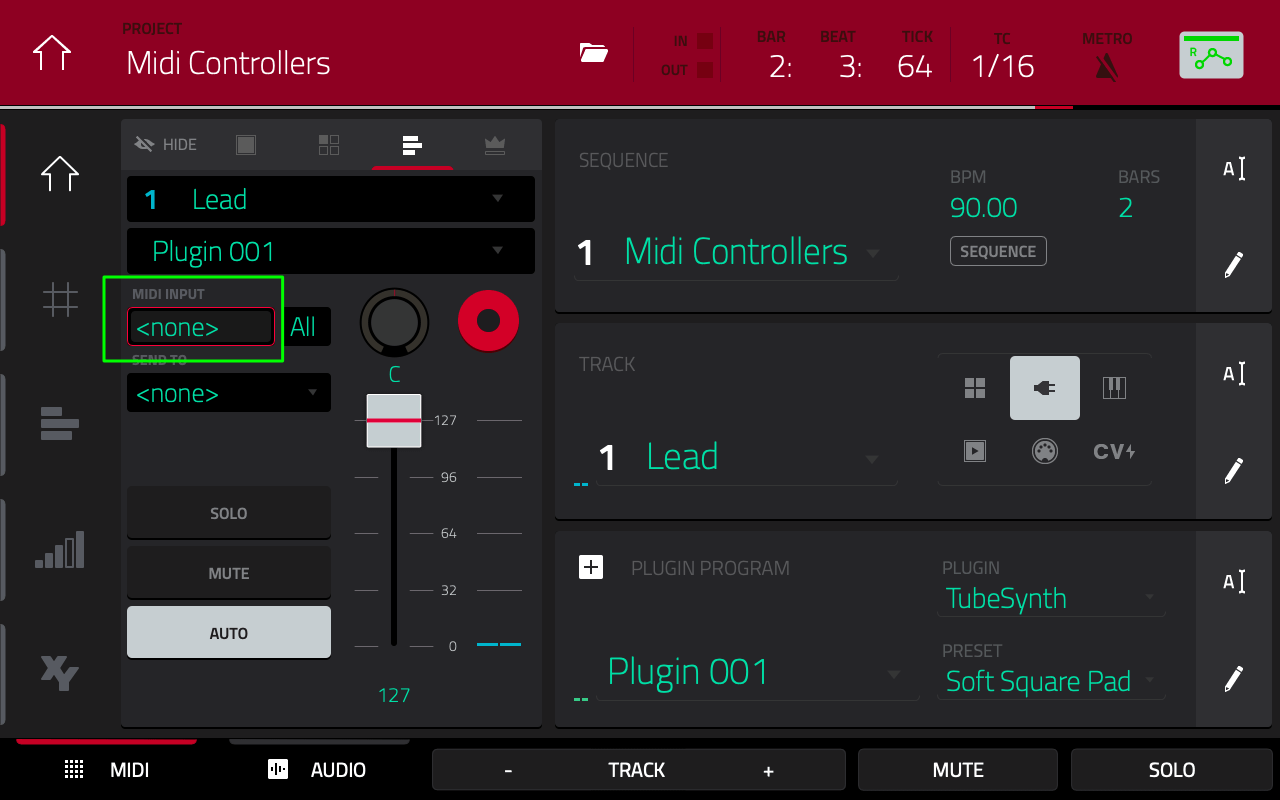
This track will now no longer accept any MIDI input from attached devices – hit a key on your controller and you should hear nothing – the blue MIDI gain meter on the channel strip should also be lifeless which indicates there is absolutely no MIDI being sent to this track.
Note: If you hit the pads and you should hear the TubeSynth patch play back. This is because the pads are considered a ‘master’ controller, they cannot be turned off and will always control the currently selected track.
Repeat the same procedure and set MIDI INPUT: <none> for track 3.
Now select track 2, our Bass track. By default your track will be set to MIDI INPUT: All Ports which means it will accept MIDI input from any connected MIDI controller. Play your controller and you should hear the bass play.
Now set MIDI INPUT to the name of your attached controller. If you connected via USB or Bluetooth the name of the controller should appear here. If you connected via MIDI cable then you need to select the MIDI port that you connected to (e.g. MPC 1 or MPC 2) – but if you previously renamed these ports in the MIDI / SYNC screen then you can just select this port by the custom name you gave it.

Finally, as highlighted in green above, set the MIDI MONITOR from AUTO to MERGE (you could also choose IN, but I’ll explain the differences in the next section).
At this point you won’t notice any difference as your controller is still playing the bass patch on the currently selected track. But now go to track 1 and play your controller – you should hear your bass patch from track 2 is still playing. Repeat on track 3; again, the controller is still playing the bass on track 2.
We’ve now successfully configured our sequence so our attached controller will always play the bass patch on track 2, irrespective of which track is selected.
Understanding MIDI MONITOR
Hit PLAY START and you should hear that I previously recorded some events to all three tracks to make a 2 bar melodic loop. Let’s use this to help understand the different ‘MIDI MONITOR’ settings.
The MIDI MONITOR in the channel strip controls how the MPC deals with both incoming MIDI and existing MIDI events on a track. By default any track in the MPC is set to MONITOR: AUTO. This means that the MPC will listen out for incoming MIDI, but only when the track is ‘Record Armed’ – by default the only MIDI track that is ‘armed’ is the currently active sequencer track (but we’ll soon see how we can change this).
You can see a complete overview of the currently armed tracks in TRACK EDIT (SHIFT & MAIN):

Tap on track 1 to select it and you’ll notice that the record arm is now enabled. Tap on track 3 and now track 3 is armed (and track 1 is no longer armed).
Look at track 2. As you can see from the previous section of this tutorial, the MIDI MONITOR for this track is set to MERGE. This acts slightly differently to AUTO as MERGE mode continues to monitor for incoming MIDI even when the track is not record armed. This is what allows our controller to continue playing bass patch on track 2 even when track 2 is not selected (and hence not armed).
Now in the previous section I said we could also have set track 2 to MONITOR:IN and still achieved the goal of playing the bass patch with our controller across all tracks. Give it a go; tap on MONITOR for track 2 until it changes to IN and tap on track 1 to select it.
Play the controller and as before your bass patch plays over track 1. So what’s the difference with ‘IN’ mode? Well, press PLAY START and you will notice that the previously recorded bass line on track 2 has now stopped playing.
And that’s the difference; MONITOR:IN disables playback of any existing MIDI data on your sequence track. This could be useful if you were wanting to experiment with a new bass line while keeping the existing data intact. MONITOR: MERGE leaves the existing track data audibly playing so you’ll always hear both your live and pre-recorded data simultaneously.
The final option for MIDI MONITOR is OFF. As you might guess, this switches off all MIDI monitoring for this track – it will continue to play back any existing MIDI events on the track but will not accept any incoming MIDI from any controller (other than the pads.
Working with Multiple MIDI Controllers
It’s also possible to connect multiple controllers to your MPC, where each controller can ‘control’ its own specific track.
In a live set up this gives you the option of playing multiple instruments through a single MPC – for example, left hand playing a piano via a keyboard controller, right hand playing a bass line via a pad controller, while maybe even the MPC pads being finger drummed by another band member (or even with your feet….).
In a studio you could configure your project template to always have certain types of track assigned to their own controllers; e.g. track 1 is always your lead sound and is played via your Arturial Minilab, while track 2 is for bass and is always played via your Korg Microkey, and so on. There’s no messing around reconnecting wires and as we’ll see in the next section, we can quickly configure the MPC for multitrack MIDI recording so this can be a real time saver.
You are free to use any combination of connection methods here, so you could just use USB (up to 32 devices can be connected via USB!), or you could ‘mix and match’ for example using a bluetooth controller, a USB controller and a traditional 5 pin MIDI controller.
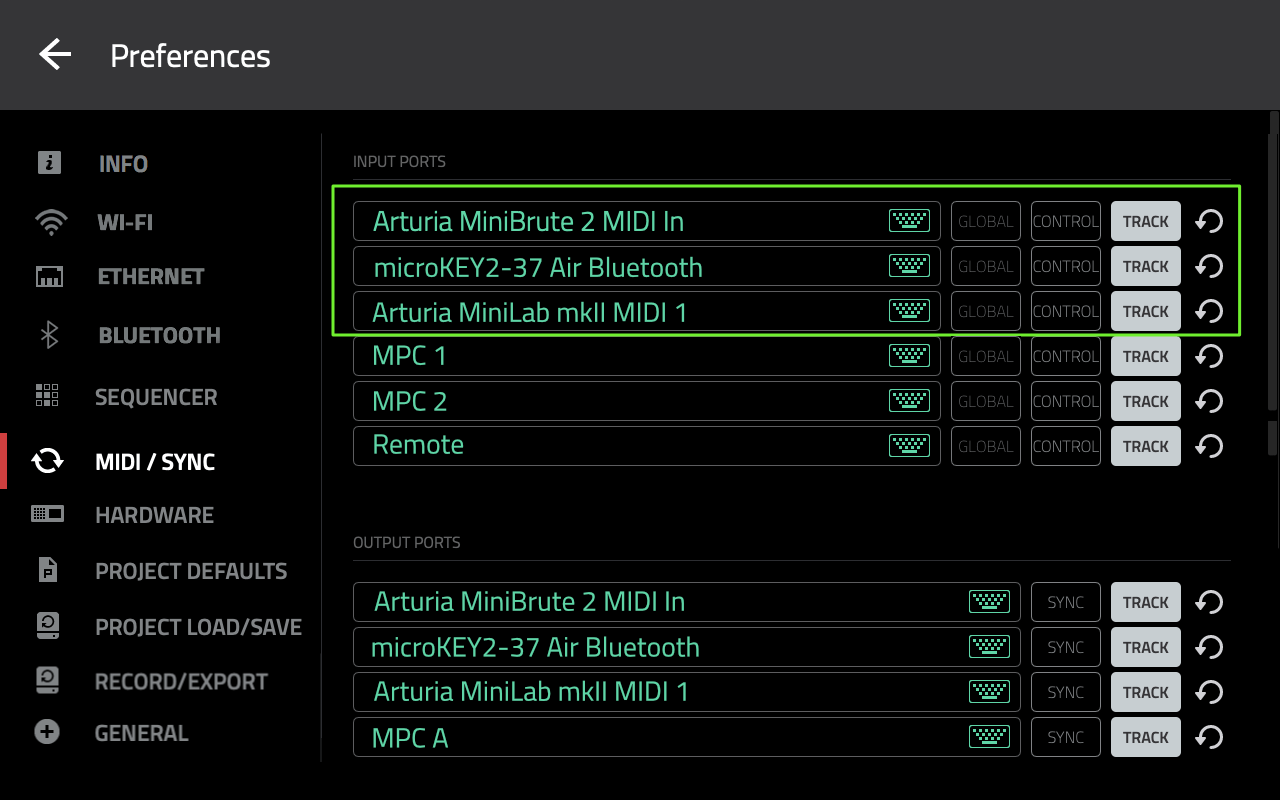
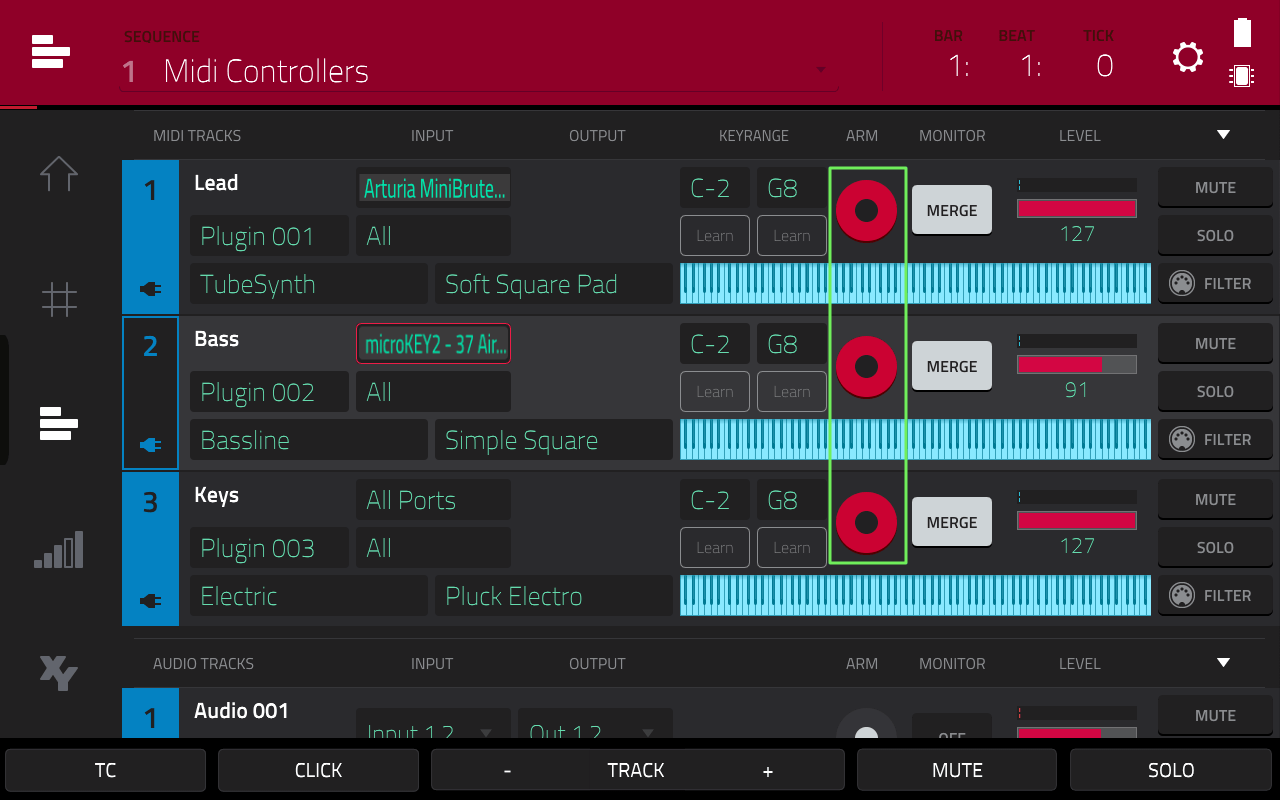
In the following example, I’ve connected my Korg MircoKey Air 2 via Bluetooth, my Arturia Minilab 2 and my Arturia Minibrute 2 via USB. The MIDI / SYNC page now looks like this:
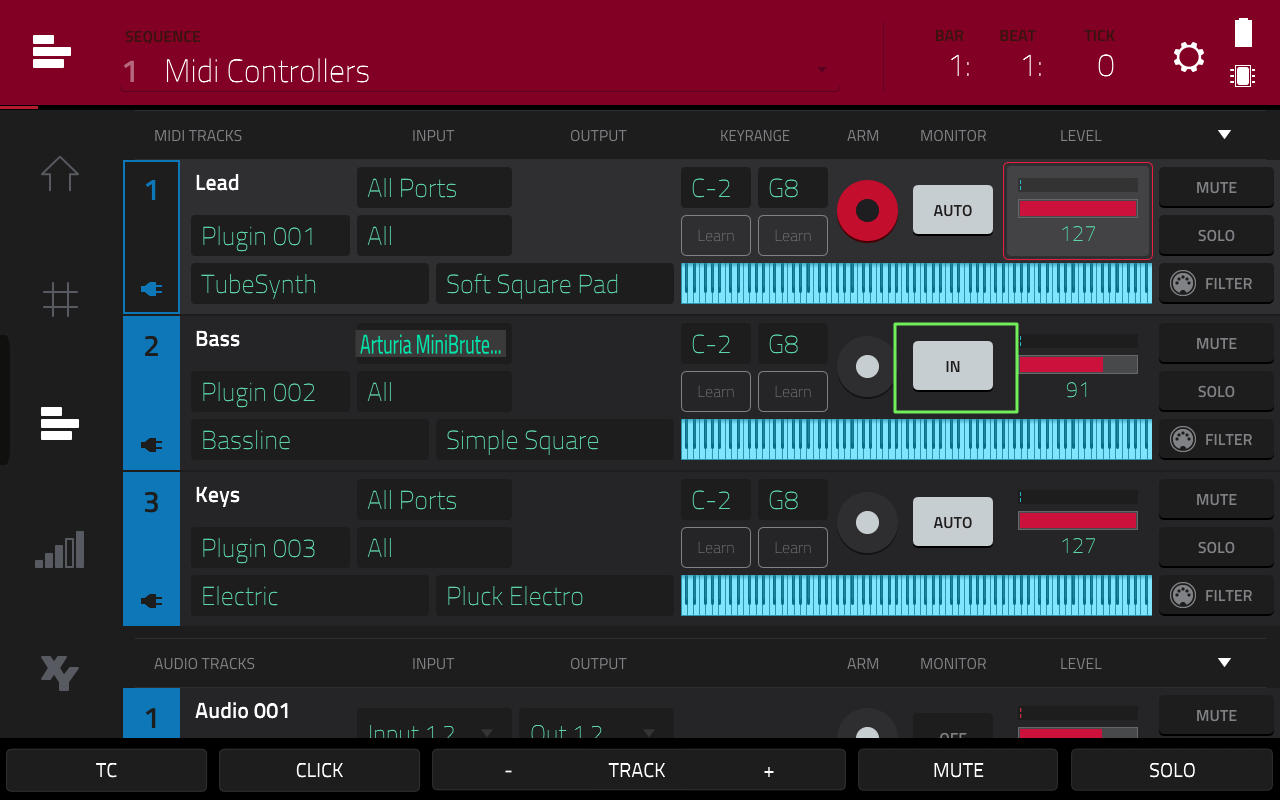
And the set up in TRACK EDIT (MAIN & SHIFT) would look like this:
Here track 1 is assigned to the Minibrute, track 2 to the Korg and track 3 to the Minilab. Each track is set to MONITOR: MERGE so we can always monitor incoming MIDI and any existing recorded track events continue to play.
Remember your pads continue to act as a ‘master’ controller and will always control the currently selected track, regardless of any track specific settings. You can at any time also assign any attached controller as a ‘master’ controller via PREFERENCES > MIDI / SYNC, just tap on the GLOBAL button for that controller:
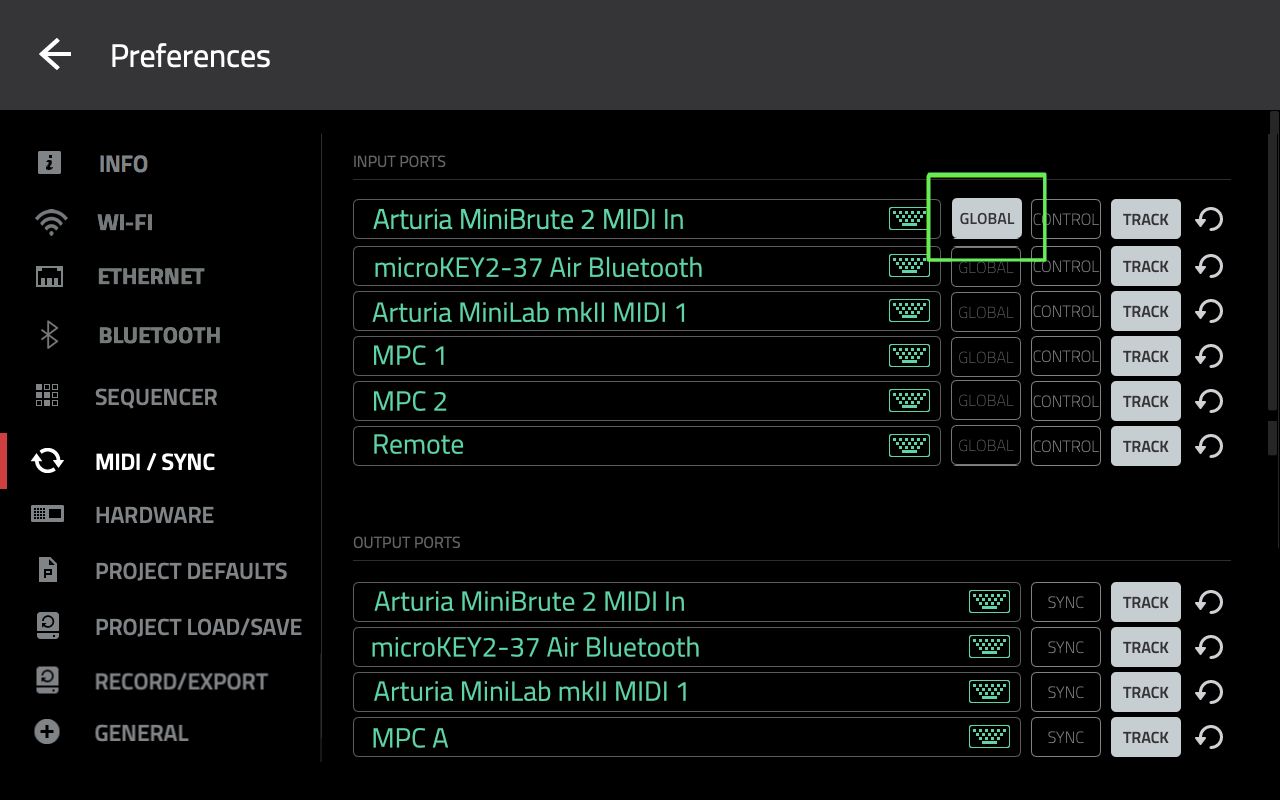
Now that controller will always play the currently selected track, even if the MIDI INPUT settings on that track may be configured to only accept MIDI input from a different controller.
Multitrack MIDI Recording
When it comes to actually recording MIDI performances to your tracks you have two options.
- Record to one track at a time – In MAIN, just select the track you wish to record the performance to and hit REC and PLAY START (it will be automatically armed for recording). Alternatively in TRACK EDIT, tap on the RECORD ARM icon for the desired track you wish to record events and hit REC & PLAY START.
- Record to multiple MIDI tracks simultaneously. In TRACK EDIT, hold down SHIFT and tap on the RECORD ARM icon for all the tracks you wish to record to – below I am ready to record to all three tracks in the sequence:
Here upon hitting REC and PLAY START the MPC will automatically record the events from each controller and assign them to the appropriate track.
This has its benefits over the more typical ‘one track at a time’ method as it means you avoid having to manually switch between active tracks to record, instead you can just leave your sequence continually looping in REC (or OVERDUB) mode while you keep the vibe going by just switching between controllers.
It’s also useful when working with multiple musicians as you can record an entire multitrack performance in one recording session with each performer having his own MIDI going to the correct track (you can of course also include audio tracks in your multitrack recording session, but we’ll look at audio tracks in a different tutorial).
Key Range Splits
It’s worth remembering that each track in your MPC can now be configured to cover a specific key range, allowing you to effectively map multiple tracks to a single controller. For example, let’s say you have a bass track and a piano track both being controlled by the same keyboard. Configure the bass track to cover notes C-2 to C1, set the piano track to cover C#1 to C6. Now on your controller you can now play the bass with your left hand and the piano with your right. You can set up splits like this on multiple controllers, with no limits on the number of splits you can configure for each keyboard. Key range splits can be set up in TRACK VIEW and the new ‘Sounds Browser’.
I look at key range splitting in more detail in the The MPC Bible, it’s my complete, up-to-date guide to all modern standalone MPCs, jam-packed with in-depth, hands-on tutorials and creative workflows for the MPC X, MPC Live, MPC Live II, MPC Key 61 and the MPC One.
39 Responses
Leave a Reply

Latest Posts
"Electric Bass 3 - Now With MPC Sample & MPC3 Support
MPC Bible 3, Revision 6 - MPC Oscillators, MPC 3.9, MPC One G2 + MPC Key 37 G2

Downbeat Kit 3 - Acoustic Drum Kit Expansion For MPC3

MPC Bible 3, Revision 4 - Clip Matrix, MPC 3.7 + MPC XL

Jun 9, 2020 11:48 am
Hello Sir: Only wanted to know, if we can get your tutorials in the PDF format?
Jun 9, 2020 11:49 am
Hi, the complete MPC Bible is multi-format and comes with PDF, EPUB and Kindle version of the book: https://www.mpc-samples.com/product.php/268/mpc-bible/
Jun 15, 2020 11:23 am
I have a question regarding 2.8 and MIDI. I have a beatstep pro I use as master clock for an MPC one and some modular racks. The issue is I have the beatstep pro playing drums however when I mute the drum part on the beatstep, notes from the melodic sequencer still make trigger the MPC. is there anyway to filter what channel is incoming on the MPC rather than pick up all incoming signals?
Jul 14, 2020 10:51 am
Hi.
Is it possible to trigger pads on the mpc live with some kind of midi footswitch? If so, do you have any suggestions for a midi footswitch?
Jul 22, 2020 5:02 am
My Alesis Q25 and Roland PK-5A both work great. I was wondering though, can I change programs by CC numbers sent from a controller?
Thanks in advance.
Jul 24, 2020 10:51 pm
Great tutorial !
Finally i can use the MPC LIVE … live 😉
It’s been 2 years i was waiting for this !
AKAI Guys could have design somethng more easy.. but we can do it a least.
Aug 21, 2020 12:21 am
trying to connect novation launchkey 49 key board controller to mpc one..would appreciate adfvice on how to get them to recognize eachother
Sep 13, 2020 7:21 pm
I connected a APC mini to control submix volumes using MIDI learn, however once I push more then one controller at a time, the screen freezes. The bigger the project, the longer the freeze lasts. This is in 2.8. Surely something as simple as MIDI control of volume shouldn’t cause the CPU to freak out like that? (cpu is at around 25% in this particular project)
Sep 16, 2020 12:21 am
Hey there! Recently picked up a MidiHub to greatly expand the MPC One MIDI out capabilities. Struggling with PadMapping to a Korg Volca Beats. Also not sure how to make an easy External Synth Template for use in other projects without re-mapping every time? Looking forward to your followup article! Maybe help me with some of my difficulties!
Thanks for creating useful content!
Nov 9, 2020 4:53 pm
How do to use midi learn on the MPC One in standalone mode ?
Dec 24, 2020 1:28 pm
Looking forward to your tutorial on hooking up external MIDI synths to the MPC: would love to synchronise it with my Korg Minilogues sequencer.
Thanks!
Dec 28, 2020 3:04 pm
Midi merge… Thank you plenty for this! Now my beatstep pro and keystep pro fire its midi channels as expected!
Jan 6, 2021 1:13 am
My usb mini keyboard had no pads…. is it possible to assign the keys to the drums?
Mar 16, 2021 1:09 pm
If I connect a usb keyboard direct to usb port on MPC ONE, it is accessible in standalone but when I go to controller it disappears – as though this is not being passed through, just like storage devices aren’t.
If I connect the keyboard to the computer instead of the mpc one, it shows up in controller mode.
Is there some way around this or is it a case of having to connect usb keyboard to the computer to use it with controller mode on the mpc one.
May 11, 2021 9:39 pm
no
May 19, 2021 9:20 am
Hey, do you have any articles where you talk about how to map controls on a MIDI keyboard/controller to specific controls in the MPC? For instance, if I want to set the “Attack” slider on my keyboard to control the Attack in the Envelope menu for a Tubesynth instrument, how do I do this? Thanks!
May 28, 2021 12:26 am
When I use external USB/MIDI keyboard, it plays correctly with the internal synths. However if I assign samples to pads (e.g. saxophone notes), the external keyboard controls the pads in a totally random mapping. Is this a bug, or somewhere the mapping can be edited? v2.9 thanks
Jun 24, 2021 8:29 am
Why does the interface on my MPC One look so different from the one in this tutorial? For example, I can’t see the names of my MIDI device or Arm buttons. I can’t work through this tutorial at all.
Jun 24, 2021 8:48 am
Update your firmware you the latest edition, 2.9.1, it sounds like you might be running an older firmware. 2.8 minimum required for this tutorial
Jun 24, 2021 6:44 pm
I actually did that already. I installed 2.9.1 right when I got it. Do you have to install the MIDI driver separately? I see a “Network MIDI Driver” in the firmware section on Akai’s MPC One page.
Jun 24, 2021 6:48 pm
I see you started a topic on MPC-Forums.com, please continue the discussion there as you’ll get more responses. Would suggest you post up some screenshots/photos of what your screen actually looks like.
Jun 24, 2021 7:07 pm
Oh shoot! I was wrong. The Info screen says the firmware is 2.7.1. I thought I had updated it to 2.9.1, but I think I confused updating the firmware with downloading the Expansion F9 lol. I’ll go ahead and update to 2.9.1 and report back if I’m still having trouble. Thanks
Jun 25, 2021 10:50 am
You should be fine after updating the firmware.
Jul 2, 2021 10:06 am
Thank you for your great tutorials
I have tried to record multi midi track but pitch and aftertouch events are only recorded on the selected track (note on and off are well recorded on all tracks)
I do a lot of tests and cant figure out a way to recorde pitch en after touch on more than one track at a time.
Do you confirm the “bug” ? or may be you have some solution ??
Jul 29, 2021 7:35 pm
Hello there,
I have been having some issues after this latest patch (2.10) regarding MIDI on the MPC LIVE (I). I do own your MPC-bible, and I even talked about this to a MPC ONE user for comparison (his MPC One is working as intended). All was working awesome before the patch, now, even after resetting system preferences and setting my Midi Settings back again, after pressing Play/Start, the external hardware synth/sequencers don’t start. I have the Midi Clock Send activated, I have the midi outputs “Synced” and “Tracked”, and MIDI notes are coming through when I play the keyboard I have connected to the MPC Midi IN (A). But when I press Play/Start, both the external sequencer and synth (with in-built sequencer) don’t start. Could this be a bug only happening to MPC LIVE?
Kudos for all your work.
Sep 26, 2021 1:23 am
I just want my MPC one and Reason 11 to sync so I can record into reasons. I want to push play/Record on my mpc or visa versa and the other Sequencer go into play/record as well. Via USB if possible as I have no midi interface plugged into my computer Neither box see’s the other. Help!!
Jul 18, 2022 6:58 pm
When using two controllers, each assigned to its own channel and track notes cancel each other when identical pitches are played at the same time.
Aug 25, 2022 9:34 am
Hi , is it possible to trigger pads in CLIP mode, with an external device ? I can trigger drum program, plugins but not the clips…?
Oct 25, 2022 8:16 am
When im using two controllers, each assigned to its own channel and track notes cancel each other when identical pitches are played at the same time.
Oct 25, 2022 8:35 am
This is a known bug in the mpc, hopefully they’ll fix it soon
Oct 28, 2022 3:06 am
Is the mpc able to send midi using the 5 knobs on the left? im trying to control a poly hector that has midi learn. i dont need the mpc working or playing just send midi thru those knobs. thx!
Oct 30, 2022 1:48 am
is there any way to send midi using the qlinks. i want to control a poly hector that has no knobs for fine adjusting parameters. is this doable? thx!
Nov 23, 2022 9:56 pm
„When im using two controllers, each assigned to its own channel and track notes cancel each other when identical pitches are played at the same time.“
This makes the MPC completely unusable in the studio. It’s unbelievable that Akai could even sell a single one of these devices. I don’t know of any multimbral instrument in the world that can’t be played with external hardware sequencers – Logic or different keyboards – because notes of the same pitch that arrive at the same time cancel each other out on different midi channels. If all multitibral samplers or synthesizers worked like this, there would be no Logic, Steinberg, Abelton. I do not understand that this error is discussed so succinctly. It’s like a car can’t drive reverse or only turn left and the manufacturer shrugs and replies: It is what it is! How long has the bug been known? Please don’t think about it. The main thing is Flavor Pro! It is to cry for. Unfortunately, I only noticed the error too late.
This controller article is actually superfluous. The midi bug is bigger than any good resolution.
Jan 5, 2023 3:33 pm
I use alot of external hardware synths, and this tutorial was very helpful. However, my dream workflow would be to start a project in Standalone mode, and finish it in Controller mode, with MPC running as a VST in Ableton. But when I connect to my computer in Controller mode, all of my external hardware midi ports disappear, and my sequences make no sound because the ports they are routed to are grayed out. The only midi port available is called DAW. This sucks. I think the only solution is to unplug all of my hardware, connect it to my laptop, and reroute every track of every sequence to point to the hardware on the new ports in my DAW. I think this is a showstopper for my desired workflow, and there is no easy way to move from standalone to controller mode if you use external hardware.
Jan 22, 2023 6:09 am
Can the MPK Mini Plus transport controls work while connected to MPC Live 2? I’ve tried everything to get them to work.
Apr 30, 2023 11:07 am
Hi!
Newbie here, maybe stupid question…
I’d like MPC ii to master my live setup. Could it be possible to play internal MPC sounds from different sequences launched from Yamaha MODX while MPC clocks the time of the sequences?
I mean that MPC should be sending clock\receiving sequences from controller at the same time…
Best greets for all and thanx in advance!
Aug 7, 2023 7:47 pm
Hi folks, thanks for all the info and videos
Is there any way to control the arpeggiator values using the Qlinks?
I don’t seem to be able to access any of the settings on the arp in midi control/learn or in qlink edit
Many thanks
Oct 16, 2023 9:23 am
Hy MPC Tutor,
first of all i want to thakn you for your great effort for the MPC Bible i buyed at your side. It helped me really to understand deeper Functions of MPC Live.
But i am facing to topics i dont find any (or did not recognize it) answer.
– As i want to use my MPC live for buskin, i want to connect midi Morningstar MC6 Midi Footcontroller to change different sequences of a track, start/stop/reset the current Track and If possible have the record function set to midi. This would help a lot for live situations.
I dont find any documentaiton on site of akai for that mpc functions. Do you have experience for that issue ?
thank you so much and have a great day
Mar 7, 2024 4:44 pm
What would be the best way to connect via midi to an MPC Key 61, or 37 a Roland Integra Sound Module? Should I use an external midi keyboard, or just route the midi in/out directly to/from the Integra to/from the MPC? I want to make sure I connect things to minimize system crashes, and maximize performance.
What I am looking to do is utilize the sound module to allow for additional tracks without using MPC system resources. I have noticed with some of my compositions I have been getting out of memory warnings and I thought I could bypass that by running the Integra 7 midi and audio inputs/outputs directly to the MPC. I know I can always bounce tracks to sample tracks, but for some reason, when I initially create a song, it sounds good to me at that time, but a day or two later, I re-listen and I usually do not like something. If I had bounced the track to sample, I would need to delete it, and redo it from scratch. Using the Integra and MPC together I can keep the tracks as midi and plug-ins and edit them individually.