If you’re a keen MPC finger drummer you’ll probably like to configure your kits with a specific layout. This is easy to achieve while initially creating the kit, but can be more tricky when trying to ‘re-arrange’ an existing kit, especially if all your pads contain many custom parameter settings such as envelopes, FX, filters and layers.
In this MPC tutorial we’re going to look at a couple of methods for ‘re-arranging’ the pads in modern standalone MPCs (MPC X, MPC Live, MPC One) as well as for kits loaded in the MPC Software and MPC Beats app.
Re-arranging The Pads in Standalone MPCs
This first part of this MPC workflow tutorial is written for rearranging pads in the hardware UI of modern standalone MPCs. Download the tutorial files and after unzipping the archive you’ll see the folder ‘Rearrange MPC Pads Tutorial’ – transfer this folder to your MPC’s SD card or USB drive (if you need help with this, check out my Standalone MPC File Transfers Guide).
Start with a new blank project. Now go to BROWSER > Places and navigate inside the ‘Rearrange MPC Pads Tutorial’ folder. Load the drum kit ‘Horizontal Kit.xpm’ into your project and assign to an empty sequencer ‘DRUM’ track.
This kit contains nine drum pads, A01 to A09, currently configured in a basic ‘horizontal’ style finger drumming layout.

We have the main kick, snare, closed and open hats on the bottom row, a ‘ghost’ (soft) kick, ghost snare, cross stick and a ‘hard’ closed hat on the second row and a crash on the third row. Hi hats are all set to mute group 1 (to ensure the open hat can be choked), and all instrument groups have been assigned a colour for easy identification when playing.
This type of generic horizontal layout is very common in commercially available kits, but many finger drummers will often prefer their pads to be arranged in an essentially ‘vertical’ layout, such as the one below:
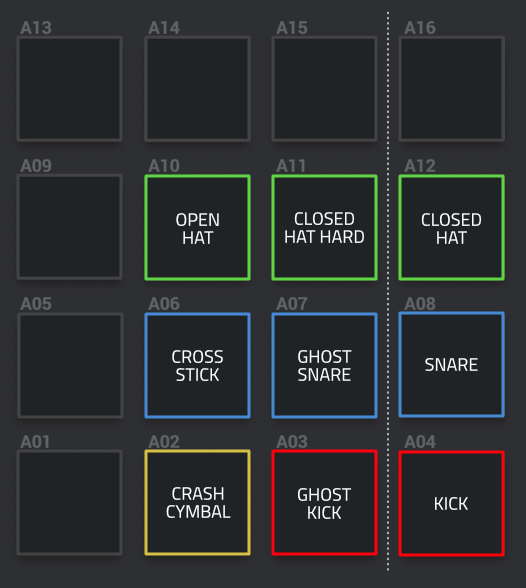
Here the ‘core’ elements of the kit (kick, snare, hat) are arranged vertically in the last column; this will enable you to play the core ‘foundation’ of your beat entirely with your right hand (for example, kick with your thumb, snare with your index finger, closed hat with your middle finger). The remaining pads will normally be played with your left hand, which can be used to add funky ‘ghost’ notes, open hat and crash, and perform hat or snare rolls (in combination with your right hand).
What I like about this arrangement is that it frees up the entire left hand column and top row for musical one shots such as bass tones, lead sounds, chords, hits and so on.
If you’re interested in finding out more about finger drumming with vertical kit layout, check out Robert Mathijs’ excellent Quest For Groove Youtube channel which features lots of finger drumming tutorials for pad based controllers (Robert’s kits tend to use the middle columns (2 and 3) for the core drums).
Whether you prefer horizontal, vertical or a more ‘freestyle’ configuration, just follow the workflows in this tutorial and you’ll be comfortable making any layout you need.
Standalone Workflow 1: Rearranging Pad Layout with ‘COPY PADS’
First, let’s create a new blank program to hold our rearranged ‘Vertical’ kit. In MAIN, hit the + icon on the program row to create a new blank DRUM program. Hit the ‘A’ icon and rename this new program as ‘Vertical Kit’.
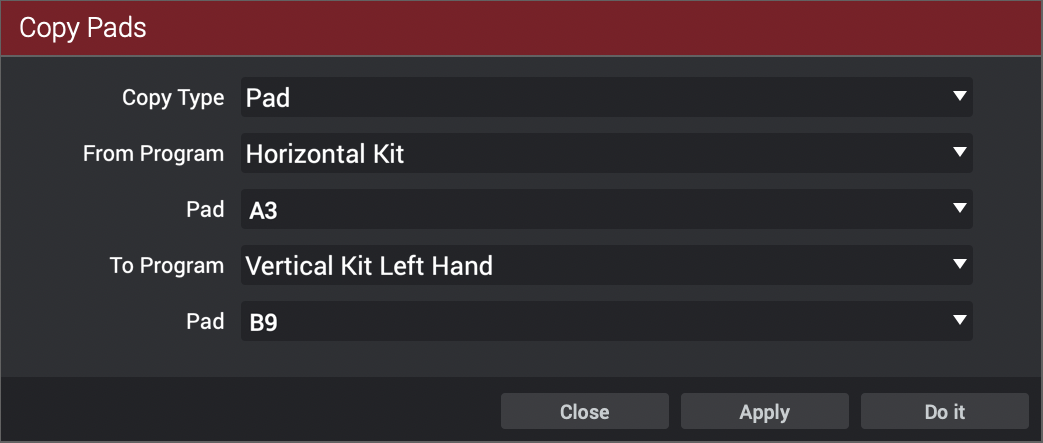
Now tap the pencil icon at the end of the PROGRAM row and select COPY PADS:

In the COPY PADS screen we can copy individual pads, a range of pads or even an entire bank of pads. These can be copied anywhere within the current program or even to a completely different program; it’s a very flexible feature.
Configure the COPY PADS screen as follows:
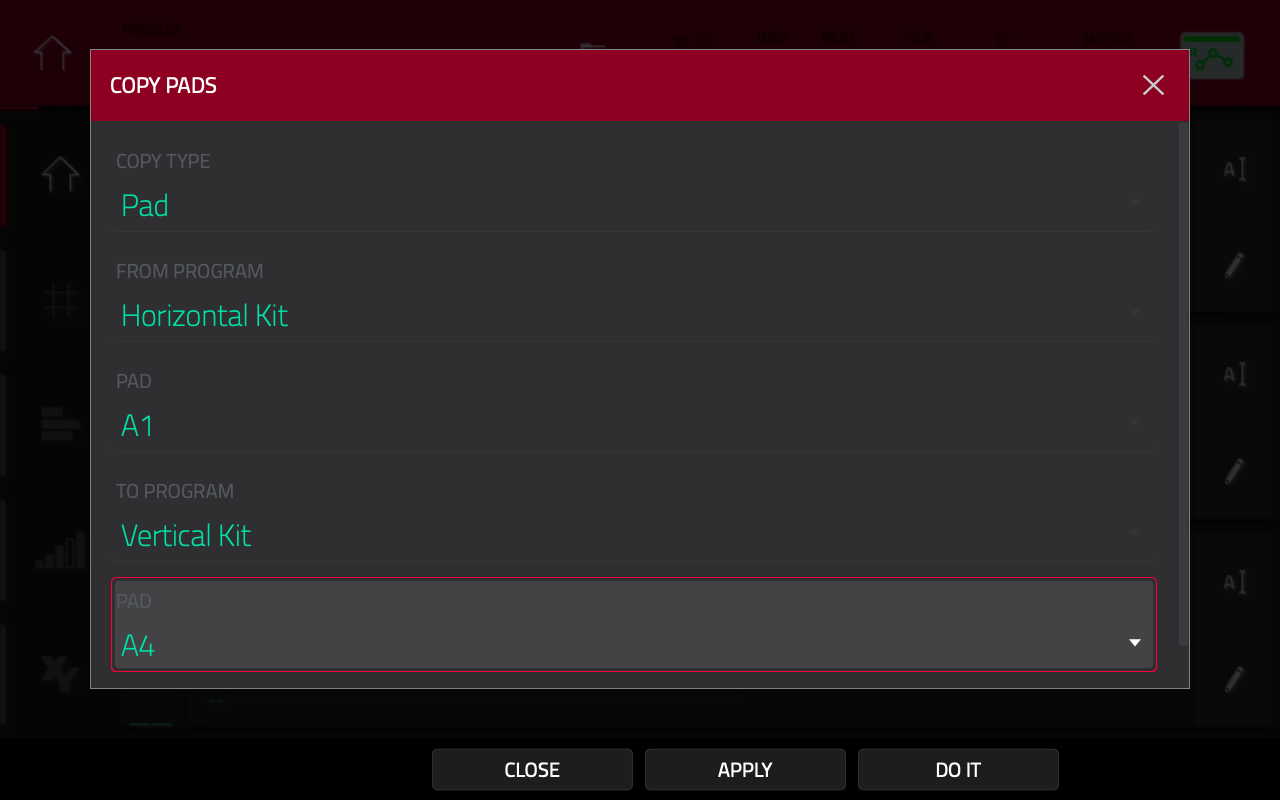
These settings will copy pad A1 from the Horizontal Kit to pad A4 in the Vertical Kit. Let’s go through each parameter:
- Make sure the COPY TYPE is set to ‘Pad’; use this setting when coping a single pad.
- The FROM PROGRAM should be set to Horizontal Kit. This is our ‘source’ program, i.e. the program we are copying the pad from.
- The first PAD parameter is set to A1 – this is the pad that is going to be copied.
- TO PROGRAM is the program that our pad will be copied to – set this to our new blank program, ‘Vertical Kit’.
- Finally, set the second ‘PAD’ parameter as A4. This is the ‘receiving’ pad on our Vertical Kit program
To perform the copy operation, you can hit DO IT or APPLY. DO IT will perform the pad copy and return you to the MAIN screen (good for ‘one-off’ pad copy operations), while APPLY will perform the pad copy but will keep you in the COPY PADS screen. As we are wanting to perform multiple copy operations, hit APPLY. It may not be obvious (as pad playback is disabled in this screen), but the pad has now been copied.
Now repeat his process for the snare on pad A2 in the Horizontal Kit. Configure the COPY PADS screen as follows:
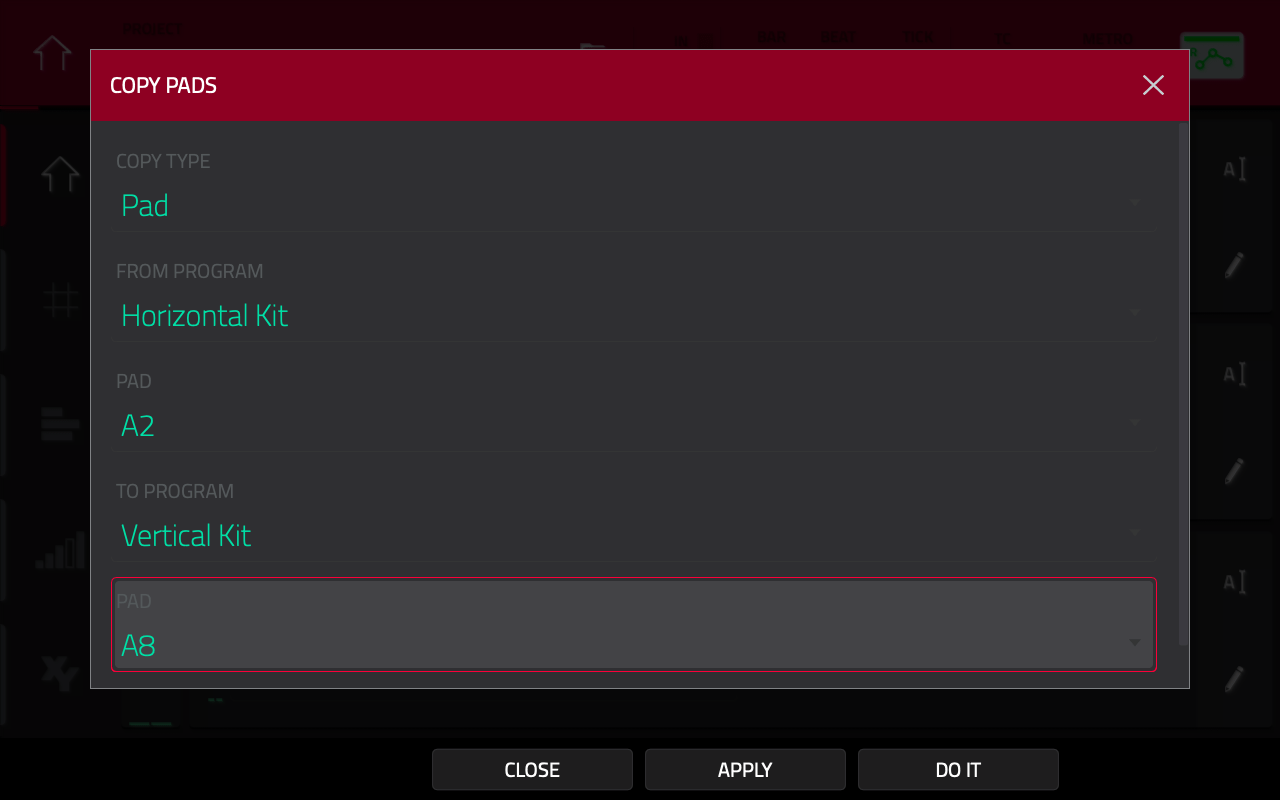
The only difference from the previous operation are the two ‘PAD’ parameters, all other parameters can remain unchanged. Set the first PAD to A2 (the pad that is being copied in the Horizontal Kit) and the second PAD parameter to A8 (the destination pad in the Vertical Kit).
Hit APPLY. The snare from A2 in the Horizontal Kit is now on pad A8 in the Vertical Kit.
Repeat this process for all 7 remaining drum pads:
- A3 (closed hat) to A12
- A4 (open hat) to A10
- A5 (ghost kick) to A3
- A6 (Ghost snare) to A7
- A7 (cross stick) to A6)
- A8 (closed hat hard) to A11
- A9 (crash) to A2
So we now have two distinct kit layouts:

Once complete, return to MAIN, ensure that Vertical Kit is the currently selected program on the active track and begin playing the pads. All settings for each pad have been copied over to the Vertical Kit program; for example, all the hi hats were originally set to MUTE GROUP 1 and these settings are present for all the hats in the Vertical Kit (go to PROGRAM EDIT > LFO MODULATION and examine the MUTE GROUP settings to confirm) .
Setting Pad Colors
COPY PADS will copy all pad parameters from the source pad such as sample assignments, filters, tunings and mute groups, but any custom pad color is not copied over. So after copying your pads you might want to assign your preferred pad colors in your new program via MENU > PAD COLOR.
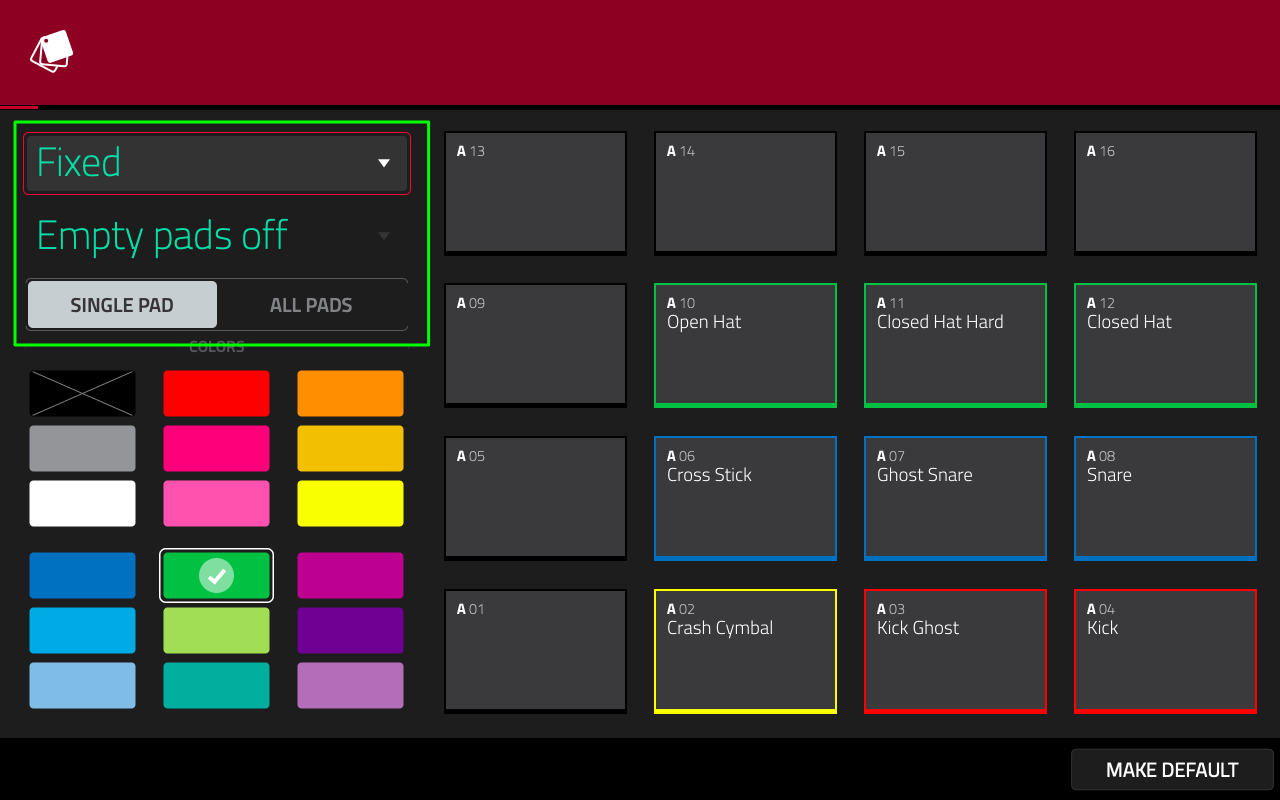
Make sure you select the ‘Fixed’ option and SINGLE PAD. I also like to set Empty pads off.
Don’t forget to save your new program; MAIN > PROGRAM row pencil icon > SAVE CURRENT PROGRAM or just save your entire memory and the new program will be saved as part of the project (MENU > SAVE, or MAIN > top folder icon > SAVE). My version can be found in the tutorial folder, ‘Vertical Kit RH’.
Standalone Workflow 2: ‘COPY PAD’ (Singular!)
So far we’ve been using COPY PADS, but there is also another pad copying feature in the MPC, this one is imaginatively called COPY PAD (no ‘s’ at the end). This option can only copy a single pad to other pads within the same program; there’s no ‘cross program’ copying and no ‘bank’ or ‘range’ copying. Unlike the ‘COPY PADS’ option, this one uses a graphical UI which many of you might prefer and it’s also compatible with all MPC firmware versions.
This time I’m going to make a left handed version of our Vertical Kit, which puts the core drum pads on the far left side of the pads – now the dominant left hand deals with ‘core’ drums, while the right deals with ghost notes, rolls, and other drum/percussion articulations.

While you could work directly in the original ‘Horizontal Kit’ I prefer to work on a copy instead, that way the original kit is always preserved should you ever need to return to it.
Go to MAIN and make sure the current track has the ‘Horizontal Kit’ assigned to it. Hit the pencil icon at the end of the DRUM PROGRAM row and select DUPLICATE:

You’ll now be returned to MAIN where you’ll see your Horizontal Kit program has been duplicated (Horizontal Kit-1). Hit the ‘A’ icon at the end of the program row and rename this program to ‘Vertical Kit Left Handed’.
Now, press and hold the physical COPY button on your MPC hardware; in fact we’re going to keep the COPY button held down for the entire copying process. So, with the COPY button still held down now hit pad A01
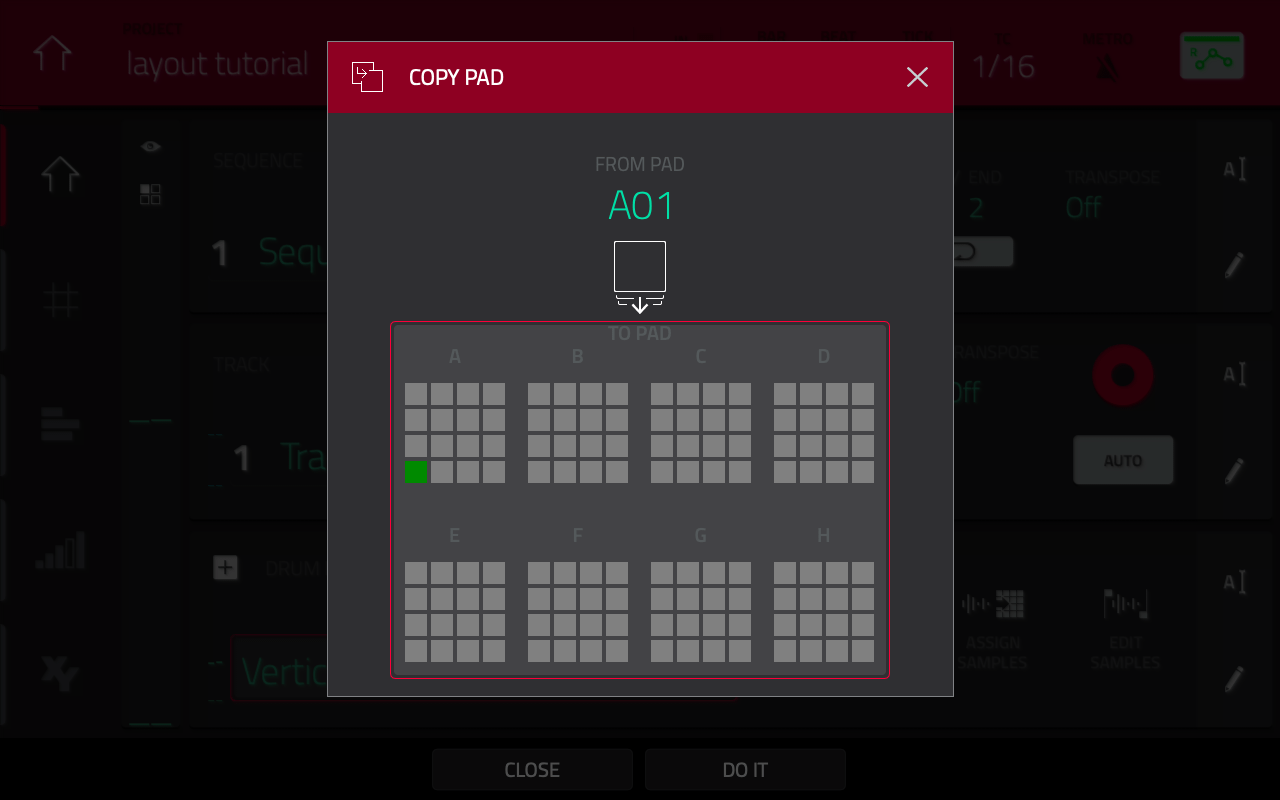
At this point you should see the bottom half of the screen turn grey (with a red outline), with pad A01 highlighted in green. This tells us that pad A01 is now going to be ‘copied’.
So, where shall we copy this to? We have two options; we could copy it within the same pad bank (bank A), but when rearranging multiple pads this can get a bit messy, so I prefer to copy the pads to the next available empty pad bank (don’t worry, we can move them all back to bank A in one quick operation at the end of the workflow).
So, with the COPY button still held down, press the BANK B button and hit pad B01:
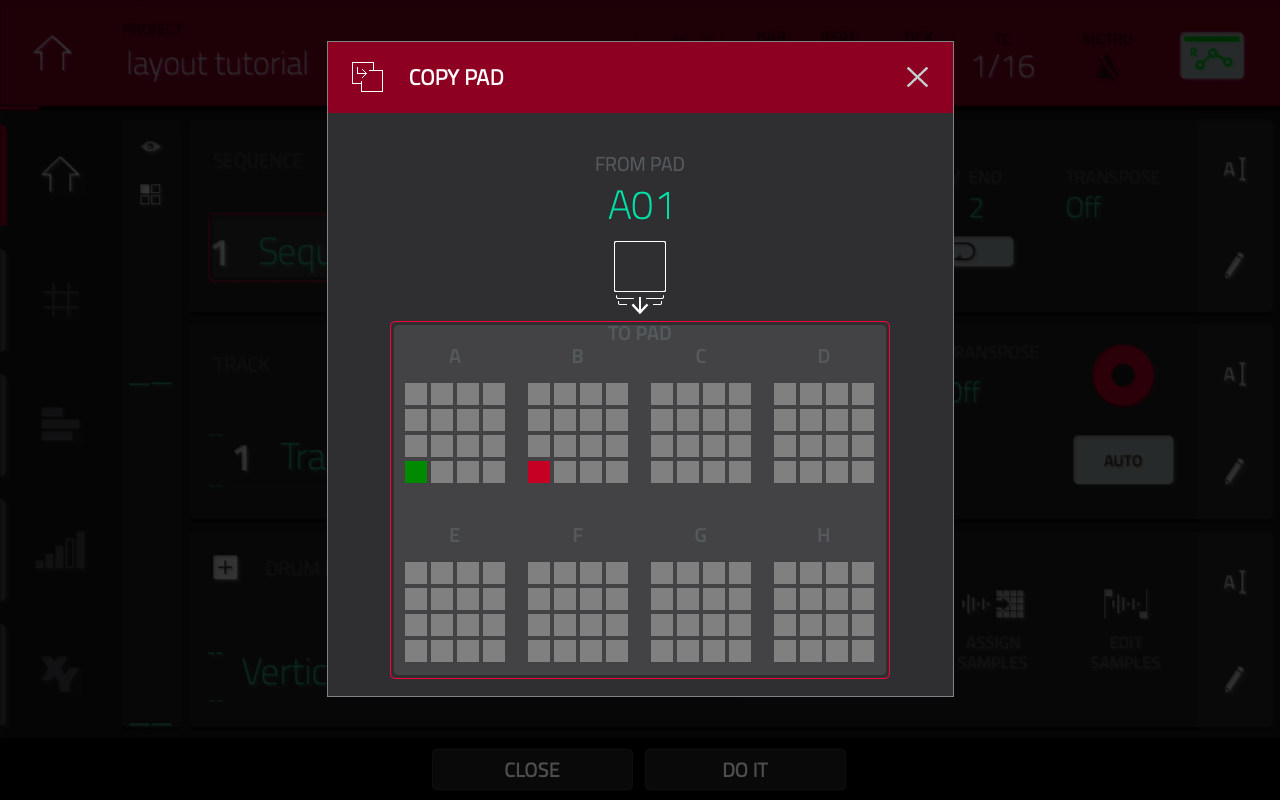
You should see on screen that pad B01 is now highlighted in red, indicating that this is the pad being copied ‘to’. Now release the COPY button to finalise the copying process, which will also return you to MAIN.
Hit pad B01 and you should hear your copied kick. Now repeat these steps for the snare on pad A02. So, press and hold COPY, select BANK A, hit pad A02 ; now press BANK B and hit pad B05.

Repeat this for the remaining pads in bank A; so, the closed hat on A03 is copied to pad B09, the open hat on A04 is copied to B11, the cross stick sample to B07, and so on. As with COPY PADS, the pad colours are not copied over, so you’ll need to add those manually at some point via MENU > PAD COLOR.
After performing the copying processes we will have two layouts; the original ‘horizontal; in bank A, and the ‘vertical’ in bank B:

You could leave the kit like this, but if you prefer to play your kits exclusively in bank A we can simply copy bank B to bank A. To do this, we need to use the COPY PADS function from the first part of this tutorial. So, in MAIN, hit the pencil icon on the DRUM PROGRAM row and select COPY PADS – configure as follows:
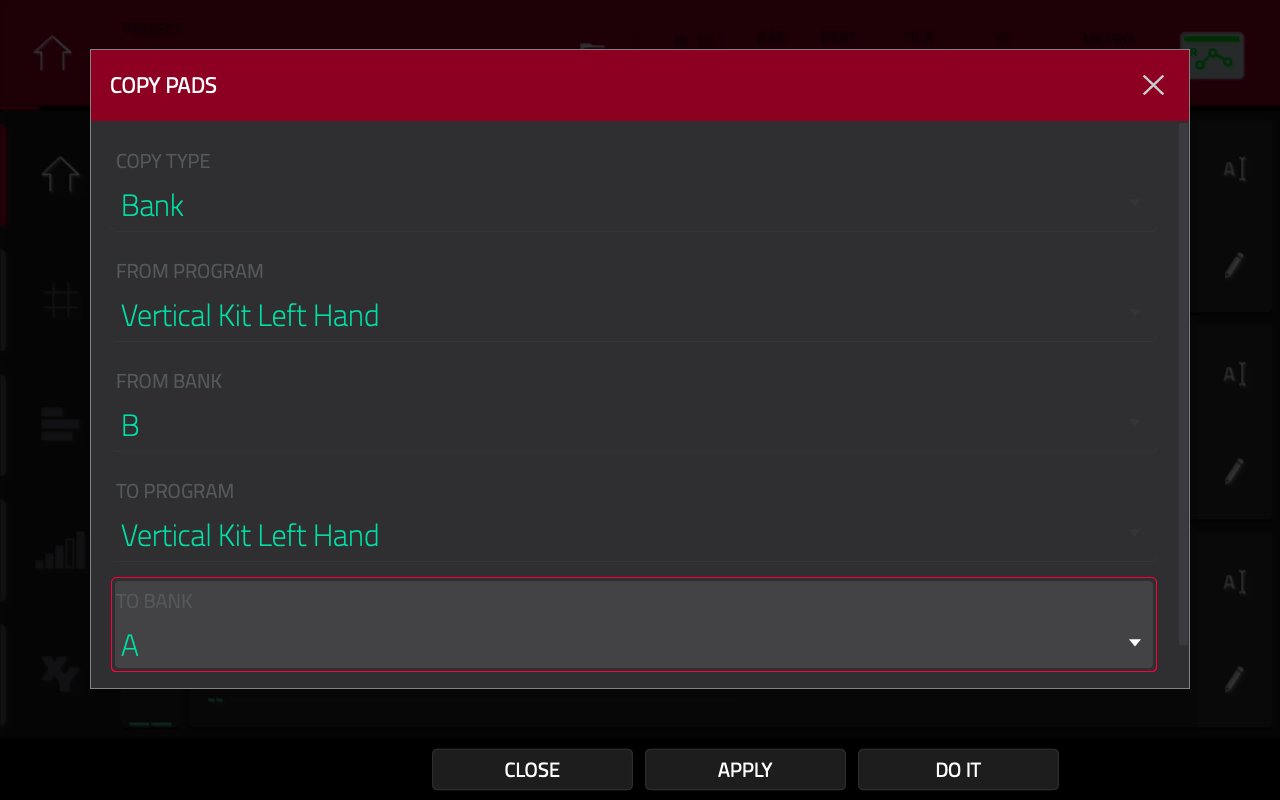
Hit APPLY to copy the entire BANK B over BANK A. And if you wish to now completely wipe bank B, simply copy the empty BANK C over BANK B.
You can try out the left handed version of this vertical kit by loading Vertical Kit LH.xpm.
Re-Arranging Pads in the MPC Software & MPC Beats
In the MPC Software (v2.8 or greater) and MPC Beats app, you can also use the ‘COPY PADS’ method to copy pads to a new program. This function can be found under Edit > Program > Copy Pads:
At this point the workflow in the MPC Software and MPC Beats is identical to the standalone mode workflow described previously.
However, there is also a bonus workflow for the software, and that’s the ability to ‘drag’ pads within the main mode GUI, and this one works in all versions of the MPC Software (even 1.0).
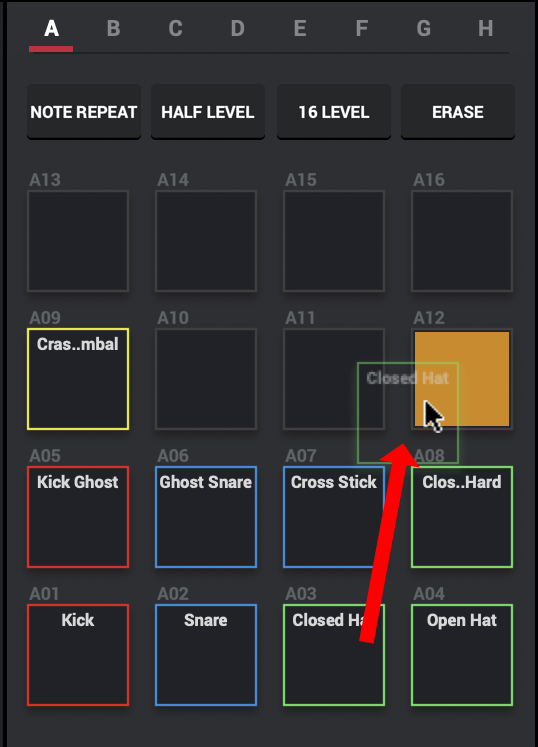
There’s three different types of pad drag; let’s assume we’re copying pad A03 to pad A12:
- Click and drag – this will move pad A03 to A12, completely replacing (deleting) the existing A12 content and leaving pad A03 empty.
- CMD + click & drag (use CTRL on a PC) – this will ‘swap’ pads A03 and A12.
- ALT + click & drag – This will make a copy of pad A03 on pad A12 (pad A03 will remain unchanged).
This does have the restriction that it is limited to copying and moving pads only within the current pad bank, but this method works well for quick rearrangements. And like all other copying methods, this one also ignores pad colour, so this will have to be added manually via Edit > Program > Pad Color.
The Complete Tutorial Course for MPC One, MPC Live & MPC X
If you’re looking for more step-by-step tutorials like this for your MPC, check out the MPC Bible, my complete and fully structured tutorial course for the MPC One, MPC Live and MPC X which covers all aspects of music production in modern standalone MPCs, including sound design, sequencing, building custom drum kits and sampled instruments, working with plugins, automation, building complete songs and much, much more.

Latest Posts
MPC Bible 3, Revision 6 - MPC Oscillators, MPC 3.9, MPC One G2 + MPC Key 37 G2

Downbeat Kit 3 - Acoustic Drum Kit Expansion For MPC3

MPC Bible 3, Revision 4 - Clip Matrix, MPC 3.7 + MPC XL

Out Now: MPC Bible 3, Revision 3 With MPC Live 3 MPC3.6 Support

Leave a Reply