
This MPC1000 tutorial is taken from my critically acclaimed book ‘Beat Making on the MPC1000‘. Here I take a look at some unique sequencing effects we can create with a little bit of elbow grease and sequencer programming. It’s quite an old school approach as it’s all about making changes to events in STEP EDIT, but these are techniques that have been used by MPC beat makers going back to the MPC60, so if they work for them…
This also works as a great MPC2500 tutorial, and apart from minor visual differences in the TRIM screenshots, will also work as a JJOS 3.15 (free) tutorial.
Creating an MPC Sequence ‘Echo’ Effect
From the tutorial files, open up the folder ECHO and load the project file ECHO.prj. This loads up a program called ‘SIMPLEC’ which contains a breakbeat chopped up in into various slices and regions (using the techniques found in chapters 019-022 from the ‘Beat Making on the MPC‘ book). It also loads up some example sequences that we will use in the tutorial.
Go to MAIN, select sequence 1 (FADE1) and hit PLAY START – you’ll hear a one bar beat. At the start of the second bar the beat suddenly stops and leaves a small trailing ‘echo’. This effect is really simple to create – it’s simply a kick sample which is repeated rapidly over time with a gradual volume fade out, all accomplished within STEP EDIT.
Let’s recreate this echo in sequence 2 – select sequence 2 (FADE2), press PLAY START and you’ll hear that this is the beat from sequence 1, but I’ve removed the echo from the start of the second bar. So, the first thing I need to do is create a single kick sample which we can use for the actual fade out. I’ll chop this from our existing SIMPLE1 region currently assigned to pad A1. To do this, I followed the following procedure:
Go to TRIM (MODE and pad 6) and select the SIMPLE1 sample. Highlight the end point using your cursor and, using the sample editing techniques covered in chapter ‘010 Editing Samples Part 1‘ hold down the Q2 slider and AFTER key and move the end point to just before the second wave form peak (thus leaving us only with our single kick selected). Set the end point to around 20828.
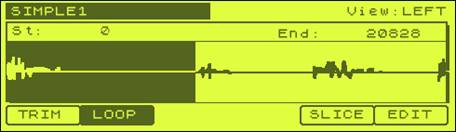
Now hit WINDOW to show the Fine screen. Press ZOOM- (F2) several times to zoom right out so we can see the waveform from a distance and jog wheel to the right to close in on where the waveform peak is about to start. Now press ZOOM+ several times to zoom right into this area and make your final adjustments with your jog wheel – I set mine to 21038.
Close this screen and press EDIT (F6) and select EXTRACT. If you wish, select ‘New Sample’ and rename our new sample – now press DO IT to create our new kick sample. You can now assign this kick sample to a spare pad in your program. At this point, don’t forget to go back to your original SIMPLE1 sample and put the end point back at the very end of the sample so that this original sample plays through (remember SIMPLE1 is the first sample played in our loop).
My version of this sample (SIMPLE7) is already assigned to pad A5. Go back to sequence 1 (FADE1) and highlight track 1. If you now go to STEP EDIT (mode and pad 14) and select the start of the second bar in the time field (002.01.00). You’ll see the following:
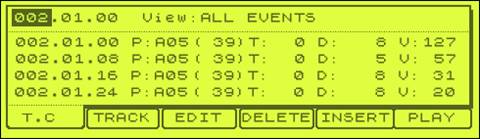
Here you can see that we have lots of instances of pad A05, each eight sequencer ‘ticks’ apart, but with a gradually decreasing velocity (the ‘V’ parameter on the far right). If you scroll down the list of sequencer notes you’ll see that the velocity eventual becomes 1 (we can’t set a velocity of 0!).
To create this echo, return to MAIN and go to sequence 2 (FADE2). Press F1 to set a new TC (timing correct/quantize) value – set the ‘Note Value’ parameter to 1/32(3) and press CLOSE. This will allow us to place our repeated echoes nice and close to each other. Go into STEP EDIT (MODE & pad 14) and highlight the top left time field and change this to the start of the second bar (02.01.00).
Press WINDOW to bring up Step Edit Options:

Set ‘Auto step increment’ to YES and press CLOSE. To insert our pad A5 events, press the red OVERDUB button and press pad A5 ten times. As you can see, each time you press the pad, your sequencer automatically advances to the next step. Don’t worry about the velocity for the moment, as we’ll now fix this manually.
To create the volume fade, we simply reduce the velocity (‘V’ value) for each successive event in the sequence. So for the first event at 02.01.00, leave this set to 127, now cursor down to highlight the event at 02.01.08, highlight ‘V:127’ and change this to ‘V: 57’, and so on for each event, reducing velocity a little each time. I used the velocity pattern ‘127, 57, 31, 20, 12, 6, 2, 1, 1, 1’.
Press PLAY to hear our echo fade. Now before you say it, yes you could have used the NOTE REPEAT function to add these notes and then assigned the kick to a Q-Link slider and performed a ‘velocity sweep’ on our kick pattern, but I believe this is overkill in this situation, as it’s such a short, controlled velocity fade, it’s just quicker and easier to just program it. I will however be covering the real time use of the Q-Link sliders for things like filter sweeps in chapter 41, so don’t worry!
It sounds good, but now play sequence 3 (FADE3). Now I’ve added a gradually increasing low pass filter to each successive beat – as we’ve discussed previously in this book, adding low pass filter to echoes makes them sound a little more realistic, a bit more like a real delay effect unit, as the low pass filter helps make the progressive echoes sounds more distant.
To apply low pass filter to a sample you first have to turn on the ‘low pass’ filter on the pad it is assigned to. To do this, go to PROGRAM (MODE and pad 7), FILTER (F2), press pad A5, and under filter ‘1’ change ‘Type:OFF‘ to read ‘Type: LOW PASS‘.
With sequence 3 still open, open up STEP EDIT (MODE and pad 14) and navigate to bar 2 (02.01.00). You should see this:
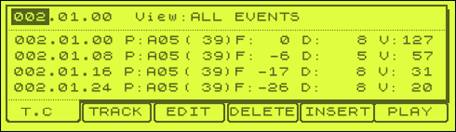
The parameter to look at is ‘F‘, which is the filter setting – normally this would say ‘T: 0‘ (tuning: 0) so to change it to a filter note event, highlight ‘T’ and scroll the data wheel until it reads ‘F: 0‘. Now you can change the filter setting by highlighting ‘0’ and either entering a number or scroll with your data wheel. To increase the low pass filter applied to a note event, you must decrease its value, i.e. make it more negative.
Again, rather than manually programming these filter changes you can also use the Q-Link slider, but this is naturally more suited to real time recordings of more complex and creative filter sweeps, and we’ll cover all this in chapter 41.
A Fake Turntable Stop
We can take the above effect, and subtly change it to achieve a completely different sound by just changing the filter ‘decrease’ into a ‘tuning’ decrease. Load up the TURNTABLE project file from the TURNTABLE folder. In this tutorial we will recreate the sound of a turntable stop.
In sequence 1 (TURNTAB1), we have a drum beat in bar 1 that ends with a repeated kick fade out in bar 2. This is identical in method to what we did previously, except this time, rather than drop the filter, we dropped the tuning of our pad. All I did in the second bar was, as before, add multiple instances of the kick on pad 5 within STEP EDIT and go through each instance gradually decreasing the velocity and tuning (the ‘T’ setting) – this can also be done by using the Q-slider as we did in the last tutorial except this time change the parameter in the note assign screen to TUNING – so basically you are performing a tuning sweep (see chapter 041 for more details on this). The effect is not bad, but not very realistic when compared to a real turntable stop. But we can get this sounding a lot better by adding another sound to our program.
If you go to BANK B, on pad B1 you’ll find another copy of our single hit ‘SIMPLE7.wav’. Sounds a bit different? All I’ve done is shave some attack off the front and shaped the decay at the end so now both ends of the sample have a fade in or out. Now, go to sequence 2 (TURNTAB2) and here I’ve replaced all the instances of PAD A5 (note 39) with this pad B1 (note 51) – you can do this by changing the note number for each step in step edit. i.e.
002.01.08 P:A05( 39) would become
002.01.08 P:B01( 51)
That method takes a little time, so I would use the TRANSPOSE function to perform this in seconds. TRANSPOSE allows us to replace any instance of one pad with another. So to transpose our pads in this example, go to SEQ EDIT (mode and pad 13), select ‘Edit: TRANSPOSE’ and set up like the following:

Note that I set the start time to 002.01.01, this means that our first instance of pad A5 on bar 2 is not transposed as I think our turntable stop sounds better with a bit of attack on the first hit, so I left it as pad A05, which is the kick without any attack or decay changes.
So play sequence 2 – pretty cool, eh? By taking the attack off the repeated element, you lose the jerky feel of the fade as all the samples just blend together. This means you can use a beat from a non-vinyl source and still put in authentic sounding turntable stop. Of course, this works with any sound, so experiment. Just make sure you always start a fade like this with the full attack version otherwise it sounds a bit lifeless (although this type of effect will also have its use).
Creating a ‘Fade Back’
Now let’s go back to our original example ECHO – so load up the ECHO project file again. Have another listen to ‘FADE3’– why not add a reverse sequence in order to bring the drums back in? Listen to sequence 4 (FADE4) and you’ll hear that I’ve extended the initial fade out, and then simply added a fade in using the same echo sequence but in reverse. Open up STEP EDIT to see exactly what I did.
Putting it all together
Finally, listen to sequence 5 (FADE5). Here I’ve added some stuttering to the start of each bar – have a look at the sequence in STEP EDIT to see what I did – basically for each main kick at the start (and the first snare), I’ve added a small echo sequence and varied the velocity within the fade so rises and falls. I’ve also got the turntable stop in there. This only took a few seconds to make, so you can imagine what you can accomplish with a bit of elbow grease and a few hours bashing the pads.
What’s next?
In the full ‘Beat Making on the MPC‘ book I’ll cover usage of the Q-Link sliders to perform real time manipulation of filter, tuning and velocity settings, which gives you an alternative method of creating unique, sequencer-based performances in your MPC beats. This is in addition to over 280 pages of additional other tutorials covering absolutely everything you need to know about making pro quality beats within your MPC1000 and MPC2500, including advanced sample editing, sequencing, effects, drum kit building, chopping, multisampling and program editing, all explained in clear, step-by-step fashion with screenshots and all the files you need to recreate everything in your MPC – plus the MPC1000 and MPC2500 versions of the book are both fully compatible with Akai OS and the third party ‘Free JJOS’!
Take a look at all my ‘Beat Making on the MPC‘ books.

Latest Posts

"Electric Bass 3 - Now With MPC Sample & MPC3 Support
MPC Bible 3, Revision 6 - MPC Oscillators, MPC 3.9, MPC One G2 + MPC Key 37 G2

Downbeat Kit 3 - Acoustic Drum Kit Expansion For MPC3

MPC Bible 3, Revision 4 - Clip Matrix, MPC 3.7 + MPC XL

Leave a Reply