In a previous MPC expansion tutorial I looked at how we can build MPC expansions using the ‘MPC Expansion Builder’ app, which is bundled with Akai’s MPC Software. This produces an ‘expansion installer’ in XPN format which can be dragged into the MPC Software and subsequently exported for ‘standalone’ MPC use in the MPC Live/X.
The Akai Force can also read and use these exported standalone expansions, however at the time of writing, neither the MPC Software nor the Expansion Builder App are bundled with the Force.
So how can Akai Force users create their own expansions without coughing up for an MPC Software license? The good news is that building a ‘standalone’ expansion is pretty easy and requires no special software at all, so let’s quickly see what the procedure is for Akai Force users. This tutorial is also handy for MPC Live/X users who don’t want to use the MPC Software!
Step 1 – Create Your Sounds & Programs
The first thing to do is fire up your Akai Force and actually create some kits and instruments to use in your expansion. Probably the easiest way to do this is to just create everything intended for your expansion within a single project. This way you can save/backup your expansion project – everything is more manageable and organised this way and it’s easy to quickly save and backup your work (SAVE button > Project).
For the remainder of this tutorial, let’s assume that we’re creating an expansion called ‘Force of Nature’. So we would save our project as ‘Force of Nature.xpj’
Step 2 – Transfer Your Kits to an Attached Disk
Once you’ve created all the kits for your expansion you will need to transfer them over to a computer where we’ll put together our ‘expansion folder’ along with the two other key elements (the expansion image and the special ‘configuration’ text file).
Firstly, as we’re moving files over to a computer you’ll need to attach a drive to your Force (remember the factory internal drive cannot be read by a computer). So attach either a USB drive or SD card (or if you have previously installed it, you can use an internal SATA drive). I’ll call this your ‘attached disk’.
There’s two ways to get your kits to this drive. If you only have a handful of programs in your project then you could just select each program and save them individually to a folder on your disk. You can do this on your Force by first selecting your program, then hit the SAVE button and select ‘Keygroup’ or ‘Drum Kit’. Save all your programs to the same folder on your attached disk – call it ‘Force of Nature’.
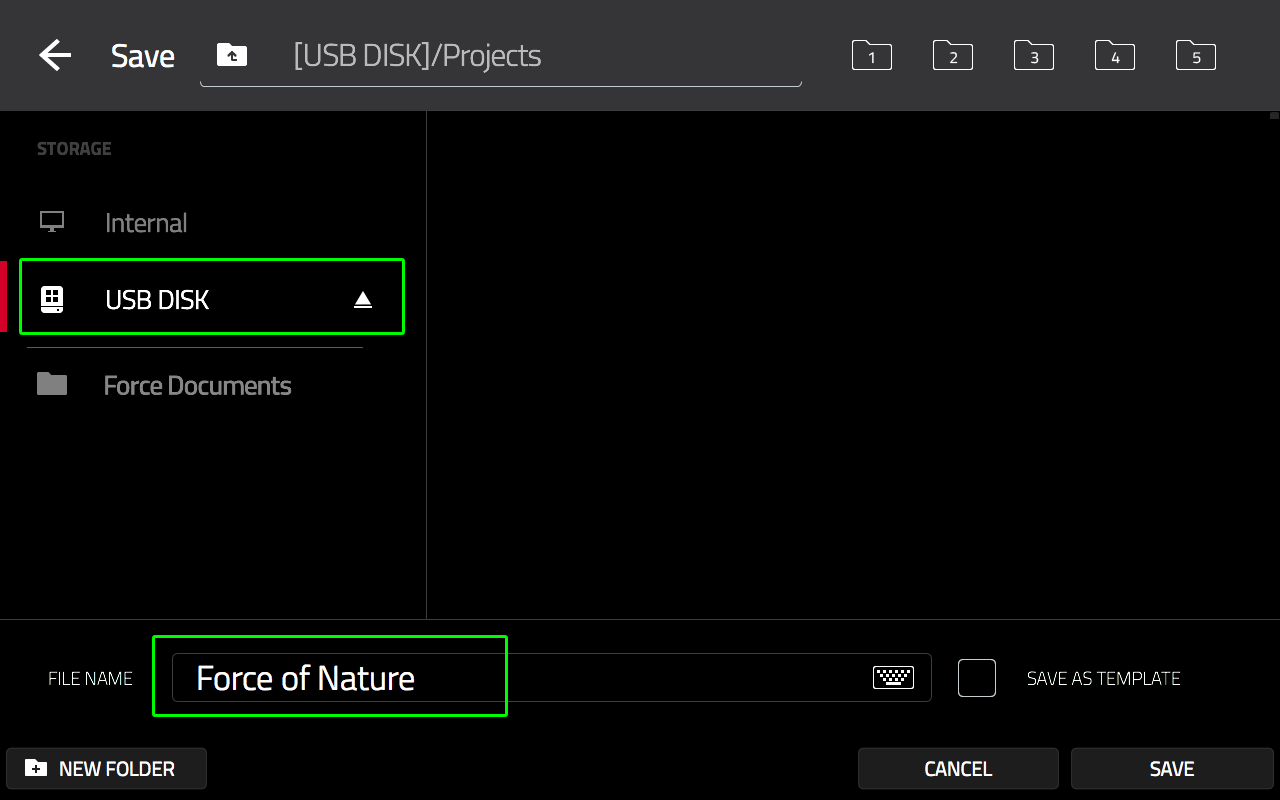
If you have a lot of kits in your project then I suggest you just re-save your entire project to your attached disk as we can easily ‘convert’ the project directly to an expansion folder later. So hit the SAVE button and select Project As – now save your project as ‘Force of Nature.xpj’ to any location on your attached disk. In the screen below I’m saving the project to a folder called ‘Projects’ on a drive called ‘USB DISK‘:
Step 3 – Transfer to your Computer
We now need to mount our attached disk on a computer. For a USB drive or SD card you could just eject it from your Force and pop it in a spare USB/SD slot on your computer.
Alternatively, connect your Force via USB to your computer, go to Menu and tap the Computer Icon:

Now select ‘Computer Mode’ and any drive connected to your Force will appear as a removable drive in your computer (which is the only option if you’ve saved your content to an internal SATA drive).
If you previously just saved all your programs individually to a ‘Force of Nature’ folder, simply copy this folder to any location on your computer (e.g. your desktop). However, if you saved all your kits as a complete project we’ll need to perform a couple of additional steps here.
When you save a project, your Force creates an XPJ file (the ‘project file’) and a separate folder that contains all the samples and programs as well as a bunch of other files that we don’t actually need in our expansion. This folder is named after your project title, so for a project called ‘Force of Nature’ the project resource folder would be called ‘Force of Nature_[ProjectData]’.
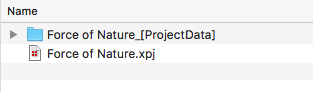
Locate your expansion project’s ‘Force of Nature_[ProjectData]’ folder on your Force disk and make a copy of this folder on your computer (there’s no need to copy the XPJ file). Once copied, rename the folder to just be the actual expansion name, e.g. ‘Force of Nature’ (i.e. remove the ‘_ProjectData’ bit from the folder name).
Now when you save a project, the Force will not only save your kits and sample inside that ProjectData folder, it will also save a bunch of other resources for your project which we don’t want in our expansion folder. For example you might see files such as .SQX, .XAI, .MCN as well as other XPM files that you never actually created (e.g. Audio 001.Audio.xpm). Simply delete these files.
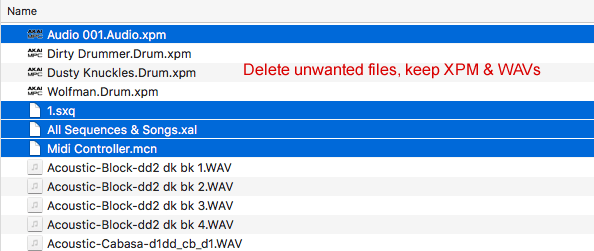
All you want remaining are the XPM files relating to the programs you actually created as well as all the samples (.WAV files). If it helps, sort your folder by ‘Kind’ (or ‘Type’) so you can easily see the rogue files.
If you feel uncomfortable doing all this, simply stick to the first method of initially saving your programs individually to a folder. Just be aware that this can be quite time consuming for large expansions!
You’ve now effectively created the basic expansion folder.
Step 4 – Create Your Expansion Image
Open up your favourite graphics program and create your expansion image. This should have square dimensions – I’d recommend making it at least 500 x 500 pixels (but there’s no need to make it bigger than 1500 x 1500px). Save it in jpg or png format – jpg will give you the smallest file size (remember that each expansion image on your drive is loaded into memory upon boot up of your Force/MPC, so don’t waste valuable system memory on huge image files – aim to keep the image file size under 200k). Check out my article on memory management which contains a section on how to create optimised expansion images.
Once created, copy the optimised image file inside your expansion folder (and make a note of the exact file name). I’ve included an example image in the tutorial files ‘Example Files’ folder.

Step 5 – Create the Expansion Configuration File
When you load an expansion in the Force (or in an MPC Live/X), it will look inside your expansion’s content folder for a special text file called ‘Expansion.xml’ – this contains all the relevant configuration information about your expansion; without this file your expansion will simply not appear in your file browser.
I’ve created a template Expansion.xml file in the tutorial download; you just need to open this up in any text editor (e.g. Textedit on a Mac, Notepad in Windows) and replace the placeholders with your expansion’s information.
Currently some of this information only seems to be superfluous when using the expansion in a standalone unit like the Force or MPC Live/X, in fact I believe the only essential info is the image location and the expansion title, however this might change in the future so it’s worth completing the additional fields regardless.
Essential
- title – the exact title of your expansion (e.g. Force of Nature)
- img – the exact file name of the expansion image, including the extension (e.g. force-nature.jpg)
Optional
The following are needed for use in the MPC Software, so you can add these for completeness (but you can ignore them if you prefer):
- manufacturer – your name or your business name.
- description – A brief description of the expansion
- identifier – a reverse dns style reference to your domain name (if you have one) and the pack name. This is used in the MPC Software as the folder name for the expansion, but is not used at all in the hardware browser. Use the format com.domain.yourname.expansiontitle, e.g. com.mpc-tutor.forceofnature
- version – the version number of this pack, e.g. 1.0.0.0
- ‘separator’ – this is used as a file name ‘delimiter’ to add ‘tags’ to files and to ‘group’ expansions in the MPC Software Media & Expansion browsers, however tagging is not currently supported in the hardware browsers (I cover tags in my MPC Expansion tutorial).
Ignore
These two tags cannot even be configured in the Expansion Builder app, so I would suggest just leaving these at the default values:
- ‘type’ – this seems to be ignored even with in the MPC Software (even pure instrument packs from Akai are still labelled ‘drum’).
- ‘priority’ – this currently only affects the order in which expansions appear in the MPC Software, it seems to have no effect in hardware browsers.
Dealing with Special Characters
Very Important: XML files are fussy about use of certain non-alpha numeric characters – if you must use any of the following characters, replace them with their corresponding ‘character entity’ version instead:
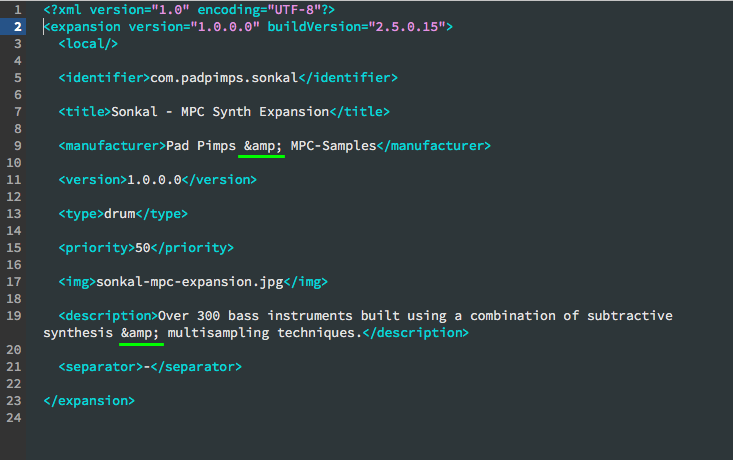
- Ampersand (&) − &
- Single quote (‘) − '
- Greater than (>) − >
- Less than (<) − <
- Double quote (“) − "
So for example, instead of typing ‘Black & White’, type Black & White (or just use ‘and’).
Here’s a screenshot of the Expansion.xml file for my latest bass expansion, Sonkal. Notice how I’ve use & instead of an ampersands. I’ve also included a complete Expansion.xml file in the ‘Example Files‘ folder.
Step 5 – Install the Expansion in your Force/MPC
You now need to transfer your entire ‘Force of Nature’ folder back to your attached disk. However, it must be placed inside a folder called ‘Expansions’ – if this doesn’t already exist on your attached disk, create it and paste your ‘Force of Nature’ expansion folder inside it.

Now boot up your Force/MPC and your expansion should be available in the ‘Expansions’ tab of the browser.
Optional Steps – Create Program Previews & File Tagging
If you want your programs to play an audio preview whenever you initially select them in the browser, you’ll need to add some ‘Program Preview’ files to your expansion. Please refer to my MPC Expansion Tutorial to see how you need to set this up.
In that tutorial I also explain how to create ‘tags’ for your programs and samples. While these are primarily for use in the MPC Software, they can also be used with the ‘search’ filters in the hardware browsers to make it easier to locate a certain type of kit or sample in a particular expansion or folder.
Example Expansions
If you’d like to see some working examples of some Force-compatible expansions, you can download the free MPC expansions from my site which all contain ready-built ‘standalone’ expansion folders that can be installed in the Force. I also have a large range of Akai Force-compatible instrument expansions featuring fully multisampled acoustic instruments and synths.
5 Responses
Leave a Reply


Mar 4, 2020 11:37 pm
So would you just drop this folder in the Software and it would add it as an expansion?
Apr 19, 2020 4:32 pm
Any plans for a Force multisampled instruments tutorial?
Apr 30, 2020 1:48 pm
Maybe, I’ll add to my ‘to-look-into’ list.
Sep 16, 2020 7:00 am
Super helpful. Is there a way I can turn Ableton packs into Force expansions?
Jan 11, 2022 10:59 pm
Finally, a comprehensive overview that showed me just to copy the unzipped contents of an XPN file to the internal drive’s expansion folder of force to get that XPN working. Blessed by you for not having to watch another potsmoking YouTube video…