
In recent years we’ve seen a lot of talk about ‘warping’ audio to dynamically change its tempo, but buried in the MPC’s SAMPLE EDIT mode is another potentially more flexible feature that can achieve similar results – the MPC patched phrase. This cool but completely slept-on feature has been available since the MPC1000 and is the MPC version of the REX file or an Apple loop, a loop that can auto-adapt to the current sequence tempo.
Let’s check out patched phrases in more detail – this tutorial is adapted from the MPC Bible and is suitable for the MPC X, MPC Live, MPC One, MPC Key 61, MPC Touch and Akai Force.
MPC Patched Phrase – Initial Set Up
First, download the tutorial files, unzip and transfer to your MPC disk (see my tutorial here on how to transfer files to your MPC disk). Go to the BROWSER > Places, navigate to the ‘Patched Phrase Tutorial Files‘ folder and load up the project file ‘Patched Phrase Tutorial.xpj‘.
Go to MAIN and select sequence 1 (Original Tempo) and press PLAY START. This is a two bar, 90 BPM sequence that plays back a 90 BPM looped drum break called ‘TBreak Original 90bpm‘ (I’ve assigned this loop to pad A01 in the program ‘Patched Phrase Breaks‘).
All good so far, but let’s turn this ‘fixed tempo’ break into something more dynamic. Head over to SAMPLE EDIT and select the sample ‘TBreak Original 90bpm‘.
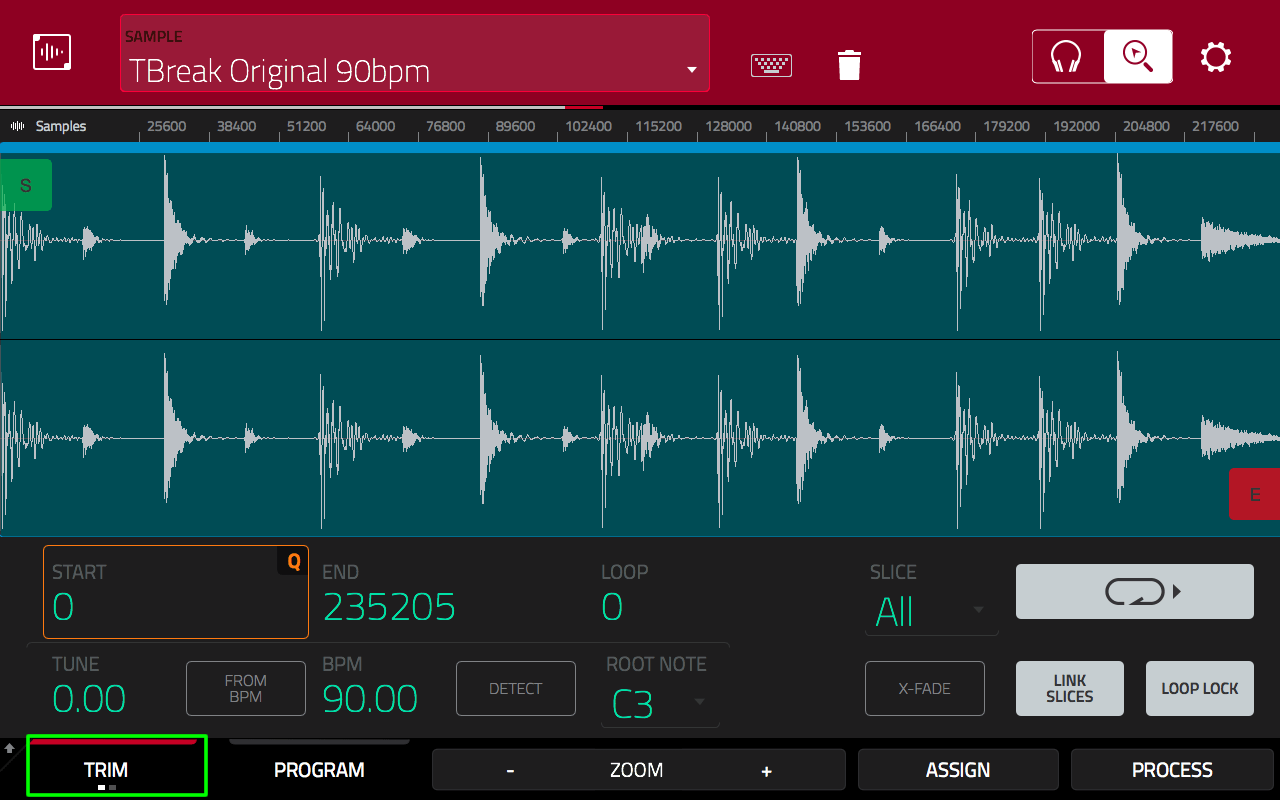
Now hit the TRIM button (highlighted in green, above) to enter CHOP mode:

The first task when creating a patched phrase is to chop our break so each slice only contains a single, individual ‘hit’. The quickest way to get the bulk of the work done is by using the THRESHOLD chopping algorithm – to engage this, hit the THRESHOLD button at the bottom left of the screen:
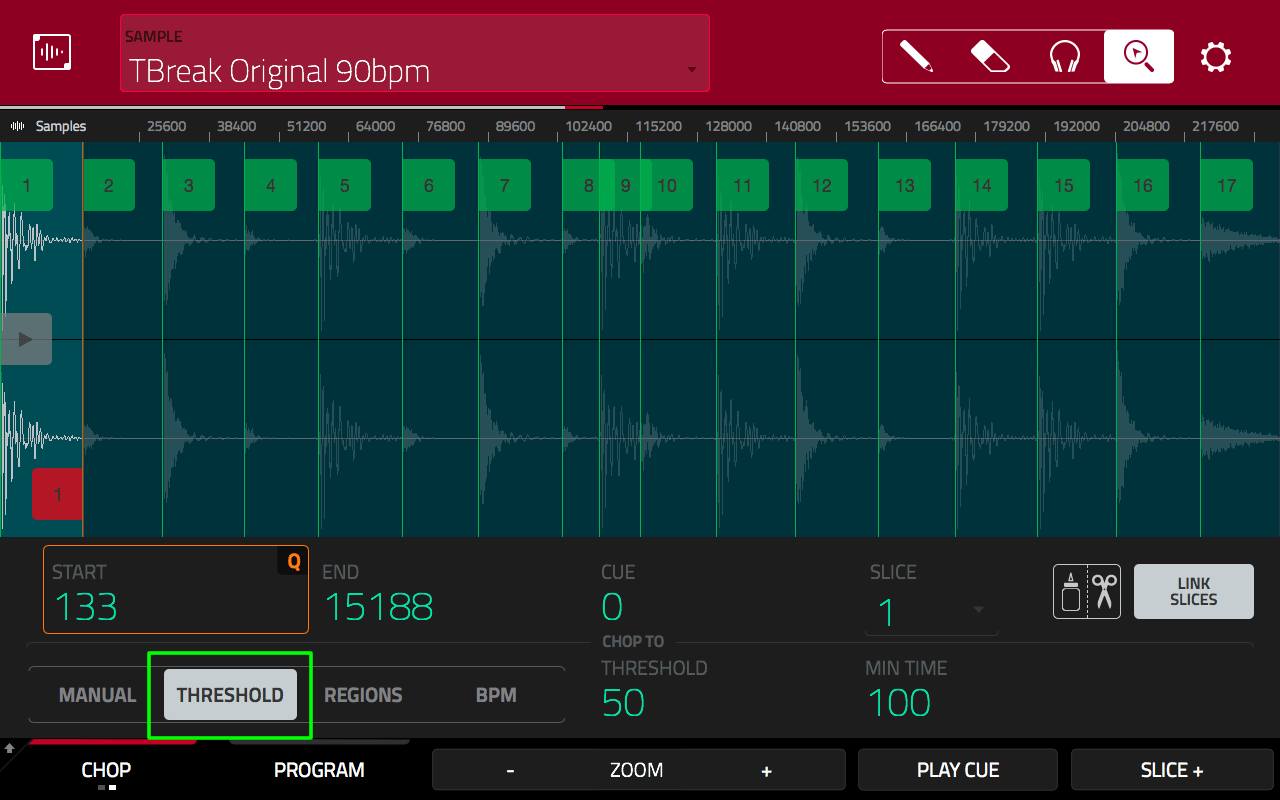
This has automatically created 17 slices and each slice contains a single ‘hit’. Preview all 17 slices by hitting all the pads in BANK A and pad B01 in BANK B. These days the MPC is very good at detecting individual hits especially with breaks like this one where each hit is clearly defined, and in this case it appears to have got everything using the default settings.
What if the MPC misses some hit points?
If you ever have any issues detecting some of the hits in a break, you can try tweaking the THRESHOLD and MIN TIME parameters under the CHOP TO header (typically these are automatically set to 50 and 100 respectively, although there seems to be a random bug that sometimes sets them both to 0):

A lower THRESHOLD and MIN TIME will help locate quieter hits, but might also incorrectly mark static or noise as ‘hits’.
Personally I prefer to just go in and manually add the missing slices – to do this, select the pencil tool and tap the waveform at the point you wish to add the new slice:

You can then adjust the start and end points of your newly added slices using standard samples editing techniques.
Fixing ‘Clicks’
As you’ve probably heard, the MPC’s chopping algorithm unfortunately has a pretty annoying habit of leaving a ‘click’ at the end of many slices and these clicks will regrettably make their way into your lovely new patched phrase, so we do need to attend to this. Luckily the fix is fairly quick and easy to perform and can be done entirely by ear.
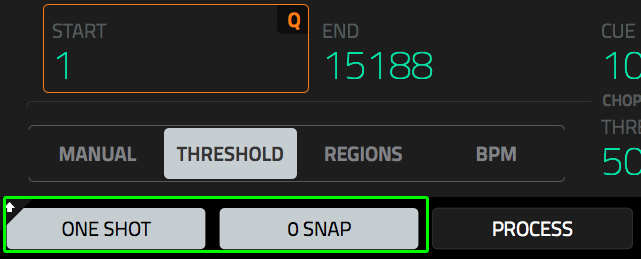
First hit the ZOOM+ button multiple times until you’ve magnified your waveform as much as possible (10 times in this case). This will ensure our subsequent sample edits will have the smallest resolution possible.

Now hold down SHIFT and press 0 SNAP so it turns white. This ensures our waveform edits will always fall on a zero crossing point, increasing the chances of getting a click-free result. Also make sure ONE SHOT is enabled here so our slice previews are played back as a one shot (hence no need to hold down the pad to hear the slice in full).
Tap on the END parameter – this ensures that any edits we make via the hardware will only affect the end point of the current slice.
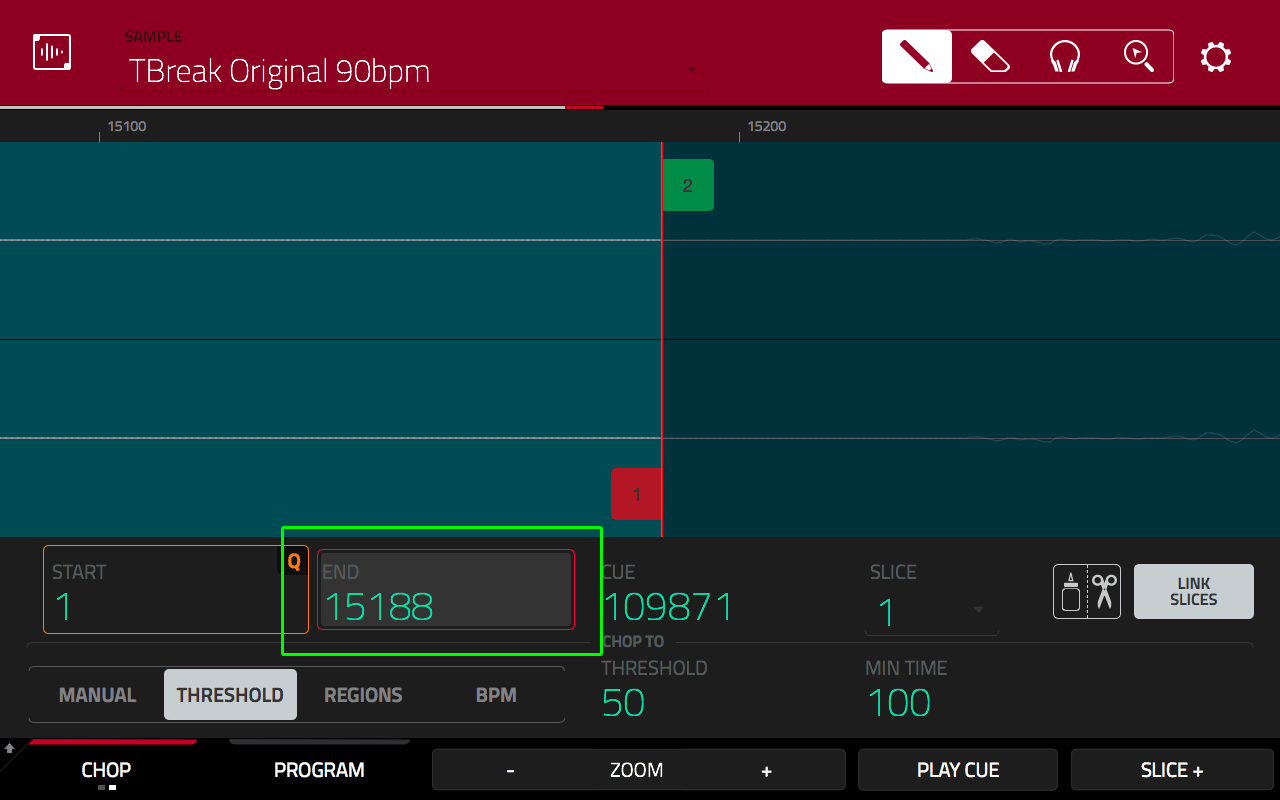
Now hit pad A01 to simultaneously select and preview slice 1. You should hear a click at the end of the slice. To remove it, press the ‘-‘ (minus) button on your MPC hardware once (or turn the data wheel one click anticlockwise) – this will reduce the END point, taking it to the next zero crossing point. Hit pad A01 again to preview the change – you should hear that the click is gone.
Now hit pad A02 and repeat the process. Again, there is a click, albeit a bit more subtle, but I’d suggest reducing that END point anyway, using the same method as before.
Repeat this process for all the slices – I’d actually recommend that you reduce the end point on all the slices by one zero crossing point, even if there isn’t an obvious click. Some slices might need two or three ‘– ‘ button presses (or data wheel clicks) to completely remove the click at the end of the sample (slice 8 is a good example of one that required three presses).
It might seem like a ball ache, but in reality it only takes around 30 seconds to do the whole break. Remember you are just using your ears here, there’s no need to even look at the waveform. If you skip this ‘click fixing’, you’ll just end up with a very clicky patched phrase, so it’s worth spending those extra 30 seconds to get it right (I’m hoping Akai will eventually do something to automatically remove these clicks, such as adding a ‘release’ option to the end of each slice, just like we had in the MPC1000).
Creating the Patched Phrase
With all the clicks gone. hold down SHIFT and press CONVERT:
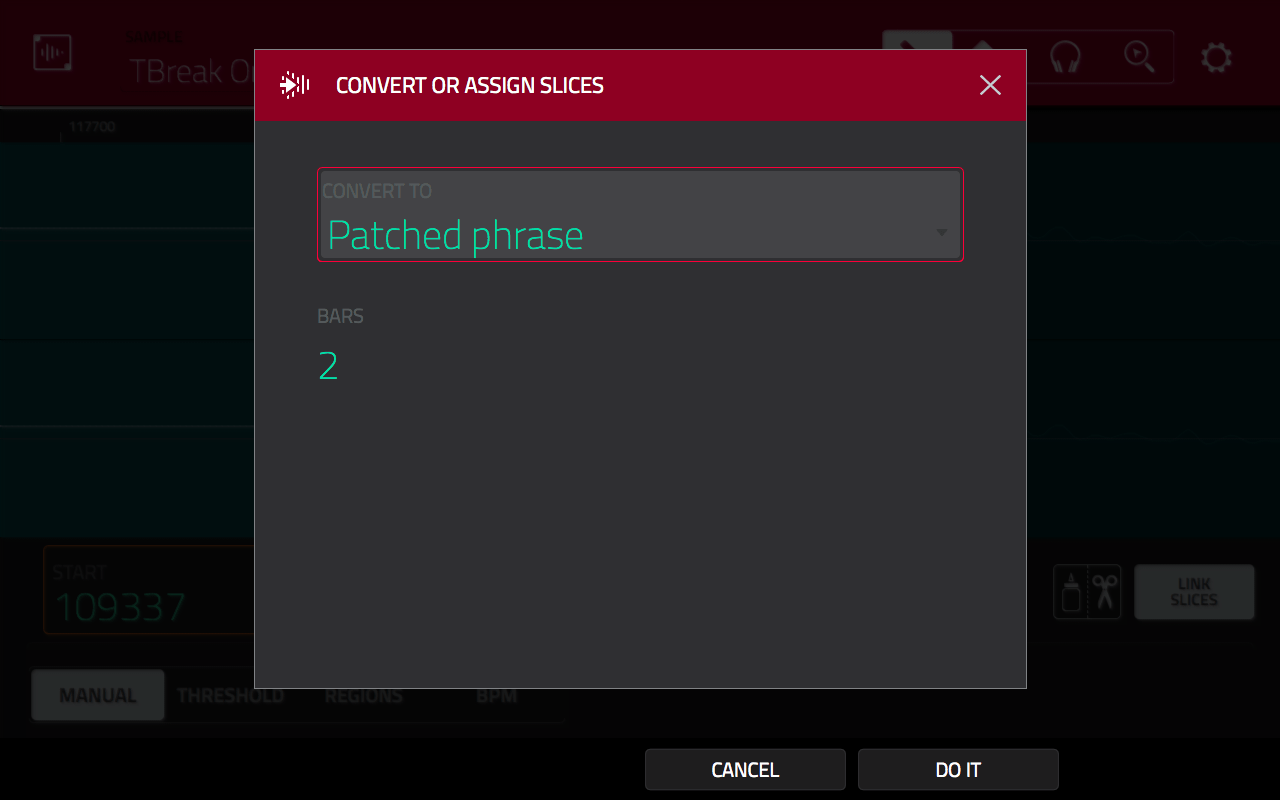
Select ‘Convert To: PATCHED PHRASE‘. As we have a 2 bar break, we can leave the ‘Number of Bars‘ set to the default ‘2‘, otherwise you would need to change this to match the bars in your sample. Hit DO IT to create the patched phrase.
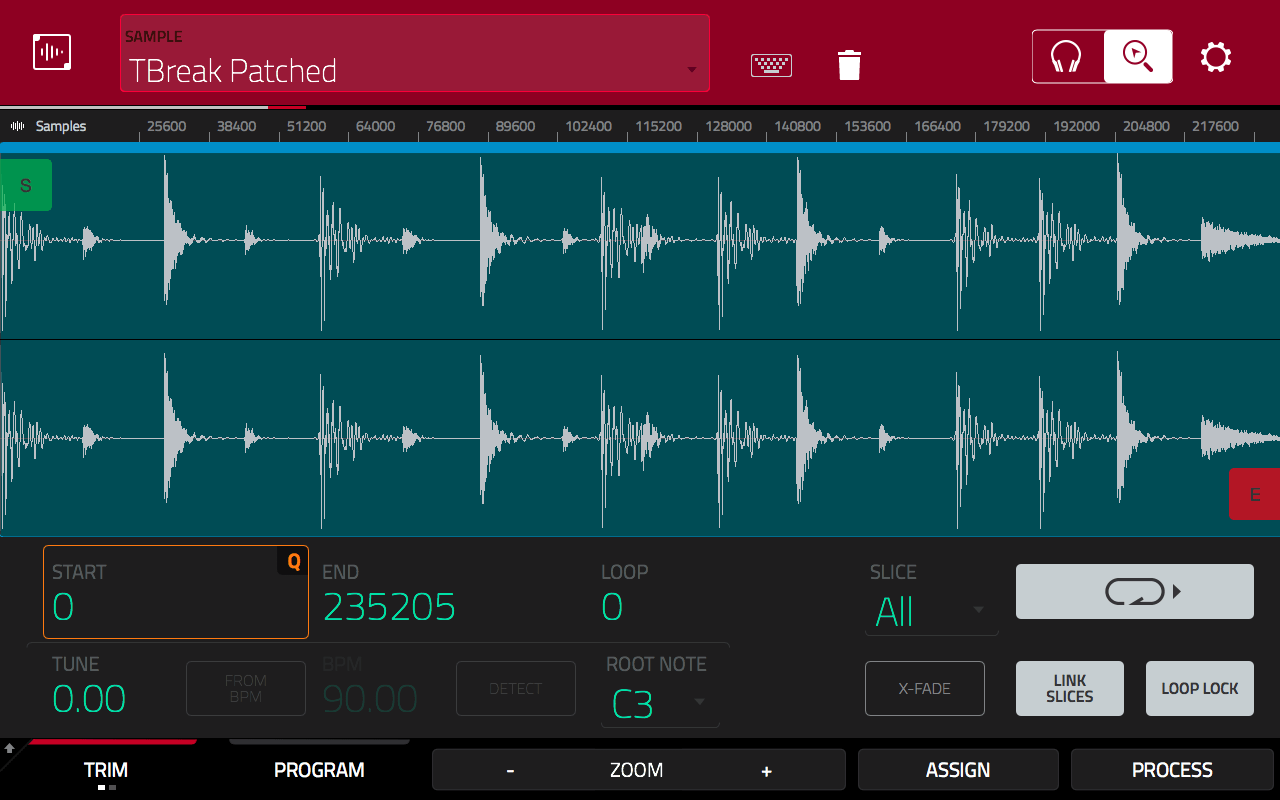
The MPC doesn’t select your new patched phrase sample straight away, so you’ll have to find it – tap the name field at the top of the screen in SAMPLE EDIT and turn your data wheel clockwise and you should see the patched phrase version appear – it will be called ‘TBreak Original 90bpmpp‘ – notice the additional ‘pp‘ at the end.
Alternatively you’ll find my version of the patched phrase break is already loaded into memory; ‘TBreak Patched‘, so feel free to select this one instead if you prefer.
Hit CHOP to return back to standard TRIM mode and press pad 9 to preview the patched phrase.
It sounds virtually identical to the original break, but as we’ll soon discover, it’s actually very different!
Head over to MAIN and select sequence 2 (‘Faster Tempo‘). I’ve now increased the sequence tempo to 100BPM and assigned my version of the patched phrase file to pad A02 in the Patched Phrase Breaks program. Hit PLAY START and you’ll hear our break has automatically adapted to the new sequence tempo.
Select sequence 3 (Slower Tempo) to hear that same patched phrase at 85 BPM. Sounds a little bit choppy, but still pretty good, but your mileage will very depending on the type of break you are chopping. Very noisy breaks, or those with lots of rides and crashes tend to sound more choppy than more simple, ‘clean’ breaks. The lower the tempo the more choppy your break will sound. Ultimately patched phrase tends to work much better when the break is being sped up.
With the sequence still playing, manually adjust the tempo in real time to hear how the patch phrase keeps up with the changes. To do this, tap the BPM field in MAIN and turn the data wheel clockwise or anticlockwise – or use Q-LINK 13 (the top Q-link, Q-LINK column 4).

Editing Patched Phrases
Head back to SAMPLE EDIT > TRIM and select the patched phrase loop, TBreak Patched. Change the TUNE parameter to read -5.00:
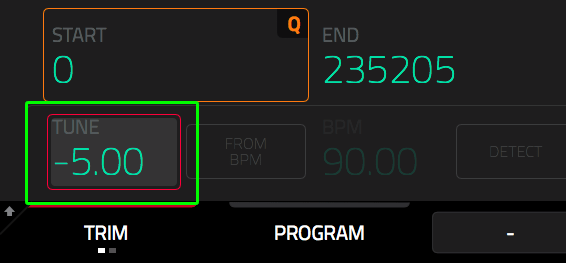
Press pad 9 to preview the break – when you tune a patched phrase, the pitch changes but unlike normal sample tuning, the sample tempo remains unchanged. Go to MAIN and select sequence 4 (Tuned Patched Phrase). This is a 110.00 BPM sequence using the tuned down version of the patched phrase – so here we have sped up the break but given it a darker sound by simultaneously pitching it down.
Now head back to SAMPLE EDIT, select CHOP mode and select our original ‘TBreak Patched‘ sample. Tap on SLICE and change this from ALL to 17 – this will select our final slice, the open hi hat.
Hold down SHIFT and select PROCESS > REVERSE:
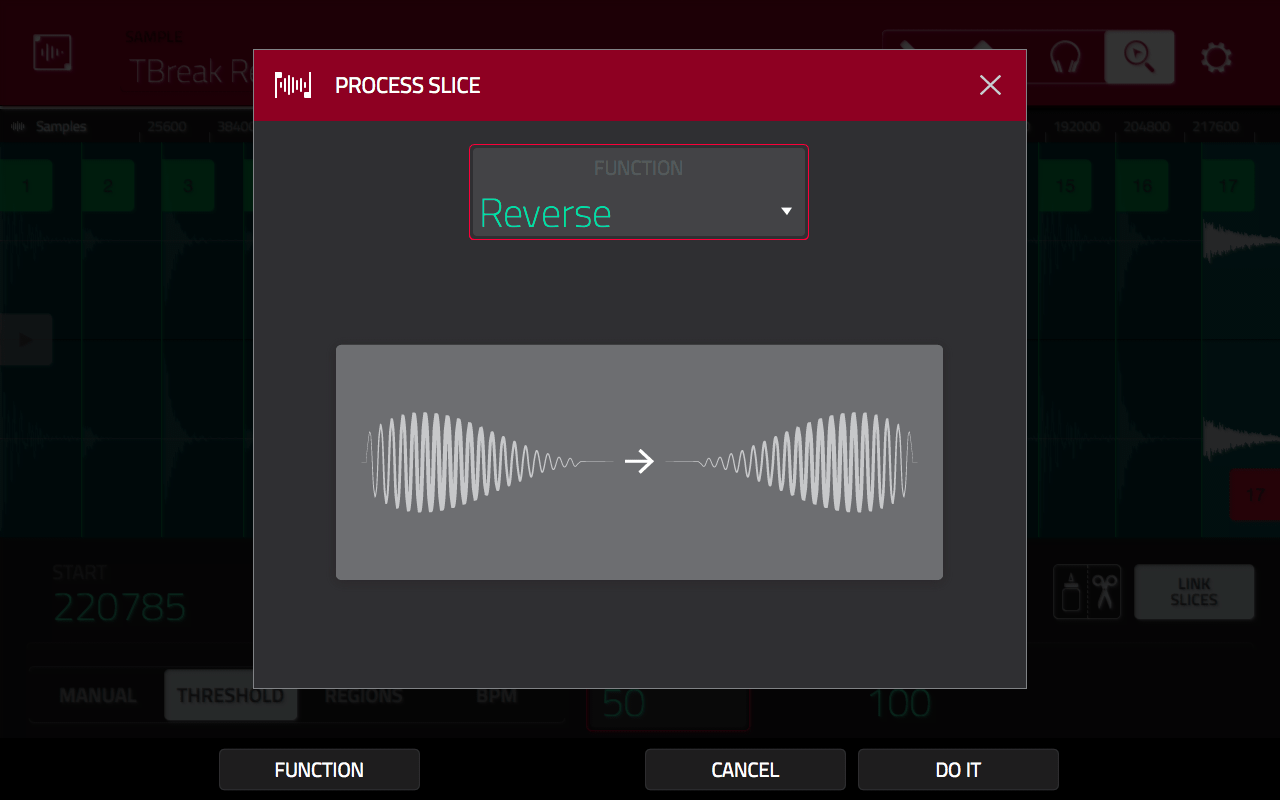
This reverses only the currently selected slice:
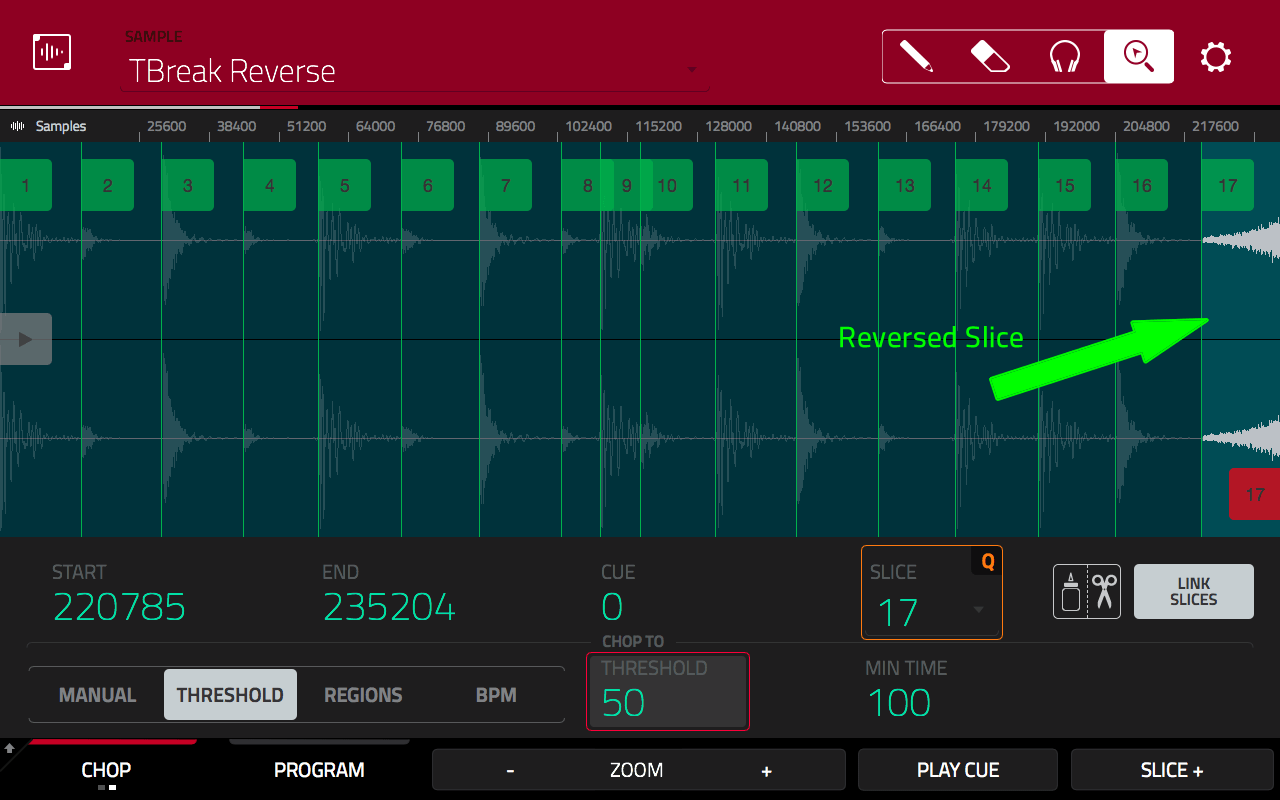
Hold down SHIFT > CONVERT > PATCHED PHRASE to create a new patched phrase sample containing the reversed open hat. You can check out my version in MAIN > sequence 5 (Reversed). Here I’ve reverted back to the original tempo but we now have an altered version of our original loop which can be used to add variety.
In chop mode you can apply any of the available processes to any individual slices. We just used ‘reverse’ but you could try processes like ‘silence’, pitch shift, gain change and fade in/out to manipulate any number of slices within your loop. Play sequence 6 (Pitched Shifted). Here I’ve pitch-shifted the snares up (+5.00) to give a different tone to the snares (if you are not familiar with pitch shift, this process changes the pitch of a sample without changing its length).
Don’t forget patched phrase can be used on any loop, it doesn’t have to be a break, it could be an instrument loop for example or even a vocal loop.
MPC Patch Phrase Summary
Now it’s clear that patch phrase isn’t perfect, for example we’ve already seen that the chopping algorithm tends to leave clicks at the end of some slices, and at slower tempos it quickly becomes ‘choppy’. But compared to warping it certainly avoids those metallic, ‘stretchy’ artefacts that warping can sometimes produce. It also gives us some extra editing options by allowing us to target specific slices within the loop for further editing.
There are of course other options when it comes to manipulating loops, including timestretching, tuning and even creating a ‘chopped’ drum kit from your break. These all have their own unique pros and cons and I cover all these techniques (and a whole lot more) in the MPC Bible.
8 Responses
Leave a Reply

Latest Posts
"Electric Bass 3 - Now With MPC Sample & MPC3 Support
MPC Bible 3, Revision 6 - MPC Oscillators, MPC 3.9, MPC One G2 + MPC Key 37 G2

Downbeat Kit 3 - Acoustic Drum Kit Expansion For MPC3

MPC Bible 3, Revision 4 - Clip Matrix, MPC 3.7 + MPC XL

Dec 2, 2019 8:56 pm
Hi there, great tutorial – thanks a lot!
I’m wondering, is there a way to find out if a sample is a patched phrase, just by looking at it in sample edit? I’m on MPC 2.6.
Dec 3, 2019 12:49 pm
No, not in sample edit, nor the browser. You can however go to the project screen (MAIN > folder icon in top red bar) and under the ‘SAMPLES’ heading patched phrase samples will show a diagonal ‘ladder’ icon instead of the waveform icon of normal samples.
Dec 4, 2019 7:44 pm
Oh wow, seems like they want to keep it a secret 😀
Thanks a lot for the help!
Jan 6, 2020 5:28 pm
Awesome tutorial!
How would you reverse the whole phrase? Do you have to do each individual slice?
‘Reverse’ is just an example – I really want to know how to process the whole program
Jan 6, 2020 5:43 pm
Just open the patch phrase in SAMPLE EDIT > TRIM where it’s just seen like any other loop. You can then apply any of the processes to it.
Apr 28, 2020 3:12 pm
Is there a limit to how long each slice can be? I’ve had this working with small samples but I just tried it with a 64 bar track, with each slice covering a bar (64 slices) and when I play the pp back, it skips through it, missing most of the slices.
Thanks,
Bible owner…
Apr 28, 2020 3:15 pm
There’s no official limit, but it sounds like you’ve encountered a bug or at least, a limitation. Maybe report this to Akai.
Nov 17, 2020 4:43 pm
This tutorial was a big help. Thank you.