
When it comes to sound design, even modern MPCs such as the MPC X, MPC Key, MPC One and MPC Live generally tend to be associated with techniques such as layering and chopping, but we often overlook one of the most powerful sound design tools available inside the MPC; synthesis. Synthesis allows you to generate your own sounds completely from scratch, be it basses, leads, pads, noises and even drums. It’s an incredibly useful tool to have in your sound design arsenal and it’s also pretty simple to get to grips with.
In this tutorial we’re going to cover the basics of synthesis by building a fat, modulated bass patch in an MPC Live, MPC X, MPC One, MPC Key or MPC Touch. The techniques covered in this tutorial can also be easily transferred to most other MPC models and the Akai Force.
Please note that I’m going to assume you are already familiar with the basic usage of the MPC, but if you need help with the absolute basics or want to learn more advanced MPC workflows and production techniques, check out The MPC Bible.
Subtractive Synthesis Overview
Synthesisers come in many shapes and forms and employ many different synthesis methods to generate their sounds. One of the most popular methods of sound generation, and the one we’re going to learn in our MPC, is that of subtractive synthesis.
Subtractive synthesis is simply the process of filtering, shaping and modulating an audio signal to alter both its harmonic content and its dynamic characteristics (often referred to as changing its ‘timbre’). Subtractive synthesis generally requires the following three key components:
- The Oscillator – an oscillator generates the initial tone which is a repeating audio signal typically made using a pure waveform such as a sine wave, square wave, triangle wave or sawtooth wave. Many synths also use custom oscillator waveforms, and many offer the ability to blend multiple oscillators together into a single sound.
- The Filter – the audio signal emanating from the oscillator is then passed through a filter to remove unwanted frequencies and attenuate others.
- The Amplifier – the amplifier controls the volume of the entire sound. The amplifier often also features an ‘envelope’ which can shape the volume of the sound over time.
Additionally, many synths also have a fourth component:
- The Low Frequency Oscillator (LFO) – this additional oscillator operates at a very low, inaudible frequency and can be used to modulate elements of your sound to create dynamic, moving texture such as rhythmical pulses, sweeps, tremolo and phasing.
So how do we perform this 4-stage synthesis chain in an MPC? Well, we don’t need any fancy plugins, no hacks and no additional software – in fact nearly everything we need is already there and waiting for us inside one of the core MPC features; the KEYGROUP program.
The MPC Keygroup Program – Our Synth ‘Interface’
Start with a new blank project, then head over to MAIN and hit the KEYGROUP icon to create and assign a new blank ‘keygroup’ program to track 1. Hit the ‘A’ icon on the PROGRAM row and rename the program ‘Bass Patch’.
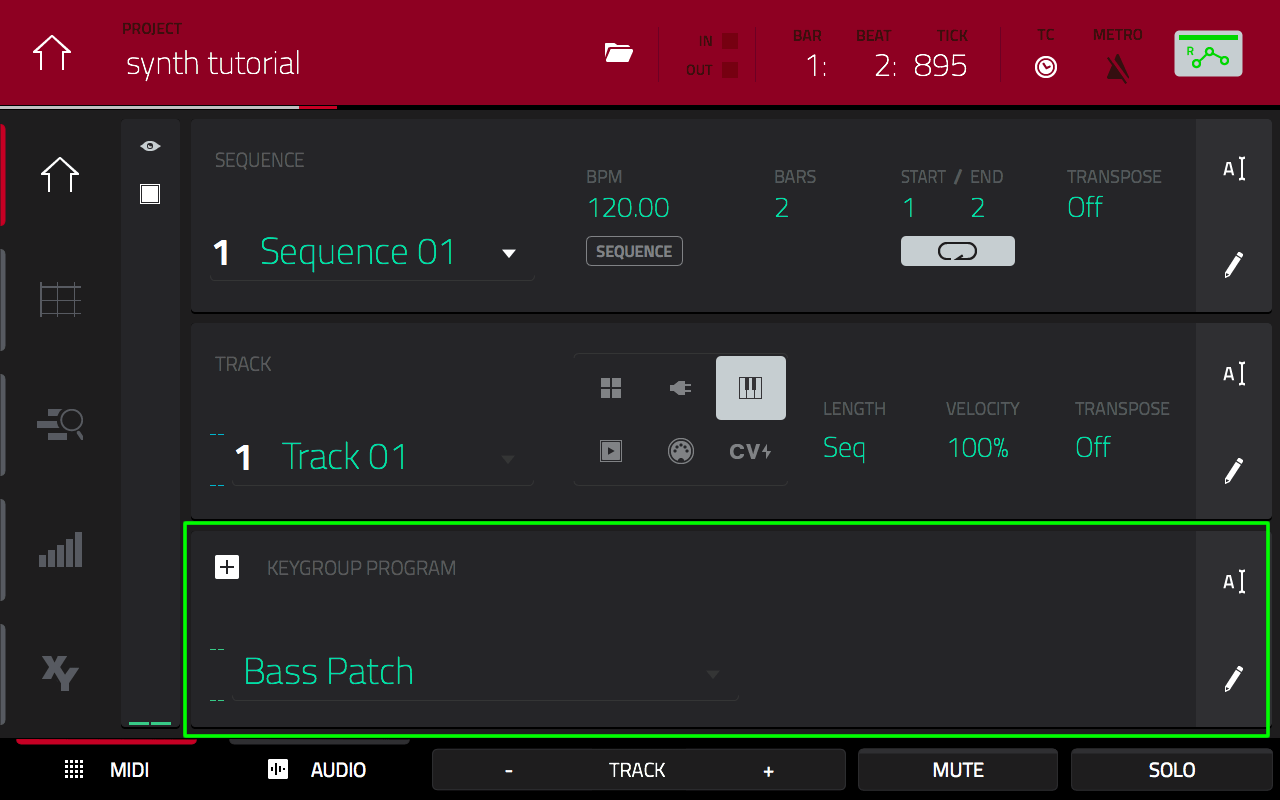
All the elements of a MPC keygroup program can be managed in a single mode; PROGRAM EDIT, which we’ll effectively consider to be our synth’s editing ‘interface’.
Head over to PROGRAM EDIT > GLOBAL, which is the ‘main’ configuration page for our program (this was previously called the ‘MASTER’ screen in previous firmwares):

On the top red bar you can see the ‘NUMBER OF KG’ field, this tells us that this program contains just one keygroup, while the NOTE RANGE shows us that this one keygroup covers the notes C-2 to G8, which is all 128 pads (over banks A to H). These default settings are perfect for our MPC synth patch.
KEYTRACK is also enabled by default– this ensures that our generated tone will be mapped automatically across all our pads in chromatic musical order, starting a C-2 for pad A01, all the way up to note G8 on pad H16. This will allow us to play the synth patch just like any other musical instrument.
The only setting I want to change at this stage is the POLYPHONY for the entire program, which is found in the left hand ‘MASTER’ column. Change this from ‘Poly’ to ‘Mono’ – this ensures that our synth is effectively a ‘monophonic’ synth, where only one note can be played at any one time.

This is perfect when creating bass (and lead) sounds, as it means we can concentrate our efforts on producing a single fat tone designed purely for solo lines (patches designed for polyphonic use tend to be created with a ‘thinner’ tone so the resulting chords don’t sound too muddy).
Setting Up The Oscillator
A hardware synth will just internally generate its oscillator waveforms, but the oscillators in our keygroup synth will simply come from samples. If you haven’t done so already, download the tutorial files, unzip them and transfer them to your MPC disk. If you need help doing this, check out my tutorial here.
Head over to the BROWSER and navigate to the tutorial folder. Inside you’ll find a sub folder called ‘Oscillators’ which contains basic oscillator samples; a sine wave, triangle wave, sawtooth and square wave. Single tap this folder to select it, hold down SHIFT and tap ‘LOAD ALL’ to load the entire contents of the folder into your project.
Go to SAMPLE EDIT and select the Sawtooth Wave:
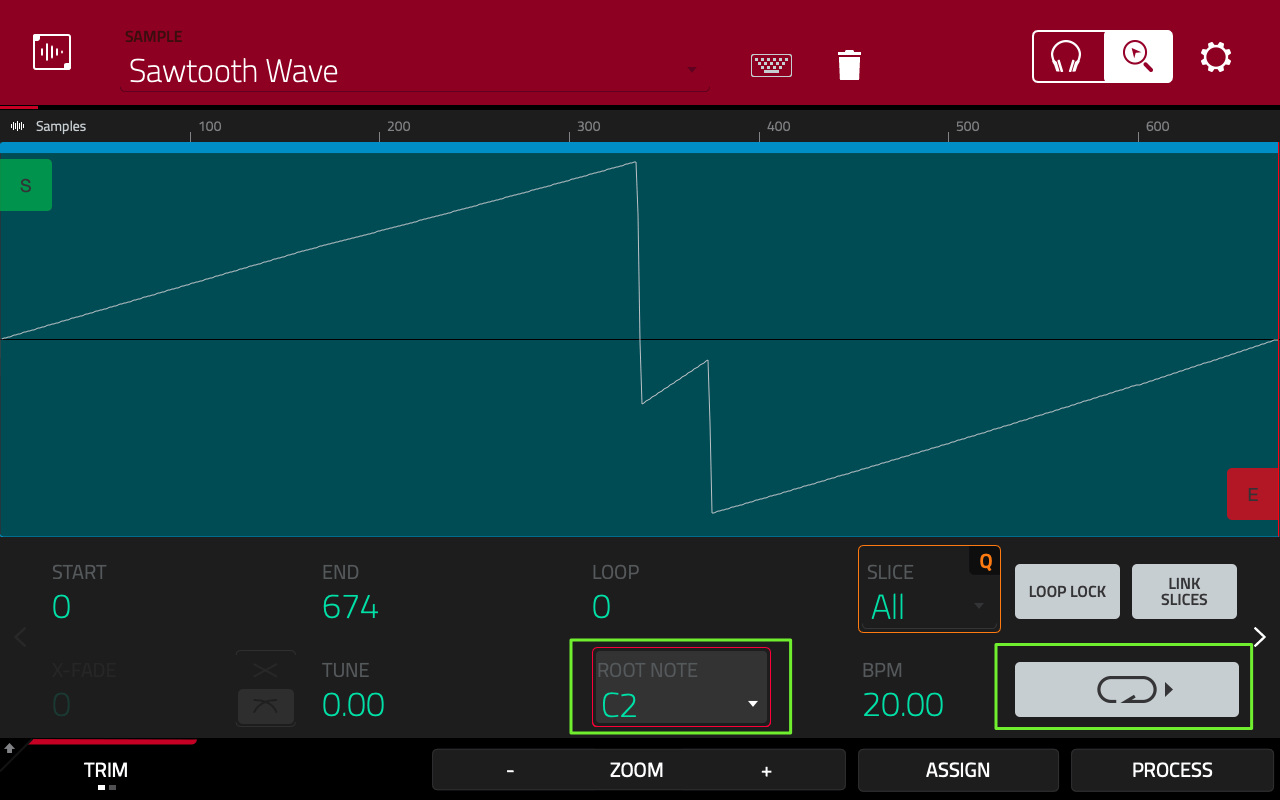
Each oscillator consists of a single-cycle waveform and each one is set to ‘LOOP:Fwd’ – hit pad 16 to preview the loop. All four samples are recorded at the pitch ‘C2’, and this has been configured in the sample’s ROOT NOTE setting (more about this below).
Head over to PROGRAM EDIT > SAMPLES, tap on the SAMPLE field in LAYER 1 and assign the Sawtooth Wave sample:
Select pad bank D and hit a few pads – as you can hear, our sawtooth oscillator sample has been automatically mapped across our pads in chromatic musical note order, and as we previously set the sample’s root note, the MPC has mapped the correct pitches to the correct pads. Additionally, if you hold down a pad, the notes continue playing until you release the pad – this is thanks to the perfect single cycle looping set up in the sawtooth sample.
So, there you go, our synth has its first oscillator and is already producing its first playable tone. That was painless – and now the fun begins!
Beefing Up The Oscillator
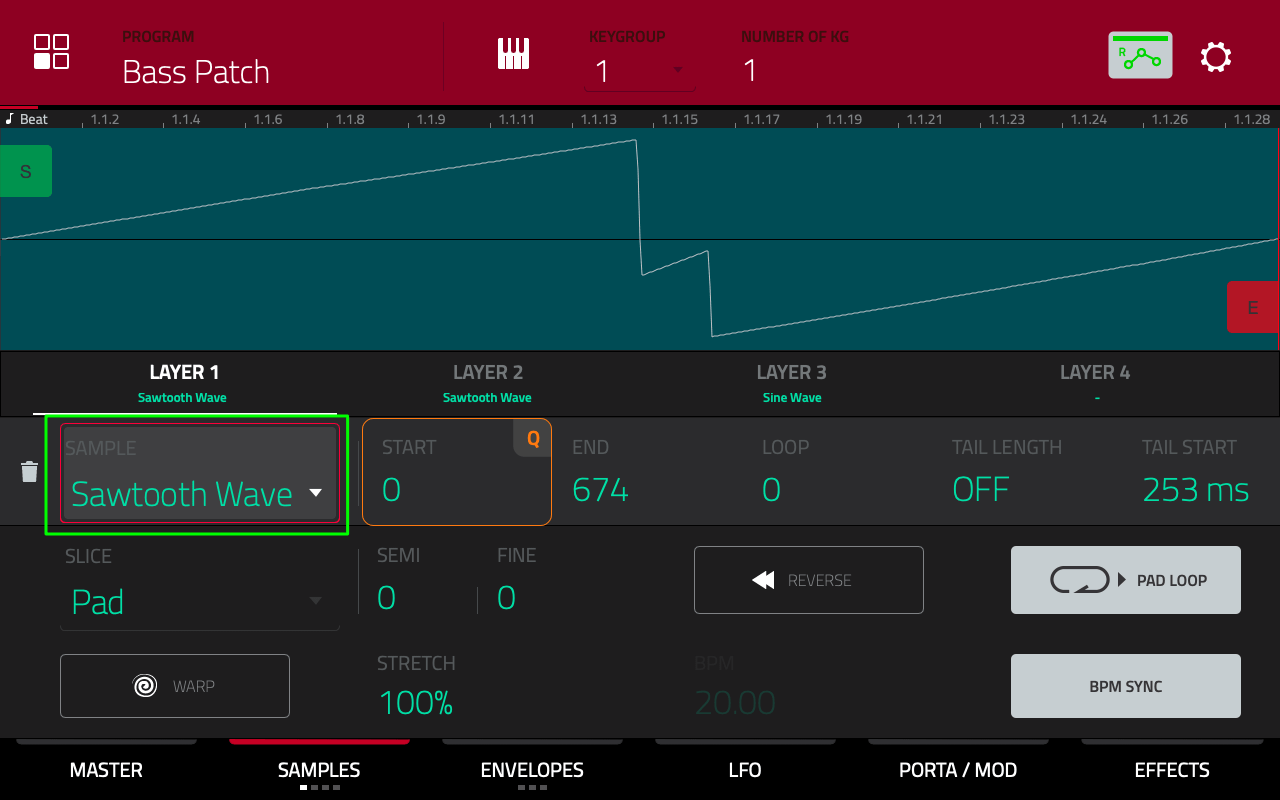
Let’s immediately deploy an incredibly common synthesis trick of doubling up our oscillator. A typical hardware synth will often allow you to generate and mix together multiple oscillators, and an MPC keygroup program has something very similar – sample layers. So to add another oscillator to our generated tone we simply assign a sample to LAYER 2 in our current keygroup.
We can do this in the current SAMPLES screen by selecting the LAYER 2 tab (directly under the waveform), but I actually prefer to use the second SAMPLES screen to manage your sample layers as it’s a bit less cluttered. To view this additional page, simply hit the SAMPLES navigation button one more time (notice the second white dot appear under the SAMPLES button):

Tap in the second LAYER and assign the exact same Sawtooth Wave sample to this layer. Layering the same sample on top of itself doesn’t really do much other than increase the overall output level of your keygroup, but the real magic occurs when we slightly detune one of the layers.
To perform a very small tuning change, tap on the FINE parameter for LAYER 2 and gradually reduce this while holding down one of the pads. As you do, you should hear your sound begin to phase, making our tone fatter and more complex. Adjust to taste – I’ll use a FINE of -6.
As I mentioned, doubling up on the oscillators has increased the output volume of our keygroup, in fact it’s now causing the output levels to clip. If you are on an MPC X you should see your physical level meter going well into the ‘red’, if you don’t have any hardware level meters it’s worth taking a look at how we can monitor and quickly adjust output levels from within the touchscreen UI itself.
Monitoring & Adjusting Levels with the Inspector
There’s a few places in the touchscreen UI that contain visible level meters; PAD MIXER mode will show you the level meter for your current keygroup while CHANNEL MIXER mode can be used for many different channels, such as program, track or master output. However another option is the Inspector. Go to MAIN and hit the ‘eyeball’ icon near the top left of the screen:
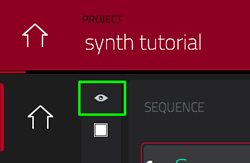
This reveals the ’Inspector’:
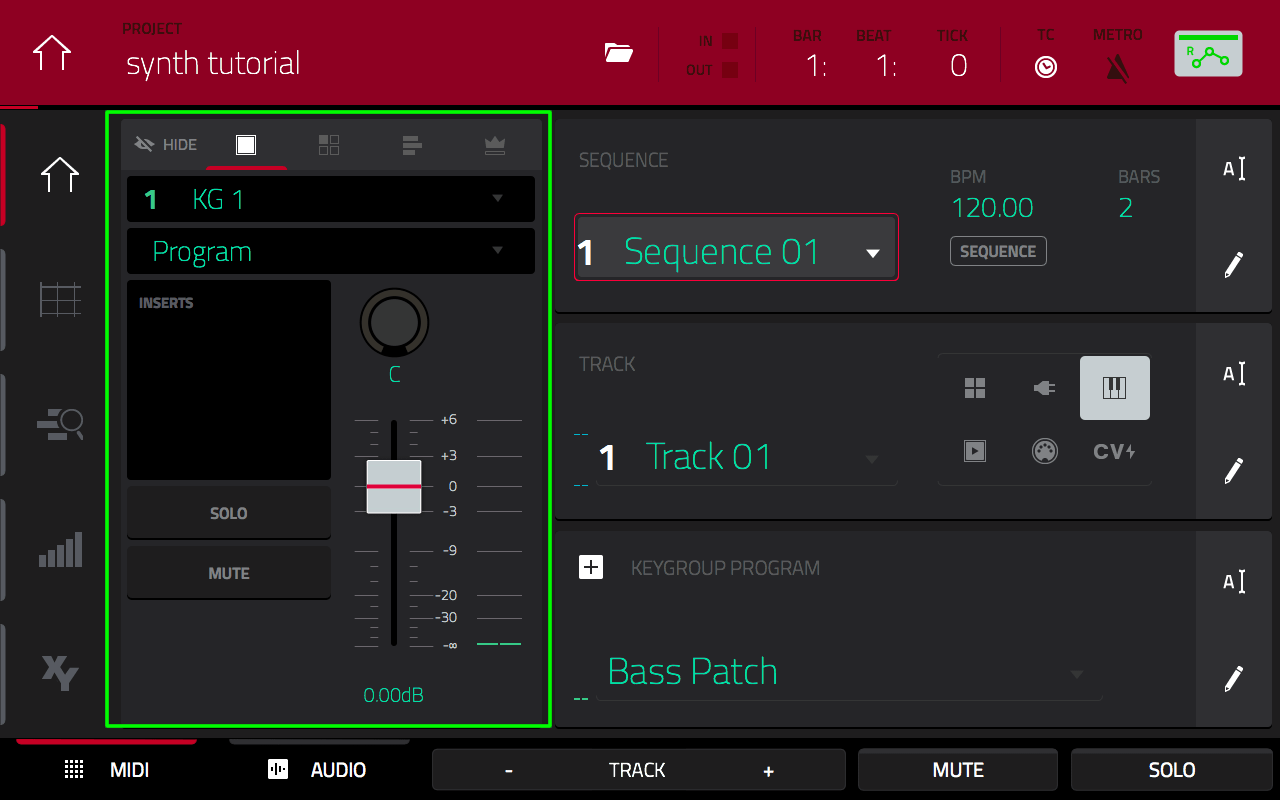
The Inspector gives you quick access to the channel strips for the 4 primary output channels in the MPC (in order of routing); keygroup (or pad), program, track and master. You can select the channel strip you wish to view using the row of icons at the top of the Inspector:
![]()
Select the pad icon to show the ‘keygroup’ channel strip; this strip shows the output level of the currently selected keygroup (remember we only have a single keygroup in this program). Hit and hold a pad to observe the level meters.
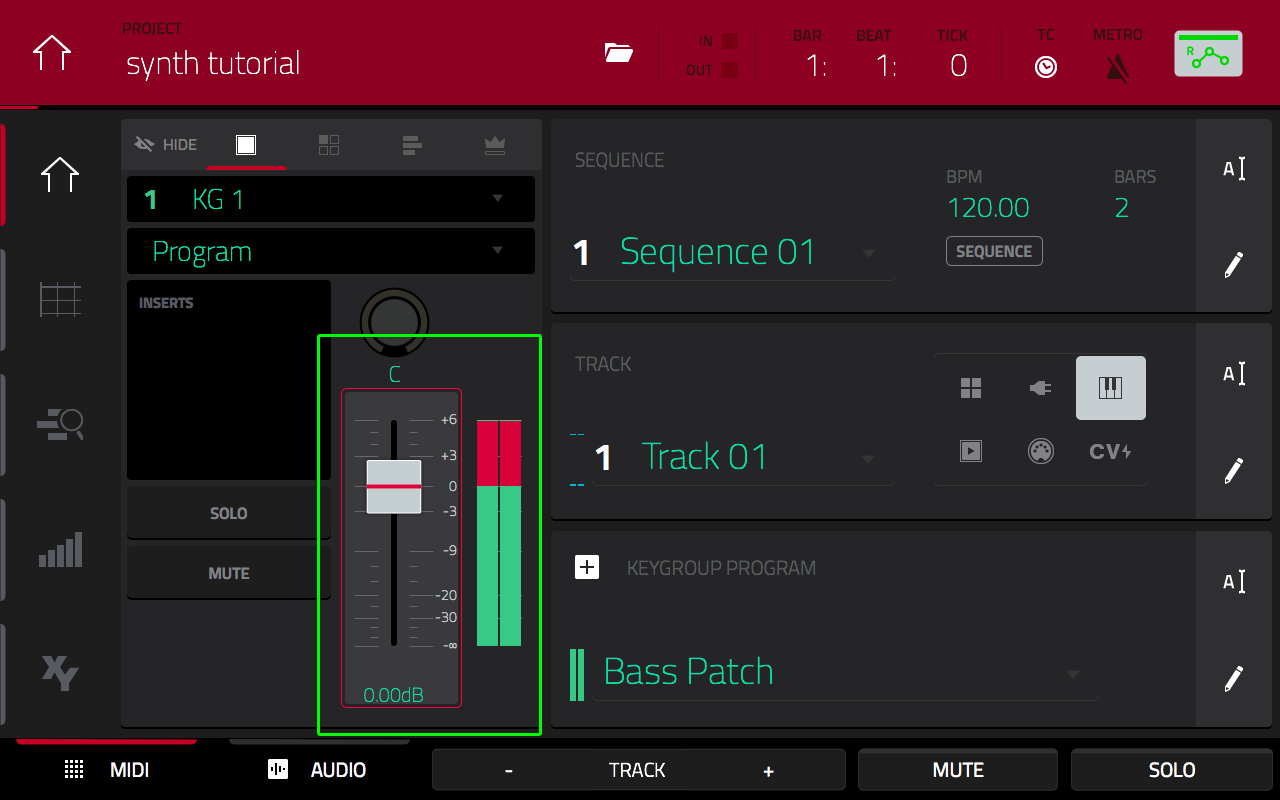
Very much in the red, so to reduce the overall output level of our keygroup, simply drag the LEVEL slider down; keep hitting some pads to continuously check the output level, ensuring that it is comfortably ‘in the green’.
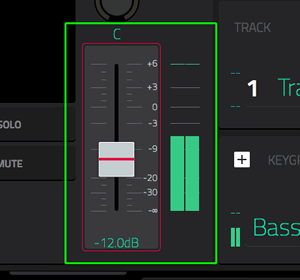
I’d suggest giving us a fair bit of breathing space as we can always raise the level up again at a later date. Set the LEVEL to around –12.0dB (use the data wheel while holding down SHIFT to move in smaller increments).
Creating a Bass Tone
Our dual oscillator tone sounds lovely, but it doesn’t necessarily sound like a bass tone yet. A great way to emphasise the ‘bass tone’ nature of our sound is to tune one of our oscillators down an entire octave. Return to PROGRAM EDIT > SAMPLES (screen 2).
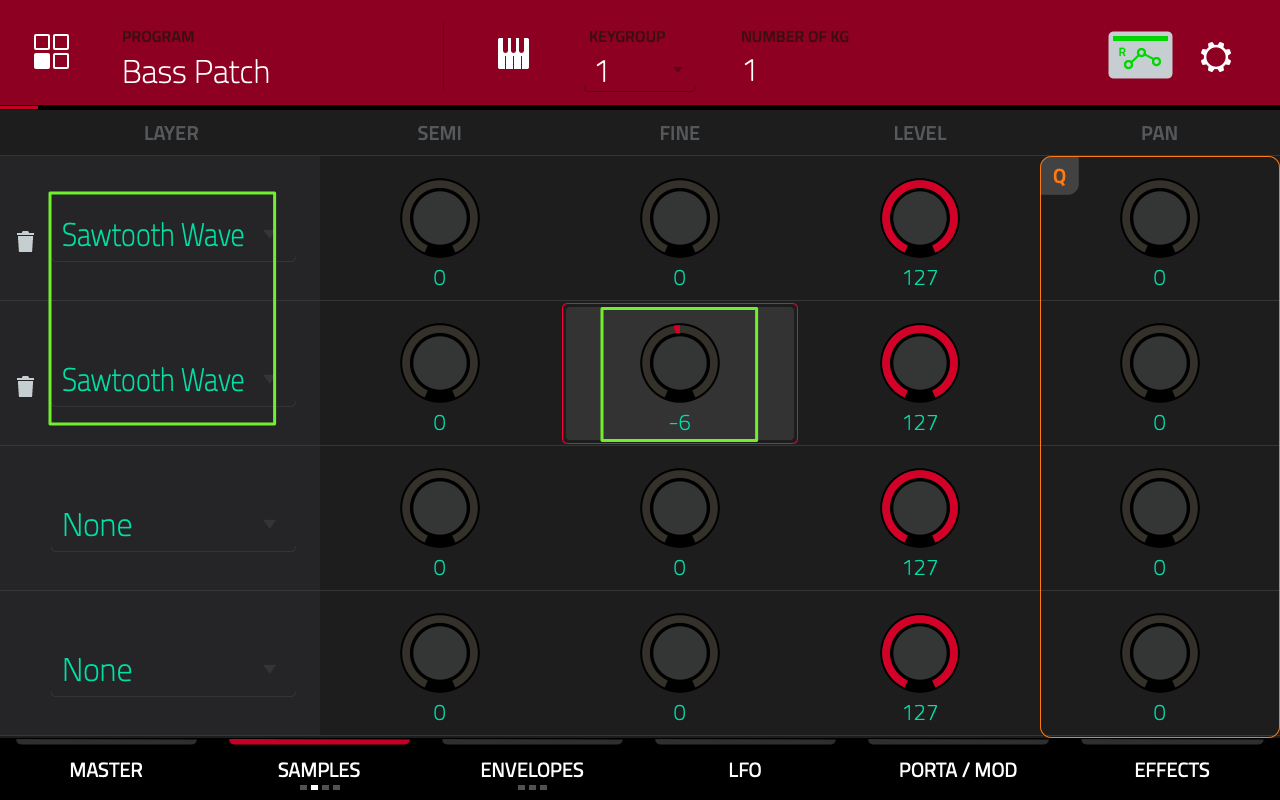
You can tune down either oscillator; select the oscillator in LAYER 1 and this time adjust the SEMI, which is used to adjust sample tuning in whole semitone units; an octave is 12 semitones, so set the SEMI to –12.
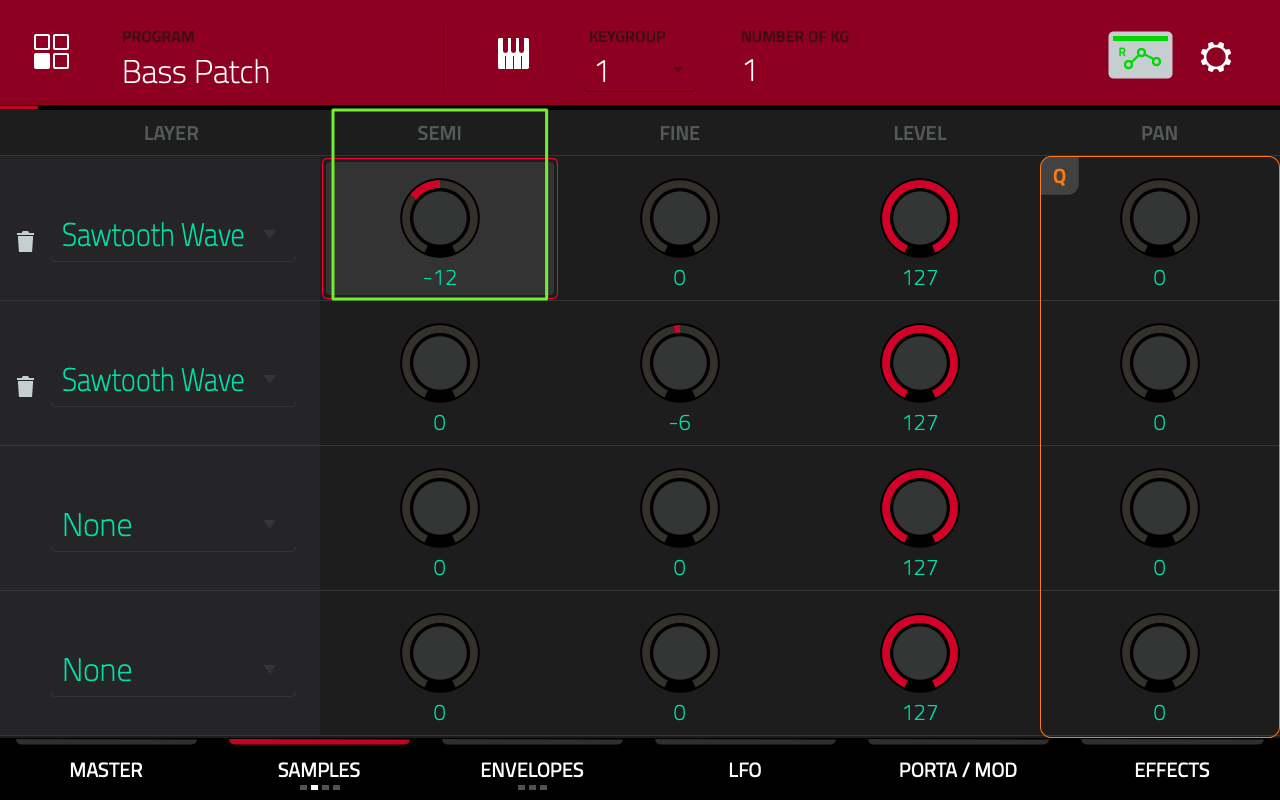
Preview the result – sounding pretty mean now. But let’s not stop there, select LAYER 3 and assign the Sine Wave sample – now we have even more bottom end to our patch.

Applying The Filter
It’s now time to start sculpting frequencies with the filter. In PROGRAM EDIT press the ENVELOPES button twice to enter the ENV:FILTER screen:
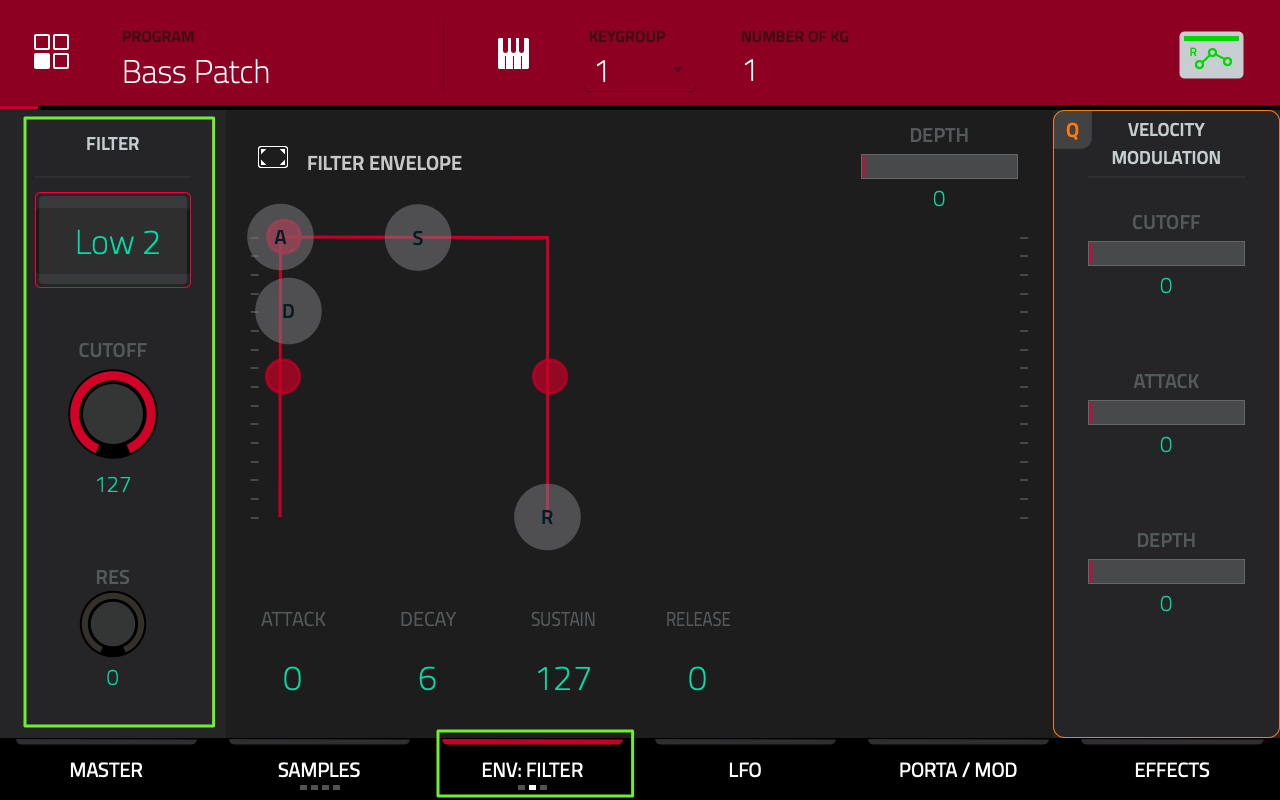
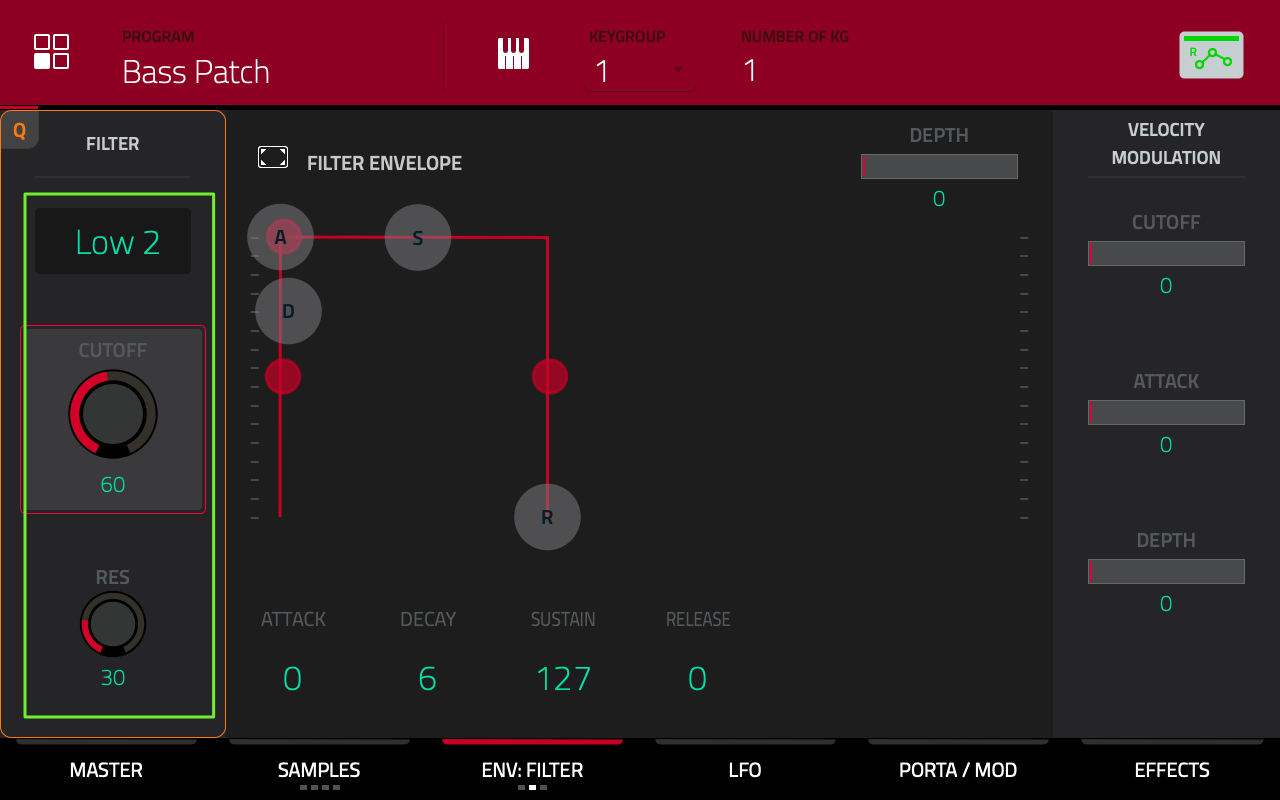
Our basic filter settings are found at the top of the page. The MPC actually has 29 different filters to choose from, but the ‘2 Pole Low Pass Filter’ is a popular one for bass; set the FILTER TYPE to Low 2.
Tap to select the CUTOFF parameter and start to reduce the value from 127 – you can use the data wheel or Q-LINK 14 (the 2nd QLINK from the top of QLINK column 1).
As you reduce the CUTOFF of the low pass filter, the sound becomes darker as more higher frequencies are filtered out. Set the CUTOFF to 60.
Now start to increase the RESO (filter resonance) while previewing a pad. This will amplify the frequencies around the frequency cutoff point, giving the sound a more pronounced, brighter or sometimes harsher tone. Try a RESO of 30 – our overall sound now has a completely different flavour thanks to the filter.
I’ll look at more advanced filtering in a later tutorial.
The Amplitude Envelope
Press ENV:FILTER twice to enter the ENV:AMP screen (or hold down SHIFT and press ENV:FILTER once). This is the ‘amplitude envelope’ (‘AMP ENVELOPE’) which is used to shape the volume of our sound over time. This is done by adjusting four parameters; ATTACK, DECAY, SUSTAIN and RELEASE.
For our simple bass tone we don’t really need to employ any fancy envelope shaping, so I’ll save the full explanation of all envelope parameters for another tutorial. However one part of the envelope I do wish to edit now is the RELEASE.
You might have noticed that whenever you release a pad, the note instantly stops playing, but in doing so produces a small but audible ‘click’. By increasing the RELEASE setting of the amp envelope we will add a gentle ‘fade out’ whenever a note ceases to play. The higher the RELEASE, the longer this fade out.
Initially try a fairly long RELEASE of 80:
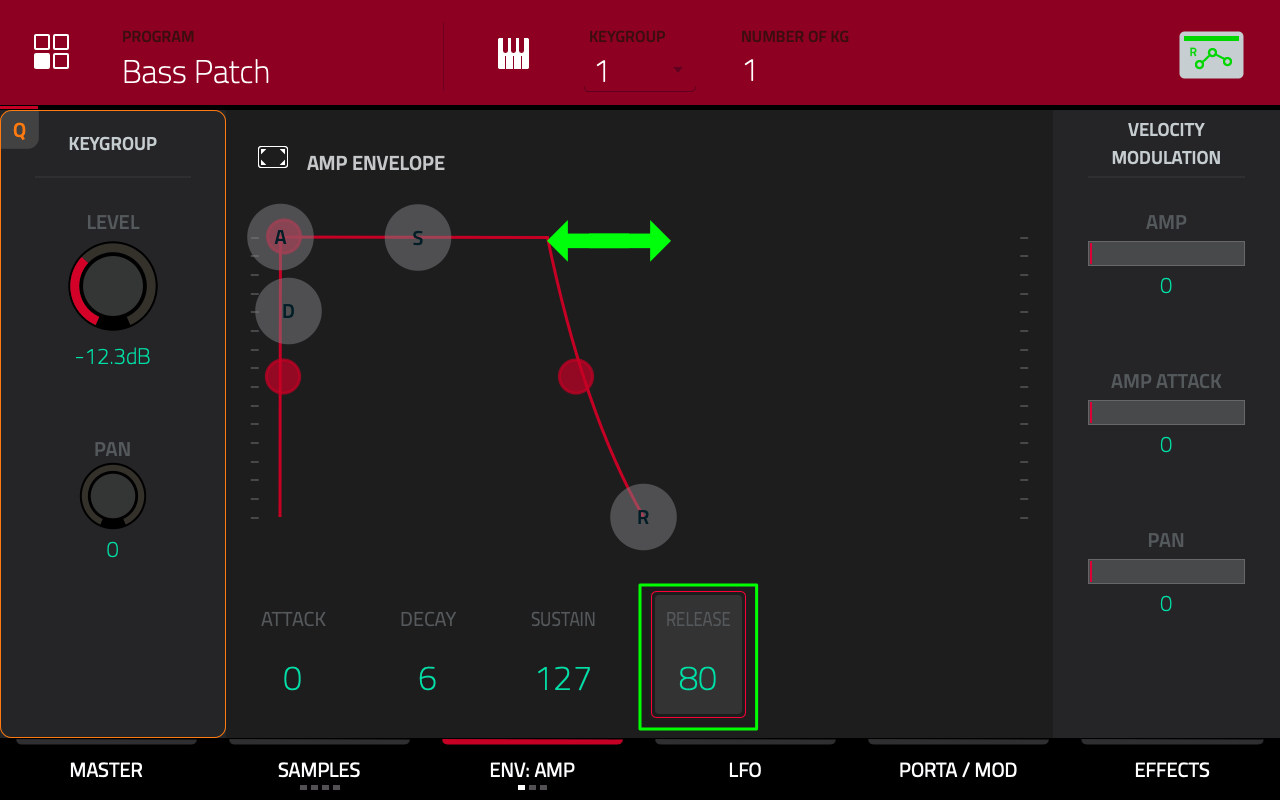
Preview some pads and upon release you’ll hear a distinctive ‘tail’. You can even see a graphical representation of the release tail on the right of the screen. The volume of our sound plays at the level set by the ‘sustain’ (S), but the moment you let go of the pad, the release kicks in and the volume gradually fades down to zero.
Set the RELEASE to 60 – this will give us a shorter, less obvious release tail (with no ‘clicks’).
The LFO
Go to PROGRAM EDIT > LFO; here we can configure the Low Frequency Oscillator (LFO).
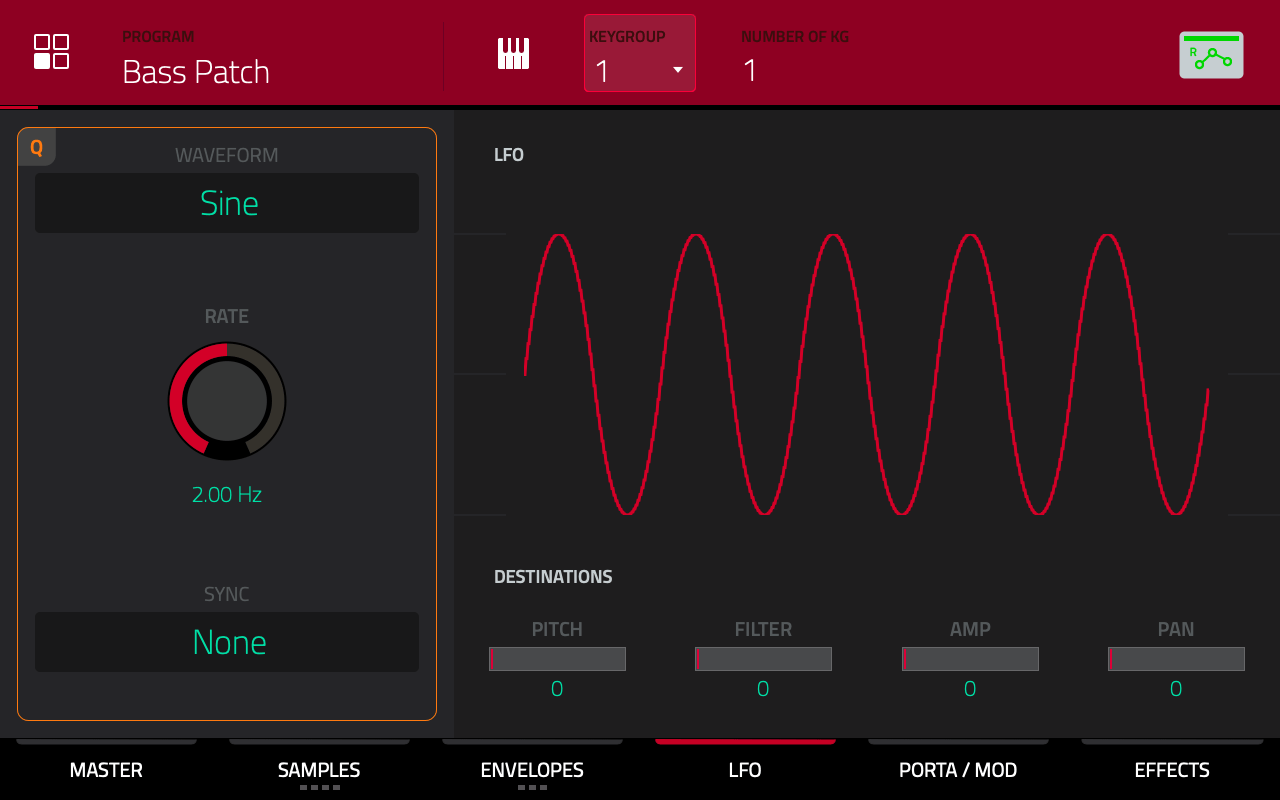
An LFO is a special type of oscillator that runs at a very low frequency (so low that we cannot hear it). Instead of using the LFO to generate a sound, we use it to manipulate (‘modulate’) certain parameters on our existing signal (these are called the LFO ‘destinations’). An LFO can give our sounds additional movement and texture.
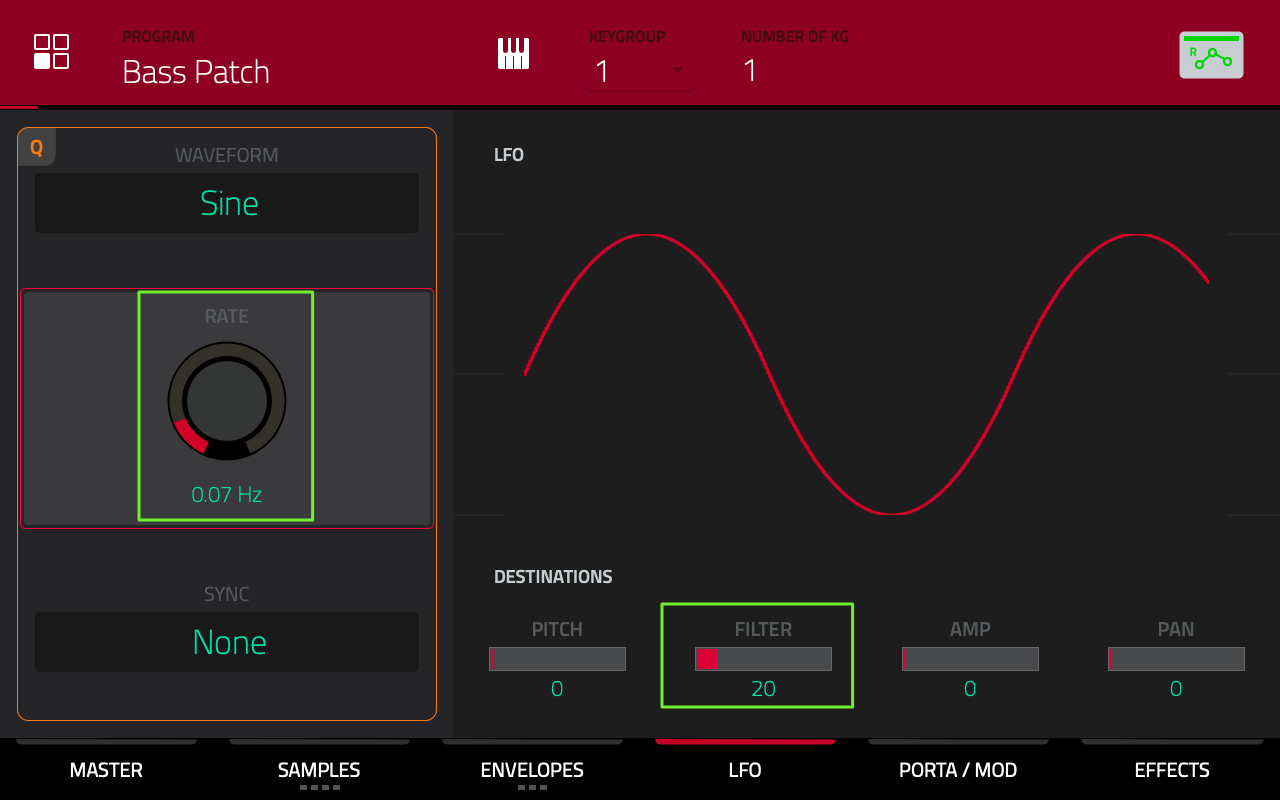
The MPC allows us to modulate four different destinations; PITCH, FILTER, AMP and PAN. Tap on the FILTER parameter – this will control the depth of modulation on the filter that we set up previously; the higher the setting here the more pronounced the depth of the modulation will be. Set a FILTER of 20; now press and hold a pad to hear how the default LFO setting is currently modulating our sound. As you can hear, this has produced a pulsating, wah-wah like effect on our sound. We can change the way the filter is modulated using the three parameters in the ‘LFO’ row.
The WAVEFORM parameter sets the type of oscillator wave used. The default is a Sine wave, which produces a smooth rising and falling modulation – try the other 6 wave types to hear the difference in the way they each modulate the filter; for the moment, leave WAVEFORM set to SINE.
The RATE controls the speed of the modulation. A fast RATE (e.g. 17 Hz) will give a ‘warbling’ effect, but if we set the rate fairly low, we can use it to create a slow, evolving filter sweep (no FX plugins or automation required!). Set a RATE of 0.07 Hz for a subtle, evolving filter modulation. Here’s the final settings:
This is a nice and simple use of the LFO, but there’s a lot more interesting modulations and tricks possible which we can look at in a future tutorial.
Alternatively you can use the SYNC option to synchronise the modulation to the current sequence tempo – once this is set to anything other than ‘None’, it will override the RATE setting. As you’d imagine, the sync option works well when you need a ‘rhythmical’ modulation that locks in with the tempo of your beat.
Velocity Sensitive Parameters
We can add a further dimension to our program by adjusting some of its the VELOCITY SENSITIVITY parameters.
When you play the pads with FULL LEVEL ‘off’ you might have noticed that the dynamic range, i.e. the difference in volume between soft and hard pad hits in your keygroup, is quite large. While this is great when playing delicate acoustic instruments it often doesn’t work too well for synth patches, especially leads and basses in electronic music, which often benefit from a more limited dynamic range to ensure lead and bass lines retain their continuous punch.
We can control the dynamic range of a keygroup program by adjusting the VELOCITY MODULATION > AMP parameter in the last column of the ENV:AMP screen:
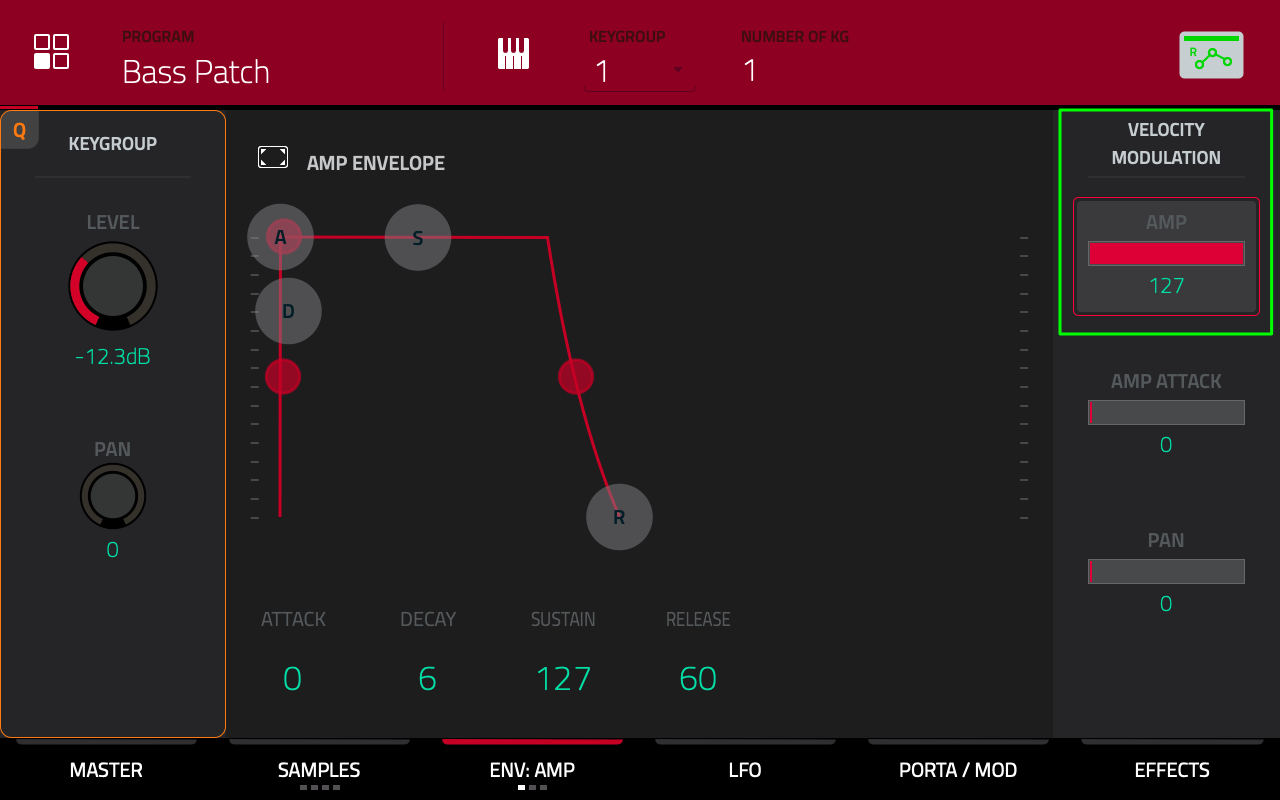
The default setting of AMP: 127 gives us full dynamic range each time we hit a pad. Reducing this will progressively narrow the dynamic range until we reach an AMP of 0 – this completely removes all dynamic range from the program, so no matter how hard you hit the pads the output volume will remain at maximum. For our current example, set AMP to 0.
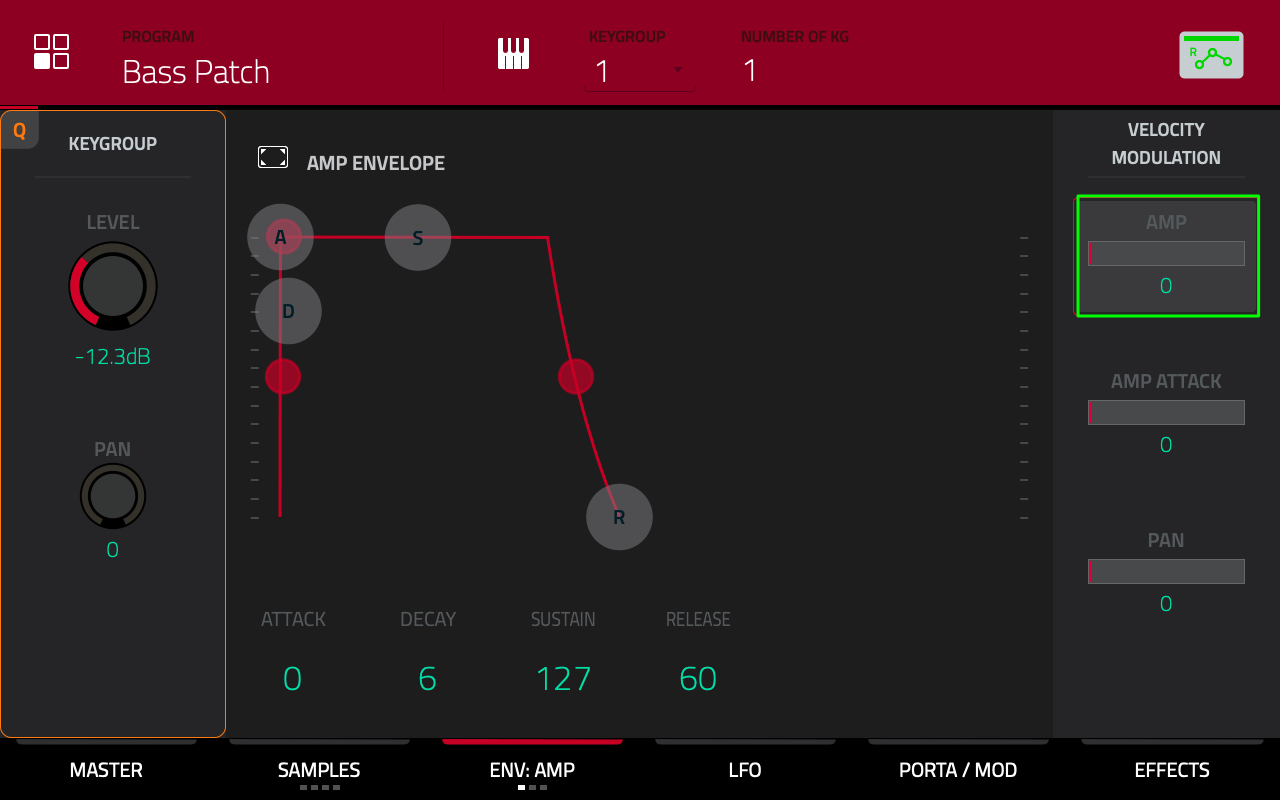
You might be wondering why we even bother with setting V>AMP:0 when we could just use the FULL LEVEL button! However, with full level engaged, the MPC ceases to detect velocity changes (as there are none)
Even though our pads’ volume is now always played at maximum, the MPC continues to detect how hard you hit the pad and therefore, unlike when using FULL LEVEL (where pad velocity is always fixed at maximum), you can continue to take advantage of the MPCs other velocity sensitive modulation options.
A great one is the velocity sensitive filter, which will change the amount of filtering based on how hard we hit the pad. Go to ENV:FILTER. In the final column are the VELOCITY MODULATION parameters. Set CUTOFF to a value of 50.
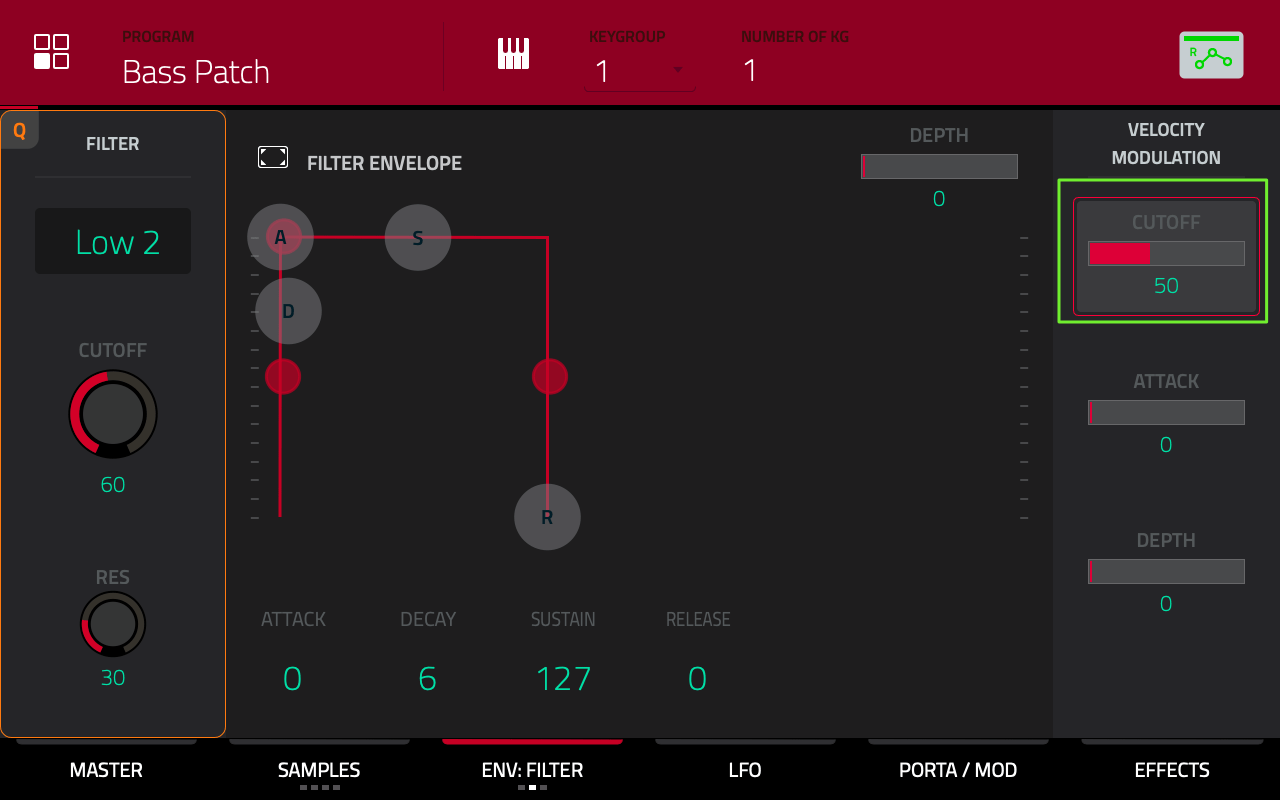
Now make sure FULL LEVEL is OFF. Pick any pad and start to jab at it, start softly and get progressively harder. You should hear that the softer notes are more heavily filtered, while the harder notes sound more open and bright. The higher the VELOCITY MODULATION > CUTOFF value the more pronounced the filtering changes will be (and thanks to our previous ‘VELOCITY MODULATION > AMP:0’ setting, the volume of the pad stays at maximum).
Check out my final version of this bass instrument in the tutorial files folder ‘Completed Instrument‘.
What’s Next?
That’s a pretty mean bass sound we have here. It’s also a fairly complex sounding patch, with its long and ‘evolving’ movement, phasing, filter sweeps and velocity sensitive modulations, and it’s all created with nothing but three tiny little single cycle waveforms that use virtually ZERO system memory – try doing that with Autosampler!
Of course you can continue tweaking your program to produce the exact sound you need, be it changes to the filter settings, new LFOs, different shaped envelopes and different oscillators – and we haven’t even mentioned adding some FX yet!
In future tutorials I’ll look at creating some other types of sounds and will also introduce some other handy sound shaping techniques with the amp and filter envelopes. In the meantime if you’d like to explore the sound design and sequencing capabilities of the MPC in more depth, check out my MPC Bibles which feature fully structured courses containing hundreds of pages of step-by-step tutorials that will guide you on the journey from beginner to advanced MPC power user in no time at all. And if you’d like to see some subtractive synthesis in action, check out my latest MPC expansion bass expansion pack, Sonkal.
3 Responses
Leave a Reply
Latest Posts

"Electric Bass 3 - Now With MPC Sample & MPC3 Support
MPC Bible 3, Revision 6 - MPC Oscillators, MPC 3.9, MPC One G2 + MPC Key 37 G2

Downbeat Kit 3 - Acoustic Drum Kit Expansion For MPC3

MPC Bible 3, Revision 4 - Clip Matrix, MPC 3.7 + MPC XL

Sep 30, 2021 12:57 pm
Thanks for this! Will use this as a custom key group!
Jan 9, 2022 8:07 pm
Thanks for this. A very straight forward tutorial that makes analogue modelling make a lot of sense in a few simple easy-to-understand steps.
Jan 11, 2022 12:43 pm
Thank you for this tutorial! It opens up all kinds of possibilities.