In this tutorial we’re going to look at creating our own MPC expansion packs with the MPC Software. We’ll also look at how we can export these expansions for use in ‘standalone’ MPCs such as the MPC X, MPC One, MPC Key 61 & MPC Live. For more tutorials like this, check out my hands-on tutorial course, the MPC Bible.
What Is an MPC Expansion Pack?
In this tutorial we’re going to look at making an MPC expansion. An expansion can contain samples, kits, instruments, sequences & projects, often based on a particular ‘theme’ and all specifically formatted and optimised for use in an MPC.
Expansion packs used in all MPC environments. In the MPC Software and MPC Beats they are accessible from the ‘expansion browser’ and ‘media browser’ and offer a range of features such as grouping, tagging, program previews, demo sequences, and thumbnail images. You can also view expansion packs in the ‘expansion’ section of the standalone MPC browser (albeit with limited features compared to the MPC Software browser), as well as the newer ‘Sounds’ browser (with even less features!)
We’ll look at all these features as we progress through the tutorial, so let’s get on with making our first ‘sample’ expansion!
Plugin Expansions? Synth Expansions?
This is actually another type of Expansion referred to within the MPC Software; the ‘plugin expansion‘. Examples include ‘Hybrid 3‘, ‘The Bank‘, ‘Wub‘ and the ‘809‘. These are not ‘sample’ expansions, but are more like VST plugins (e.g. synths and ‘romplers’). The MPC Software has the Hybrid expansion pre-installed, but you can also download the other plugin expansions from your Akai/inMusic account. These plugin expansions are currently not compatible with standalone MPCs.
What is a little confusing is that in more recent years Akai have introduced a range of ‘synth plugins‘ (pr ‘plugin instruments’) some of which are pre-installed (e.g. Tubesynth, Drumsynth, Bassline, Electric etc), some of which are free but need a separate download (e.g. Solina, Mellotron, Hype etc) and some which need to be purchased (e.g. Fabric, OPX4 etc). In reality, the original plugin expansions are the same concept as these new synth plugins, i.e. they are all just proprietary plugins built for the MPC that ‘expand’ the core functionality.
However you will still see the original ‘plugin expansions’ like Hybrid 3 listed in the Expansion browser and in the Expansions Manager, so just be aware that these are very different to a sample expansion and not the subject of this tutorial (it’s not possible to create a proprietary MPC plugin expansion…yet!).
Creating Your Own MPC Expansion Packs
You can make your own sample expansions very easily using the separate ‘MPC Expansion builder’ application that is bundled with the MPC Software installer.
On a Mac you’ll find the expansion builder application in Applications > Utilities > MPC Expansion Builder. In Windows, you should find a shortcut in your Start Menu under All Programs > Akai Pro > MPC Expansion Builder. If there’s no shortcut there, you can access it directly in C:\Program Files\Akai Pro\MPC\ExpansionBuilder.exe.
If the MPC Expansion Builder application is not installed, just download the latest MPC Software installer from the Akaipro.com web site and launch the installer. Select ‘ReInstall MPC Software’ and after agreeing to the License terms you should see the following page:
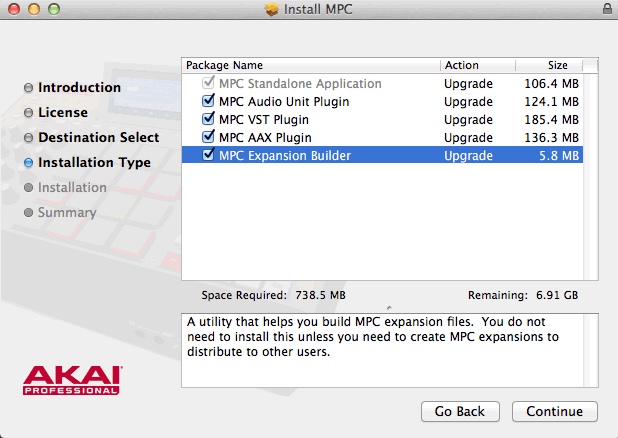
Make sure the MPC Expansion Builder package is checked and continue with the installation. If you are using MPC Beats the expansion builder does not come included, however you can install the MPC Software trial and you’ll find the Expansion Builder is not only installed but also continues to work after your MPC Software trial has ended!
After the installation is complete, launch the Expansion Builder:
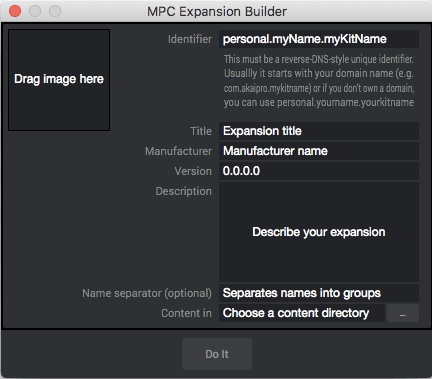
The concept behind building an expansion pack is simple – point the Expansion Builder to a folder containing the samples, programs and sequences you wish to make up the expansion pack (this is the ‘Content Directory’) and the expansion builder takes care of the rest, creating a single ‘Expansion Installer’ file (XPN) from the content it finds inside the folder.
You can see that there are a few other fields to complete so we’ll take a look at these one step at a time. But the most important thing we need is some actual content to convert into an expansion pack!
Download the project files for this tutorial and inside you’ll see two items. First there is a sub folder called ‘MPC Bible Expansion Files’ which contains the sounds and MPC programs that we’ll use to create our expansion pack.
You’ll also see an image file, ‘mpc-bible-expansion.jpg’. This is the image we’ll display in the Expansion Browser to identify this expansion pack. When you create your own pack you’ll need to use your favourite image creation software to make a perfectly square image; it doesn’t have to be a specific size as Akai seem to use various sizes, although the latest expansion packs use images that are 1000 x 1000 pixels in size. I would not bother with any images bigger than this and you will most likely be fine with much smaller sizes. It seems both JPEG and PNG format are accepted.
Optimising Images
Do make sure you optimise the file size of your expansion images as they do use up valuable memory when used in ‘standalone’ mode – for more information, check out my separate ‘Reducing MPC Memory Drain’ tutorial.
Configuring the MPC Expansion Builder
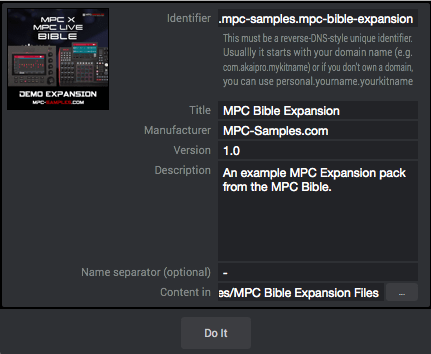
To start making our ‘MPC Bible Expansion’, enter the following details into the builder app:
- Title: MPC Bible Expansion
- Manufacturer: MPC-Samples.com
- Version: 1.0
- Description: An example MPC Expansion pack from the MPC Bible
- Identifier: com.mpc-samples.mpc-bible-expansion
- Name Separator: – (i.e. a ‘hyphen’)
Finally for ‘Content Directory’ navigate to and select the location of the ‘MPC Bible Expansion Files’ folder.
The ‘Version‘ field will tell the MPC Software what version of this expansion is being installed. If you ever update your expansion make sure you increment this version number when building the new version otherwise the MPC Software will refuse to update the expansion until the existing version is uninstalled.
The description field is used during installation to inform the end user what the expansion is all about.
The ‘identifier’ is a unique name used by the MPC Software to identify your pack and its contents on the system and needs to be in a ‘reverse-DNS-style’ format. If you have a domain name, enter it in reverse, e.g. com.mpc-samples; if you don’t have a domain name, just enter personal.yourname. Then enter the name of the expansion, replacing any spaces with full stops. We’ll look at the Name Separator a little later in the tutorial.
Now drag the provided expansion image from your computer’s file system (via Finder or Explorer) directly into where it states ‘Drag Image Here’ in the Expansion Builder.
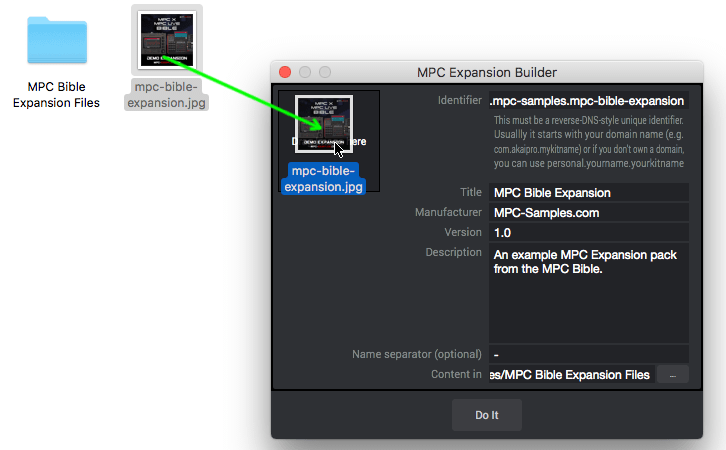
So far, everything should look like this:
Hit Do It and you’ll get the following warning:
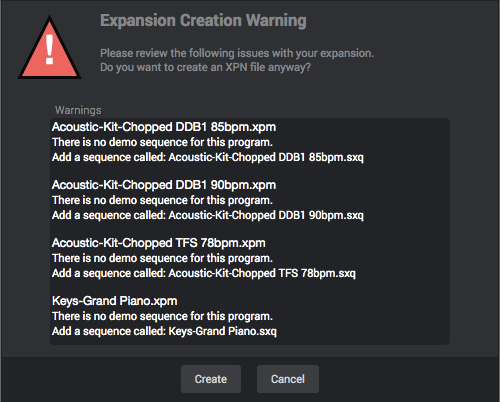
Here the MPC is offering you the opportunity to add a demo sequence for each program in your expansion pack. This is entirely optional so you can omit this step if you wish – however as we’ll soon see, I have already created some demo sequences for three of the kits in our expansion pack, so I’ll explain how to do this correctly later in this tutorial.
Hit Create and you’ll be asked to give the file a name and select a location to save your XPN ‘installer’ file to. Name the XPN file something like ‘MPC Bible Expansion Installer’ and choose any location on your computer (it doesn’t matter where you save this).
Hit Save and after a few seconds your XPN file will be created and placed in the selected location.
Installing an Expansion Pack From an XPN File
To install the expansion into the MPC Software, simply drag the XPN file directly into the MPC Software GUI – it shouldn’t matter where in the GUI you drag it, but I usually just drop it into the grid.
Bug Alert: Double Clicking XPN Files
It’s important to note that you cannot install an XPN file by ‘double clicking’ the file from Finder/Explorer, as you’ll get a ‘Cannot Load Project’ warning (this is a bug in the MPC Software).
After dragging the XPN into the grid, you should see the following:

Hit Import to install the expansion. At this point the Expansion will appear in your Expansion Browser
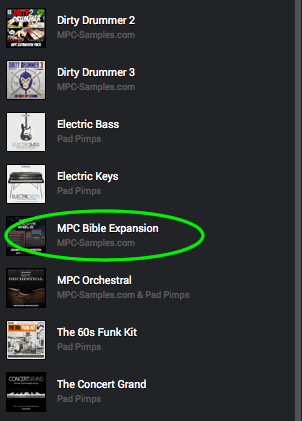
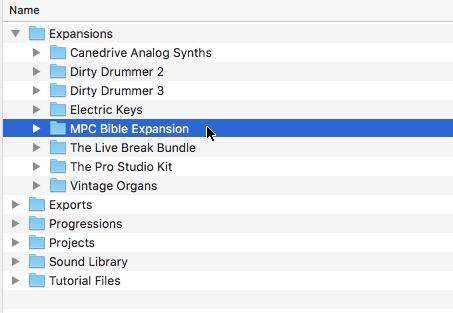
Click on the MPC Bible Expansion entry to see the contents:
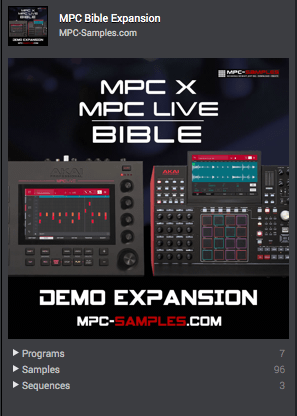
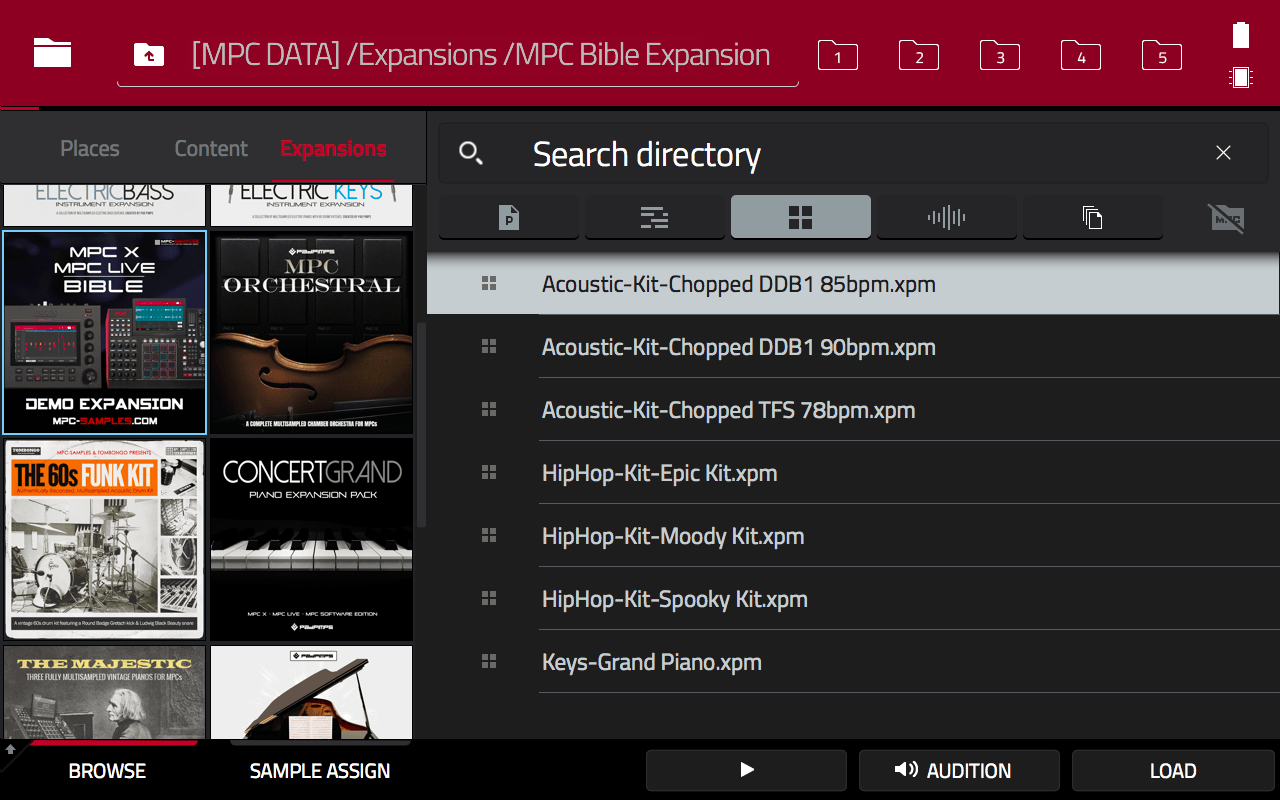
As you can see, the expansion contains three categories; Programs, Samples and Sequences. Click on the triangle to the left of the ‘Programs’ category to expand:
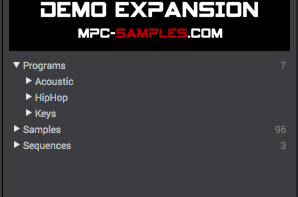
You’ll see there are three further sub categories – click on ‘Acoustic’ to show the three acoustic kits in this expansion.
We’ll take a look at the various features of the expansion browser later in the tutorial.
Creating Program Previews
When you click on a program in some expansions you’ll hear an audio preview of that program; this is referred to as a ‘Program Preview‘ and is a feature available in both software and hardware UI browsers. Select the MPC Bible Expansion in the expansion browser. If you don’t have auto audition enabled, click on the speaker icon at the bottom of the Browser:
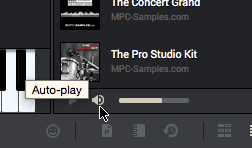
Now click on any of the programs in this expansion, either in the ‘HipHop’ group or in the ‘Acoustic’ group and you should now hear an audio demo play.
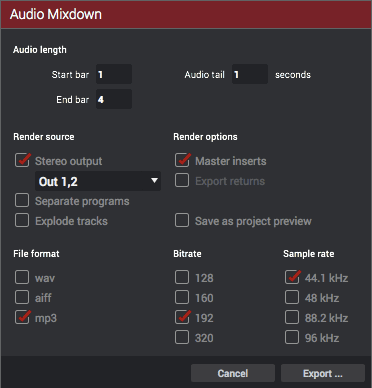
To create a program preview you’ll first need to create a sequence that uses the sounds from a particular program – luckily we already have those three demo sequences I made previously, so I just used those to create the audio previews. With your demo sequence loaded and active, go to File > Export > Audio Mixdown and render your sequence into a stereo master (mp3, 192 bitrate will be fine, but you can use wav files if you prefer):
To use this mp3 file as a program preview, it’s important that you give the audio file a name that exactly matches the full file name of the original program; so not only the ‘name’ of the program, but also the ‘.xpm’ file extension.
So for the Moody Kit demo:
- the program ‘name’ is HipHop-Kit-Moody Kit
- the program’s ‘full file name’ is HipHop-Kit-Moody Kit.xpm
- hence the ‘mp3’ program preview must be called HipHop-Kit-Moody Kit.xpm.mp3
If you create a WAV file, then append ‘.wav’ instead: HipHop-Kit-Moody Kit.xpm.wav
Do be aware that since MPC 2.1, programs pulled from a project ‘ProjectData’ folder have the term ‘.keygroup‘ appended to the program ‘name’, giving a ‘full file name’ of e.g. ‘abc.keygroup.xpm’ (drum programs will have .drum’ appended). However the rule is still the same; simply add ‘.mp3’ to the full file name; abc.keygroup.xpm.mp3.
Please note: if you save your program ‘individually’ (right click ‘save program in the MPC Software, or File > Save current program) then .keygroup is not appended to the file name.
All your ‘program preview’ audio files must go into a special sub folder in the ‘content’ directory that you use to create your expansion pack. Navigate inside the MPC Bible Expansion Files folder. Here I had already created a sub folder called [Previews]:
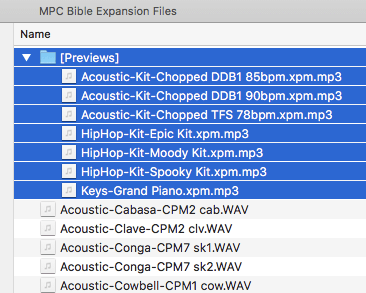
Here you’ll see the program previews I created for all the programs in the expansion; for the chopped break programs I just converted the actual original breaks themselves into mp3 format. When the Expansion Builder app installed the expansion pack it uses this ‘[Previews]’ folder to set up the program previews throughout the pack. Program previews are however entirely optional – if you omit a preview, clicking on the program in the expansion browser will simply play nothing.
Audio Previews For Other File Types
The ‘Previews’ folder method also works for other file types such as sequence files (.SQX), project files (.XPJ), MIDI patterns (.mpcpattern) and even plugin preset files (.XPL). The same rules apply, simply name the audio file to exactly match the name of the file you are previewing and then add ‘.mp3’ (or .WAV etc) on the end. So for a MIDI pattern file called ‘My Drum Pattern.mpcpattern‘ the corresponding preview file would be called ‘My Drum Pattern.mpcpattern.mp3‘.
Using Name Separators (MPC Software)
When setting up the expansion pack we entered a ‘name separator’ (in the shape of a hyphen). This name separator serves two purposes in the MPC Software; firstly it is used to provide ‘tags’ in the Media Browser, and secondly it allows us to ‘group’ sounds and programs into categories within the Expansion Browser.
In the hardware browser there is no tagging or group support, however as tagging is incorporated into the file name of the program or sample it can be used for search filtering.
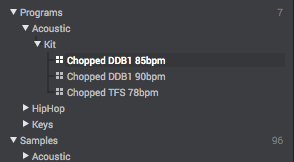
Expand the ‘Programs’ group to reveal three ‘sub’ groups; Acoustic, HipHop and Keys. Expand the HipHop group to reveal the three hip hop ‘kits’:

Load the Spooky Kit by double clicking it or by dragging it into your project. Now take a look at it in the Project Panel:

Notice how its name is not just ‘Spooky Kit’? It’s actually called ‘HipHopKit-Spooky Kit’.
If you set a name separator when creating your expansion pack, the MPC Software will look at the text before each instance of that name separator and will create a group from this. The structure is as follows:
<primary group name><separator><secondary group name><separator><kit name>
So with our hyphen (-) acting as a separator, the MPC sees ‘HipHop’ as the primary group name for this file and ‘Kit’ as the secondary group – these are then displayed as categories/groups within the Expansion Browser.
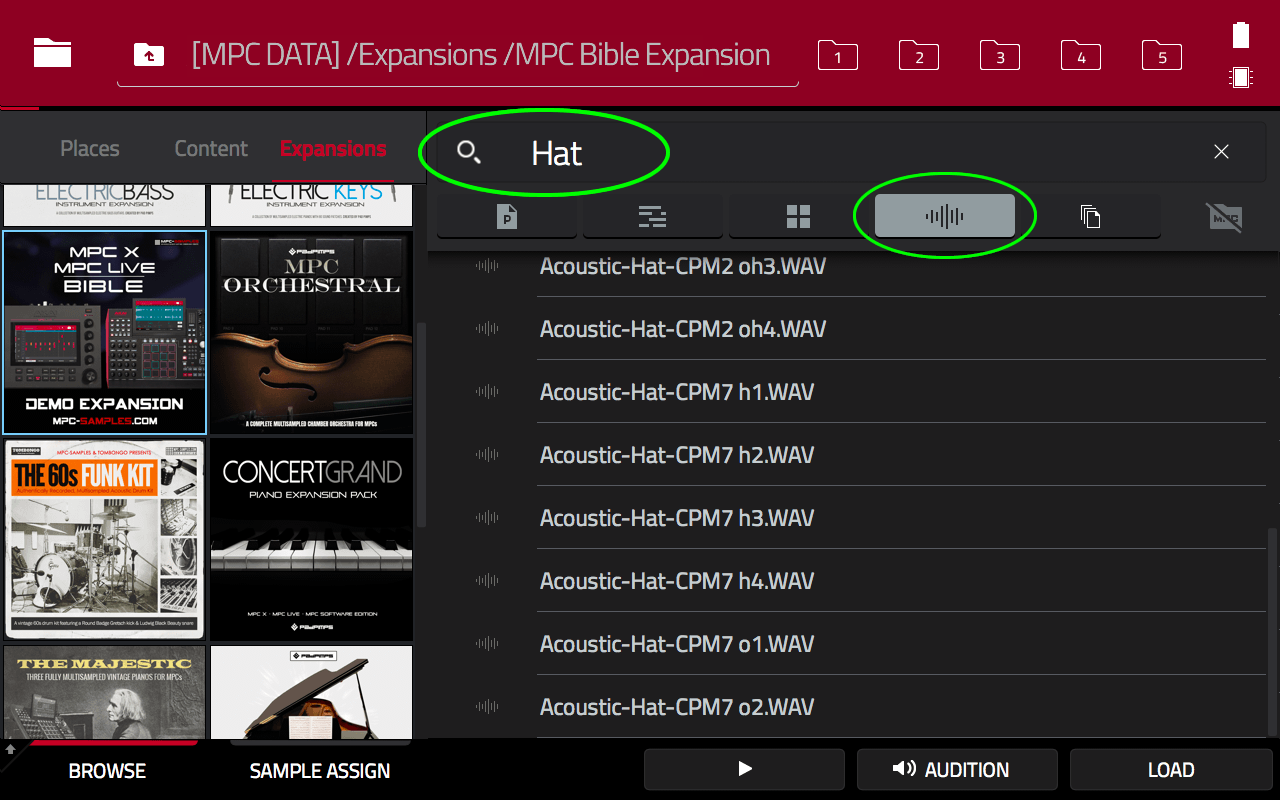
It’s the same for the ‘Samples’ category – expand ‘Samples > Acoustic > Hat’:
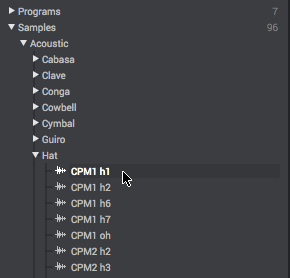
Now load the CPM1 h1 sample and view it in the Project panel:
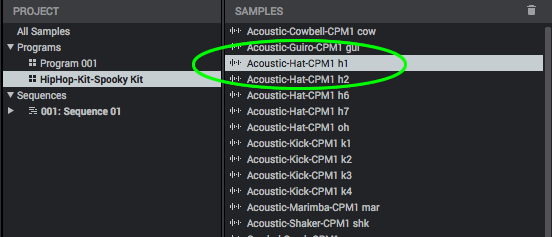
This hat sample is actually called Acoustic-Hat-CPM1 h1, but is displayed in the Expansion Browser as CPM1 h1 within the groups ‘Acoustic’ and ‘Hat’, thus placing them all within the snare group.
You can place a file in as many groups as you wish, just use a hyphen to separate them all. Now, while you can use any group names you wish it’s important to understand that these groups actually have a dual purpose as they are also used as ‘tags’ in the Media Browser.
Using Tags in the Media Browser
Hit B on your computer keyboard to open up the Media Browser.
The Media Browser provides an interface to search for specific sounds or programs within your entire Expansion pack library – basically if the Expansion is installed on your system, be it an Akai or a third party expansion, it’s sounds, programs and sequences will be included in Media Library search.
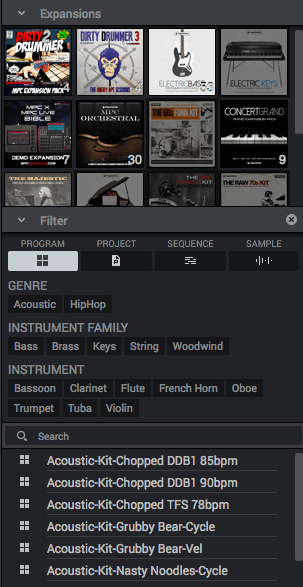
A search box allows you to search for a specific phrase or keyword, but the ‘Filter’ section allows you to filter your Expansion collection by specific tags.
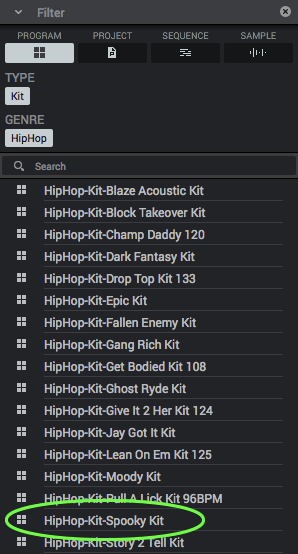
For example, make sure the ‘PROGRAM’ filter is selected, and then select TYPE: Kit and GENRE: HipHop and you’ll see a filtered list of all ‘Hip Hop kits’ in your Expansion library (or at leat, all the ones that have been tagged as HipHop kits) – here you’ll see Spooky Kit, Epic Kit and Moody Kit from the MPC Bible Expansion.
So you can see how the Expansion file ‘groups’ we set up are also being utilised as ‘tags’. The tagging system employed by Akai actually requires you use very specific tag names, although currently there is no official list of accepted tags from Akai so the only way to know which ones to use is to examine the tags used in the official Akai expansions. For example, here’s the ‘Program’ tags generated from expansions such as The Vault 2 and Essential Instruments:

And here’s the ‘Samples’ tags:
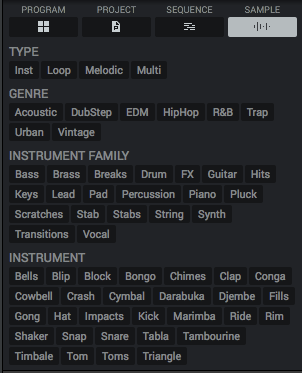
So most common instrument types have a tag but genre tagging seems fairly limited. There may be other tags you can use but I’ve not found any yet.
To be clear, you are of course free to use any tags in your naming structure, but only a specific set of tags can appear as selectable options in the ‘Filter’ section of the Media Browser. For example the file Acoustic-Guiro-CPM1 gui is an acoustic ‘guiro’ sample in the MPC Bible Expansion, but as you can see, the tag Guiro does not appear in the recognised tag list, while other percussion instruments do (e.g. Timbale, Shaker etc). You can however still manually search for the term ‘Guiro’ using the search box.
Using tags is of course entirely optional, it’s a lot of work to have to rename all your files just to get them ‘tagged’ so I suspect most people simply won’t bother. Hopefully in the future Akai will introduce a tagging system like Maschine, in which tags can be batch applied to multiple files simultaneously.
Demo Sequences
Demo sequences are ready-made sequences that showcase a particular program. Head back to the Expansion Browser (X) and go to the ‘Sequences’ category; expand the groups to reveal the Epic Kit sequence:
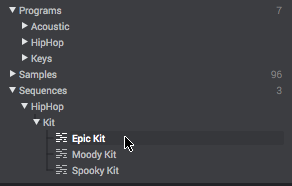
Double click (or drag and drop) this sequence to load it into your project. As the sequence loads you’ll see that the MPC also simultaneously loads the Epic Kit program.
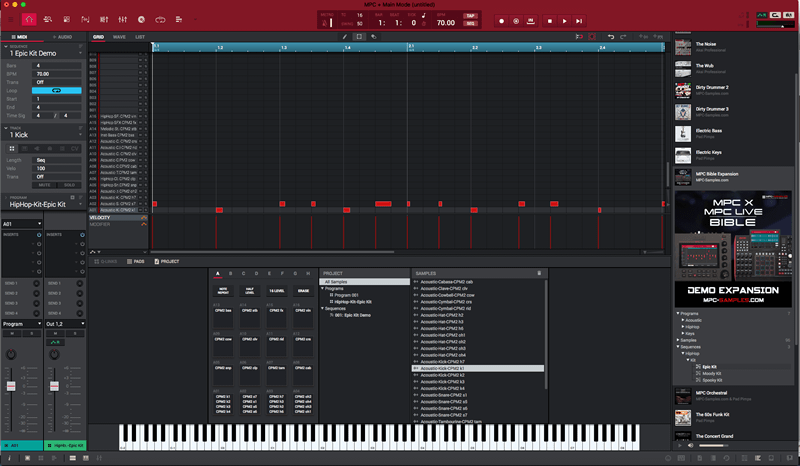
You can hit PLAY START to immediately to hear the demo.
Creating a demo sequence is very simple. Start off with a blank sequence and load up the program you wish to create a demo with. Now, simply get sequencing and write a short demo with the kit – there’s no limit on the length of the sequence, it can be 1 bar or 1000 bars, it’s up to you. Once you’ve finished it go to File > Save Current Sequence and give the sequence the exact same name as the program it is demoing.
So, the Epic Kit program is called HipHop-Kit-Epic Kit.xpm; its demo sequence must therefore be called HipHop-Kit-Epic Kit.sxq. Save the demo sequence to your expansion pack ‘content’ folder. When the Expansion Builder creates the expansion XPN it will see there is a demo sequence for this kit and it will associate them together accordingly.
If you navigate to the original content directory we created the XPN from you can see my demo sequences were already there:

Remember the ‘nag’ screen we had when creating the XPN file? We got this because the Expansion Builder noticed there were no demo sequences for our chopped break programs – that’s fine, demo sequences are optional and the MPC will create the expansion pack regardless.
You can of course include other sequences in your expansion pack – basically any other sequence file included in your ‘content directly’ will also appear under the ‘Sequences’ category, but unless they are exactly named after a particular program, the MPC will just treat these like any normal sequence, so will load it purely as a sequence (it will not load any associated programs simultaneously).
The Touchscreen ‘Expansion’ Browser
The expansion browser in the ‘touchscreen’ UI for all the standalone MPCs has more limited Expansion pack support, but it will recognise installed Expansion packs and organise them by thumbnail image (although browsing functionality is no different to the standard file browser, for example, there’s no file grouping).
In ‘Controller‘ mode, the Expansions listed in the browser are the ones already installed in your computer. In ‘standalone‘ mode you’ll see the pre-installed factory expansions plus any third party expansions you have installed directly on any attached MPC disk (I’ll show you how to do this in the next section)
To view the Expansions from the hardware UI, go to BROWSE and click on the ‘Expansions‘ tab on the left side of the screen:
Click on the Expansion you wish to view on the contents will appear on the right side of the screen. At this point the browsing experience is identical to browsing folders, so you’ll need to use the ‘file type filters’ and keyword search for further filtering. The ‘tags’ we set up previously can be used here to assist with searching. For example in the following screenshot I have selected the ‘Samples‘ file filter and a search filter for ‘Hat‘:
What about the Sounds Browser?
Installing Third Party Expansions in Standalone Mode
The pre-installed expansions in ‘standalone mode’ are stored in a folder called ‘Expansions‘ on your internal factory drive (‘INTERNAL’). Access to this internal drive is restricted so we cannot copy additional expansions to this location; instead we have to install additional expansions to ‘attached’ disks.
Whenever you attach a disk to your MPC, be it a USB drive, SD card or internal SATA disk, the MPC immediately looks for a folder in the root location called ‘Expansions‘. If it finds any expansions inside this folder it will display these expansions alongside your factory expansions in the MPC browser ‘expansions’ tab.
Exporting Expansions Via The MPC Software
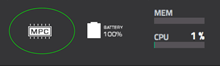
These easiest way to set up your expansions on an attached disk is to first install the expansion into the MPC Software. First connect your MPC disk to your computer; you could do this via controller mode (a requirement if transferring to an internal SATA disk) or you can attach a removable disk directly to your computer. To enter controller mode from your hardware, go to MENU and press the MPC ‘chip’ icon:
Now select CONTROLLER MODE. You should now see the MPC drive appear in your computer as a removable drive.
Then in the MPC Software go to ‘File > Export > Expansion‘.
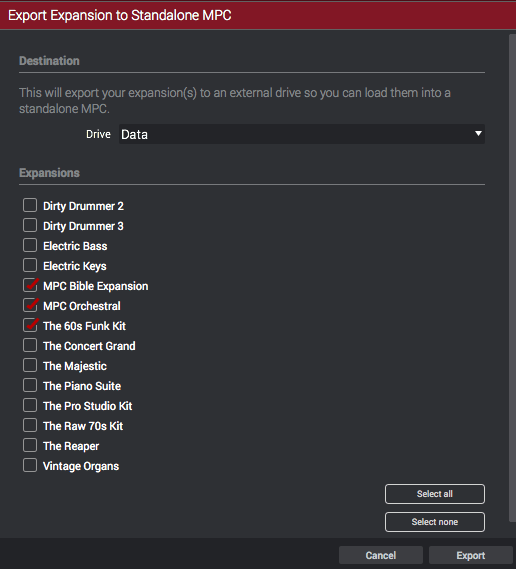
Select your MPC disk as the ‘Drive‘ in the ‘Destination’ section and then check all the expansions you wish to export to standalone mode. Hit Export.
After export your MPC disk will now contain a folder called ‘Expansions‘ and inside there will be a folder for each expansion you exported – these folders contain all the expansion content files:
The next time you are in standalone mode, these expansions will appear in the browser – but only if your MPC disk is attached.
Installing Dedicated ‘Standalone Expansions’
Inside all my own commercial expansions I provide two distinct installers; an XPN as described above, and a pre-built ‘standalone’ expansion folder that can be copied directly to your standalone MPC/Force disk without the need for exporting from the MPC Software. In these cases, simply connect your MPC/Force to your computer via USB and enter controller mode (computer mode in a Force). Once your MPC’s SD Card/USB drive/SATA disk appears on your computer as a removable disk you can copy the standalone expansion folder inside the ‘Expansions‘ folder on that disk (if an ‘Expansions’ folder doesn’t exist, simply create it first). Check out my separate article on MPC-Samples.com: ‘Installing Standalone Expansions‘.
Alternative Export Method: XPN Archive Extraction
If you have an XPN and prefer not to use the MPC Software you can also easily create a ‘standalone’ version of the expansion directly from the original XPN installer itself. An XPN file is just a standard compressed archive – it’s basically a ‘.zip’ file with a different file extension and can be opened with most standard ‘zip’ applications. For example on a Mac I can simply drag the XPN file directly into ‘Archive Utility‘ (or right click and select ‘Open With’) and it will immediately extract the contents of the XPN installer to a folder. You can perform a similar procedure using the archive utilities built into Windows. If you have any problems opening the XPN file, try renaming the file extension from ‘.xpn’ to ‘.zip’.
After extraction, simply rename the extracted folder to match your Expansion name. Now go to your MPC Disk and if it doesn’t already exist in the root location of the disk, create a folder called ‘Expansions’ and drag and drop your expansion folder inside it. That’s it!
Creating Standalone Expansions Without the Expansion Builder
You can also create your own standalone expansions for the MPC and Force without the expansion builder as it’s ultimately just a folder containing a bunch of MPC samples, kits, an image file and a small text file. Check out my tutorial ‘Creating Expansions For The Akai Force‘ which is suitable for the Akai Force and all standalone MPCs.
Uninstalling/Removing Expansions
To remove an expansion from the standalone browser, go to the Places tab on the left side of the BROWSER screen and select your MPC disk. Enter the Expansions folder and single tap on the folder relating to the expansion you wish to remove. Hold down SHIFT and select DELETE FILE > DELETE. Alternatively simply delete that expansion’s folder from your computer’s file manager the next time you are in controller mode.
In the MPC Software you can manage the installed expansion packs by going to Tools > Expansion Manager:
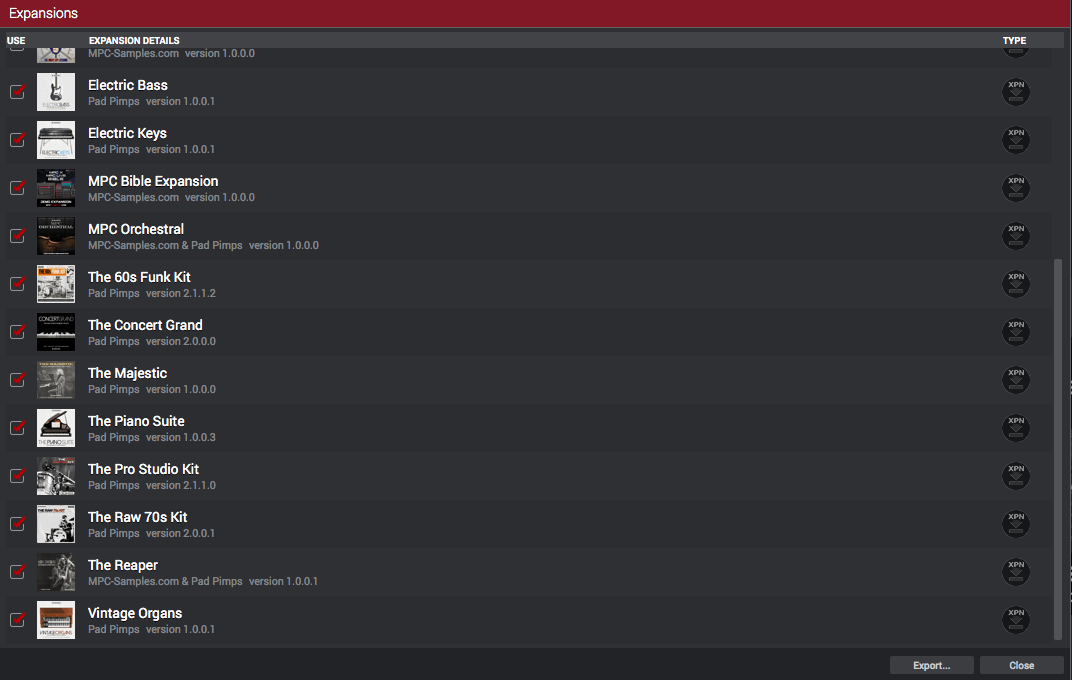
If you wish to temporarily remove any expansion, just uncheck its red check box – this leaves the expansion on your hard drive but makes it no longer visible from the expansion browser. If you wish to uninstall an expansion pack, click on its entry and an ‘uninstall’ button will appear – however, this option is only available for third party ‘XPN’ installed packs.
Official Akai packs cannot currently be uninstalled using the expansion manager. If you wish to completely uninstall an Akai expansion pack you’ll need to manually delete the pack from in the following locations on your hard drive:
Mac: Library > Application Support > Akai > MPC PC: C:\Program Files\Akai Pro\MPC\
Once inside you’ll need to look at two different folders; ‘Expansions’ contains the pack image and the pack configuration file (XML), while ‘Content’ contains the actual sound content folders for each pack. To remove an official Akai pack you need to delete its specific ‘content’ folder and you need to delete it’s XML file in the ‘Expansions’ folder.
Further Resources
If you need help using your MPC to create your own sounds, kits and beats, check out my MPC Bible courses, a collection of hands-on tutorials for all the latest standalone MPCs, including the MPC X, MPC One, MPC Live and MPC Key 61.
And don’t forget to check out my huge range of MPC Expansions, including acoustic instruments, multisampled acoustic drum kits, and classic analog synth expansions.
51 Responses
Leave a Reply


Jun 4, 2016 8:15 am
WOW ! Really, really useful and helpful. Thanks so much Tutor
Jun 12, 2016 9:14 pm
There is no other place on the internet to find this full information on MPC Expansions but MPC-Tutor.com. This was exactly what i was looking for and I;ve finally found it after month’s of searching. Thanks very much!
Jul 19, 2016 7:32 pm
Is there a way to create Expansion Packs for iMPC Pro?
Thanks
Jul 20, 2016 1:27 pm
Not as far as I’m aware.
Aug 27, 2016 6:01 pm
Hey, i got problem. I have windows 64bit newest update but my bank and 809 gone away i have only some hybrid 3 but all my past project are lost because of this, please help.
Sep 9, 2016 9:47 pm
Completely uninstall using the provided uninstaller in program files > akai pro, reboot and reinstall.
Oct 28, 2016 8:50 am
The demo sequence doesn’t work here, named exactly the same as the program, everything else works but not the demo sequence, any ideas ?
Oct 30, 2016 4:47 pm
Are you referring to the demo sequences in the included expansion pack, or your own demo sequences?
Jan 28, 2017 6:46 pm
Very informative article. My question is why someone doesn’t post this same thing specifically for PC users. I see nothing on the net explaining how to create expansions on PC. Must be secret
Jan 28, 2017 11:57 pm
The article does give you the location of the Windows version of the Expansion Builder, so all the instructions work for PC or Mac.
Mar 5, 2017 3:31 pm
I know. My point was this article provides the details we PC users need. No where else on the internet (no where) shows how this is done. Go figure!
Mar 11, 2018 9:00 pm
Can I see my own expansions with the cover on my mpc live’s display?
‘…in the browser..next to “clip launch”.”thevault 2.0″.”essential instruments.”??
Or not possible?
May 1, 2018 8:30 pm
Hey! You’re the MPC guru, man! I’m about to pull the trigger on an MPC Live and I think it’s only major downside is that it lacks vst in standalone mode. Are these user created expansions able to work on the Live in standalone mode? It’s extremely exciting if it does.
Nov 4, 2018 5:01 pm
Is there a way to remove expansions in MPC 1.9 on a Mac? I went to ” Library > Application Support > Akai > MPC”, but I found no expansions.
Nov 4, 2018 9:13 pm
Only official Akai expansions are in that path. To remove third party expansions, go to the equivalent folder in your user home folder, i.e.
Your Username > Library > Application Support > Akai > MPC
Nov 4, 2018 10:18 pm
Thank you very much.
Nov 27, 2018 8:52 am
Cool! But the part that explains the preview of the kits is poorly explained
Nov 27, 2018 9:00 am
Hi, what problem are you having with creating program previews? Happy to update the tutorial if anything is unclear, let me know where you feel it could ve more clearly explained.
Dec 14, 2018 3:21 pm
Anyone else having issues creating an xpn on mac and the expansion then not working on windows?
Dec 22, 2018 9:41 am
No, XPNs should be cross-platform.
Dec 31, 2018 6:50 pm
I’m running Mpc 2.3 on a surface pro with limited storage….is it possible to move the expansions to a external hard drive?
Feb 27, 2019 10:04 am
If you can set up ‘symbolic links’ on a surface pro (or the windows equivalent), then yes, you should be able to.
Feb 4, 2019 5:39 am
If I buy an expansion pack from akaipro.com how do I upload it. And can I save it on a flash drive and still use it. In the akai studio program. 1.9
Feb 27, 2019 10:03 am
As per the article, Akai expansions are located at:
Mac: Library > Application Support > Akai > MPC
PC: C:\Program Files\Akai Pro\MPC\
Feb 27, 2019 7:13 am
This has a lot of great information. However, it was just incomplete enough to cause some frustrations when trying to make keygroups and program previews for them. Let everyone else know that if you want to make a keygroup program, you have to save it as: program name.Keygroup.xpm, and then save the mp3 preview with the same extension:exact name: program name.Keygroup.xpm. Don’t actually write “.mp3” as part of the name because then the live will not recognize the file. All the mp3s should be in a separate folder as you indicated [Previews]. Hope this helps someone.
Feb 27, 2019 10:00 am
Hi. The information described in the article is definitely correct, the key point is that the preview file must exactly match the program file name, plus the .mp3/.wav file extension. i.e. for a program called ‘xxx.xpm’ the preview is ‘xxx.xpm.mp3’, for a program called ‘xxx.keygroup.xpm’ the preview should be ”xxx.keygroup.xpm.mp3′.
Regarding programs with ‘.keygroup’ in the file name:
Since MPC 2.1 whenever you save an entire project, the programs inside the [ProjectData] folder have the program type appended to the file name, e.g. ‘.keygroup’, ‘.drum’ etc. So if you pull a program file from a project folder, the program name will be of the format ‘name.keygroup.xpm’. However the key point still applies; the preview file still needs to match the program file name, e.g. xxx.keygroup.xpm.mp3.
But, when you save a program ‘individually’ (e.g. right click in the project panel and ‘save program’, or in the hardware ‘MAIN > save current program’), the word ‘.keygroup’ (or ‘.drum’) is omitted from the file name. So for the preview file here you again just add .mp3 (or .wav) to that file name. There is absolutely no need to save a program file with ‘.keygroup’ manually added, it makes no difference.
Regarding omitting ‘.mp3’:
I am not sure why you are recommending omitting .mp3; if the file is an mp3, then keep the mp3 file extension, the MPC Live has no problem recognising a program preview with an .mp3 file extension. I suspect the mp3 extension is still there on yours, but your computer is set to hide file extensions from view. If that was the case, you are effectively manually adding a second ‘.mp3’ to the file name, giving you ‘xxx.xpm.mp3.mp3’ which no longer matches the original program name.
All my commercially released expansions follow the rules described in the article and there are no problems and they work well in MPC Software 1.9 or greater, including standalone MPC Live/X and Force.
To summarize, the program preview must exactly match the program file name + the mp3/wav file extension, there is no requirement to add ‘.keygroup’ or ‘.drum’ to the original file name.
Apr 3, 2019 1:16 am
Thanks, sorry I’m a dope.
Aug 31, 2019 5:43 am
How can i create a preview for a XPJ project. Tim Kelley has a preview on a project on his expansion. Couldn’t find the trick
Nov 30, 2019 3:54 pm
MPC Newbie but I get lost pretty early open in this article. When following the tutorial for building expansion packs I get to the part where we’re adding the xpn file to the software. It looks to load as I see the image. However I do not get a window which shows programs and samples with the drop down triangle. I’ve been looking for an hour now and I just don’t see it at all.
Besides adding the image to the expansion builder, how would my xpn file even contain that information for it to be recognized in the MPC Software? Thanks any help would be great.
Ash!
Nov 30, 2019 4:15 pm
NVW I see what I did wrong. When adding the content folder I was pointing to where we wanted the content to go, not where the content we just downloaded was.
Nov 30, 2020 9:22 am
My cursor turns into a big “Circle with Line Through It” or “NO!” whenever I try to drag an xpn file into the GUI. tried restarting, no dice. Help?
Nov 30, 2020 9:43 am
Make sure the XPN has been fully extracted from any zip file. By default, Windows does not actually ‘extract’ files from a zip, it just opens up a ‘virtual’ folder within the zip file. This is fine for loading things like PDFs but an XPN needs to have been physically extracted to a location on your computer before installing into the MPC. So, right click the zip and select ‘Extract’ and extract the xpn to your desktop; drag it into the MPC from there. More here: https://www.mpc-samples.com/article/install-mpc-software-expansions-guide
Dec 4, 2020 2:05 pm
It extracts to a folder which also cannot be drug into MPC 2.9. Same circle with line through it. But this is actually a different expansion, I got the last one to work eventually, but I have no idea what it was I did different last time… Sigh
Dec 4, 2020 2:10 pm
Extract everything to a folder on your desktop, go inside the folder, drag the XPN into the MPC Software. This should work, works for me every time, tested on Macs and all versions of Windows, with every XPN I’ve ever tried. The only time I have been able to get this ‘circle with a line through’ problem is on Windows when the XPN hadn’t been extracted from the zip file. The only other reason I can think is if the software you are using to extract the XPN is somehow corrupting it. Please post up all the details of what you are using – computer OS version, MPC Software version, which app you are using to extract the zip file (including version number). I will set up the same environment and test.
Dec 4, 2020 2:18 pm
Figured it out, had to turn MPC off. Go figure.
Dec 4, 2020 2:20 pm
Do you mean a re-launch of the MPC Software fixed it?
Dec 4, 2020 6:57 pm
Okay its broke again. Okay so the pack is an xpn. There should be, by the instructions, no extraction necessary.
Dec 14, 2020 10:19 pm
Hi the recording in the sampler does not record any more any info on how to fix I tried everything .
Dec 26, 2020 10:44 am
Thanks for this article, very helpful !
Jan 5, 2021 12:27 am
Hey MPC, how do I delete a beat or file I don’t want anymore?
Feb 12, 2021 10:44 am
This helps me somewhat, thank you. But I’m trying to create an expansion by using the auto sampler on an external hardware synthesizer. So I sample using autosampler and then save as program. I can then make that an expansion, but it’s just one keygroup patch. How do I create an expansion that has a bunch of different patches/sound banks etc?
Nov 26, 2022 4:25 pm
Is there any official reference information for expansion packs or did you reverse engineer this knowledge? It would be great to have a link to the source, thanks!
Nov 28, 2022 4:35 pm
No reference, just worked it out
Nov 28, 2022 4:29 pm
Hi Group. I’m having an issue when I extract the expansion file then import it into the Force. It does read all of the samples in the expansion but will not load the demo xpj. It says “This file type is not supported”. Does anyone know how to fix this by either editing the source code or saving the expansion to the software MPC beats before exporting??? I would really like to run these demos for the expansions. Any help would greatly be appreciated! -Greg
Nov 28, 2022 4:38 pm
MPC projects (XPJ) are not compatible with the Force, there’s no conversion available, they use completely different project structures (one sequence based, the other clip based). If you are making expansions compatible with both the Force and MPC you’ll need to stick to XPM files, samples and MPC patterns.
Feb 12, 2023 12:48 am
Your hard work is MUCH appreciated. It feels so great to have my own expansion to make things much more organized. I had no trouble following this article.
Sep 19, 2023 4:05 am
Hey there,
I followed this precisely (even doing the demo with your samples) but I keep getting “expansion error, expansion invalid” error.
I see conflicting info regarding a size limit issue. Some say there is a ~2gb size limit, but some say there is no limit.
My pack is 17gbs large. I have manually installed it into my MPC Live 2 and it works perfectly (pre XPN creation, and it behaves just like any other expansion on the MPC).
Any help would be greatly appreciated.
Sep 19, 2023 8:10 am
Check my response here:
https://www.mpc-forums.com/viewtopic.php?f=48&t=188162&p=1870299#p1870299
Nov 1, 2023 3:13 pm
Hi, I am new to the MPC so please don’t shoot the messenger.
I recently found your tutorial on the build editor and it is extremely well done. But while following this after the 2.12.2 update I have found the Media Browser – PROGRAM – TYPE: Kit – GENRE: HipHop is not showing the Spooky Kit, Epic Kit and Moody Kit from the MPC Bible Expansion.
Even with the path set as above and typing the name of one of the kits they do not show. You can find them with out using any tags and just typing the name Spooky into the search filter which will then show the kit.
I am not sure why this is, maybe they changed something in the categorisation of the media browser.
Nov 11, 2023 10:44 pm
I keep creating Expansion Packs per the instructions, but once everything is loaded onto my MPC, the only files I have are samples and not Programs and Sequences. Why does my Expansion Builder “not” create Program Files and Sequences. From the Samples, I have to individually load on to each pad, whereas with the program or sequence, I can just drop on the pads all at once. Thanks!
Jan 30, 2024 12:07 am
Andy, great work as always! Your expansions are top quality and I’m recommending your Bible to others almost once a day. Thanks!