I recently released a new electric piano expansion, Electric Keys 2.0 which is the first MPC expansion to feature 8 velocity layer keygroup instruments (I have now also released Piano Suite 2.0, with 8 velocity acoustic pianos). This has led to a lot of enquires as to how this is possible, given that the MPC keygroups only have 4 velocity layers!
So in this tutorial we’re going to create a simple 8-layer keygroup instrument to show exactly how this technique is achieved. I’m going to assume you have a basic understanding of MPC keygroup programs – if you don’t check out my MPC Subtractive Synthesis and Autosampler tutorials for some more background, or check out chapters 11 and 22 of the MPC Bible for a complete step-by-step breakdown.
This tutorial will work with with any MPC running in standalone mode, but the concepts are transferrable to the MPC Software, MPC Beats and even the Akai Force.
What Are Velocity Layers?
In an MPC keygroup program each keygroup contains 4 ‘layers’ and each of these layers can hold a single sample. By default these layers will play together simultaneously to create a rich layered sound. However another option is to configure these layers to employ ‘velocity switching‘; here, each layer is assigned to a particular ‘velocity range’ and can only be triggered whenever a note is struck at a velocity that falls within this velocity range.
This is great for emulating the changes in tone and timbre that occur when acoustic instruments are played at different velocities, playing dedicated ‘soft’ samples at low velocities and ‘hard’ samples at higher velocities. Another use of velocity switching is to recreate velocity sensitive filters found in some synth patches, where for example, notes become brighter the harder you play them. In both examples the more velocity layers we have, the more detailed and realistic our emulation will be as the audible ‘transition’ between the layers will be less obvious. 4 layers is good, but 8 is better!
In this tutorial we’ll learn how to more beyond the standard 4 layers to build an 8-layer analog lead instrument with a very accurate recreation of its original ‘velocity sensitive’ filtered sound.
Creating a Basic Keygroup Program
Download the tutorial files, unzip them and transfer to your MPC disk (check out my article transferring files to your MPC if you need help).
Create a blank new project (MENU > NEW PROJECT), and head over to the BROWSER. Navigate to the tutorial folder and inside you’ll see the sub-folder ‘8 Layer Multisamples’. This contains the multisamples we’ll be using in this tutorial.

In an MPC, hold down SHIFT and hit LOAD ALL to load all samples into your project. You can check that these have been successfully load by going to MAIN > top ‘folder’ icon to reveal the PROJECT window – make sure ‘All Samples’ is selected on the left:

All the multisamples have been recorded in the key of ‘C3′, but at eight progressive velocities (the velocity is at the end of the file name, where 015 is the lowest/softest velocity and 127 is the hardest).
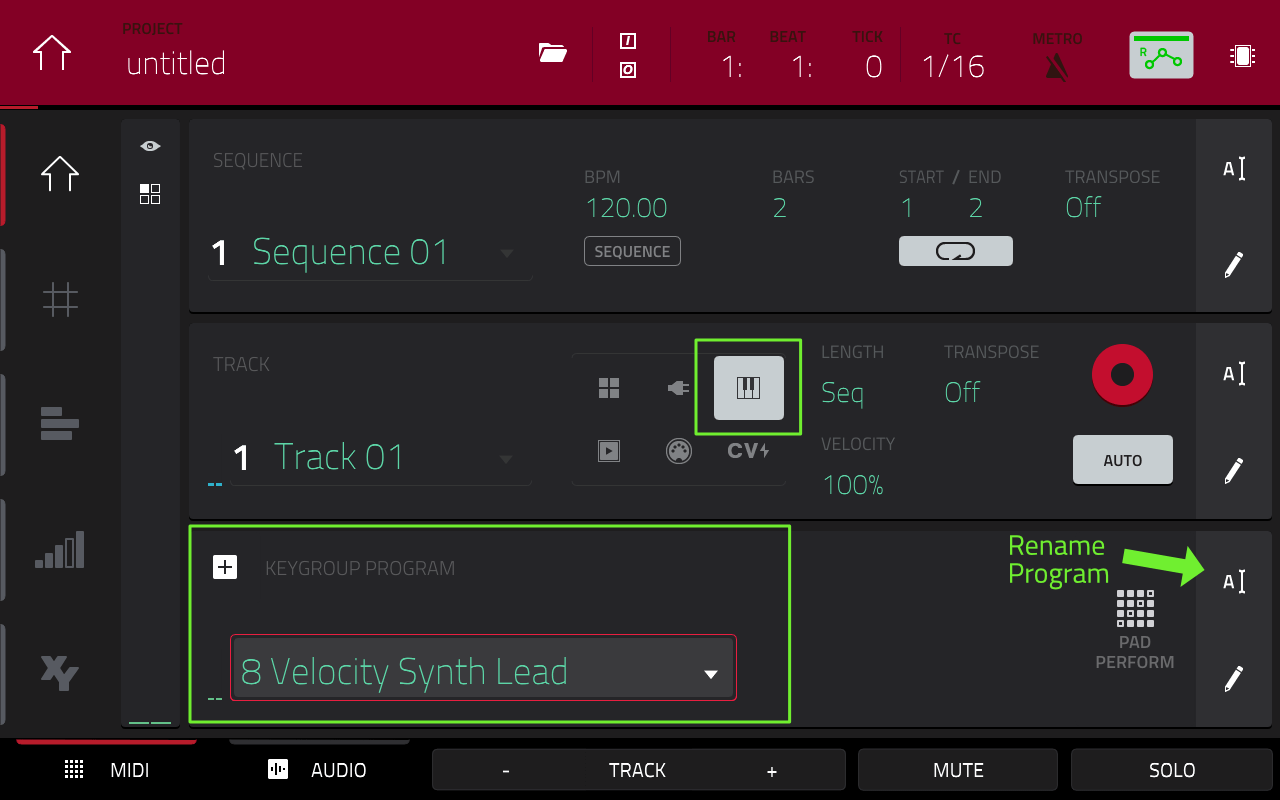
Go to MAIN and press the KEYGROUP icon to create a KEYGROUP type track. This will simultaneously create a new blank keygroup program called Program 002. Hit the ‘A’ icon at the end of the program row to rename this to 8 Velocity Synth Lead:
Setting Up in the Force
The procedure is slightly different on a Force as there is no ‘LOAD ALL’ functionality. I’d recommend you first create a blank keygroup track by clicking the + button at the top of the touchscreen matrix. This will bring up the ADD TRACK window (or locate an unused track and press and hold its track select button) – select ‘Keygroup‘:

Then press the LOAD button to enter the BROWSER, select the Places tab and navigate inside the tutorial’s ‘Multisamples‘ folder. Single tap the first sample in the list and press LOAD. Now press the NEXT button several times to automatically load each sample in the list. As a keygroup track is currently selected, all these samples are simply loaded directly into the ‘pool’ (if an audio track was selected they would be loaded as clips into the audio track). To view the Project pool in the Force, go to MENU > PROJECT.
Go to PROGRAM EDIT > MASTER (in the Force, ‘PROGRAM EDIT is called ‘TRACK EDIT’ and has the same functionality):

Take a look at the top row. A new blank keygroup program contains a single ‘keygroup’ as indicated by the NUMBER OF KG parameter (‘1‘). This default keygroup has a ‘NOTE RANGE’ indicated by the LO KEY and HI KEY parameters (highlighted above), so the ‘note range’ of this default keygroup is C-2 to G8, which represents the complete 128 MIDI note range (i.e. pad A01 to pad H16).
This means any samples assigned to this keygroup will be chromatically tuned across all 128 MPC pads and can be played as a pitched musical instrument.
The next step is to assign some samples to the layers of this keygroup. Tap on the SAMPLES button three times to enter the ‘SAMPLES 3′ screen:
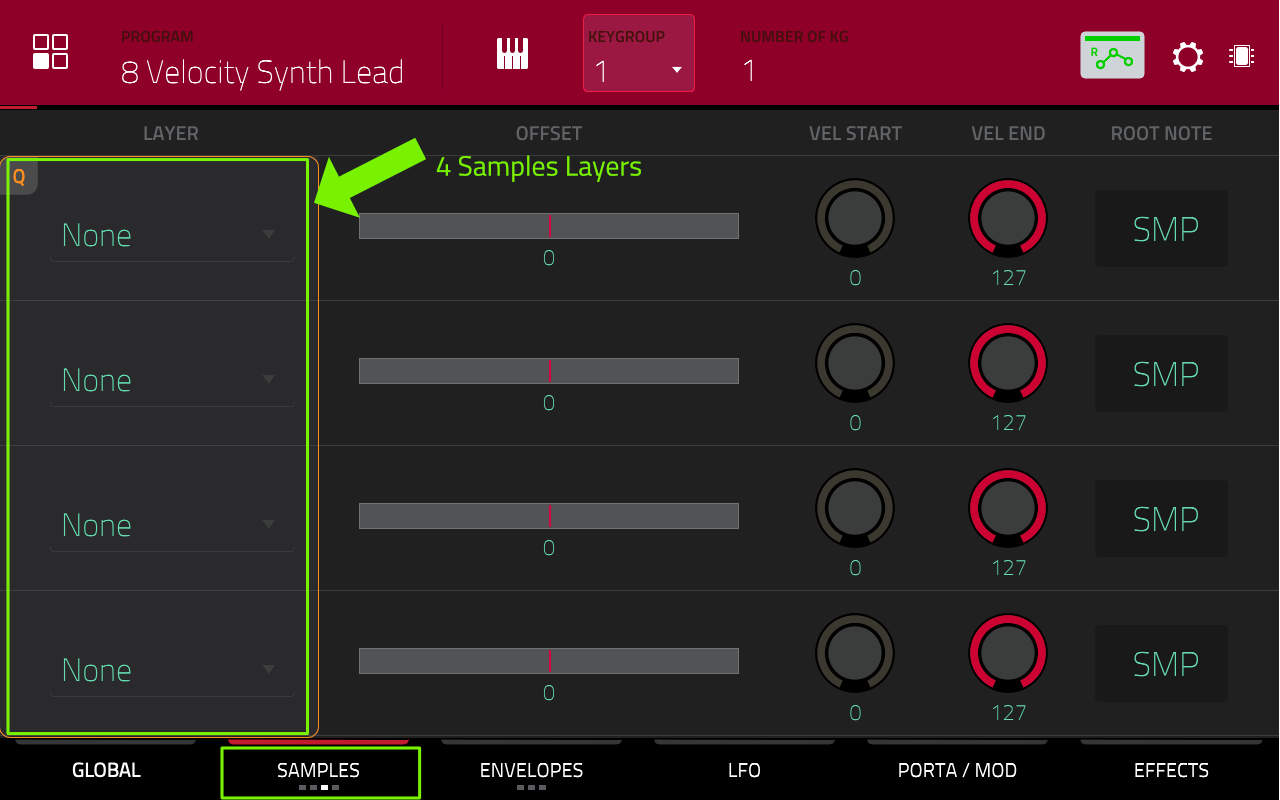
The first column in this screen shows the four unique sample layers for this particular keygroup. Single tap on the top layer and use the data wheel to choose the ‘hardest’ velocity sample, Synth Lead C3 127:

At this point this sample will now be automatically tuned across the entire pad range, so if you hit some pads you’ll hear a very basic pitched keygroup instrument. If ‘pad perform‘ (‘Notes’ in the Force) is currently enabled, you can just hit some pads in bank A, otherwise try playing in bank C (as bank A is going to be really low rumbles). It doesn’t sound that great yet, but don’t worry, it’s going to sound pretty nice once we’ve finished.
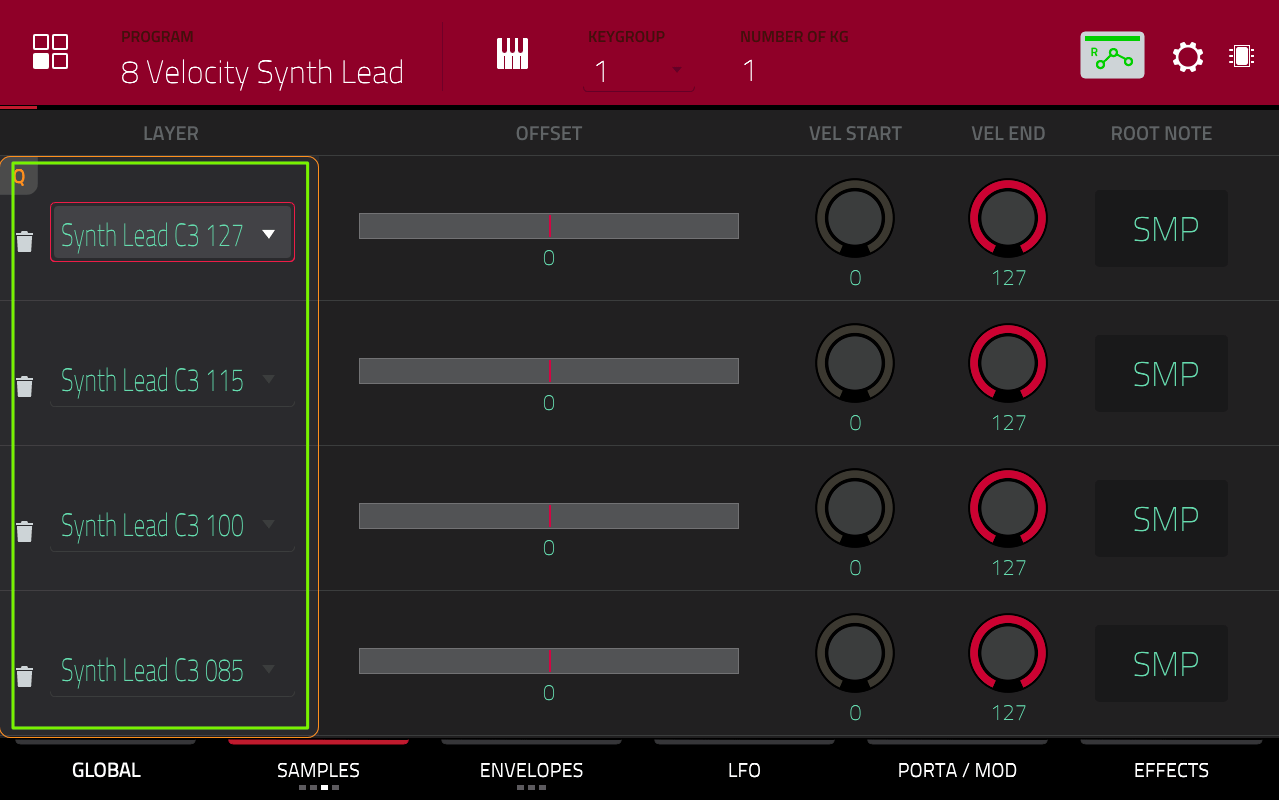
Now repeat this process for layers 2, 3 and 4, assigning the samples Synth Lead C3 115, Synth Lead C3 100 and Synth Lead C3 085 respectively:
As I mentioned earlier in the tutorial, the default action when using multiple layers is for all four layers to play simultaneously, creating a multi-layered sound. To configure these layers for ‘velocity switching’ we’ll need to configure a velocity range for each layer. This is set using the VEL START and VEL END parameters in columns 3 and 4 of the current screen.
Configure the velocity ranges for layers 1, 2, 3 and 4 as follows:
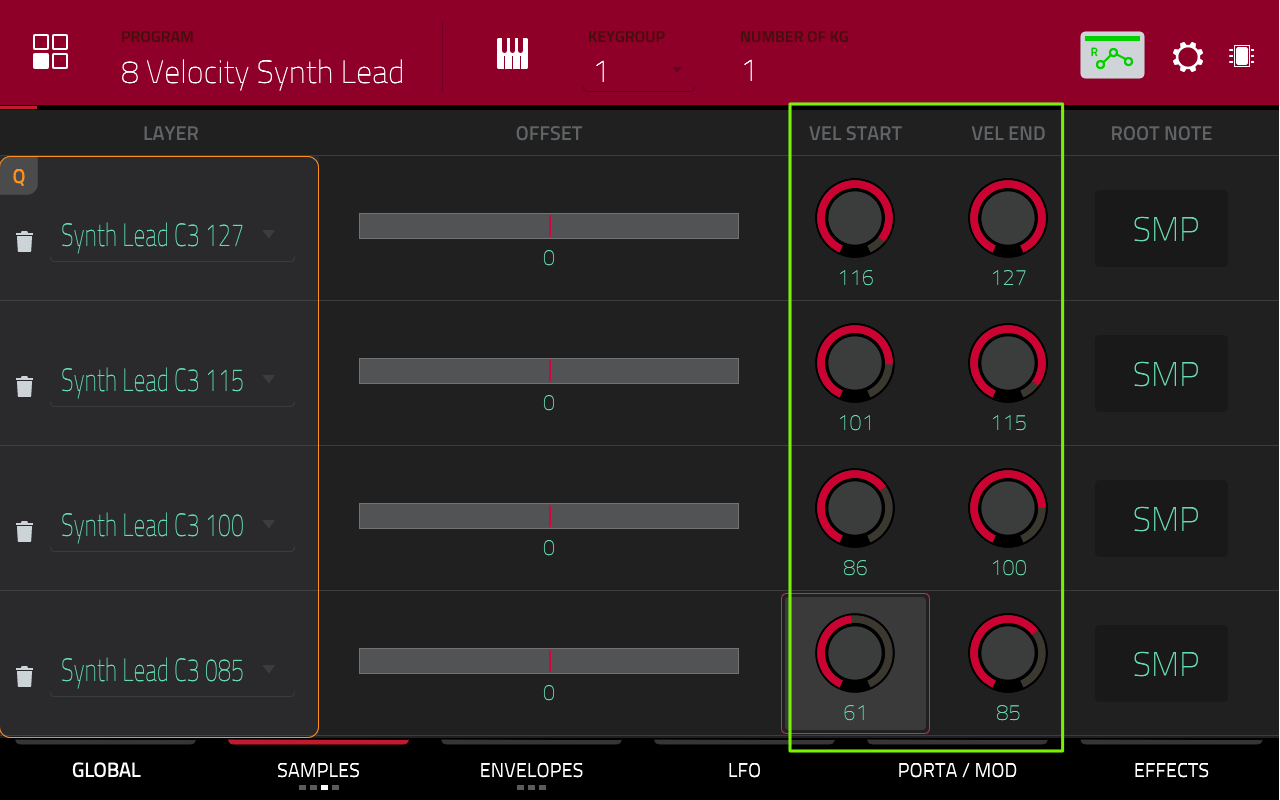
Now if you strike the pads at velocities between 61 and 127, only one of the four layers will be triggered (remember to turn off the FULL LEVEL button!). For example, hit a pad with a velocity of 110, and the layer 2 sample will be triggered, as this serves velocity range 101 to 115.
As we currently do not have any sample layers assigned to the velocity range of 0 to 60, any pad hit under a velocity of 61 will not play anything. So…on to the magic!
What about ROOT NOTE?
The ROOT NOTE column is our opportunity to tell the MPC the actual musical pitch of the samples we have assigned to the four layers. This way when the MPC ‘tunes’ the samples across the pads, it will ensure that each pad is assigned the correct musical note (pitch). The default ROOT NOTE setting here is SMP (‘sample’). This tells the MPC to check the sample itself to see if it has any ‘root note’ meta data baked into the sample. You can view and edit the sample’s root note in SAMPLE EDIT > TRIM:As you can see, our samples have root notes of C3 (which is actually the default ‘assumed’ root note for any sample unless you tell the MPC otherwise). Alternatively (or additionally) you can set the root note directly on the layer here in program edit (which will always override the sample edit root note).
Adding a Second Keygroup
To recap; our current keygroup, which we know covers the entire pad note range of ‘C-2 to G8’ contains four sample layers. These are configured to only trigger when pads are hit within the velocity range of 61-127.
The solution to serving those velocities below 61 is to simply create a second keygroup covering the exact same note range (C-2 to G8), but this time the four sample layers will be split over the velocity range 0-60.
Creating a second keygroup is easy. At the top of any screen in PROGRAM EDIT, single tap the NUMBER OF KG parameter and set it to ‘2‘:
![]()
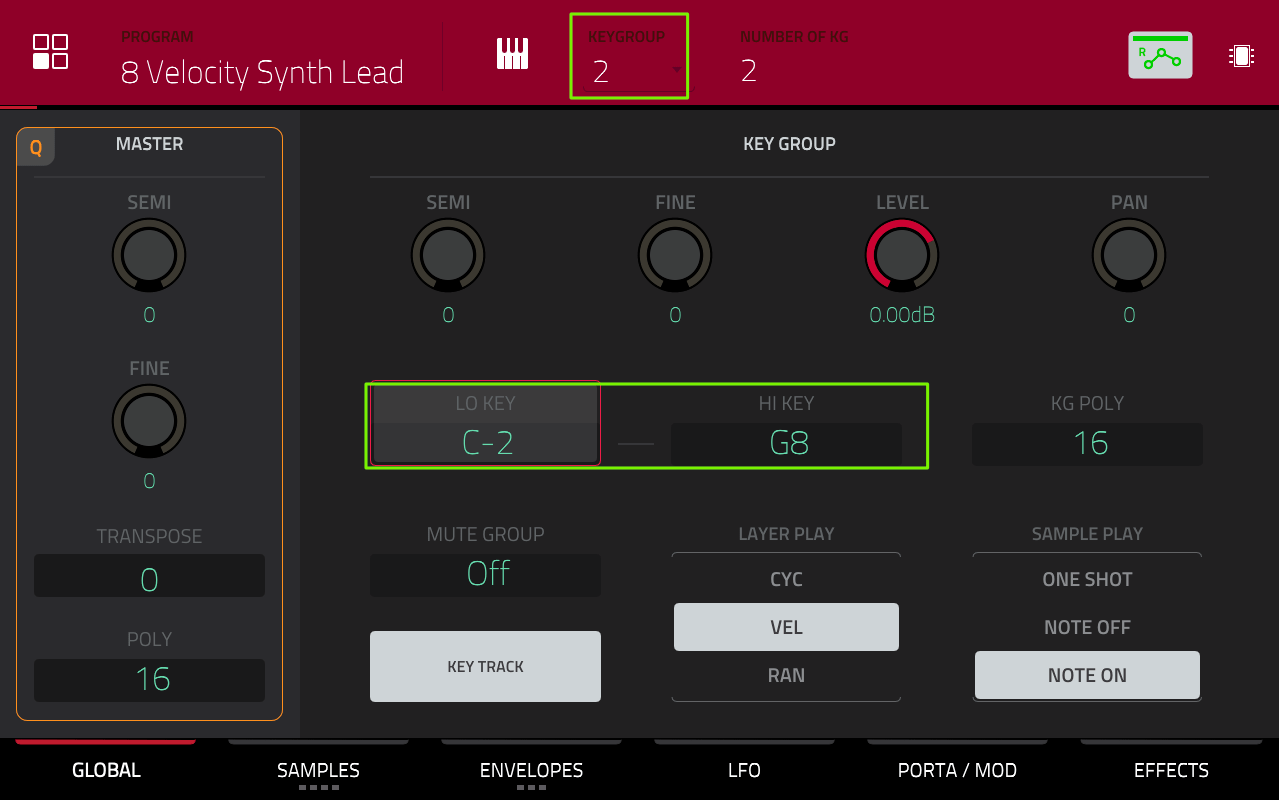
To select the new ‘keygroup 2’, tap on the KEYGROUP parameter and change it from 1 to 2:
![]()
With the second keygroup selected, go to PROGRAM EDIT > GLOBAL and you’ll see that this second keygroup has the same default NOTE RANGE as keygroup 1 (C-2 to G8), so no changes needed here:
Now go back to the SAMPLES 3 screen and on layers 1 to 4, assign the four remaining samples as follows:
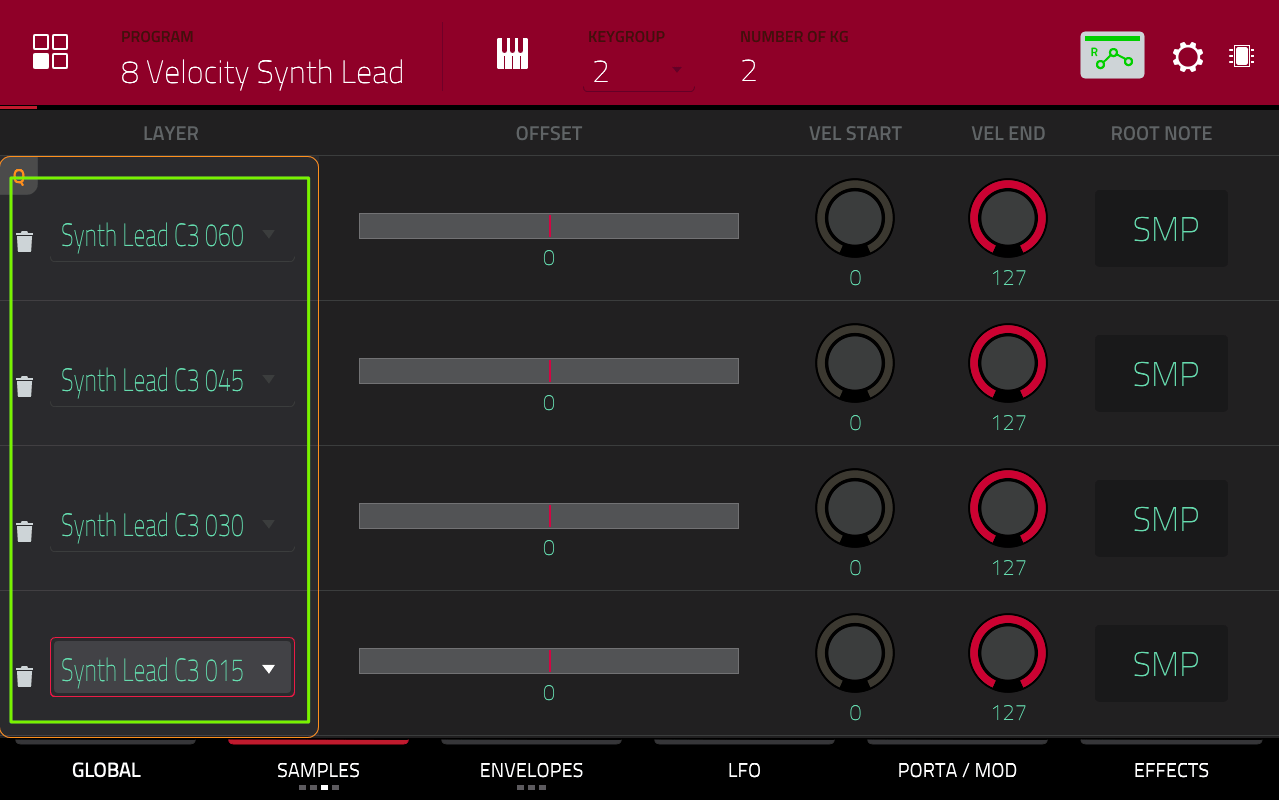
Finally we need to configure the velocity ranges for these four layers. Remember this time we need to spread them out over the range 0-60, so configure them as follows:

Velocity Range Settings
The velocity ranges here are just suggestions, you can of course experiment with different ranges to suit the samples you have; in this tutorial I’ve pretty much split the 0-127 range into 8 roughly equal parts.
At this point you can play the pads at any velocity and you’ll hear one of the 8 layer samples triggered. For example, a pad at a velocity of 55 will trigger the sample from keygroup 2, layer 1. Hit a pad at a velocity of 71 and it will trigger the sample from keygroup 1, layer 4.
Try continuously hitting a pad in small, ever increasing velocity increments to hear the filter open up on our lead sound, just like it would have done in the original synth.
Finishing The Instrument
The instrument is still fairly raw so let’s give it a few finishing tweaks. At the top of the screen in PROGRAM EDIT, tap on KEYGROUP and turn the data wheel anticlockwise to read ALL:
![]()
With ‘ALL’ keygroups selected, any edits we perform now will be applied equally to all our keygroups. Press the ENVELOPES button to enter the ENV:AMP screen and give our keygroups a RELEASE of around 76; this will add a little tail to our notes each time we release the keys.
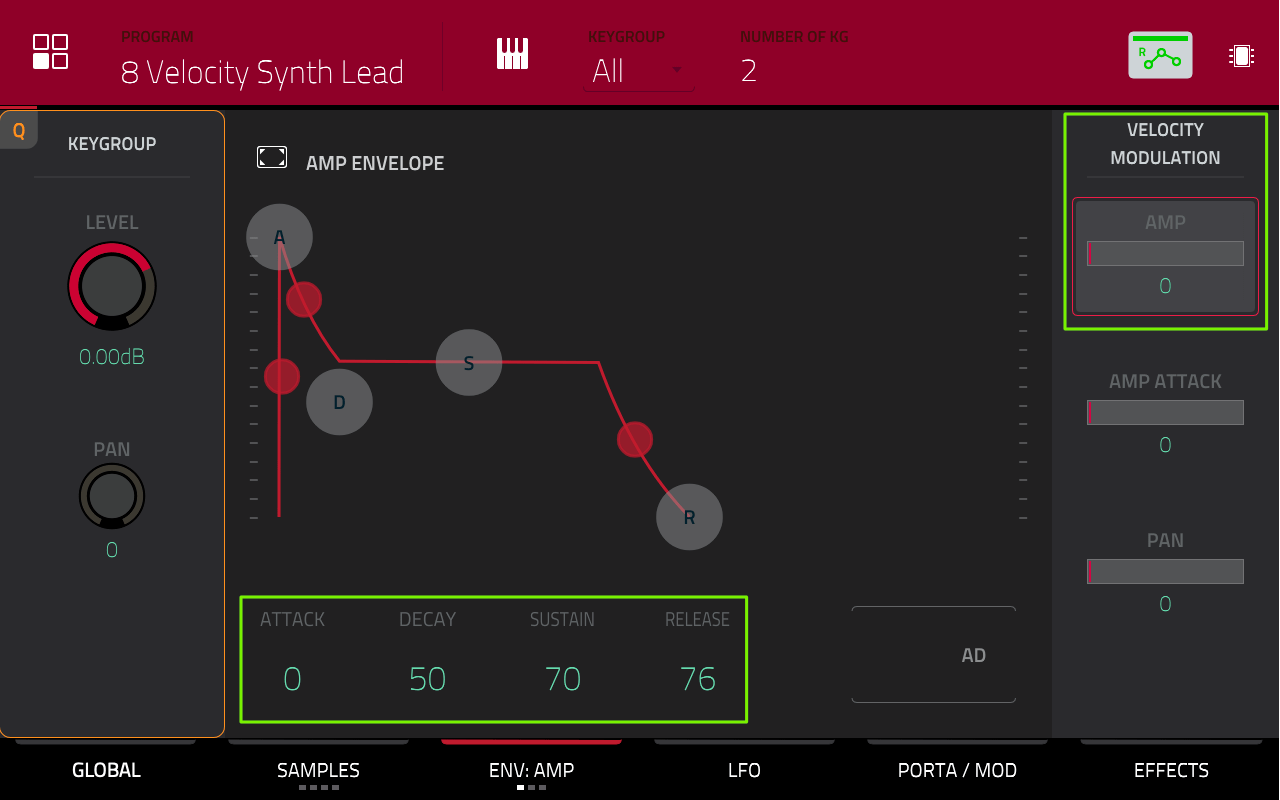
I’ve also shaped the envelope a little further by reducing the SUSTAIN level to 70, and a DECAY of 50.
On the right hand side you’ll see the VELOCITY MODULATION: AMP setting. Reducing this allows the naturally quieter, low velocity notes to sound louder in relation to the higher velocity notes (see my Subtractive Synthesis tutorial for more information https://www.mpc-tutor.com/subtractive-synthesis-mpc-beginners/). At the default 127 I felt the lower velocity notes were just too quiet. In fact I found an AMP setting of 0 actually worked really well, but you can tweak this to taste.
Now some global program tweaks (‘ALL’ keygroups not required here, but won’t cause any problems either). Go to PORTA/MOD and set PORTAMENTO TIME to 30; this will put a little ‘glide’ between each note:
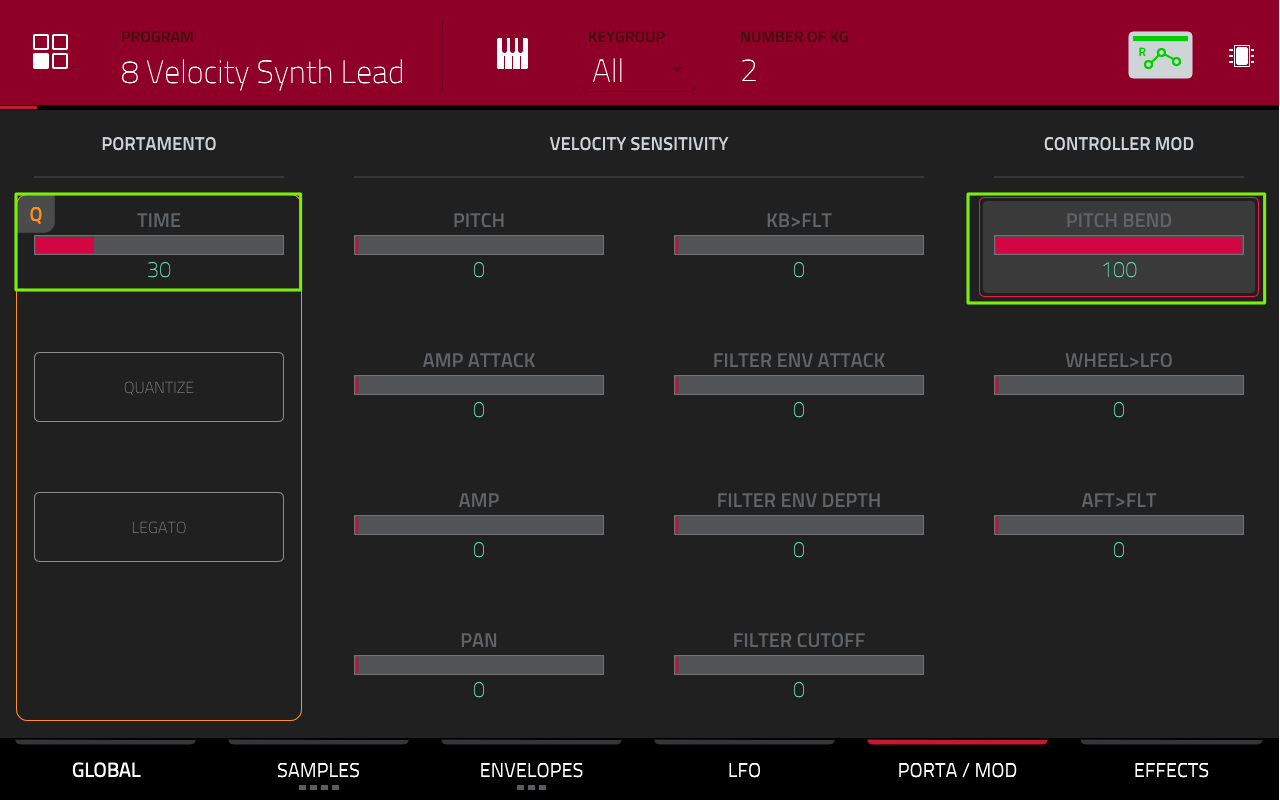
And if you are using a keyboard, go to the CONTROLLER MOD column and set the PITCH BEND to 100 to give a maximum +/- octave bend range to your controller’s pitch bend wheel (or adjust to your preferred maximum bend level).
You can load up my final version, ‘8 Velocity Synth Lead Final’ which is inside the ‘Final Instruments’ sub folder from the tutorial files. In my version I’ve also inserted some Air Decay across the entire program (via CHANNEL MIXER > Programs) and also added some LFO modulated ‘PAN’ via PROGRAM EDIT > LFO).
More Complex Instruments
In this tutorial we’ve kept it very basic with samples representing a single ‘pitch’ (C3) covering the entire 128 note range. But traditional keygroup programs typically have use samples covering many pitches to reduce the amount of sample tuning required and therefore require multiple keygroups with each keygroup covering its own, smaller note range. This is sometimes referred to as ‘note stride‘ (see Step 6 of my Autosampling tutorial).
But the principle is still the same; for each individual note range we wish to cover in the instrument we must have an extra keygroup set to the same note range which will handle the additional 4 layers. So if the ‘usual’ 4 layer instrument has 16 keygroups, the 8 layer version would have 32 keygroups.
And we don’t have to stop at 8 layers. To create 12 layers, just use 3 keygroups per note range, 4 keygroups per note range for 16 layers, and so on. Remember there is a maximum of 128 keygroups available in a single keygroup program and eventually memory limitations are going to become a problem, so employing techniques such as sustain looping become essential (I cover sustain looping techniques within the MPC Bible).
And if you’d like to take a peak at some more advanced keygroup programming, check out Electric Keys 2.0, where you’ll see I used a combination of sustain looping, envelope shaping (often combined with LFO amplitude modulation to create a more natural sounding decay) and the use of ‘note off’ sample play to provide key release noises in the Clavinet D6.
Finally, this technique is not just restricted to keygroup programs and we can also do something similar with DRUM programs and ‘simultaneous play’. I’ve actually just finished recording some new acoustic drum kits to add to the MPC Drummer series, so will be employing these extended layer techniques in those upcoming expansion packs – I’ll create a tutorial for this nearer the time.
2 Responses
Leave a Reply

Latest Posts

"Electric Bass 3 - Now With MPC Sample & MPC3 Support
MPC Bible 3, Revision 6 - MPC Oscillators, MPC 3.9, MPC One G2 + MPC Key 37 G2

Downbeat Kit 3 - Acoustic Drum Kit Expansion For MPC3

MPC Bible 3, Revision 4 - Clip Matrix, MPC 3.7 + MPC XL

May 18, 2022 10:49 am
Thanks for that great post. I spent ages yesterday trying to do the same in a Drum Program on the FORCE and no realise I was in the wrong section.
Aug 28, 2022 4:00 am
Great tut Sir!
I have the Akai-Force-1yr old! I prefer all in one units vs clicking w the mouse lol.
Might you have a tut on how to ADD THE EFX ON THE KNOBS Sir!-? I’ve looked at YouTube but either they assume I know the step before the effect gets placed on the knobs or and I say or I’m a dumb-dumb Sir! If you have a visual tut on this or a written one like the 8-layer above, I really realy appreciate it Sir. I’m still a new-b even though I’m a year into working w my Akai-Force Sir. Thanks a million! God Bless you.