
In this MPC & Pro Tools tutorial taken from my book, ‘Using the Akai MPC With Pro Tools‘, I’ll be explaining how to set up your MPC as a fully recognised MIDI device within Pro Tools. This will mean that each MIDI track you set up in Pro Tools will be able to display the exact MIDI port and channel your Pro Tools track is connected to.
Pro Tools Recognition of MIDI Devices
Pro Tools is a little different to some DAWs as it doesn’t directly recognise your MIDI interface or MIDI control devices. Instead it relies on your computer’s own built-in MIDI software utility to deal with the set up and configuration of MIDI devices, and in turn, Pro Tools communicates directly with that utility.
The utility in question is ‘MIDI Studio’ and is accessed from within Pro Tools via ‘Setup > MIDI > MIDI Studio’. This application is completely different in PC and Mac, with the PC version being much more stripped down and basic. However, both applications serve similar purposes; first, they should detect any MIDI interfaces connected to your computer, and secondly they allow your computer to recognise MIDI devices connected to that interface, which in this book will be your MPC.
It’s important to note that the only essential element here is that MIDI Studio recognises your MIDI interface – if it doesn’t recognise that interface, then Pro Tools will not be able to use MIDI!
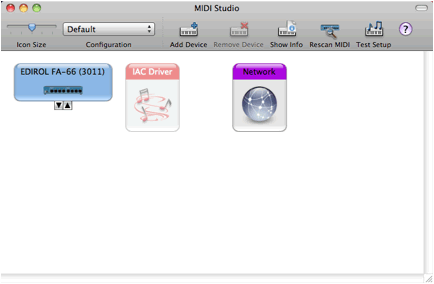
However, if you’ve installed your MIDI interface correctly with all its drivers (where relevant), then you should find MIDI Studio has already detected your interface. With your MIDI interface detected, whenever you make a MIDI connection on a track within Pro Tools, you’ll see a direct reference to your MIDI interface, as seen below:
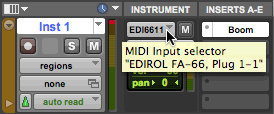
The above is telling us that this track is receiving MIDI on MIDI track 1 through connection ‘1’ on the Edirol FA66 ‘MIDI IN’ port. That’s fine – if you wish to leave it at that if you wish, and there’s no need to do anything further in MIDI Studio.
However, using MIDI Studio, we are able to ‘add’ our MPC and recreate the physical MIDI connection as a virtual connection and change the above to the following:
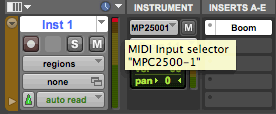
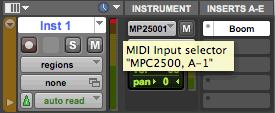
Here we have the Pro Tools instrument track telling us that it is receiving MIDI over MIDI track 1 sent from the MPC2500. That gives us much more clarity. And even better, on a Mac we can take this even further by getting Pro Tools to specify the exact MPC MIDI OUT port it is receiving MIDI data from:
So remember, the following is purely optional and not essential but personally I feel it’s worth the extra 15 minutes it takes to set this up, as you only have to do this once – and once set up, your MPC connections will show like this in any audio software on your computer that also utilises your computer’s ‘MIDI Studio’ application.
Adding Your MPC to ‘MIDI Studio’
The following instructions are for the Mac, because the PC version of MIDI Studio is more basic compared to the Mac, and does not allow us to assign graphic icons, or draw in virtual MIDI connections to specific MIDI ports. However it will still let us have Pro Tools label MIDI connections as ‘MPC’, so at the end of this section, I’ll briefly run through the PC set up as well, but I recommend PC owners also read this Mac section, as all concepts are identical.
In Pro Tools, go to ‘Setup > MIDI > MIDI Studio’.
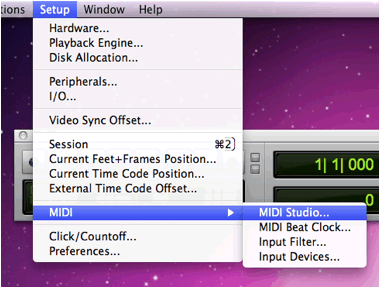
There are two distinct windows in this app; if you can’t see the MIDI page, go to ‘Window > Show MIDI Window’.
If your MIDI interface is already connected (and if needed, drivers installed), you should already see your MIDI interface listed here. If it isn’t, please consult the manufacturer of your MIDI interface for further support. Assuming your interface is already there, double click on it:
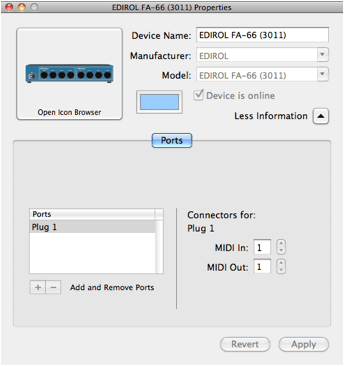
This shows you the MIDI configuration of the interface; in this case, I have just the one MIDI port (called ‘Plug 1’), and that consists of a single ‘MIDI in’ and a single ‘MIDI out’ . Close this window.
To allow Pro Tools to correctly label which port of our MPC it is communicating with, we first need to ‘Add’ the MPC to the MIDI Studio – once added and correctly configured, we’ll then use MIDI Studio to create a graphical representation of all MIDI connections between our audio/MIDI interface and the MPC, which will be the ‘MIDI Handshake’ set up we described earlier in this book.
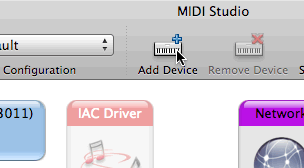
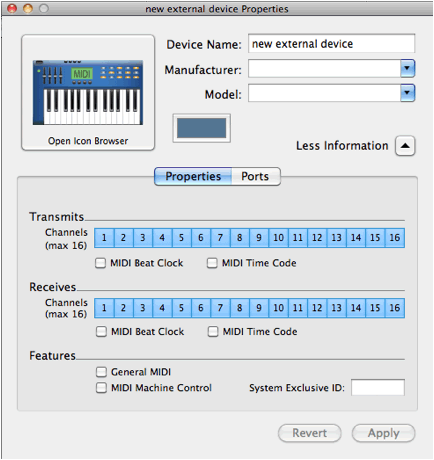
Click on ‘Add Device’:
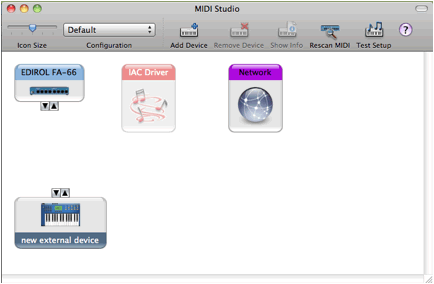
At this point, a new default device is added to the MIDI Studio screen:
If you double click this device, we can set it up as our MPC.
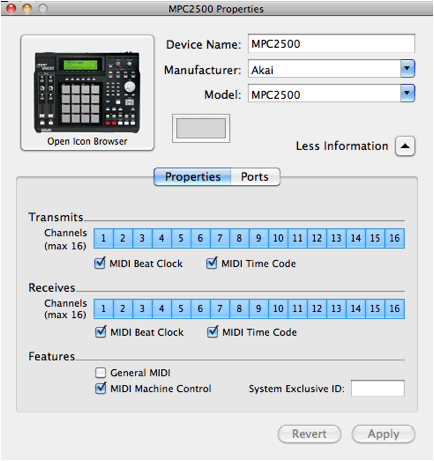
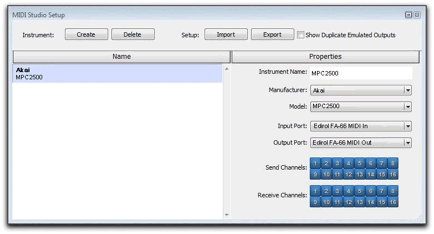
First, set ‘Manufacturer’ to ‘Akai’. Now under ‘Model’, you have a choice of three different MPCs – there’s nothing newer than an MPC2000, however, all three produce the same default configuration, so just select MPC2000 if your MPC isn’t listed.
Upon selecting MPC2000, you should see some changes to the ‘Properties’ section of the screen:
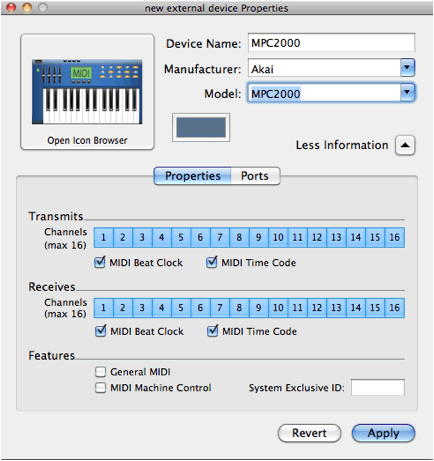
This shows that the MPC2000 transmits and receives both ‘MIDI Beat Clock’ and ‘MIDI Time Code’, all over 16 MIDI Channels. This is all correct for the MPC2000, but isn’t true for all MPCs. Additionally, under ‘Features’ the ‘MIDI Machine Control’ box should be checked, as the MPC2000 does transmit this.
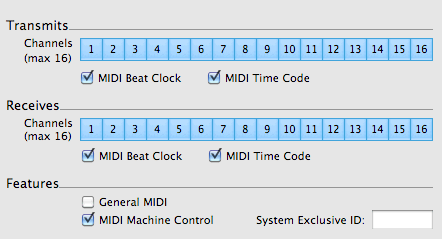
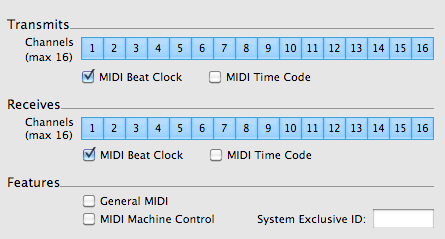
All MPCs receive and transmit over 16 channels, and all use ‘MIDI beat clock’ (referred to as MIDI Clock in your MPC OS). However the MPC500 and any MPC1000 running Akai OS or the free JJ OS, do not transmit or receive MIDI time code (MTC) nor do they send MMC (MIDI Machine Control). The correct configuration for each MPC is as follows:
MPC5000/2500/4000/2000/XL/3000/60/JJOS1 or greater:
MPC500 & MPC1000 (Akai OS):
At this point, you can change your device name to match your MPC, and you can also change the ‘Model’ by typing in your MPC model. If you click on the icon, you can also assign a more appropriate image for your MPC, although you’ll not find any MPCs available. This is easy to fix – in the tutorials download for this article you’ll find a collection of MPC images you can use within the ‘MPC Icons’ folder – simply go inside this folder and copy these images to the following location :
Macintosh HD/Library/Audio/MIDI Devices/Generic/Images/
Just note that you’ll have to quit ‘Audio MIDI Setup’ (CMD & Q) and re-launch it again before those images will appear in the available icon list. So far, my set up looks like this:
Setting the MIDI Port Information
Now click on ‘Ports’
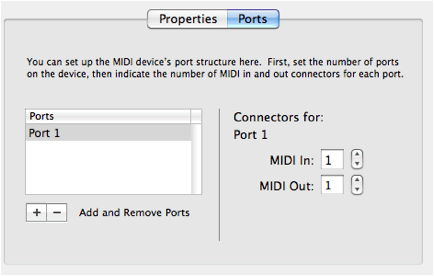
Here you’ll need to inform your Mac just how many MIDI ports your MPC has. There are a number of ways you could set this up -I’ll show you two methods. The easiest way is to simply think of the MPC as having a single MIDI ‘port’ containing all the MIDI Outs and Ins. To do this, we have a single ‘port’ set up in the left column, and in the right hand column, set up the appropriate number of MIDI IN and MIDI OUT for your MPC.
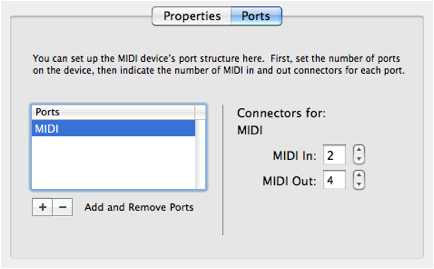
In the left hand column, click in ‘Port 1’ and change the name to anything you wish – I changed it to ‘MIDI’. In the right hand column, change ‘MIDI In’ and ‘MIDI Out‘ to reflect the number of MIDI in and Out on your MPC.
So for example, an MPC2500 has 2 MIDI IN and 4 MIDI OUT. This will look like the following:
Adjust the above to match your MPC’s own specific MIDI port configuration (MPC500 users should just have ‘1’ MIDI IN and ‘1’ MIDI OUT). Close the properties window and you should now see this in your MIDI Studio window:
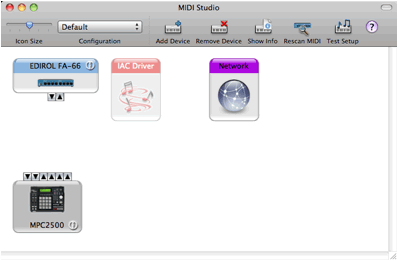
Here you can see your MPC, with all MIDI ports displayed as black arrows, either pointing away from the MPC (MIDI OUT) or pointing inwards (MIDI IN).
Now so far so good, and while this way is perfectly fine, I personally like to have a bit more information about each MIDI port showing in MIDI Studio. Let me quickly show you an alternative way of setting up the MPC MIDI ports that will give us more immediate information on which MIDI ports we have set up with Pro Tools.
MIDI Studio Set Up – Alternative Configuration
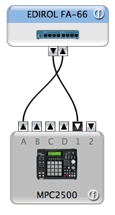
Looking at the MPC2500 for example, the MIDI ports at the back look like this:
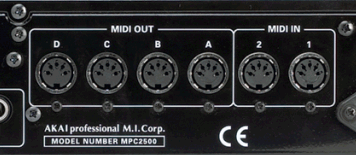
As you can see, the MIDI IN ports are labelled numerically (1 and 2), and the MIDI OUT ports are labelled alphabetically, A, B, C, D.
Now, when I assign an MPC MIDI port to a track in Pro Tools, what I ideally want to show up in that Pro Tools track is a clear indication of which MPC MIDI port I am connecting to that track. So, if it’s MIDI OUT A, I want Pro Tools to specifically list ‘MPC2500 A’. That way, there is no confusion, especially if I am utilising more than one MIDI OUT port on my MPC. The only way to do this is to assign each port individually.
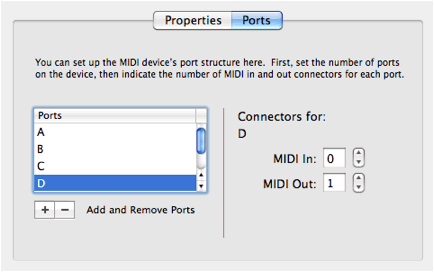
To do this, click on ‘Port 1’ in the ‘Ports’ column, and rename is to ‘A’. Now in the ‘Connectors For’ column on the right, assign ‘MIDI In’ as ‘0’, and ‘MIDI OUT’ as ‘1’.
Repeat this process for all the MIDI OUT ports on your MPC. To add each additional port, just click the ‘+’ button to the left of ‘Add and Remove Ports’.
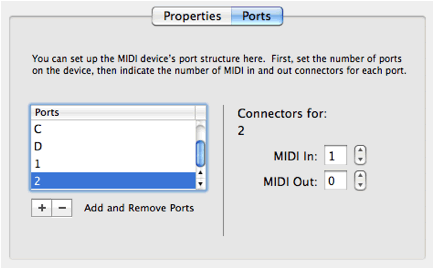
Now repeat for your MIDI INs. On the MPC2500, there are two MIDI INs, so I added a further two ports, called ‘1’ and ‘2’, each with a single ‘MIDI In’ connector and ‘0’ MIDI Out:
Close the properties window to return to the main MIDI Studio screen:
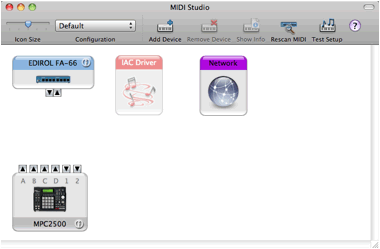
We now have a clear representation of the actual MPC MIDI port labelling as seen on the back of the MPC. Now, the last task is to graphically mimic the physical MIDI connections you have made between the MPC and your audio interface – that is, the MIDI ‘handshake’ we discussed earlier in this book.
So to recreate our physical MIDI handshake, first click and drag port A on the MPC2500 over to the incoming port on the audio interface and let go – a black line will be created joining the two ports together. This represents the MIDI connection that transmits MIDI from the MPC to Pro Tools.
Now click and drag from the remaining MIDI port on your interface to the MPC MIDI port 1. This represents the MIDI connection that sends MIDI data from Pro Tools to your MPC.
Finally, hover over the ‘i’ next to ‘MPC2500’ to see a description of your connection:
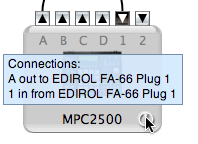
Now your physical MIDI handshake has been recreated virtually.
PC MIDI Studio
The PC MIDI Studio is more basic than the Mac. Your MIDI interface should already be listed in the select boxes for ‘Input Port’ and ‘Output Port’. To add your MPC, click ‘Instrument: Create’ and complete the boxes as per the Mac set up, using your MIDI interface as the input and output ports. No fancy icons in this one.
What’s Next?
I hope this MPC & Pro Tools tutorial has helped you configure your MPCs MIDI ports with Pro Tools 9. In the complete 102 page book, ‘Using the Akai MPC With Pro Tools‘, we’ll be using our MIDI connections to help us use Pro Tools as a sound module for our MPC beats, learning how to sync Pro Tools with the MPC using MIDI Clock and MIDI Time Code, and finally we’ll be tracking both audio and MIDI performances from our MPC into Pro Tools for final mix down of our beat.
‘Using the Akai MPC With Pro Tools‘ can be purchased as an instant digital download from my site MPC-Samples.com.
4 Responses
Leave a Reply
Latest Posts

"Electric Bass 3 - Now With MPC Sample & MPC3 Support
MPC Bible 3, Revision 6 - MPC Oscillators, MPC 3.9, MPC One G2 + MPC Key 37 G2

Downbeat Kit 3 - Acoustic Drum Kit Expansion For MPC3

MPC Bible 3, Revision 4 - Clip Matrix, MPC 3.7 + MPC XL

Apr 6, 2015 9:27 am
hi, my name is dexter. I have the mpc5000 & I’m having problems trying to synch my mpc5000 to my pro tools 10. plz help me configure my mpc5000 to play as midi. I also have a korg le triton & I would love to use the triton sounds in pro tools as midi (man I would luv that)
Apr 6, 2015 10:22 am
Hi
As mentioned in the article, I’ve written a book entirely dedicated to using pro tools with the MPC which explains syncing, using pro tools as a sound module, tracking etc. It contains full step-by-step instructions for the MPC5000
http://www.mpc-samples.com/product.php/177/using-the-akai-mpc-with-pro-tools/
Jan 23, 2016 8:53 pm
To track the midi information from the mpc into pro tools do I have to sync them.
Jun 3, 2018 3:31 am
Hi, do you have knowledge on how to setup to record MIDI from MPC Essentials with say an Akai MPK Mini, into Pro Tools? I can’t find anything about it anywhere… I’m not an MPC user and would love to be able to do with this with the Mini.