
This is an excerpt from chapter 2 of our Reason & MPC tutorial ebook ‘Using the Akai MPC With Reason‘. This entire book is dedicated to helping all hardware MPC owners use their MPC with Propellerhead’s Reason 5 and covers everything from initial hardware and software set up (chapter 1), using Reason as an MPC sound module (chapter 2), syncing Reason sequences and Dr OctoRex with your MPC using MIDI clock, and controlling Reason parameters using your Q Links.
In this section from the Reason & MPC tutorial book, we’ll learn how to configure your audio interface, set your MPC as a keyboard/control surface for Reason and also set up two software instruments in a basic Reason song to accept incoming MIDI instructions on specific MIDI channels. Learn more about our book ‘Using the Akai MPC With Reason‘.
Reason & MPC Tutorial – Audio Interface
Please note that we are using Reason 5 in this tutorial, so there will be some differences if you are using an older version of Reason. Also be aware that Reason looks a little different on Mac and PC and some settings are accessed in different ways, but we’ll cover all this for both platforms as we go along, although for consistency, I’ll just use screen shots from the Mac version.
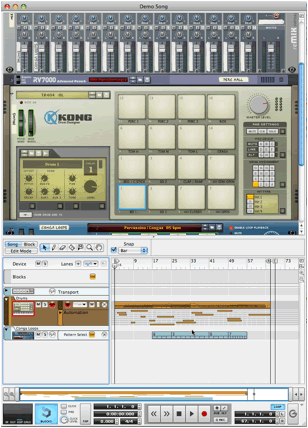
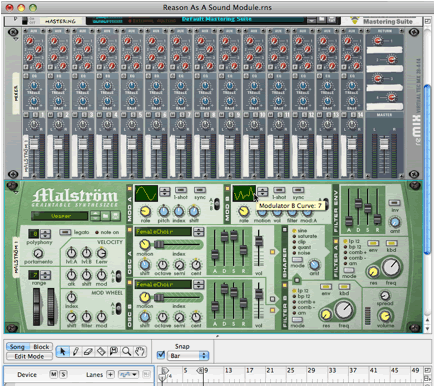
Open up Reason in your computer. You’ll see something like the following (the default demo song):
First, make sure your audio interface is being used as the primary audio source for Reason.
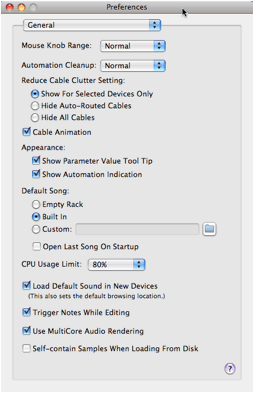
Mac: In the Finder bar, locate: ‘Reason > Preferences‘
PC: In the program bar, locate: ‘Options > Preferences‘
You should see the following:
From the top select box, select ‘Audio’. Under ‘Audio Device’, you should see your audio interface listed.
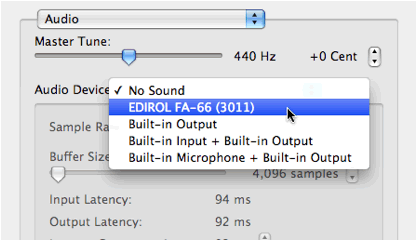
If the audio interface isn’t listed, make sure it is connected and (if required), plugged in to the power supply. Also ensure that any required software drivers have been installed (you’ll probably have to close down and restart Reason for it to recognise the audio interface).
Setting Your MPC as the Reason Control Surface/Keyboard
Select your audio interface, and at this point, Reason will test the connection and give you a green tick. Now select ‘Keyboards & Control Surfaces’ from the top preference select box:
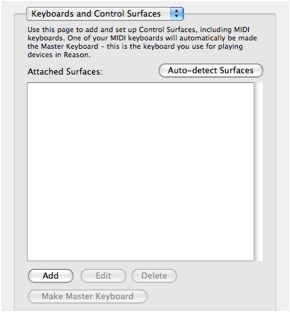
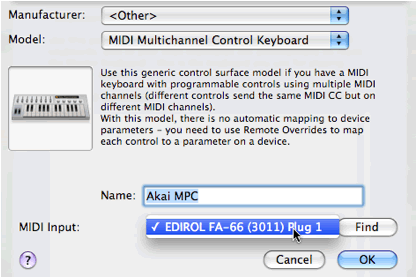
This shows you what keyboards or controllers have been set up to communicate with Reason. To add your MPC, press ‘Add’. Under ‘Manufacturer’, you could select ‘Akai’, however the MPC is not listed as a possible ‘Model’ option (which may not be an issue for this chapter, but will cause problems in chapter 4 when dealing with MIDI control assignments).
Instead, select ‘Other’, and under ‘Model’ select ‘MIDI Multichannel Control Keyboard’ (the MPC in this example is effectively a keyboard, and as we’ll see later, is going to transmit MIDI over multiple channels). You could alternatively assign the MPC as a control surface, it shouldn’t actually make any difference to how Reason will recognise your MPC.
What is a control surface?
A control surface is simply a piece of hardware that lets you control the functions of software within your computer. So, rather than use your computer mouse to increase the volume of a particular synth in Reason, you could use a hardware controller and assign one of its knobs or sliders to control the synth volume dial in Reason.
It just gives you easier and more tactile control over your software. Advanced control surfaces feature many knobs and sliders – and as you can see in the preferences section, Reason is able to recognise many different hardware controllers with pre-configured knob and slider assignments. However, the MPC isn’t included here – but this doesn’t affect the MPC’s ability to control Reason’s sounds via MIDI, and if you have an MPC4000 or the JJ OS on your MPC, you’ll be able to set up your MPC as a makeshift control surface, as we’ll see later in this book!
Pick a name, you could put your MPC model in here, such as ‘Akai MPC1000’, or just ‘Akai MPC’. Finally for MIDI input, you should be able to select your audio interface from the select box.
You should now see the following:
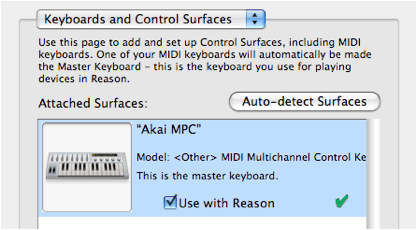
Reason automatically assigns it as the ‘Master Keyboard’.
Now from the select box at the top, choose ‘Advanced’:
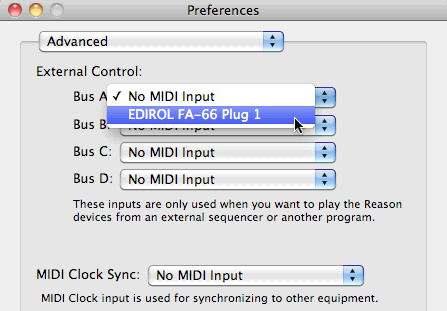
Under ‘Bus A’ select your MIDI interface. This tells Reason to search for incoming MIDI instructions from your audio interfaces primary MIDI input.
At this point, Reason is ready to recognise incoming MIDI instructions from your MPC. Let’s now load up a few instruments into Reason; once these have been loaded, we can move over to the MPC and get that set up as well.
Configuring the Reason Software Instruments
In Reason, create a new song: ‘File > New‘. Now save this new song project, ‘File > Save‘, and give it any name you wish.
A default new song will contain no instruments at all. To add instruments, go to ‘Create’ and click ‘Malstrom Graintable Synthesizer’:
Now click on the ‘Browse Patch’ icon:
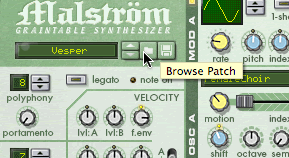
Go to the ‘Pads’ folder and select the ‘Sweeepy’ patch. We’ll use this for an eerie pad sound within our beat.
Finally, go to ‘Create’ and add a copy of the NNXT sampler. Here, use the ‘B Grand Piano 1’ patch. We’ll use this for the main melody line in our beat.
With the two instruments loaded, go to the top of the screen in Reason, and under ‘Hardware Interface’, click on ‘Advanced MIDI’:

This reveals the MIDI assignment controls:
![]()
At the top there are four busses, where each buss would relate to a single MIDI IN on your audio interface. In this tutorial, I assume you have only one MIDI IN, so we’ll only deal with the default ‘A’ bus.
Underneath the bus selection you’ll see 16 green rectangles. Each one represents one of the 16 MIDI channels passing from the MIDI OUT A of your MPC to the MIDI IN of your audio interface.
Locate channel 1 and click the down arrow.
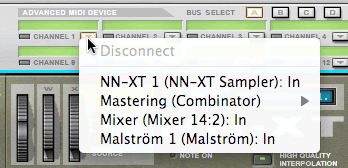
Here are a list of instruments that can be assigned to this MIDI channel. Select ‘NN-XT 1’. Now, the NN XT sampler (the piano sound) will receive MIDI instructions on MIDI channel 1.
Go to the Channel 2 box and repeat this process, but this time select the Malstrom. So now the Malstrom is set to receive MIDI instructions via MIDI channel 2. At this point, save your project (CTRL & S, or on a Mac, Cmd & S). At this point, save your project (CTRL & S, or on a Mac, Cmd & S)
What’s Next?
 With our basic Reason song now set to accept incoming MIDI signals from specific MIDI channels for each software instrument, we’ll need to set up our MPC sequence correctly so that each track outputs MIDI over the correct MIDI channel so it can easily control each Reason software instrument.
In our book ‘Using the Akai MPC With Reason‘ we go through each model of MPC and explain the exact step-by-step process needed to do this, including clear screenshots and ready-made MPC project files that let you work through the tutorial in real time within your MPC.
After the ‘Using Reason as an MPC Sound Module’ chapter, we look in detail at more advanced usage of Reason with an MPC, including syncing your MPC with Reason sequences (examples given for all MPCs) and controlling Reason parameters with MIDI control change messages assigned to Q-link sliders (MPC4000 and JJOS2/XL only).
‘Using the Akai MPC With Reason‘ is suitable for all hardware MPCs and people running Reason 5 on Mac or PC (other versions of Reason should be fine but screenshots will differ slightly). It’s available as an instant digital download from MPC-Samples.com and contains all the example MPC and Reason song files to recreate all the tutorials within your own studio set up.
4 Responses
Leave a Reply
Latest Posts
"Electric Bass 3 - Now With MPC Sample & MPC3 Support
MPC Bible 3, Revision 6 - MPC Oscillators, MPC 3.9, MPC One G2 + MPC Key 37 G2

Downbeat Kit 3 - Acoustic Drum Kit Expansion For MPC3

MPC Bible 3, Revision 4 - Clip Matrix, MPC 3.7 + MPC XL

Feb 1, 2013 4:31 am
Just copped the mpc studio, I’m reason user for the past 2 years, need ur book on using reasons or protools with mpc studio.
Nov 30, 2013 5:48 am
Still having trouble using midi with my akai mpc 500 drum machine in Reason 6.5. Any suggestions? been trying to do this for weeks.
Dec 9, 2013 1:03 pm
Perhaps my Reason book would help, although this was written for Reason 5, but I assume most of it is still relevant:
http://www.mpc-samples.com/product.php/160/using-the-akai-mpc-with-reason/
Sep 25, 2020 1:04 am
What about Kong & MPC Live II? Can you pad, sequence and Q-Link the knobs / controls in order to synthetise drumkit inside Kong?